2021 ALFA ROMEO STELVIO steering wheel adjustment
[x] Cancel search: steering wheel adjustmentPage 10 of 280

8
DEAR CUSTOMER
READ THIS CAREFULLY
Refueling..................................................... 2
Starting The Engine .................................... 2
Parking On Flammable Material ............... 2
Respecting The Environment .................... 2
Electrical Accessories ................................ 2
Scheduled Servicing .................................. 2
Rollover Warning ........................................ 3
VEHICLE CHANGES / ALTERATIONS
Accessories Purchased By The Owner ...... 4
Installing Electrical/Electronic Devices .... 4
Radio Transmitters And Mobile Phones ... 5
GETTING TO KNOW YOUR VEHICLE
KEYS..........................................................18
Key Fob................................................... 18
ENGINE IMMOBILIZER SYSTEM ..............20
IGNITION SWITCH ...................................20
Keyless Push Button Ignition ................ 20
REMOTE START — IF EQUIPPED .............22
How To Use Remote Start ..................... 22
To Exit Remote Start Mode ................... 22
Remote Start Comfort Systems —
If Equipped ............................................. 23
VEHICLE SECURITY SYSTEM —
IF EQUIPPED............................................. 23
To Arm The System................................ 23
To Disarm The System .......................... 23
Volumetric/Anti-Lift Protection —
If Equipped ............................................. 24
DOORS ...................................................... 24
Power Door Locks.................................. 24
Locking The Doors With A Depleted
Battery .................................................... 25 Passive Entry System ........................... 25
Power Lock Safety Device..................... 27
Automatic Door Locks — If Equipped .. 27
Child-Protection Door Lock System — Rear
Doors ...................................................... 27
STEERING WHEEL.................................... 28
Manual Tilt/Telescoping Steering
Column ................................................. 28 Heated Steering Wheel —
If Equipped ............................................ 29
DRIVER MEMORY SETTINGS —
IF EQUIPPED............................................. 30
Programming The Memory Feature ..... 30
Memory Position Recall ........................ 30
SEATS ...................................................... 30
Sparco Racing Seats (Quadrifoglio
Vehicles) — If Equipped ......................... 30 Split Folding Rear Seat ......................... 31
Power Adjustment (Front Seats)........... 33
Heated Seats — If Equipped ................ 34
Head Restraints .................................. 35
MIRRORS ..................................................37
Automatic Dimming Mirror ....................37
Vanity Mirror ...........................................37
Outside Power Mirrors .........................38
Power Folding Outside Mirrors ..............38
Outside Automatic Dimming Mirrors —
If Equipped .............................................39 Heated Mirrors .....................................39
UNIVERSAL GARAGE DOOR OPENER
(HOMELINK®) ..........................................39
Before You Begin Programming
HomeLink® ............................................39 Erasing All The HomeLink®
Channels ................................................. 39 Identifying Whether You Have A Rolling
Code Or Non-Rolling Code Device .........40 Programming HomeLink® To A
Garage Door Opener ..............................40 Programming HomeLink® To A
Miscellaneous Device ............................ 41 Reprogramming A Single HomeLink®
Button .....................................................41 Canadian/Gate Operator
Programming .......................................... 41
EXTERIOR LIGHTS ....................................42
Headlight Switch ..................................42
Daytime Running Lights (DRLs) .........42
High Beam Headlights ..........................43
Automatic Headlights ...........................43
Flash-To-Pass .........................................43
21_GU_OM_EN_USC_t.book Page 8
Page 30 of 280
GETTING TO KNOW YOUR VEHICLE
28
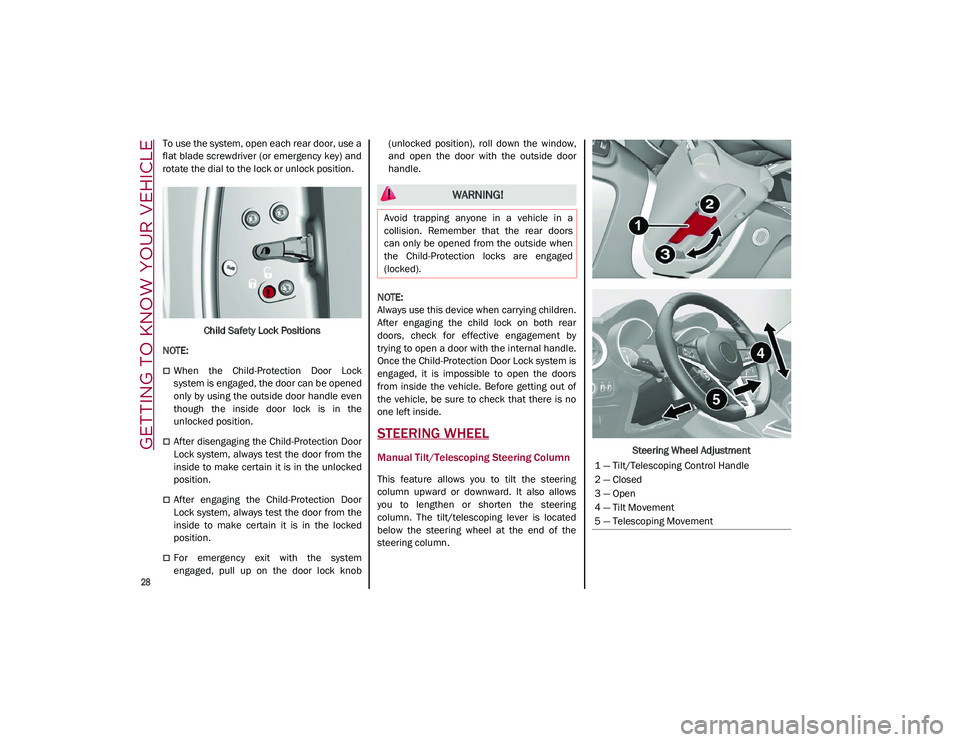
To use the system, open each rear door, use a
flat blade screwdriver (or emergency key) and
rotate the dial to the lock or unlock position.Child Safety Lock Positions
NOTE:
When the Child-Protection Door Lock
system is engaged, the door can be opened
only by using the outside door handle even
though the inside door lock is in the
unlocked position.
After disengaging the Child-Protection Door
Lock system, always test the door from the
inside to make certain it is in the unlocked
position.
After engaging the Child-Protection Door
Lock system, always test the door from the
inside to make certain it is in the locked
position.
For emergency exit with the system
engaged, pull up on the door lock knob (unlocked position), roll down the window,
and open the door with the outside door
handle.
NOTE:
Always use this device when carrying children.
After engaging the child lock on both rear
doors, check for effective engagement by
trying to open a door with the internal handle.
Once the Child-Protection Door Lock system is
engaged, it is impossible to open the doors
from inside the vehicle. Before getting out of
the vehicle, be sure to check that there is no
one left inside.
STEERING WHEEL
Manual Tilt/Telescoping Steering Column
This feature allows you to tilt the steering
column upward or downward. It also allows
you to lengthen or shorten the steering
column. The tilt/telescoping lever is located
below the steering wheel at the end of the
steering column. Steering Wheel Adjustment
WARNING!
Avoid trapping anyone in a vehicle in a
collision. Remember that the rear doors
can only be opened from the outside when
the Child-Protection locks are engaged
(locked).
1 — Tilt/Telescoping Control Handle
2 — Closed
3 — Open
4 — Tilt Movement
5 — Telescoping Movement
21_GU_OM_EN_USC_t.book Page 28
Page 49 of 280
47
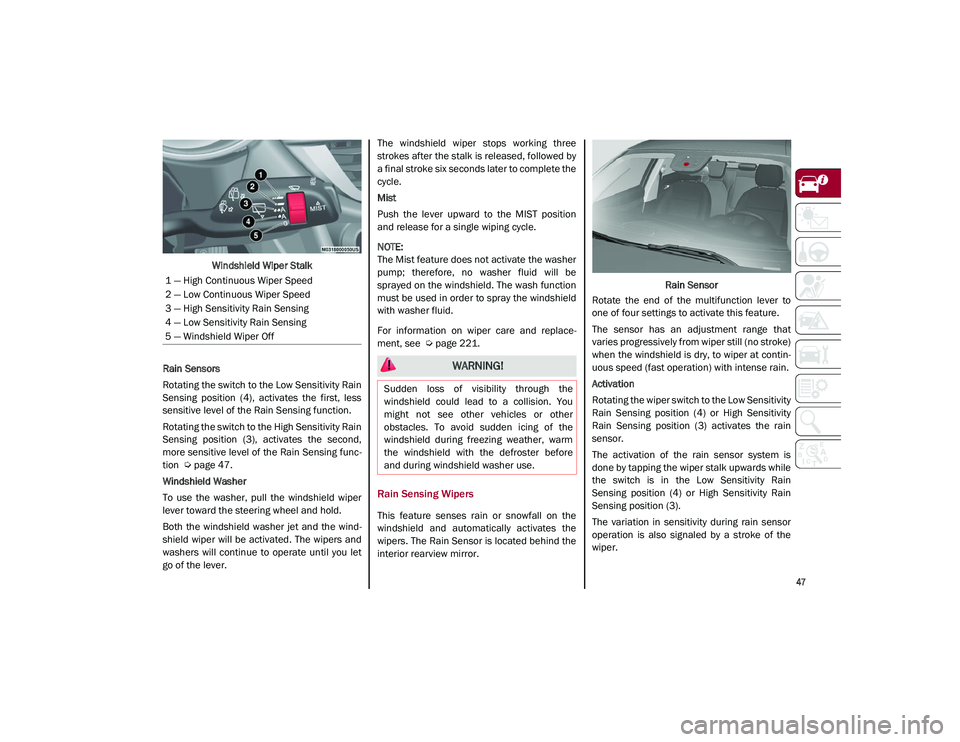
Windshield Wiper Stalk
Rain Sensors
Rotating the switch to the Low Sensitivity Rain
Sensing position (4), activates the first, less
sensitive level of the Rain Sensing function.
Rotating the switch to the High Sensitivity Rain
Sensing position (3), activates the second,
more sensitive level of the Rain Sensing func -
tion
Ú
page 47.
Windshield Washer
To use the washer, pull the windshield wiper
lever toward the steering wheel and hold.
Both the windshield washer jet and the wind -
shield wiper will be activated. The wipers and
washers will continue to operate until you let
go of the lever. The windshield wiper stops working three
strokes after the stalk is released, followed by
a final stroke six seconds later to complete the
cycle.
Mist
Push the lever upward to the MIST position
and release for a single wiping cycle.
NOTE:
The Mist feature does not activate the washer
pump; therefore, no washer fluid will be
sprayed on the windshield. The wash function
must be used in order to spray the windshield
with washer fluid.
For information on wiper care and replace
-
ment, see
Ú
page 221.
Rain Sensing Wipers
This feature senses rain or snowfall on the
windshield and automatically activates the
wipers. The Rain Sensor is located behind the
interior rearview mirror. Rain Sensor
Rotate the end of the multifunction lever to
one of four settings to activate this feature.
The sensor has an adjustment range that
varies progressively from wiper still (no stroke)
when the windshield is dry, to wiper at contin -
uous speed (fast operation) with intense rain.
Activation
Rotating the wiper switch to the Low Sensitivity
Rain Sensing position (4) or High Sensitivity
Rain Sensing position (3) activates the rain
sensor.
The activation of the rain sensor system is
done by tapping the wiper stalk upwards while
the switch is in the Low Sensitivity Rain
Sensing position (4) or High Sensitivity Rain
Sensing position (3).
The variation in sensitivity during rain sensor
operation is also signaled by a stroke of the
wiper.
1 — High Continuous Wiper Speed
2 — Low Continuous Wiper Speed
3 — High Sensitivity Rain Sensing
4 — Low Sensitivity Rain Sensing
5 — Windshield Wiper Off
WARNING!
Sudden loss of visibility through the
windshield could lead to a collision. You
might not see other vehicles or other
obstacles. To avoid sudden icing of the
windshield during freezing weather, warm
the windshield with the defroster before
and during windshield washer use.
21_GU_OM_EN_USC_t.book Page 47
Page 51 of 280
49
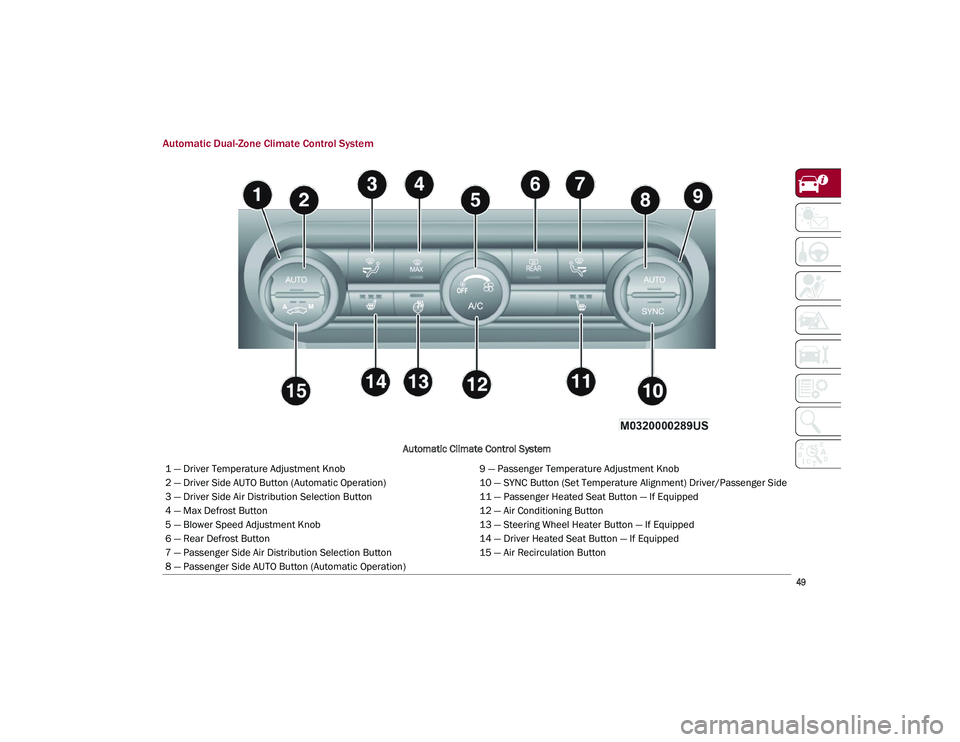
Automatic Dual-Zone Climate Control System
Automatic Climate Control System
1 — Driver Temperature Adjustment Knob 9 — Passenger Temperature Adjustment Knob
2 — Driver Side AUTO Button (Automatic Operation) 10 — SYNC Button (Set Temperature Alignment) Driver/Passenger Side
3 — Driver Side Air Distribution Selection Button 11 — Passenger Heated Seat Button — If Equipped
4 — Max Defrost Button 12 — Air Conditioning Button
5 — Blower Speed Adjustment Knob 13 — Steering Wheel Heater Button — If Equipped
6 — Rear Defrost Button 14 — Driver Heated Seat Button — If Equipped
7 — Passenger Side Air Distribution Selection Button 15 — Air Recirculation Button
8 — Passenger Side AUTO Button (Automatic Operation)
21_GU_OM_EN_USC_t.book Page 49
Page 104 of 280
STARTING AND OPERATING
102
System Manual Activation/Deactivation
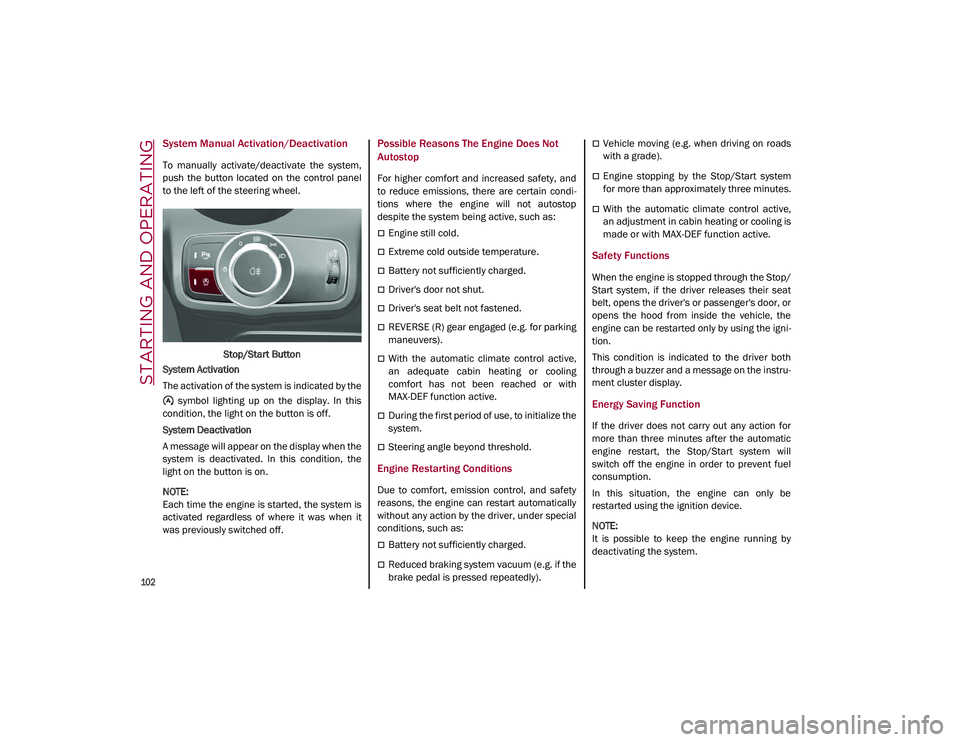
To manually activate/deactivate the system,
push the button located on the control panel
to the left of the steering wheel.Stop/Start Button
System Activation
The activation of the system is indicated by the symbol lighting up on the display. In this
condition, the light on the button is off.
System Deactivation
A message will appear on the display when the
system is deactivated. In this condition, the
light on the button is on.
NOTE:
Each time the engine is started, the system is
activated regardless of where it was when it
was previously switched off.
Possible Reasons The Engine Does Not
Autostop
For higher comfort and increased safety, and
to reduce emissions, there are certain condi -
tions where the engine will not autostop
despite the system being active, such as:
Engine still cold.
Extreme cold outside temperature.
Battery not sufficiently charged.
Driver's door not shut.
Driver's seat belt not fastened.
REVERSE (R) gear engaged (e.g. for parking
maneuvers).
With the automatic climate control active,
an adequate cabin heating or cooling
comfort has not been reached or with
MAX-DEF function active.
During the first period of use, to initialize the
system.
Steering angle beyond threshold.
Engine Restarting Conditions
Due to comfort, emission control, and safety
reasons, the engine can restart automatically
without any action by the driver, under special
conditions, such as:
Battery not sufficiently charged.
Reduced braking system vacuum (e.g. if the
brake pedal is pressed repeatedly).
Vehicle moving (e.g. when driving on roads
with a grade).
Engine stopping by the Stop/Start system
for more than approximately three minutes.
With the automatic climate control active,
an adjustment in cabin heating or cooling is
made or with MAX-DEF function active.
Safety Functions
When the engine is stopped through the Stop/
Start system, if the driver releases their seat
belt, opens the driver's or passenger's door, or
opens the hood from inside the vehicle, the
engine can be restarted only by using the igni -
tion.
This condition is indicated to the driver both
through a buzzer and a message on the instru-
ment cluster display.
Energy Saving Function
If the driver does not carry out any action for
more than three minutes after the automatic
engine restart, the Stop/Start system will
switch off the engine in order to prevent fuel
consumption.
In this situation, the engine can only be
restarted using the ignition device.
NOTE:
It is possible to keep the engine running by
deactivating the system.
21_GU_OM_EN_USC_t.book Page 102
Page 107 of 280
105
To Activate
To activate the Cruise Control System, push
the on/off button located on the left side of the
steering wheel.
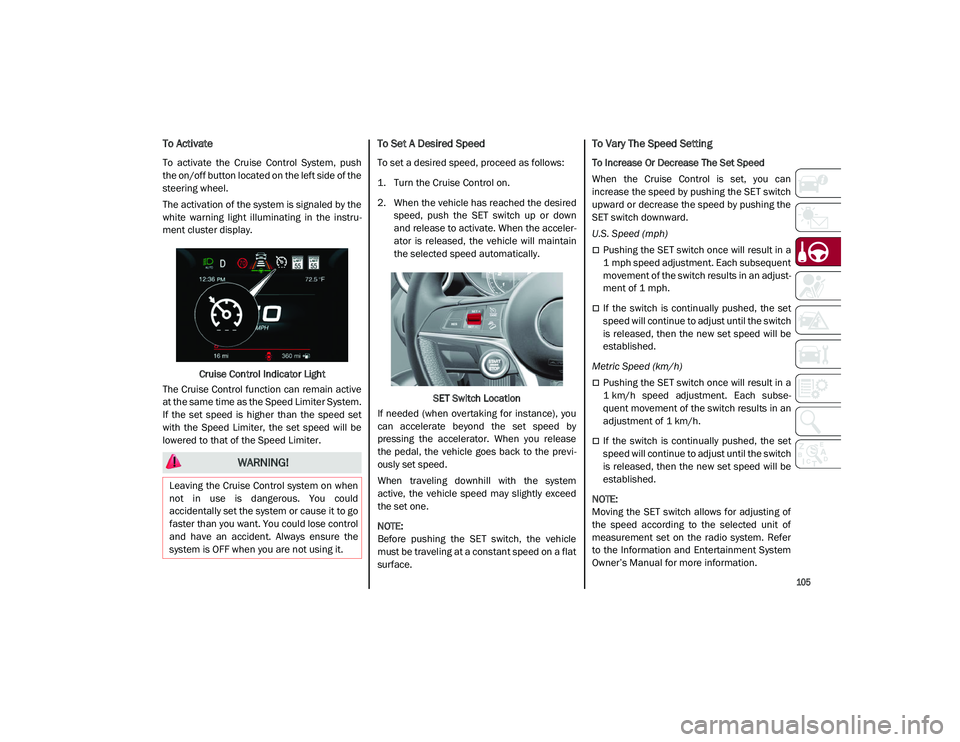
The activation of the system is signaled by the
white warning light illuminating in the instru-
ment cluster display.
Cruise Control Indicator Light
The Cruise Control function can remain active
at the same time as the Speed Limiter System.
If the set speed is higher than the speed set
with the Speed Limiter, the set speed will be
lowered to that of the Speed Limiter.
To Set A Desired Speed
To set a desired speed, proceed as follows:
1. Turn the Cruise Control on.
2. When the vehicle has reached the desired speed, push the SET switch up or down
and release to activate. When the acceler -
ator is released, the vehicle will maintain
the selected speed automatically.
SET Switch Location
If needed (when overtaking for instance), you
can accelerate beyond the set speed by
pressing the accelerator. When you release
the pedal, the vehicle goes back to the previ -
ously set speed.
When traveling downhill with the system
active, the vehicle speed may slightly exceed
the set one.
NOTE:
Before pushing the SET switch, the vehicle
must be traveling at a constant speed on a flat
surface.
To Vary The Speed Setting
To Increase Or Decrease The Set Speed
When the Cruise Control is set, you can
increase the speed by pushing the SET switch
upward or decrease the speed by pushing the
SET switch downward.
U.S. Speed (mph)
Pushing the SET switch once will result in a
1 mph speed adjustment. Each subsequent
movement of the switch results in an adjust -
ment of 1 mph.
If the switch is continually pushed, the set
speed will continue to adjust until the switch
is released, then the new set speed will be
established.
Metric Speed (km/h)
Pushing the SET switch once will result in a
1 km/h speed adjustment. Each subse -
quent movement of the switch results in an
adjustment of 1 km/h.
If the switch is continually pushed, the set
speed will continue to adjust until the switch
is released, then the new set speed will be
established.
NOTE:
Moving the SET switch allows for adjusting of
the speed according to the selected unit of
measurement set on the radio system. Refer
to the Information and Entertainment System
Owner’s Manual for more information.
WARNING!
Leaving the Cruise Control system on when
not in use is dangerous. You could
accidentally set the system or cause it to go
faster than you want. You could lose control
and have an accident. Always ensure the
system is OFF when you are not using it.
21_GU_OM_EN_USC_t.book Page 105
Page 123 of 280
121
(Continued)
NOTE:
By selecting “Blinking”, the driver can acti-
vate a warning to display when the speed
exceeds the limit indicated by the TSR
system. The speed road sign on the instru -
ment cluster display will blink until the
vehicle speed drops below the displayed
limit.
Selecting “Offset” will set the speed at
which “Blinking” is activated up to a
maximum of 6 mph (10 km/h) above the
limit detected by the system.
If no speed limit signs are found, the system
will revert to the speed limit signs that are
stored in the NAV system.
Indications On The Display
The system status can always be viewed
through the instrument cluster display.
The instrument cluster display shows only the
speed limit indications and consists of the
following steps:
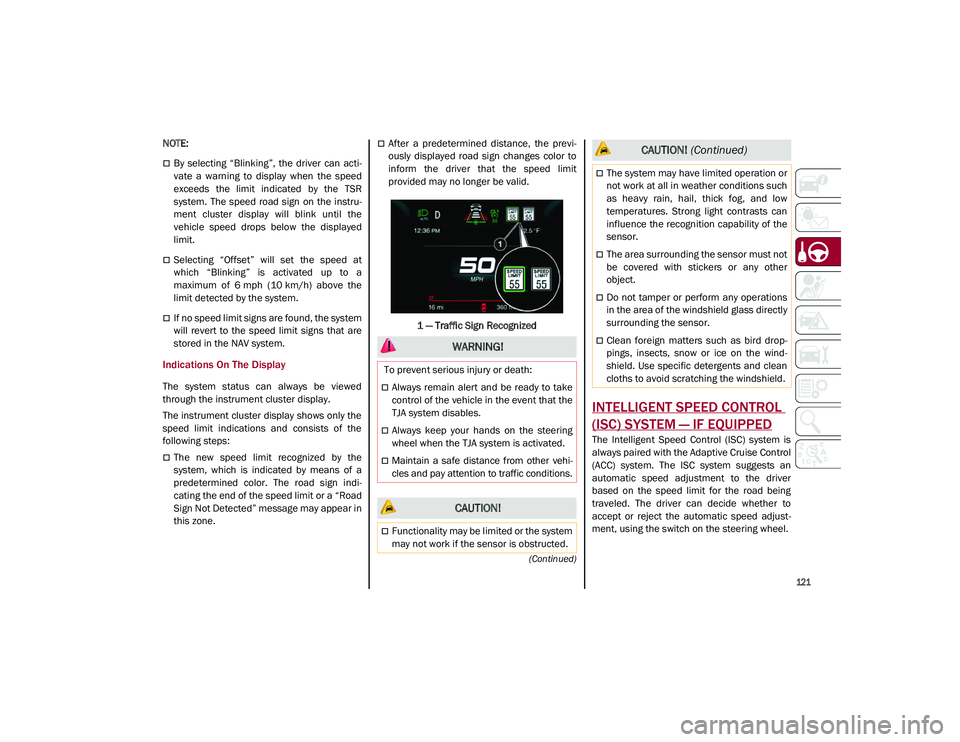
The new speed limit recognized by the
system, which is indicated by means of a
predetermined color. The road sign indi -
cating the end of the speed limit or a “Road
Sign Not Detected” message may appear in
this zone.
After a predetermined distance, the previ -
ously displayed road sign changes color to
inform the driver that the speed limit
provided may no longer be valid.
1 — Traffic Sign Recognized
INTELLIGENT SPEED CONTROL
(ISC) SYSTEM — IF EQUIPPED
The Intelligent Speed Control (ISC) system is
always paired with the Adaptive Cruise Control
(ACC) system. The ISC system suggests an
automatic speed adjustment to the driver
based on the speed limit for the road being
traveled. The driver can decide whether to
accept or reject the automatic speed adjust -
ment, using the switch on the steering wheel.
WARNING!
To prevent serious injury or death:
Always remain alert and be ready to take
control of the vehicle in the event that the
TJA system disables.
Always keep your hands on the steering
wheel when the TJA system is activated.
Maintain a safe distance from other vehi -
cles and pay attention to traffic conditions.
CAUTION!
Functionality may be limited or the system
may not work if the sensor is obstructed.
The system may have limited operation or
not work at all in weather conditions such
as heavy rain, hail, thick fog, and low
temperatures. Strong light contrasts can
influence the recognition capability of the
sensor.
The area surrounding the sensor must not
be covered with stickers or any other
object.
Do not tamper or perform any operations
in the area of the windshield glass directly
surrounding the sensor.
Clean foreign matters such as bird drop -
pings, insects, snow or ice on the wind -
shield. Use specific detergents and clean
cloths to avoid scratching the windshield.
CAUTION! (Continued)
21_GU_OM_EN_USC_t.book Page 121
Page 163 of 280
161
Tire Pressure Monitoring System (TPMS)
The vehicle is equipped with a Tire Pressure
Monitoring System (TPMS) that sends the
inflation pressure information of each tire to
the control unit, and will signal the driver in the
event of insufficient tire pressure.
The TPMS uses wireless technology with wheel
rim mounted electronic sensors to monitor tire
pressure levels. Sensors, mounted to each
wheel as part of the valve stem, transmit tire
pressure readings to the receiver module.
Tire pressure will vary with temperature by
approximately 1 psi (7 kPa) for every 12°F
(6.5°C). This means that when the outside
temperature decreases, the tire pressure will
also decrease. Tire pressure should always be
set based on cold inflation tire pressure. This
is defined as the tire pressure after the vehicle
has not been driven for at least three hours, or
driven less than 1 mile (1.6 km) after a three
hour period. The cold tire inflation pressure
must not exceed the maximum inflation pres-
sure molded into the tire sidewall. The tire
pressure will also increase as the vehicle is
driven. This is normal, and there should be no
adjustment for this increased pressure.
See
Ú
page 233 for information on how to
properly inflate the vehicle’s tires.
The TPMS will signal the driver if pressure falls
below the warning limit for any reason,
including the effects of low temperature and
normal loss of pressure from the tire. The TPMS will stop indicating insufficient tire
pressure when pressure is equal to or greater
than the prescribed cold inflation level. There
-
fore, if insufficient tire pressure is indicated by
the ( ) warning light displaying in the instru -
ment cluster, increase the inflation pressure
up to the prescribed cold inflation value.
The system will automatically update, and the
TPMS Warning Light will turn off once the
system receives the updated tire pressures.
The vehicle may need to be driven for up to
20 minutes above 15 mph (24 km/h) in order
for the TPMS to receive this information.
NOTE:
The TPMS cannot indicate sudden tire pres -
sure drops (e.g. if a tire bursts). In this case,
proceed with caution and avoid abrupt
steering.
Operating Example
For example, your vehicle may have a recom -
mended cold (parked for more than three
hours) placard pressure of 33 psi (227 kPa). If
the ambient temperature is 68°F (20°C), and
the measured tire pressure is 28 psi (193 kPa),
a temperature drop to 20°F (-7°C) will
decrease the tire pressure to approximately
24 psi (165 kPa). This tire pressure is low
enough to turn on the “Tire Pressure Monitoring
Warning Light.” Driving the vehicle may cause
the tire pressure to rise to approximately 28 psi
(193 kPa), but the TPMS Warning Light will still
be on. In this situation, the TPMS Warning Light
WARNING!
The system has not been designed to
prevent impacts and cannot detect
possible conditions leading to an accident
in advance. Failure to take into account
this warning may lead to serious or fatal
injuries.
The system may activate, assessing the
trajectory of the vehicle, for the presence
of reflecting metal objects different from
other vehicles, such as safety barriers,
road signs, barriers before parking lots,
tollgates, level crossings, gates, railways,
objects near road constructions sites or
higher than the vehicle (e.g. a fly-over). In
the same way, the system may intervene
inside multi-story parking lots or tunnels,
or due to a glare on the road surface.
These possible activations are a conse -
quence of the real driving scenario
coverage by the system and must not be
regarded as faults.
The system has been designed for road
use only. If the vehicle is driven on a track,
the system must be deactivated to avoid
unnecessary warnings. Automatic deacti -
vation is signaled by the dedicated
warning light/symbol switching on in the
instrument panel
Ú
page 74.
21_GU_OM_EN_USC_t.book Page 161