Page 89 of 136

Periodic maintenance an d a djustment
7-8
7
EAU72811
TIP Air filter
• This model’s air filter uses a disposable oil-coated paper element. This element cannot be cleaned with compressed air, doing so will only damage it.
• The air filter element needs to be replaced more frequently when riding in unusually wet or dusty areas.
Hydraulic brake service
• Regularly check the front and rear brake fluid levels. Replenish if necessary.
• Every two years replace the rear brake master cylinder, the internal components of the front brake master cylinder, the brake calipers, and change the brake fluid.
• Replace the brake hoses every four years or sooner if cracked, damaged, or if any section of the stainless steel brake hose has turned black.30 *Movin
g parts an d
ca bles • Lubricate.
√√√√√
31 *Throttle g rip • Check operation.
• Lubricate throttle grip housing
tube guides. √√√√√
32 *Li
ghts, si gnals an d
switches • Check operation.
• Adjust headlight beam.
√√√√√√
NO. ITEM CHECK OR MAINTENANCE JOB
ODOMETER READING
ANNUAL
CHECK
1000 km
(600 mi) 10000 km
(6000 mi) 20000 km
(12000 mi) 30000 km
(18000 mi) 40000 km
(24000 mi)
UB3LE0E0.book Page 8 Tuesday, July 23, 2019 12:05 PM
Page 90 of 136
Periodic maintenance an d a djustment
7-9
7
EAU18713
Removin g an d installin g cowl-
in gs an d panelsThe cowlings and panels shown need
to be removed to perform some of the
maintenance jobs described in this
chapter. Refer to this section each time
a cowling or panel needs to be re-
moved and installed.
EAU88440
Cowlin gs A an d B (for YZF-R1)
To remove a cowling1. Remove the panel. (See page 7-11.)
2. Remove the quick fasteners, and then take the cowling off.
1. Cowling A
2. Panel C
1
2
1. Cowling B
2. Panel D
1. Panel A
2. Panel B
1
2 2
1
2
1. Cowling A
2. Quick fastener
3. Panel C
3
2
2
1
UB3LE0E0.book Page 9 Tuesday, July 23, 2019 12:05 PM
Page 91 of 136
Periodic maintenance an d a djustment
7-10
7
To install a cowling
1. Place the cowling in its original po-
sition, and then install the quick
fasteners.
2. Install the panel.
Cowlin gs A an d B (for YZF-R1M)
To remove a cowling1. Remove the panel. (See page 7-11.)
2. Remove the bolt, collar, and quick fasteners, and then take the cowl-
ing off.
1. Cowling A
1. Cowling B
2. Quick fastener
3. Panel D
2
2
3 3
1
1. Cowling B
1
1. Cowling A
2. Quick fastener
3. Bolt and collar
4. Panel C
1. Cowling A
3
4
1
2
2
1
UB3LE0E0.book Page 10 Tuesday, July 23, 2019 12:05 PM
Page 92 of 136
Periodic maintenance an d a djustment
7-11
7
To install a cowling
1. Place the cowling in its original po-sition, and then install the collar,
bolt, and quick fasteners. 2. Install the panel.
EAU66984
Panels A an
d B
To remove a panelRemove the quick fastener and bolt,
and then pull the panel off.
To install the panel
Place the panel in the original position,
and then install the quick fastener and
bolt.
Panels C and D
To remove a panelRemove the bolts and washers, and
then pull the panel off.
1. Cowling B
2. Quick fastener
3. Bolt and collar
4. Panel D
1. Cowling B
1
2
2
3
4
1
1. Panel A
2. Bolt
3. Quick fastener
2
1
3
1. Quick fastener
2. Bolt
3. Panel B
1
2
3
UB3LE0E0.book Page 11 Tuesday, July 23, 2019 12:05 PM
Page 93 of 136

Periodic maintenance an d a djustment
7-12
7
To install the panel
1. Insert the projections into the holders as shown, and then place
the panel in the original position. 2. Install the washers and bolts.
EAU67110
Checkin
g the spark plu gsThe spark plugs are important engine
components, which should be
checked periodically, preferably by a
Yamaha dealer. Since heat and depos-
its will cause any spark plug to slowly
erode, they should be removed and
checked in accordance with the peri-
odic maintenance and lubrication
chart. In addition, the condition of the
spark plugs can reveal the condition of
the engine.
The porcelain insulator around the
center electrode of each spark plug
should be a medium-to-light tan (the
ideal color when the vehicle is ridden
normally), and all spark plugs installed
in the engine should have the same
color. If any spark plug shows a dis-
tinctly different color, the engine could
be operating improperly. Do not at-
tempt to diagnose such problems
yourself. Instead, have a Yamaha deal-
er check the vehicle.
If a spark plug shows signs of elec-
trode erosion and excessive carbon or
other deposits, it should be replaced.
1. Panel C
2. Bolt and washer
1. Panel D
2. Bolt and washer
2 2
1
2 2 1
1. Projection
2. Panel C
1. Projection
2. Panel D
21 1
2
1 1
UB3LE0E0.book Page 12 Tuesday, July 23, 2019 12:05 PM
Page 94 of 136

Periodic maintenance an d a djustment
7-13
7 Before installing a spark plug, the
spark plug gap should be measured
with a wire thickness gauge and, if
necessary, adjusted to specification.
Clean the surface of the spark plug
gasket and its mating surface, and
then wipe off any grime from the spark
plug threads.
NOTICE
ECA10841
Do not use any tools to remove or in-
stall the spark plu
g cap, otherwise
the i gnition coil coupler may get
d amag ed . The spark plu g cap may
b e difficult to remove because the
ru bber seal on the en d of the cap fits
ti g htly. To remove the spark plu g
cap, simply twist it b ack and forth
while pullin g it out; to install it, twist
it back an d forth while pushin g it in.
EAU36112
CanisterThis model is equipped with a canister
to prevent the discharging of fuel vapor
into the atmosphere. Before operating
this vehicle, make sure to check the
following:
Check each hose connection.
Check each hose and canister for
cracks or damage. Replace if
damaged.
Make sure that the canister
breather is not blocked, and if
necessary, clean it.
Specifie d spark plu g:
NGK/LMAR9E-J1. Spark plug gapSpark plu g g ap:
0.6–0.7 mm (0.024–0.028 in)
1
1
Ti ghtenin g torque:
Spark plug (new):
18 N·m (1.8 kgf·m, 13 lb·ft)
Spark plug (after checking):
13 N·m (1.3 kgf·m, 9.6 lb·ft)
1. Canister
2. Canister breather
1
2
UB3LE0E0.book Page 13 Tuesday, July 23, 2019 12:05 PM
Page 95 of 136

Periodic maintenance an d a djustment
7-14
7
EAU66536
En gine oil an d oil filter car-
tri dgeThe engine oil level should be checked
before each ride. In addition, the oil
must be changed and the oil filter car-
tridge replaced at the intervals speci-
fied in the periodic maintenance and
lubrication chart.
To check the en gine oil level
1. Place the vehicle on a level sur- face and hold it in an upright posi-
tion. A slight tilt to the side can
result in a false reading.
2. Start the engine, warm it up for several minutes, and then turn it
off.
3. Wait a few minutes for the oil level to settle for an accurate reading,
and then check the oil level
through the check window locat-
ed at the bottom-left side of the
crankcase.TIPThe engine oil should be between the
minimum and maximum level marks.
4. If the engine oil is at or below theminimum level mark, add suffi-
cient oil of the recommended type
to raise it to the correct level.TIPCheck the oil filler cap O-ring for dam-
age, and replace it if necessary.To chan ge the en gine oil
1. Start the engine, warm it up for several minutes, and then turn it
off.
2. Place an oil pan under the engine to collect the used oil. 3. Remove the engine oil filler cap,
the engine oil drain bolt and its
gasket to drain the oil from the
crankcase.1. Engine oil level check window
2. Maximum level mark
3. Minimum level mark
2
3
1
1. Engine oil filler cap
1. Engine oil drain bolt
2. Gasket
12
UB3LE0E0.book Page 14 Tuesday, July 23, 2019 12:05 PM
Page 96 of 136

Periodic maintenance an d a djustment
7-15
7 4. Install the engine oil drain bolt and
its new gasket, and then tighten
the bolt to the specified torque.
5. Refill with the specified amount of the recommended engine oil.
TIPBe sure to wipe off spilled oil on any
parts after the engine and exhaust sys-
tem have cooled down.NOTICE
ECA11621
In or der to prevent clutch slip-
pa ge (since the en gine oil also
lu bricates the clutch), do not
mix any chemical additives. Do not use oils with a
diesel speci-
fication of “CD” or oils of a hi gh-
er quality than specifie d. In
a ddition, do not use oils la beled
“ENERGY CONSERVING II” or
hi gher.
Make sure that no forei gn mate-
rial enters the crankcase.
6. Check the oil filler cap O-ring for damage, and replace it if neces-
sary.
7. Install and tighten the oil filler cap. 8. Start the engine, and then let it idle
for several minutes while checking
it for oil leakage. If oil is leaking,
immediately turn the engine off
and check for the cause.
TIPAfter the engine is started, the oil pres-
sure and coolant temperature warning
light should go off if the oil level is suf-
ficient.NOTICE
ECA22490
If the oil pressure an d coolant tem-
perature warnin g lig ht flickers or re-
mains on even if the oil level is
correct, immed iately turn the en gine
off an d have a Yamaha d ealer check
the vehicle.9. Turn the engine off, wait a few minutes for the oil level to settle for
an accurate reading, and then
check the oil level and correct it if
necessary.
Tightenin g torque:
Engine oil drain bolt: 23 N·m (2.3 kgf·m, 17 lb·ft)
Recommen ded en gine oil:
Full synthetic
10W-40, 15W-50
Oil quantity: Oil change:3.90 L (4.12 US qt, 3.43 Imp.qt)
With oil filter removal: 4.10 L (4.33 US qt, 3.61 Imp.qt)
1. Engine oil filler cap
2. O-ring
12
UB3LE0E0.book Page 15 Tuesday, July 23, 2019 12:05 PM
 1
1 2
2 3
3 4
4 5
5 6
6 7
7 8
8 9
9 10
10 11
11 12
12 13
13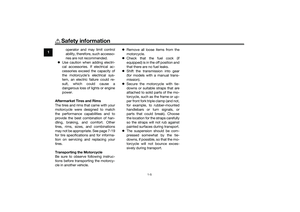 14
14 15
15 16
16 17
17 18
18 19
19 20
20 21
21 22
22 23
23 24
24 25
25 26
26 27
27 28
28 29
29 30
30 31
31 32
32 33
33 34
34 35
35 36
36 37
37 38
38 39
39 40
40 41
41 42
42 43
43 44
44 45
45 46
46 47
47 48
48 49
49 50
50 51
51 52
52 53
53 54
54 55
55 56
56 57
57 58
58 59
59 60
60 61
61 62
62 63
63 64
64 65
65 66
66 67
67 68
68 69
69 70
70 71
71 72
72 73
73 74
74 75
75 76
76 77
77 78
78 79
79 80
80 81
81 82
82 83
83 84
84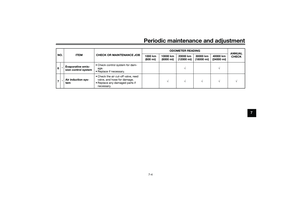 85
85 86
86 87
87 88
88 89
89 90
90 91
91 92
92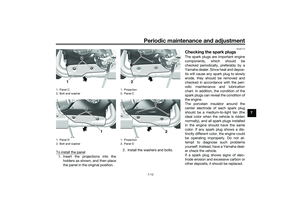 93
93 94
94 95
95 96
96 97
97 98
98 99
99 100
100 101
101 102
102 103
103 104
104 105
105 106
106 107
107 108
108 109
109 110
110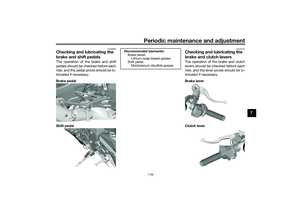 111
111 112
112 113
113 114
114 115
115 116
116 117
117 118
118 119
119 120
120 121
121 122
122 123
123 124
124 125
125 126
126 127
127 128
128 129
129 130
130 131
131 132
132 133
133 134
134 135
135

