2020 MERCEDES-BENZ SPRINTER lock
[x] Cancel search: lockPage 247 of 416

#
Todisconnect: selectDisconnect .
If applicable, the mobile phone will be auto‐
matically reconnected when theve hicle is
next star ted. #
Tode-authorize: selectDeauthorize.
In fo rm ation on NearField Communication
(NFC)
NFC enables short- range wi reless data transfer
or (re)connection of a mobile phone with the mul‐
timedia sy stem.
The following functions are available without hav‐
ing authorized a mobile phone:
R Trans ferring a URL or a con tact to be vie wed
in the multimedia sy stem (see the manufac‐
turer's operating instructions).
R Setting up theve hicle's Wi-Fi access da tavia
th e sy stem settings (/ page212).
Fu rther information can be obtained at: https://
www.mercedes-benz-mobile.com/
Using the mobile phone with NearField Com‐
munication (NFC)
Requ irements:
R NFC is activated on the mobile phone (see
th e manufacturer's operating instructions)
R The mobile phone's screen is switched on
and unloc ked (see the manufacturer's operat‐
ing instructions) #
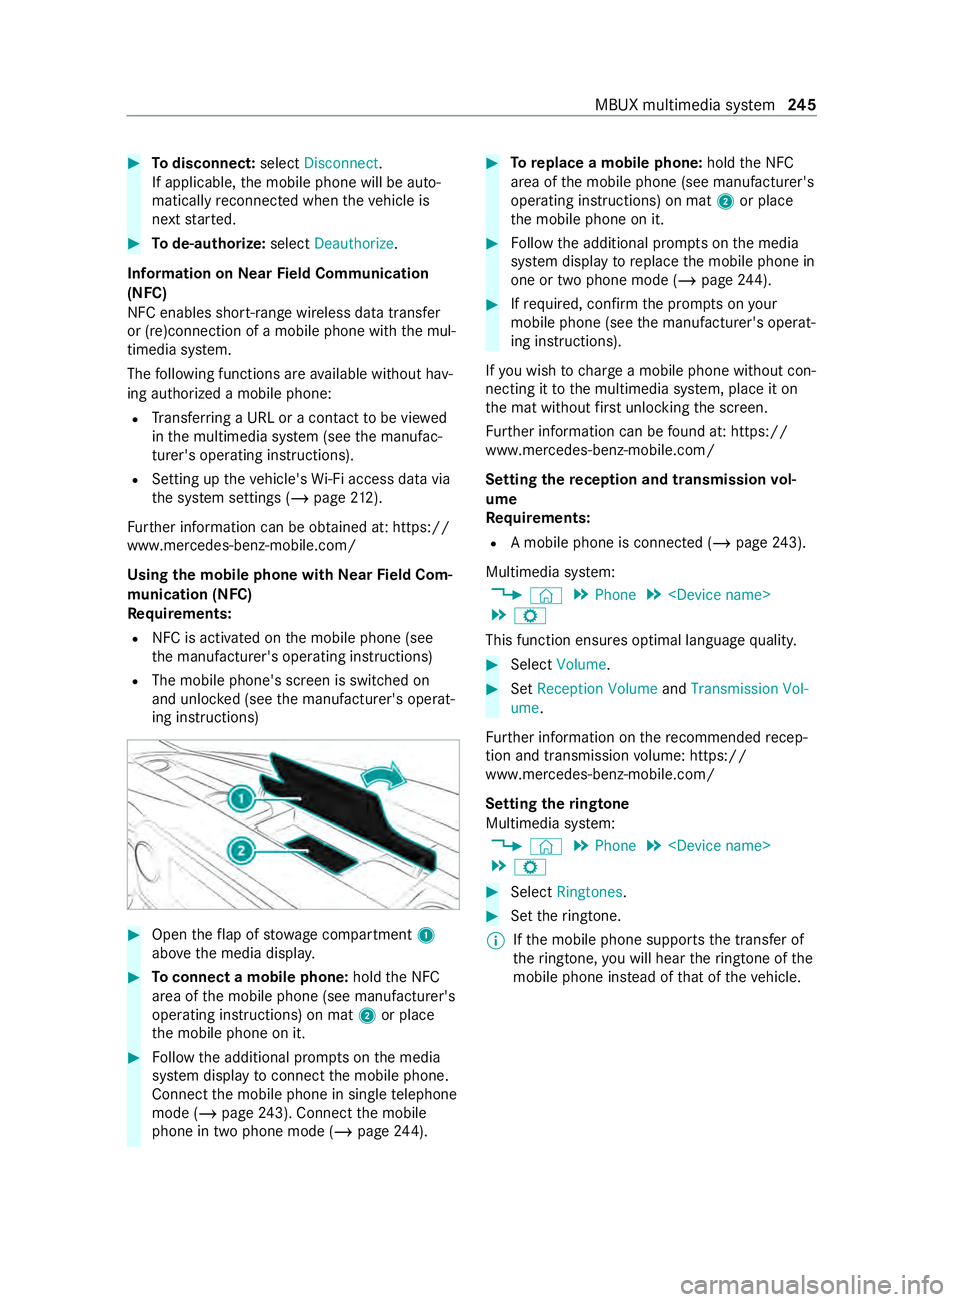
Open theflap of stowage compartment 1
abo vethe media displa y. #
Toconnect a mobile phone: holdthe NFC
area of the mobile phone (see manufacturer's
operating instructions) on mat 2or place
th e mobile phone on it. #
Follow the additional prom pts on the media
sy stem display toconnect the mobile phone.
Connect the mobile phone in single telephone
mode (/ page243). Con nectthe mobile
phone in two phone mode (/ page244). #
Toreplace a mobile phone: holdthe NFC
area of the mobile phone (see manufacturer's
operating instructions) on mat 2or place
th e mobile phone on it. #
Follow the additional prom pts on the media
sy stem display toreplace the mobile phone in
one or two phone mode (/ page244). #
Ifre qu ired, con firm the prom pts on your
mobile phone (see the manufacturer's operat‐
ing instructions).
If yo u wish tocharge a mobile phone without con‐
necting it tothe multimedia sy stem, place it on
th e mat without firs t unlocking the screen.
Fu rther information can be found at: https://
www.mercedes-benz-mobile.com/
Setting there ception and transmission vol‐
ume
Re quirements:
R A mobile phone is connec ted (/ page243).
Multimedia sy stem:
4 © 5
Phone 5
5 Z
This function ensures optimal language quality. #
Select Volume . #
Set Reception Volume andTransmission Vol-
ume.
Fu rther information on there commended recep‐
tion and transmission volume: https://
www.me rcedes-benz-mobile.com/
Setting theringtone
Multimedia sy stem:
4 © 5
Phone 5
5 Z #
Select Ringtones. #
Set theringtone.
% If
th e mobile phone supports the transfer of
th eringtone, you will hear theringtone of the
mobile phone ins tead of that of theve hicle. MBUX multimedia sy
stem 245
Page 260 of 416

We
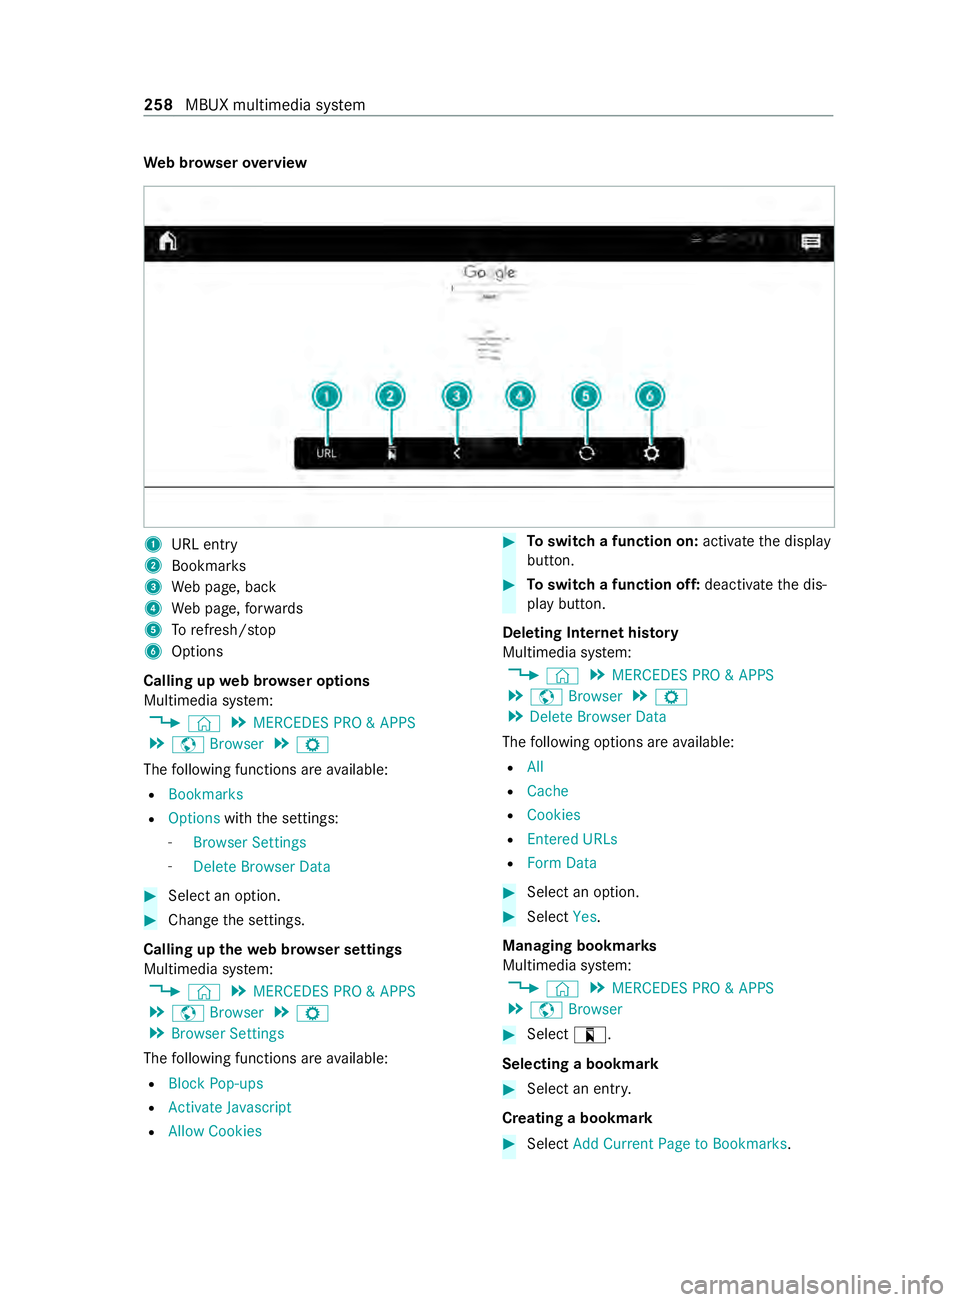
b br owser overview 1
URL ent ry
2 Bookma rks
3 Web page, back
4 Web page, forw ards
5 Torefresh/s top
6 Options
Calling up web br owser options
Multimedia sy stem:
4 © 5
MERCEDES PRO & APPS
5 z Browser 5
Z
The following functions are available:
R Bookmarks
R Options withthe settings:
- Browser Settings
- Delete Browser Data #
Select an option. #
Change the settings.
Calling up thewe b br owser settings
Multimedia sy stem:
4 © 5
MERCEDES PRO & APPS
5 z Browser 5
Z
5 Browser Settings
The following functions are available:
R Block Pop-ups
R Activate Javascript
R Allow Cookies #
Toswitch a function on: activatethe display
button. #
Toswitch a function off: deactivatethe dis‐
play button.
Deleting Internet his tory
Multimedia sy stem:
4 © 5
MERCEDES PRO & APPS
5 z Browser 5
Z
5 Delete Browser Data
The following options are available:
R All
R Cache
R Cookies
R Entered URLs
R Form Data #
Select an option. #
Select Yes.
Managing bookmar ks
Multimedia sy stem:
4 © 5
MERCEDES PRO & APPS
5 z Browser #
Select ?.
Selecting a bookmark #
Select an entry.
Creating a bookmark #
Select Add Current Page to Bookmarks. 258
MBUX multimedia sy stem
Page 269 of 416

Displaying
radio text Multimedia sy
stem:
4 © 5
Radio 5
Z 5
General #
Switch Display Radio Text Information on or
off. Satellite
radio In
fo rm ation on the satellite radio
SIRIUS XM ®
satellite radio of fers more than 175
digital-quality radio channels pr oviding 100%
commercial-free music, sports, ne wsand enter‐
ta inment, forex ample. SIRIUS XM satellite radio
emplo ysafleet of high-per form ance satellites to
broadcast around the clock thro ughout the USA
and Canada. The satellite radio program is availa‐
ble for a monthly fee. Information about this can
be obtained from a Sirius XM ®
Service Center
and at http://www.siriusxm.com (USA) or
http://www.siriusxm.ca (Canada).
% Sirius, XM and all
related mar ksand logos
are trademar ksof Sirius XM Radio Inc. and
its subsidiaries. All other mar ks,ch annel
names and logos are the property of their
re spective owners. All rights reser ved.
Limitations of satellite radio
Satellite radio mode may be temp orarily una vaila‐
ble or inter rupte dfo r a variet y of reasons. These
include environmental or topog raphical condi‐
tions be yond the cont rol of Mercedes-Benz US A,
LLC. Thus operation at cer tain locations may not
be possible.
Re gis tering satellite radio
Re quirements:
R satellite radio equipment
R registration with a satellite radio pr ovider
R ifre gistration is not included when pur chas‐
ing the sy stem, your credit card de tails will be
re qu ired toactivate your account
Multimedia sy stem:
4 © 5
Þ Radio 5
SiriusXM Radio
5 Z Options #
Select Service Information.
The service information screen appears show‐
ing thera dio ID and the cur rent subscription
st atus. #
Establish a telephone connection. #
Follow the service staff's instructions.
The activation process may take up toten
minutes.
% Yo
u can also ha vethe satellite service activa‐
te d online. Todo so, please visit http://
www.siriusxm.com (USA) or http://
www.siriusxm.ca (Canada).
Switching on satellite radio
Multimedia sy stem:
4 © 5
Þ Radio #
Select SiriusXM (SiriusXM). MBUX multimedia sy
stem 267
Page 271 of 416

Un
locking a channel #
Enter thefo ur-digit character sequence and
select ¡.
All channels with adult con tent are unloc ked.
Music and sport alerts function
This function makes it possible tostore a pro‐
gram alert foryo ur favo rite artists, trac ksor
sporting events. Music alerts can be sa ved whilst
a tra ckis being pla yed and sport alerts can be
sa ve d during a live game. You can also specify
sport alerts via the menu option. The sy stem then
continuously sear ches thro ugh all thech annels. If
a mat chisfound with a stored alert, you will be
informed.
Setting music and sport alerts
Multimedia sy stem:
4 © 5
Þ Radio 5
SiriusXM Radio
5 Z 5
Notes
Ac tivating the music in form ation function #
Activate 0073Music Alerts.
Setting a music ale rt#
Select Add New Alert. #
Select Artists orSong inthe dialog windo w.
The alert is set forth e cur rent artist or trac k.
If a match is found, a prom ptappears asking
whe ther you wish tochange tothest ation.
Ac tivating spo rts information #
Activate 0073Activate Sports Alerts .
Setting a spo rtalert #
Select Add New Alert. #
Select thete am name or league in the dialog
windo w.
Deleting individual sports and music alerts #
Select Manage Music Alerts .
or #
Select Manage Sports Alerts. #
Select an artist or trac k.
or #
Select a team. #
Select Delete Selected Entries.
All highlighted alerts are dele ted.
Deleting all sports and music alerts #
Select Manage Music Alerts.
or #
Select Manage Sports Alerts. #
Select Delete All Entries.
All alerts are dele ted.
Information on Sma rtFavo rite s and Tune
St art
Fr om thest ation presets you can set up toeight
st ations as Smart Favorite s. Smart Favorite sst a‐
tions are automatically sa vedto te mporary stor‐
age in the bac kground. If youch ange toa Smart
Favo rite sst ation, you can repla y,pause or
actively skip forw ard or back tobroadcasts which
yo u ha vemissed. If Tune Start is activated and
yo uch ange toano ther Smart Favorite sst ation,
th e music track cur rently pl aying on thest ation is
automatically restar ted from the beginning of the
trac k.
Creating a TuneMix list
Multimedia sy stem:
4 © 5
Þ Radio 5
SiriusXM Radio
5 Z 5
TuneMix Lists
In order tolistento seamless music, you can put
to ge ther a TuneMix li stfrom various stations. #
Select Create TuneMix List . #
If necessar y,limit the number of stations
shown using theCategory entry. #
Select thest ation shown 0073. #
Press 0047toconfirm.
A Tu neMix station logo is created in thera dio
menu.
Ac tivating/deactivating TuneStart
Multimedia sy stem:
4 © 5
Þ Radio 5
SiriusXM Radio
5 Z #
Switch TuneStart on or off.
Switching on satellite radio playback control
Multimedia sy stem:
4 © 5
Þ Radio 5
SiriusXM Radio
Yo u can pause the playback of the cur rent station
or skip forw ard or backward in the timeline. This
lea ves live mode toaccess the internal temp orary
st orage. #
Toshow the timeline: press .
#
Tofast forw ard/r ewind: tap anywhere on the
timeline. #
Topause playback: select 00CF. #
Toreturn tolive mode: navigate tothe end of
th e timeline. MBUX multimedia sy
stem 269
Page 275 of 416

lation and any ensuing consequences.
Obser
vecountr y-specific la ws.
Make sure that the load is secure before every
jou rney and at regular inter vals during a long
journe y.Ad just the load securing as necessar y.
Information on how tosecure loads cor rectly can
be obtained from the manufacturers of load
securing aids or tie downs for load-securing, for
ex ample.
When securing loads, obse rveth efo llowing:
R Fill spaces between the load and the cargo
compartment walls or wheel wells. Forth is
purpose, use rigid load securing aids, such as
we dges, wooden fixings or padding.
R Attach secured and stabilized loads in all
directions.
Use the cargo tie-down points or tie-down
ey es and the loading rails in the cargo com‐
partment or on the load sur face.
Only use tie downs, such as lashing rods, lock
ro ds or lashing nets and lashing stra ps, which
has been tested in accordance with cur rent
st andards (e.g. DIN EN). Alw ays use the cargo
tie-down points closest tothe load; pad sharp
edges.
Loads, and heavy loads in particular, should
preferably be secured using the tie-down
ey es.
% Yo
u can obtain tie downs tested in accord‐
ance with cur rent standards (e.g. DIN EN)
from any specialist company or from a quali‐
fi ed specialist workshop.
Note s onthe pa rtition
Wi thout a partition, vehicles that are appr oved as
commercial vehicles (N1, N2) do not fulfill ISO
27 956, whi chdescribes the equipment for prop‐
erly securing a load in deli very vehicles. If the
ve hicle is used totranspo rtgoods, retrofitting the
partition is stro ng lyrecommended, as prope rly
securing the load in vehicles without a partition
will alw ays be a complex operation.
% Yo
u must not store anything in the area
between the back of the seats and the parti‐
tion. Overview of cargo tie-down points
Cargo tie-down points (e
xample:Passenger
Va n)
1 Tie-down eyes Cargo tie-down points (e
xample: Cargo Van
without loading rails)
1 Tie-down eyes
Secure loose loads with an appr oved lashing net
or a tarp s.
Alw aysfast enthe lashing net or tarp toall availa‐
ble cargo tie-down points. Make sure that thefa s‐
te ning hoo ksare secured against acciden tal
opening.
If yo ur vehicle is equipped with loading rails in
th e cargo compartment floor, you can place lash‐
ing rods directly in front of and behind the load.
The lashing rods directly absorb the po tential
shi fting forc es.
Securing loads on the cargo compartment floor
by lashing them down is only recommended for Tr
ansporting 273
Page 276 of 416

light
weight loads. Lay anti-slip mats underneath
th e load tosecure the load additionally. Installing and
removing tie-down eyes #
Toinstall: slidethe tie-down eyeth ro ugh a
re cess in the loading rail close tothe load
until locking mechanism engages in the
re cess.
% When
you pull locking mechanism up and out
of there cess, the tie-down eye is able to
mo vewithin the loading rail. Make sure that
locking mechanism is alw ays engaged in a
re cess. #
Che ckthe tie-down eyefo rfirm seating. #
Toremo ve:pull lo cking mechanism up and
pull the tie-down eyeto wa rdsth e locking
mechanism and out of the loading rail
th ro ugh a recess. Car
rier sy stems Information about
thero of rack &
WARNING Risk of inju rydue tothe maxi‐
mum roof load being exceeded
When you place a load on thero of as well as
all outer and inner attachments, theve hicle's
center of gr avity will rise and thefa miliar driv‐
ing characteristics as well as thesteering and
braking characteristics will change. When
driving around bends, theve hicle will tilt
more heavily and may react more sluggishly
to steering mo vements.
If yo uexc eed the maximum roof load, the
driving characteristics, as well as thesteering
and braking, will be greatly impaired. #
Neverexc eed the maximum roof load
and adjust your driving style. 1
Mounting rails
Information about the maximum roof load can be
fo und in the "Technical data" section
(/ page 353).
Obser vethefo llowing points for assembling roof
ra ck s:
R Tighten thero of rack 's scr ewsto ato rque of
6.0 lb -ft(8 Nm) – 7.4 lb-f t(10 Nm) in the des‐
ignated groo ved plates.
R The tightened scr ews should not touch the
ra ils.
R Ensure that the groo ved plates are not loca‐
te d in the areas around the plastic caps.
R The groo ved plates must ha vetheright cross-
section.
R The insides of the mounting rails must be free
of dirt.
R Re-tigh tenth e scr ews uniformly af ter around
300 miles (500 km).
Mercedes-Benz recommends that you use on ly
ro of rack sth at ha vebeen tested and appr oved
fo r Mercedes-Benz. These help topreve ntvehicle
damage.
If yo uwa nttoretrofit the mounting rails, ha ve
th em ins talled at a qualified specialist workshop.
Otherwise, you could damage theve hicle.
If yo ur vehicle is ins talled with mounting rails on
th ero of, you can install a roof rack on thero of.
Special fasteners (sliding bloc ks) are available as
accesso ries forth is purpose.
These fasteners are available from any authorized
Mercedes-Benz Center. 274
Transporting
Page 278 of 416

#
Tomo vetherack ra ils:unsc rew star knobs
7 coun ter-clockwise until they are slightly
loose. #
Slide rack rail2 along roof rail1 tothe
desired position. #
Screw star knobs 7tight clo ckwise. #
Check that thera ck rail is seated securely.
Moving the sliders &
WARNING Risk of inju rydue toinade‐
qu ately secured loads
If th e slider of the interior roof rack system is
not engaged proper ly,th e load may come
loose, fall down and injure people, for
ins tance when they enter or load and unload
th e cargo compartment. #
Always engage the slider properly. %
Ring
8of slider 4must alw ays be at an
angle of 90° torack rail2, so that slider 4
is engaged proper ly. #
When thering of the slider is at an angle
of 90° totherack ra il:pull ring 8 of slider
4 down and simul taneously mo veslider 4
to the desired position. #
Release ring 8 atthe desired position. #
Moveslider 4slightly fur ther along on rack
ra il2 until slider 4engages automaticall y. #
When thering of the slider is pa rallel to
th erack ra il:mo veslider 4tothe desired
position. #
Position ring 8 of slider 4at an angle of
90° torack rail2.
Slider 4is engaged. Ad
justing the belt strap #
Press and hold the locking mechanism on
slider 9. #
Pull or release belt stra p5. #
Release the locking mechanism on slider 9.
% When securing or loosening a load, be sure
to not stand under the load.
Securing and loosening the load #
Tosecure the load: placethe load in the belt
st ra ps of thera ck rails. #
Fasten the load flush with the partition. #
Secure belt stra p5. #
Check that the load is seated securel y. #
Toloosen the load: press and hold the lock‐
ing mechanism on slider 9. #
Pull ring 8 ofthe slider down and simultane‐
ously mo vethe slider away from the load. #
Loosen belt stra p5 and at the same time
make sure that the load does not fall out of
th e belt stra ps. #
Remo vethe load from the belt stra ps.
Installing cargo tie down rings 276
Transporting
Page 279 of 416

#
Turn thering of cargo tie-down ring B until it
is pa rallel tothe longitudinal axis of cargo tie-
down ring C. #
Hold cargo tie-down ring C between the
index finger and middle finger and place your
th umb thro ugh thering of cargo tie-down ring
B and onto the cent ral pressure point. #
Use your thumb topush the locking pin down
as far as it will go. #
Push cargo tie-down ring C near the load
th ro ugh the notches on rack rail2 and mo ve
it appr oximately 0.5 in (12 mm). #
Remo veyour thumb from the pressure point
and slide cargo tie-down ring C until it
engages. #
Turn thering of cargo tie-down ring B until it
is pe rpendicular tothe longitudinal axis of
cargo tie-down ring C.
Cargo tie-down ring C is secu red.
Re moving cargo tie down rings #
Turn thering of cargo tie-down ring B until it
is pa rallel tothe longitudinal axis of cargo tie-
down ring C. #
Grip cargo tie-down ring C as described
ab ove under ins talling and use your thumb to
push the locking pin down as far as it will go. #
Slide cargo tie-down ring C and pull it down
and out thro ugh the notches of rack rail2.
At taching the head lashing &
WARNING Risk of inju rydue toincor‐
re ctly secu red loads
When the hooks on the head lashing are
attached totherings of the sliders, the slid‐
ers could come loose. The load may come
loose, fall down and injure people, for
ins tance when they enter or load and unload
th e cargo compartment. #
Only atta chthe hooks on the head lash‐
ing totherings of the cargo tie-down
ri ngs. %
The hoo
kson head lashing 3may only be
attached totherings of cargo tie down rings
B. #
Check that the load is seated securel y. #
Toattach the head lashing: tension head
lashing 3at bo thends of load 6and
attach two hooks Aofthe head lashing to
th erings of cargo tie down rings B. Placing a load on the wheel ar
ch
Comply with the impor tant sa fety no tes under
"No tes on loading" (/ page271). #
Place the objects on wheel ar ch2 and lash
th em using tie-down eyes 1(/ page273).
% A wheel arch may be subjec
tedto a load of
330 lb (150 kg). Tr
ansporting 277