2020 MERCEDES-BENZ SPRINTER USB port
[x] Cancel search: USB portPage 254 of 416
Only one
route guidance can be active at a time.
If ro ute guidance is active on the multimedia sys‐
te m, it is closed when route guidance is star ted
on the mobile phone.
Connecting an iPhone ®
via Apple CarPlay ®
Requ irements:
R The cur rent version of your device's operating
sy stem is being used (see the manufacturer's
operating instructions).
R The full range of functions for Apple CarPlay ®
is only available with an In tern et connection.
R The iPhone ®
is connected tothe multimedia
sy stem via the USB port çusing a suita‐
ble cable (/ page 262).
Multimedia sy stem:
4 © 5
Mercedes PRO & Apps
5 Smartphone 5
Apple CarPlay
5 Start Apple CarPlay #
Alternative: If an Apple CarPlay ®
application
is active (e.g. when music is being pla yed or
ro ute guidance is active), you can call up the
active application using the|, zor
002B application buttons (/ page 201).
Ac cepting/rejecting the data pr otection pro‐
visions
Fo rth e initial start of the application: a message
with the data pr otection pr ovisions appears. #
Select Accept & Start.
Exiting Apple CarPlay ®#
Press the00E2 button.
% Apple CarPlay ®
starts automatically when the
iPhone ®
is connec ted with the sy stem using
a cable. If Apple CarPlay ®
wa s not displa yed
in thefo re ground be fore disconnecting, the
application starts in the bac kground when
re connected. You can call up Apple CarPlay ®
in the main menu.
Calling up Apple CarPlay ®
sound settings
Multimedia sy stem:
4 © 5
Mercedes PRO & Apps
5 Smartphone 5
Apple CarPlay 5
Z #
Select sound settings. Setting control of
the application but tons
Multimedia sy stem:
4 © 5
Mercedes PRO & Apps
5 Smartphone 5
Apple CarPlay 5
Z
5 General #
Toswitch on Control via Application Buttons:
activate the display button. #
Toswitch off Control via Application Buttons:
deactivate the display button.
Ending Apple CarPlay ® #
Toend the connection of Apple Car‐
Play ®
(cable): disconnect the connection via
th e connecting cable between the iPhone ®
and multimedia sy stem.
% Mercedes-Benz
recommends disconnecting
th e connecting cable only when theve hicle is
st ationar y. Android
Auto Android
Autoove rview &
WARNING Risk of distraction from infor‐
mation sy stems and communications
equipment
If yo u operate information and communica‐
tion equipment integ rated in theve hicle when
driving, you will be distracted from the tra ffic
situation. This could also cause youto lose
control of theve hicle. #
Only operate this equipment when the
traf fic situation permits. #
Ifyo u cannot be sure of this, stop the
ve hicle whilst paying attention toroad
and traf fic conditions and ope rate the
equipment with theve hicle stationar y. Yo
u must obse rveth e legal requirements forthe
country in whi chyou are cur rently driving when
ope rating the multimedia sy stem.
Mobile phone functions can be used with Android
Au tousing the Android operating sy stem on the
multimedia sy stem. It is operated using the
to uchsc reen or thevo ice-operated control sys‐
te m. You can activate thevo ice-opera ted control
sy stem bypressing and holding the£ button
on the multifunction steering wheel.
When using Android Autovia thevo ice-opera ted
control sy stem, the multimedia sy stem can still
be opera ted via theVo ice Cont rol Sy stem
(/ page 184). 252
MBUX multimedia sy stem
Page 255 of 416
Only one mobile phone at a time can be connec‐
te d via Android Auto to the multimedia sy stem.
This also applies totwo phone mode.
The availability of Android Autoand Android Auto
apps may vary according tothe count ry.
The service pr ovider is responsible forth is appli‐
cation and the services and content connected to
it.
Information on Android Auto
While using Android Auto,va rious functions of
th e multimedia sy stem, forex ample the media
source Blue tooth®
audio, are not available.
On lyone route guidance can be active at a time.
If ro ute guidance is active on the multimedia sys‐
te m, it is closed when route guidance is star ted
on the mobile phone.
Connecting a mobile phone via Android Auto
Requ irements:
R The mobile phone supports Android Auto
from Android 5.0.
R The Android Autoapp is ins talled on the
mobile phone.
R In order touse thete lephone functions, the
mobile phone must be connected tothe mul‐
timedia sy stem via Blue tooth®
(/ page 243).
If th ere was no prior Internet connection, this
is es tablished with the use of the mobile
phone with Android Auto.
R The mobile phone is connected tothe multi‐
media sy stem via the USB port çusing a
suitable cable (/ page 262).
R There is an Internet connection forth e full
ra nge of functions for Android Auto.
Multimedia sy stem:
4 © 5
Mercedes PRO & Apps
5 Smartphone 5
Android Auto
5 Start Android Auto #
Alternative: If Android Autois active (e.g.
when music is being pla yed or the navigation
sy stem is being used), you can call up the
application using the|, zor002B
buttons (/ page 201).
% The
firs t acti vation of Android Autoon the
multimedia sy stem must be car ried out when
th eve hicle is stationary for saf etyre asons. Ac
cepting/rejecting the data pr otection pro‐
visions
A message with the data pr otection pr ovisions
appears. #
Select Accept & Start.
% The
firs t acti vation of Android Autoon the
multimedia sy stem must be car ried out when
th eve hicle is stationary for saf etyre asons.
Exiting Android Auto #
Press the00E2 button.
% Android
Autostarts automatically when the
mobile phone is connected with the sy stem
using a cable. If Android Autowa s not dis‐
pla yed in thefo re ground before disconnect‐
ing, the application starts in the bac kground
when reconnected. You can call up Android
Au tointhe main menu.
Calling up the Android Autosound settings
Multimedia sy stem:
4 © 5
Mercedes PRO & Apps
5 Smartphone 5
Android Auto 5
Z #
Select sound settings.
Setting control of the application but tons
Multimedia sy stem:
4 © 5
Mercedes PRO & Apps
5 Smartphone 5
Android Auto 5
Z
5 General #
Toswitch on Control via Application Buttons:
activate the display button. #
Toswitch off Control via Application Buttons:
deactivate the display button.
Ending Android Auto #
Disconnect the connecting cable between the
mobile phone and multimedia sy stem.
Mercedes-Benz recommends disconnecting
th e connecting cable only when theve hicle is
st ationar y. Tr
ansfer redve hicle data with Android Auto
and Apple CarPlay ® Overview of transfer
redve hicle data
When using Android Autoor Apple CarPlay ®
, cer‐
ta in vehicle data is transfer redto the mobile
phone. This enables youto getth e best out of
selected mobile phone services. Vehicle data is
not directly accessible. MBUX multimedia sy
stem 253
Page 263 of 416
Calling up
thest ation list for the category last
selected
Multimedia sy stem:
4 © 5
Radio 5
TuneIn Radio #
Press the co ver of the cur rent station.
Depending on how thest ation was selected, a
st ation list is shown. Media
Information about media mode
Information about suppor
tedfo rm ats and
data storage media &
WARNING Risk of distraction when han‐
dling da tastorage media
If yo u handle a data storage medium while
driving, your attention is diver ted from the
traf fic conditions. This could also cause you
to lose control of theve hicle. #
Only handle a data storage medium
when theve hicle is stationar y. %
Depending on
the equipment ins talled play‐
back of video form ats may not be possible.
The multimedia sy stem supports thefo llow‐
ing form ats and data media:
Pe rm issible
fi le sy stems FA
T32, exFA T,NTFS
Pe rm issible
data car riers USB devices, iPod
®
/iPhone ®
,
MTP devices, Blue tooth®
audio
equipment
Suppor ted
fo rm ats: Au
dio: MP3, WMA, AAC, WAV,
FL AC , AL AC
Vi deo: MPEG, AVI, DivX, MKV,
MP4, M4V, WMV R
The multimedia sy stem supports a total of up
to 50,000 files.
R Data storage media up to2 TB are suppor ted
(32‑bit address space).
% Obser vethefo llowing no tes:
R Due tothe large variet y of available music
and video files rega rding encoders, sam‐ pling
rates and data transfer rates, play‐
back cannot be guaranteed.
R Due tothe wide range of USB devices
av ailable on the mar ket, pl ayback cann ot
be guaranteed for all USB devices.
R Videos up toFullHD (1920x1080) are
suppor ted.
R Cop y-pr otected music and video files or
DRM (Digital Rights Management)
enc rypte dfiles cannot be pla yed bac k.
R MP3 pla yers must support Media Trans fer
Pr oto col (MTP).
In fo rm ation on copy right pr otection and
tradema rks
Au dio files that you create or reproduce yourself
fo r playback aregeneral lysubject tocopyright
pr otection. In many count ries, reproductions,
eve nfo r private use, are not permitted without
th e prior consent of the copyright holder. Make
sure that you kn owabout the applicable copy‐
ri ght regulations and that you comply with these. Manufactured under license from Dolby Laborato‐
ri
es. Dolb y,Dol byAudio and the double-D symbol
are trademar ksof Dolby Laboratories. Graceno
te,th e Graceno telogo and logotype,
"P ow ered byGracen ote", MusicID and Pla ylist MBUX multimedia sy
stem 261
Page 264 of 416
Plus are either
regis tere d trademar ksor trade‐
mar ksof Graceno te, Inc. in theUn ited States
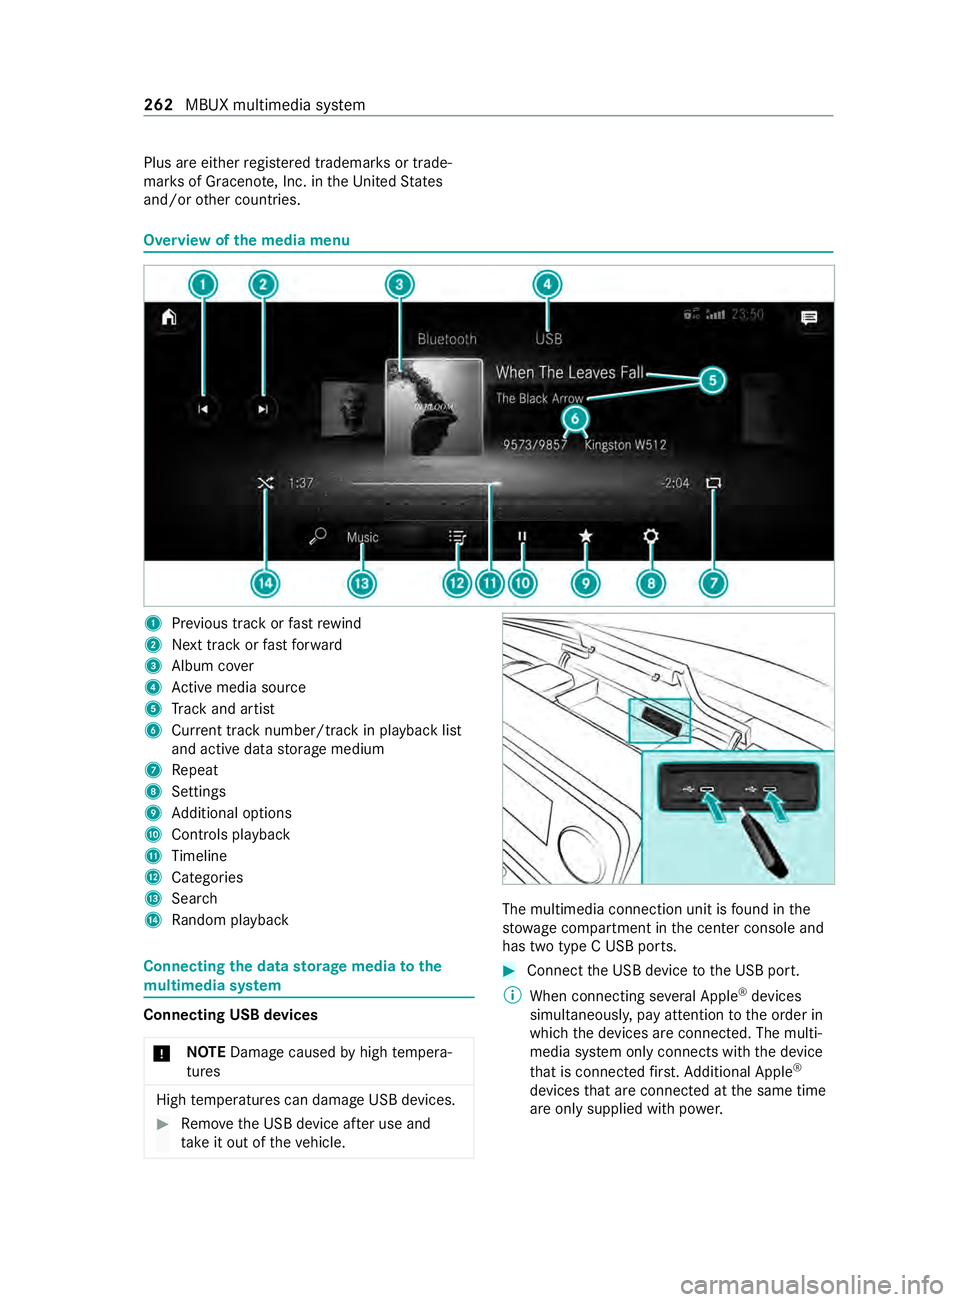
and/or other countries. Overview of
the media menu 1
Prev ious track or fastrewind
2 Next track or fastforw ard
3 Album co ver
4 Active media sou rce
5 Track and artist
6 Current track number/track in pl ayback list
and active data storage medium
7 Repeat
8 Settings
9 Additional options
A Controls playback
B Timeline
C Categories
D Sear ch
E Random pl ayback Connecting
the data storage media tothe
mu ltimedia sy stem Connecting USB devices
* NO
TEDama gecaused byhigh temp era‐
tures High
temp eratures can damage USB devices. #
Remo vethe USB device af ter use and
ta ke it out of theve hicle. The multimedia connection unit is
found in the
stow age compartment in the center console and
has two type C USB ports. #
Connect the USB device tothe USB port.
% When connecting se veral Apple ®
devices
simultaneousl y,pay attention tothe order in
which the devices are connected. The multi‐
media sy stem only connects with the device
th at is connec tedfirs t. Ad ditional Apple ®
devices that are connec ted at the same time
are only supplied with po wer. 262
MBUX multimedia sy stem
Page 265 of 416
Sear
ching for and authorizing a Blue tooth ®
audio device
Requ irements:
R Blue tooth ®
is activated on the multimedia
sy stem and audio equipment.
R The audio equipment supports the Blue tooth ®
audio profiles A2DP and AVRC P.
R The audio equipment is "visible" forot her
devices.
Multimedia sy stem:
4 © 5
Media 5
Bluetooth 5
00A5
Au thorizing a new Blu etoo th®
audio device #
Select Connect New Device.
De tected equipment is displa yed in the device
list. #
Select an audio device.
Auth orization starts. A code is displa yed on
th e multimedia sy stem and on the mobile
phone. #
Ifth e codes are identical, confirm on the
audio equipment. #
Select Only as Bluetooth Audio Device .
The Blue tooth®
audio equipment is connec ted
with the multimedia sy stem.
Connecting pr eviously authorized Blue tooth ®
audio equipment #
Select a Blue tooth®
audio device from the
list.
The connection is es tablished. St
arting media playback A data
storage medium is connected tothe multi‐
media sy stem.
Multimedia sy stem:
4 © 5
Media #
Select USBorBluetooth asthe media source. Controlling media playback
Multimedia sy
stem:
4 © 5
Media #
Topause playback: select00CF. #
Tocontinue playba ck:select X. #
Torepeat a track: select:.
Fo rth ere peat function there are thefo llow‐
ing settings:
R Select once: the active pla ylist is repea‐
te d.
R Select twice: the cur rent track is repea‐
te d.
R Select three times: there peat function
is deactivated. #
Toplay back trac ksinrandom order:
select 9. #
Towind a track forw ards or backwards:
ta p on the desired point on the timeline. #
Toselect the next track: select00F6. #
Toselect the pr evious track: select00F5. #
Toscroll through trac ksquickl y:press and
hold 00F5 or00F6. #
Toshow the cur rent track lis t:select the
track ima geshown. Ad
ditional options for setting media playba ck Multimedia sy
stem:
4 © 5
Media
Calling up additional options #
Select f.
The additional options are shown.
The following options are available:
R Play Similar Tracks
Select during playback of a track in order to
crea tea pla ylist with similar trac ks.
R Surprise Mix
A pl aylist with randomly selected trac ksis
created.
R Add to Favorite Songs
The cur rent track is added tothefa vo rite
songs.
R Remove from Favorite Songs
The cur rent track is remo ved from thefa vo rite
songs. #
Select an option. MBUX multimedia sy
stem 263
Page 401 of 416

Limiting speed
...................................... 11 3
Live Traf fic Information
Displaying the tra ffic map ................ 233
Displaying traf fic incidents ............... 234
Pr ov ider information ........................ .233
Showing local area messa ges ..........2 35
Switching the tra ffic information
display on ........................................ .234
Load Determ ining the maximum ............... 318
Sample calculation ........................... 318
Load distribution .................................. 272
Load index (tire) .................................. .321
Load securing Cargo tie-down point ........................ 273
Ins talling and removing tie-down
ey es .................................................. 274
No tes ................................................ 272
Load-bea ring capacity (tire) ................321
Loading Definitions ........................................ 323
Loading guidelines ...............................271
Loading information table ...................317
Low beam Activating/deactivating ...................... 84
Changing bulbs .................................. .91
Setting for abroad (symmetrical) ........ 84
LO Wrange ............................................. 12 6
Lu bricant additives
see Additive
Lu mbar support (4-w ay)........................ 69 M
M+S tires .............................................. 309
Main tenance
Ve hicle ................................................ 24
Maintenance see ASS YST PLUS
Malfunction Restra int sy stem ................................. 31
Malfunction message see Display messa ge
Manual parking brake ..........................141
App lying/ releasing .......................... .141
Emergency braking ........................... 14 2
Fo lding up/down .............................. 14 2
Manually inflating air bello ws(ENR) ...1 32 Map
............................................... 233, 236
Av oiding an area ...............................2 38
Av oiding an area (o verview) .............. 238
Changing an area ............................ .238
Deleting an area ............................... 238
Displ aying the compass ...................2 39
Displ aying the map version .............. 238
Displaying the next intersecting
st re et ................................................ 237
Displaying the satellite map .............2 39
Displ aying the tra ffic map ................ 233
Displaying weather information ........ 24 0
Map data .......................................... 239
Moving ............................................. 236
Selecting POI symbols ......................2 36
Selecting text information ................ 237
Selecting the map orientation ..........2 36
Setting the map scale ......................2 36
Setting the map scale automati‐
cally .................................................. 239
Showing thera nge ............................ 24 0
Switching free way in form ation
on/off .............................................. 237
Up dating .......................................... 239
Mat tefinish (cleaning instructions) ... 287
Maximum load Determ ining ...................................... 318
Sample calculation ........................... 318
Maximum tire load ...............................321
Maximum tire pressure ....................... 321
MBUX multimedia sy stem
Configuring display settings ............ .209
MBUX multimedia sy stem (o ver‐
vi ew )...................................................... 19 8
Mechanical key
Locking door ...................................... 50
Re moving/inserting ............................ 47
Un locking door .................................. .50
Media Menu (on-boa rdcompu ter) ............... 182
Operating media playback ................1 82
Selecting a media sou rce ................. 182
Media display Entering characters .......................... 208
Home sc reen .................................... 19 9
No tes ................................................ 19 8
Media mode Adding a favo rite song ......................2 63
Connecting Blue tooth®
audio
equipment ........................................ 263
Connecting USB devices .................. 262
Controlling media playback .............. 263 Index
399