2020 MERCEDES-BENZ SPRINTER USB
[x] Cancel search: USBPage 229 of 416

St
arting an automatic gasst ation sear ch
Re quirements:
R The automatic gasst ation sear chis activated
(/ page 226) .
Driving situation
The fuel le vel in the fuel tank reaches there ser ve
fuel le vel.
The following notification is shown in the media
display Reserve Fuel Tap here to search for gas
stations. #
Confirm the notification.
The automatic gasst ation sear chbegins. The
av ailable gasst ations along thero ute or in
th e vicinity of theve hicle's cur rent position
are displ ayed. #
Select a gasst ation.
The address of thega sst ation is displa yed. #
Calculate thero ute (/ page 222).
The gasst ation is set as the destination or
th e next intermediate destination. #
Ifth ere are already four intermediate des‐
tinations: selectYesinthe prom pt.
The gasst ation is entered in thero ute over‐
vie w. Intermediate destination 4 is dele ted.
Ro ute guidance begins.
St arting the automatic service station sear ch
Re quirements:
R ATTENTION ASSIST and theSuggest Rest
Area function are activated (/ page163).
R There are se rvice stations along thero ute
section ahead.
Driving situation
The following notification is shown in the media
display ATTENTION ASSIST Tap here to search
for rest areas. #
Confirm the notification.
The service station sear ch starts. The availa‐
ble service stations along thero ute or in the
vicinity of theve hicle's cur rent position are
displ ayed. #
Select a service station.
The service station address is displa yed. #
Calculate thero ute (/ page 222).
The service station is set as the destination
or the next intermediate destination. #
Ifth ere are already four intermediate des‐
tinations: selectYesinthe prom pt.
The service station is entered in thero ute
ove rview. Intermediate destination 4 is
dele ted. Ro ute guidance begins.
Showing a stored route on the map
Re quirements:
R A USB device with stored routes is connec ted
with the multimedia sy stem.
R The route is stored in the "Routes" folder with
th e GPS Ex change form at (.gpx).
Multimedia sy stem:
4 © 5
Navigation 5
ª Where to?
5 SAVED ROUTES #
Select a route. #
Select Show on Map . #
Movethe map (/ page 236).
St arting a sa vedro ute
Requ irements:
R A USB device with stored routes is connec ted
with the multimedia sy stem.
R The route is stored in the "Routes" folder with
th e GPS Ex change form at (.gpx).
Multimedia sy stem:
4 © 5
Navigation 5
ª Where to?
5 SAVED ROUTES #
Select a route. #
Select Start Route Guid. from Beginning of
Route orStart Route Guidance from Curr.
Position.
Ro ute guidance starts.
% The
route can be sa ved with finthe
menu (/ page 222).
Re cording a route
Requ irements:
R A USB device is connec ted with the multime‐
dia sy stem.
Multimedia sy stem:
4 © 5
Navigation 5
ª Where to?
5 SAVED ROUTES #
Tostart recording: selectStart Recording a
New Route .
A redre cording symbol is shown.
The route is stored on the USB device. #
Tosto pre cording: selectEnd Recording. MBUX multimedia sy
stem 227
Page 230 of 416

Saving a
recorded route
Re quirements:
R A USB device is connec ted with the multime‐
dia sy stem.
Multimedia sy stem:
4 © 5
Navigation 5
ª Where to?
5 SAVED ROUTES #
Select a route. #
Select f. #
Select Save in "Previous Destinations" .
The route is stored in the "Pr evious destina‐
tions" memo ryand can be called up from
th ere forro ute guidance.
Editing a storedro ute
Re quirements:
R A USB device with stored routes is connec ted
with the multimedia sy stem (/ page 262).
Multimedia sy stem:
4 © 5
Navigation 5
ª Where to?
5 SAVED ROUTES #
Select a route with V. #
Toenter a name: selectChange Name . #
Enterth e name. #
Select OK.
or #
When the name has been changed, press the
G button. #
Select Yes. #
Todel ete a route: select Delete. #
Select Yes. Ro
ute guidance Note
s onroute guidance &
WARNING Risk of distraction from oper‐
ating integrated communication equip‐
ment while theve hicle is in motion
If yo u operate communication equipment
integ rated in theve hicle when driving, you
will be distracted from the tra ffic situation.
This could also cause youto lose control of
th eve hicle. #
Only operate this equipment when the
traf fic situation permits. #
Ifyo u cannot be sure of this, stop the
ve hicle whilst paying attention toroad and traf
fic conditions and ope rate the
equipment with theve hicle stationar y. Yo
u must obse rveth e legal requirements forthe
country in whi chyou are cur rently driving when
ope rating the multimedia sy stem.
Ro ute guidance begins once a route has been cal‐
culated.
The road and traf fic ru les and regulations alw ays
ha ve priority over multimedia sy stem driving
instructions.
Driving instructions are:
R Navigation announcements
R Route guidance displ ays
R Lane recommendations
If yo u do not follow the driving instructions or if
yo u lea vethe calculated route, a new route is cal‐
culated automaticall y.
Driving instructions may di ffer from the actual
ro ad and traf fic conditions if:
R The route is diver ted
R The direction of a one-w aystre et has been
ch anged
Fo rth is reason, you must alw ays obser veroad
and traf fic ru les and regulations during your jour‐
ney as well as the pr evailing traf fic conditions.
The route may dif fer from the ideal route due to
th efo llowing:
R Roadwor ks
R Incomple tedigital map data
Note s on GPS reception
The cor rect function of the navigation sy stem
depends amongst other things on GPS reception.
In cer tain situations GPS reception can be
impaired, defective or even not possible, e.g. in
tunnels or in pa rking garage s.
Changing direction overview
Changes of direction are shown in thefo llowing
displa ys:
R Detailed image of the intersection
The display appears when you drive into an
intersection.
R 3D image
The displ ayappears when driving on intersec‐
tion-free, multi-lane roads, forex ample on
free wayex its and free way inter changes. 228
MBUX multimedia sy stem
Page 238 of 416
#
Select Report Traffic Incident.
A prom ptis shown. #
Select Yes.
The Thank You for Supporting Accident Pre-
vention message appears. Map and compass
Setting
the map scale
Multimedia sy stem:
4 © 5
Navigation
Zooming in #
When the map is shown, tap twice quickly
with one finger on the media displa y.
or #
Movetwo fingers apart on the media displa y.
Zooming out #
Tap with two fingers on the media displa y.
or #
Movetwo fingers toge ther on the media dis‐
pla y.
% Yo
u can set the unit of measurement of the
map scale (/ page213).
Moving the map
Multimedia sy stem:
4 © 5
Navigation #
Movethefinger in any di rection on the
to uchsc reen when the map is shown.
When the map has been mo vedth efo llowing
information appears in thest atus line, forex am‐
ple:
R The dis tance from theve hicle's cur rent posi‐
tion is shown.
R Information about the cur rent map position is
shown, e.g. the name of thero ad.
The following functions are available:
R Select a destination on the map
(/ page 221).
R Select a POI (/ page219).
R Show traf fic incidents on the map
(/ page 234).
This function is not available in all countries. #
Toreset the map tothe cur rent position
of theve hicle: tap on symbol \. Ro
tating the map #
With two fingers, rotat e counter-clockwise or
clockwise on the media sy stem displa y.
Selecting the map orientation
Multimedia sy stem:
4 © 5
Navigation 5
Z
5 Advanced #
Select View. #
Select Map Orientation. #
Select an option.
The 003Bdot indicates the cur rent setting.
The following options are available:
R 2D Heading Up option:the 2D map view
is aligned tothe direction of tr avel.
R 2D North Up option:the 2D map view is
displa yed so that nor this alw ays at the
to p.
R 3Doption: the 3D map view is aligned to
th e direction of tr avel.
or #
Touse quick- access: repeatedly tap or press
on theÄ compass symbol on the map.
The view changes in the sequence 3D,2D
Heading Up to2D North Up .
If th e map is mo ved, it can switch between
3D and 2D North Up.
Selecting POI symbols for the map display
Multimedia sy stem:
4 © 5
Navigation 5
Z
POIs include gasst ations and ho tels, forex ample.
These can be displa yed as symbols on the map.
Not all POIs are available everywhere.
Pe rsonal POIs are destinations which you ha ve
sa ve d on a USB device, forex ample.
% The display of POI symbols on
the map can
be activated or deactivated as a favo rite. #
Toswitch on/off using quick- access: if
av ailable, swit chPOI Symbols on or off.
The POI symbols forth e selected categories
are shown on the map.
or #
Toswitch on/off in the menu: select
Advanced. #
Select View. #
Select Map Elements. 236
MBUX multimedia sy stem
Page 249 of 416
Contacts
Information about
the contacts menu
The con tacts menu contains all contacts from
ex isting data sources, e.g. mobile phone or data
st orage medium.
Depending on the data source, you ha vethefo l‐
lowing number of con tacts:
R Perm anently sa ved con tacts: 3,000 entries
R Contacts loaded from the mobile phone:
5,000 entri es per mobile phone
Fr om the contacts menu, you can per form thefo l‐
lowing actions:
R Make a call, forex ample call a con tact
(/ page 248)
R Navigation (/ page 221)
R Compose messa ges (/ page 250)
R Additional options (/ page248)
If a mobile phone is connected tothe multimedia
sy stem (/ page243) and automatic calli ng up
(/ page 247) is ac tivated, the mobile phone's
contacts are displa yed in the address book.
The multimedia sy stem can show suggestions
based on frequently used contacts as well as
incoming and outgoing calls (/ page 204).
These are shown at theto p of the contact list.
Downloading mobile phone contacts
Multimedia sy stem:
4 © 5
Phone 5
5 Z #
Select Contacts & Recent Calls.
Au tomatically #
Toswitch on Synchronize Contacts Automati-
cally: activate the display button.
Manually #
Toswitch off Synchronize Contacts Automati-
cally: deactivate the display button. #
Select Synchronize Contacts.
Calling up contacts
Multimedia sy stem:
4 © 5
Phone 5
g
The following options can be used tosear chfor
contacts:
R searching byinitials
R sear ching byname
R searching byphone number #
Ente rch aracters into the sear chfield. #
Select the contact.
De tails forth e contact are shown.
A contact can contain thefo llowing de tails:
R Phone numbe rs
Te lephone numbe rscan be sa ved as global
fa vo rite s (/ page 204).
R Navigation addre sses
R Geo-coordinates
R Internet address
R E-mail addresses
R Relation (if set)
R Information on messenger services
Editing thefo rm at of a contact's name
Multimedia sy stem:
4 © 5
Phone 5
Z #
Select General . #
Select Name Format .
The following options are available:
R Last Name, First Name
R Last Name First Name
R First Name Last Name #
Select an option.
Overview of importing contacts
Contacts from various sources Source
Requirements:
ò USB device The USB device is
connected with the
USB port.
ñ Bluetooth ®
con‐
nection If
th e sending of
vCards via Blue tooth®
is suppor ted, vCards
can be received on
mobile phones or net‐
boo ks,fo rex ample.
Blue tooth ®
is activa‐
te d in the multimedia
sy stem and on the
re spective device (see
th e manufacturer's
operating instruc‐
tions). MBUX multimedia sy
stem 247
Page 254 of 416
Only one
route guidance can be active at a time.
If ro ute guidance is active on the multimedia sys‐
te m, it is closed when route guidance is star ted
on the mobile phone.
Connecting an iPhone ®
via Apple CarPlay ®
Requ irements:
R The cur rent version of your device's operating
sy stem is being used (see the manufacturer's
operating instructions).
R The full range of functions for Apple CarPlay ®
is only available with an In tern et connection.
R The iPhone ®
is connected tothe multimedia
sy stem via the USB port çusing a suita‐
ble cable (/ page 262).
Multimedia sy stem:
4 © 5
Mercedes PRO & Apps
5 Smartphone 5
Apple CarPlay
5 Start Apple CarPlay #
Alternative: If an Apple CarPlay ®
application
is active (e.g. when music is being pla yed or
ro ute guidance is active), you can call up the
active application using the|, zor
002B application buttons (/ page 201).
Ac cepting/rejecting the data pr otection pro‐
visions
Fo rth e initial start of the application: a message
with the data pr otection pr ovisions appears. #
Select Accept & Start.
Exiting Apple CarPlay ®#
Press the00E2 button.
% Apple CarPlay ®
starts automatically when the
iPhone ®
is connec ted with the sy stem using
a cable. If Apple CarPlay ®
wa s not displa yed
in thefo re ground be fore disconnecting, the
application starts in the bac kground when
re connected. You can call up Apple CarPlay ®
in the main menu.
Calling up Apple CarPlay ®
sound settings
Multimedia sy stem:
4 © 5
Mercedes PRO & Apps
5 Smartphone 5
Apple CarPlay 5
Z #
Select sound settings. Setting control of
the application but tons
Multimedia sy stem:
4 © 5
Mercedes PRO & Apps
5 Smartphone 5
Apple CarPlay 5
Z
5 General #
Toswitch on Control via Application Buttons:
activate the display button. #
Toswitch off Control via Application Buttons:
deactivate the display button.
Ending Apple CarPlay ® #
Toend the connection of Apple Car‐
Play ®
(cable): disconnect the connection via
th e connecting cable between the iPhone ®
and multimedia sy stem.
% Mercedes-Benz
recommends disconnecting
th e connecting cable only when theve hicle is
st ationar y. Android
Auto Android
Autoove rview &
WARNING Risk of distraction from infor‐
mation sy stems and communications
equipment
If yo u operate information and communica‐
tion equipment integ rated in theve hicle when
driving, you will be distracted from the tra ffic
situation. This could also cause youto lose
control of theve hicle. #
Only operate this equipment when the
traf fic situation permits. #
Ifyo u cannot be sure of this, stop the
ve hicle whilst paying attention toroad
and traf fic conditions and ope rate the
equipment with theve hicle stationar y. Yo
u must obse rveth e legal requirements forthe
country in whi chyou are cur rently driving when
ope rating the multimedia sy stem.
Mobile phone functions can be used with Android
Au tousing the Android operating sy stem on the
multimedia sy stem. It is operated using the
to uchsc reen or thevo ice-operated control sys‐
te m. You can activate thevo ice-opera ted control
sy stem bypressing and holding the£ button
on the multifunction steering wheel.
When using Android Autovia thevo ice-opera ted
control sy stem, the multimedia sy stem can still
be opera ted via theVo ice Cont rol Sy stem
(/ page 184). 252
MBUX multimedia sy stem
Page 255 of 416
Only one mobile phone at a time can be connec‐
te d via Android Auto to the multimedia sy stem.
This also applies totwo phone mode.
The availability of Android Autoand Android Auto
apps may vary according tothe count ry.
The service pr ovider is responsible forth is appli‐
cation and the services and content connected to
it.
Information on Android Auto
While using Android Auto,va rious functions of
th e multimedia sy stem, forex ample the media
source Blue tooth®
audio, are not available.
On lyone route guidance can be active at a time.
If ro ute guidance is active on the multimedia sys‐
te m, it is closed when route guidance is star ted
on the mobile phone.
Connecting a mobile phone via Android Auto
Requ irements:
R The mobile phone supports Android Auto
from Android 5.0.
R The Android Autoapp is ins talled on the
mobile phone.
R In order touse thete lephone functions, the
mobile phone must be connected tothe mul‐
timedia sy stem via Blue tooth®
(/ page 243).
If th ere was no prior Internet connection, this
is es tablished with the use of the mobile
phone with Android Auto.
R The mobile phone is connected tothe multi‐
media sy stem via the USB port çusing a
suitable cable (/ page 262).
R There is an Internet connection forth e full
ra nge of functions for Android Auto.
Multimedia sy stem:
4 © 5
Mercedes PRO & Apps
5 Smartphone 5
Android Auto
5 Start Android Auto #
Alternative: If Android Autois active (e.g.
when music is being pla yed or the navigation
sy stem is being used), you can call up the
application using the|, zor002B
buttons (/ page 201).
% The
firs t acti vation of Android Autoon the
multimedia sy stem must be car ried out when
th eve hicle is stationary for saf etyre asons. Ac
cepting/rejecting the data pr otection pro‐
visions
A message with the data pr otection pr ovisions
appears. #
Select Accept & Start.
% The
firs t acti vation of Android Autoon the
multimedia sy stem must be car ried out when
th eve hicle is stationary for saf etyre asons.
Exiting Android Auto #
Press the00E2 button.
% Android
Autostarts automatically when the
mobile phone is connected with the sy stem
using a cable. If Android Autowa s not dis‐
pla yed in thefo re ground before disconnect‐
ing, the application starts in the bac kground
when reconnected. You can call up Android
Au tointhe main menu.
Calling up the Android Autosound settings
Multimedia sy stem:
4 © 5
Mercedes PRO & Apps
5 Smartphone 5
Android Auto 5
Z #
Select sound settings.
Setting control of the application but tons
Multimedia sy stem:
4 © 5
Mercedes PRO & Apps
5 Smartphone 5
Android Auto 5
Z
5 General #
Toswitch on Control via Application Buttons:
activate the display button. #
Toswitch off Control via Application Buttons:
deactivate the display button.
Ending Android Auto #
Disconnect the connecting cable between the
mobile phone and multimedia sy stem.
Mercedes-Benz recommends disconnecting
th e connecting cable only when theve hicle is
st ationar y. Tr
ansfer redve hicle data with Android Auto
and Apple CarPlay ® Overview of transfer
redve hicle data
When using Android Autoor Apple CarPlay ®
, cer‐
ta in vehicle data is transfer redto the mobile
phone. This enables youto getth e best out of
selected mobile phone services. Vehicle data is
not directly accessible. MBUX multimedia sy
stem 253
Page 263 of 416
Calling up
thest ation list for the category last
selected
Multimedia sy stem:
4 © 5
Radio 5
TuneIn Radio #
Press the co ver of the cur rent station.
Depending on how thest ation was selected, a
st ation list is shown. Media
Information about media mode
Information about suppor
tedfo rm ats and
data storage media &
WARNING Risk of distraction when han‐
dling da tastorage media
If yo u handle a data storage medium while
driving, your attention is diver ted from the
traf fic conditions. This could also cause you
to lose control of theve hicle. #
Only handle a data storage medium
when theve hicle is stationar y. %
Depending on
the equipment ins talled play‐
back of video form ats may not be possible.
The multimedia sy stem supports thefo llow‐
ing form ats and data media:
Pe rm issible
fi le sy stems FA
T32, exFA T,NTFS
Pe rm issible
data car riers USB devices, iPod
®
/iPhone ®
,
MTP devices, Blue tooth®
audio
equipment
Suppor ted
fo rm ats: Au
dio: MP3, WMA, AAC, WAV,
FL AC , AL AC
Vi deo: MPEG, AVI, DivX, MKV,
MP4, M4V, WMV R
The multimedia sy stem supports a total of up
to 50,000 files.
R Data storage media up to2 TB are suppor ted
(32‑bit address space).
% Obser vethefo llowing no tes:
R Due tothe large variet y of available music
and video files rega rding encoders, sam‐ pling
rates and data transfer rates, play‐
back cannot be guaranteed.
R Due tothe wide range of USB devices
av ailable on the mar ket, pl ayback cann ot
be guaranteed for all USB devices.
R Videos up toFullHD (1920x1080) are
suppor ted.
R Cop y-pr otected music and video files or
DRM (Digital Rights Management)
enc rypte dfiles cannot be pla yed bac k.
R MP3 pla yers must support Media Trans fer
Pr oto col (MTP).
In fo rm ation on copy right pr otection and
tradema rks
Au dio files that you create or reproduce yourself
fo r playback aregeneral lysubject tocopyright
pr otection. In many count ries, reproductions,
eve nfo r private use, are not permitted without
th e prior consent of the copyright holder. Make
sure that you kn owabout the applicable copy‐
ri ght regulations and that you comply with these. Manufactured under license from Dolby Laborato‐
ri
es. Dolb y,Dol byAudio and the double-D symbol
are trademar ksof Dolby Laboratories. Graceno
te,th e Graceno telogo and logotype,
"P ow ered byGracen ote", MusicID and Pla ylist MBUX multimedia sy
stem 261
Page 264 of 416
Plus are either
regis tere d trademar ksor trade‐
mar ksof Graceno te, Inc. in theUn ited States
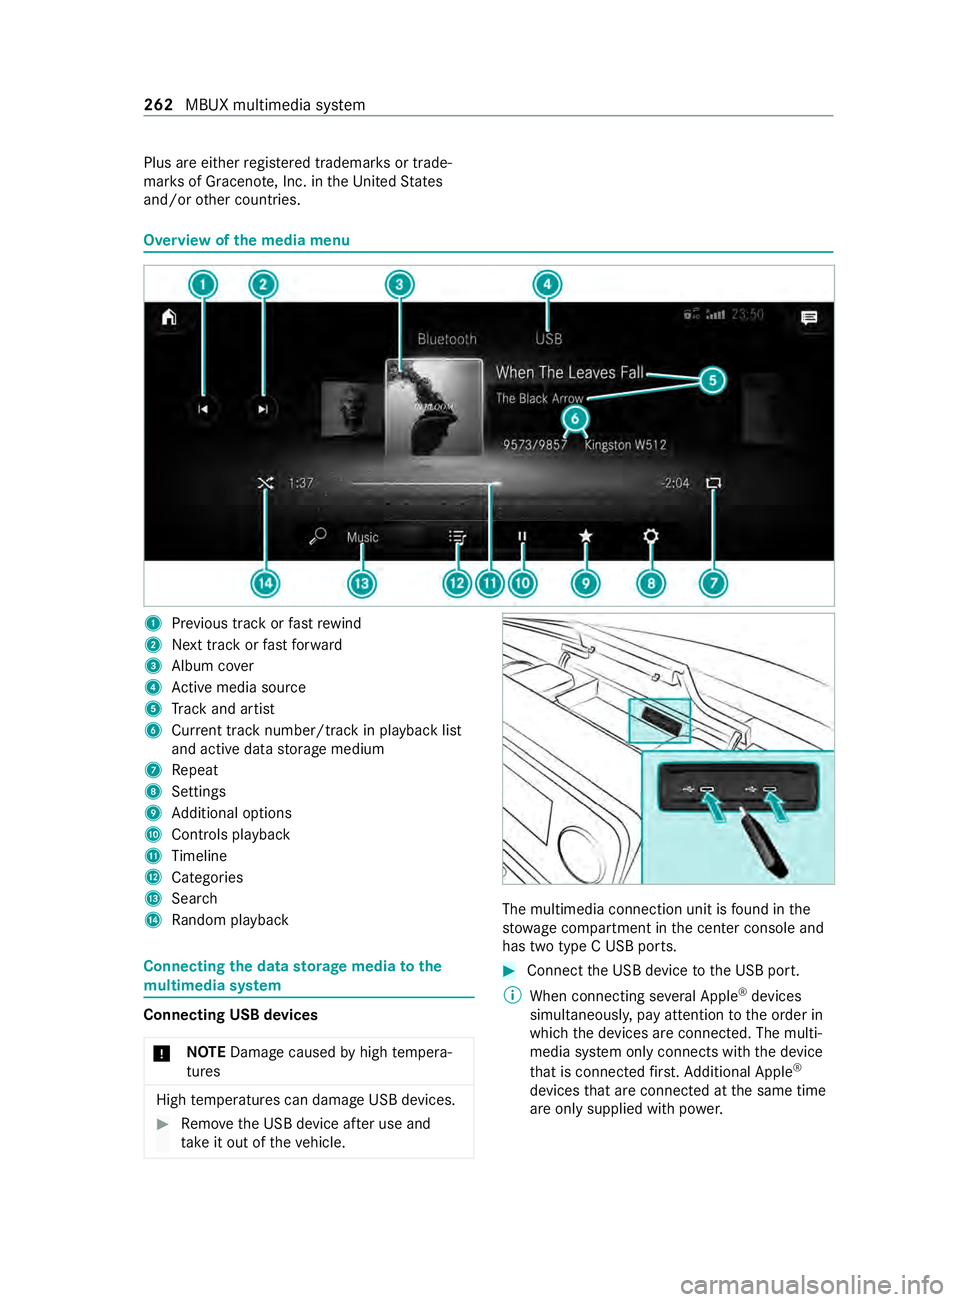
and/or other countries. Overview of
the media menu 1
Prev ious track or fastrewind
2 Next track or fastforw ard
3 Album co ver
4 Active media sou rce
5 Track and artist
6 Current track number/track in pl ayback list
and active data storage medium
7 Repeat
8 Settings
9 Additional options
A Controls playback
B Timeline
C Categories
D Sear ch
E Random pl ayback Connecting
the data storage media tothe
mu ltimedia sy stem Connecting USB devices
* NO
TEDama gecaused byhigh temp era‐
tures High
temp eratures can damage USB devices. #
Remo vethe USB device af ter use and
ta ke it out of theve hicle. The multimedia connection unit is
found in the
stow age compartment in the center console and
has two type C USB ports. #
Connect the USB device tothe USB port.
% When connecting se veral Apple ®
devices
simultaneousl y,pay attention tothe order in
which the devices are connected. The multi‐
media sy stem only connects with the device
th at is connec tedfirs t. Ad ditional Apple ®
devices that are connec ted at the same time
are only supplied with po wer. 262
MBUX multimedia sy stem