Page 297 of 400

8V2012721BK
Child safety
A WARNING
Improper installation of child restraints will
— Always follow the instructions provided by
the manufacturer of the child restraint you
intend to install in your Audi.
— Improper use of child restraint anchors (in-
cluding tether anchors) can lead to injury in
a collision. The anchors are designed to
withstand only those loads imposed by cor-
rectly fitted child restraints.
— Never mount two child restraint systems on
one LATCH lower anchor point.
— Never attach two child restraint systems to
one tether strap or tether anchorage.
— Never attach a tether strap to a tie-down
hook in the luggage compartment.
— Never use child restraint tether anchorages
to secure safety belts or other kinds of occu-
pant restraints.
— Never secure or attach any luggage or other
items to the LATCH lower anchorages or to
the tether anchors.
— If you must install a rearward facing child
safety seat on the front passenger seat be-
cause of exceptional circumstances and the
PASSENGER AIR BAG OFF light does not
come on and stay on, immediately install
the rear-facing child safety seat in a rear
seating position and have the airbag system
inspected by your Audi dealer.
increase the risk of injury and death in a crash.
B8V-0565
Installing the upper tether strap on the
anchorage
B4L-1435
Applies to: Sedan
Fig. 237 Tether strap: proper routing and mounting
Applies to: Cabriolet/Sportback
Fig. 238 Tether strap: proper routing and mounting. @
center, @ outside
Installing the tether strap
Applies to: Sedan
> Release or deploy the tether strap on the child
restraint according to the child restraint manu-
facturer's instructions.
> Guide the upper tether strap under the rear
head restraint (raise the head restraint if neces-
sary) > fig. 237. For child restraints with V-
tether straps, always make sure that the head
restraint guide rods do not interfere with any
part of the top tether strap.
> Tilt the recess flap up to expose the anchor
bracket.
> Attach the tether strap anchorage hook into the
opening of the tether anchorage.
> Pull on the tether strap hook so that the spring
catch of the hook engages.
> Tighten the tether strap firmly following the
child restraint manufacturer's instructions.
Installing the tether strap
Applies to: Cabriolet/Sportback
> Release or deploy the tether strap on the child
restraint according to the child restraint manu-
facturer's instructions.
295
>
Page 298 of 400

Child safety
» Applies to: Sportback: Unlock the backrest and
fold it slightly forward > page 62, Increasing
the cargo area and locate the tether anchor be-
hind the rear seat backrest.
» Applies to: Cabriolet: Unlock the backrest and
fold it slightly forward > page 63, Pass-
through and locate the tether anchor behind
the rear seat backrest.
> Guide the upper tether strap under the rear
head restraint (raise the head restraint if neces-
sary) > fig. 238. For child restraints with V-
tether straps, always make sure that the head
restraint guide rods do not interfere with any
part of the top tether strap.
> Attach the tether strap anchorage hook into the
opening of the tether anchorage.
> Pull on the tether strap hook so that the spring
catch of the hook is engaged.
> Straighten the backrest back up into its upright
position and press it firmly into the locking
mechanism.
>» Tighten the tether strap firmly following the
child restraint manufacturer's instructions.
Releasing the tether strap
> Loosen the tension on the straps following the
child restraint manufacturer's instructions.
> Depress the spring catch on the hook and re-
lease it from the anchorage.
Remember: Use tether straps to help keep the
child restraint firmly in place.
ZA WARNING
Improper use of the LATCH system can in-
crease the risk of serious personal injury and
death in an accident.
— These anchors were developed only for child
safety seats using the “LATCH” system.
— Never attach other child safety seats, belts
or other objects to these anchors.
— Always make sure that you hear a click when
latching the seat in place. If you do not hear
a click the seat is not secure and could fly
forward and hit the interior of the vehicle, or
be ejected from the vehicle.
Z\ WARNING
Improper installation of child restraints will
increase the risk of injury in an accident.
— Always follow the child restraint system
manufacturer's instructions for proper in-
stallation of the child restraint system and
proper use of tether straps as well as the
lower anchorages or safety belts in your ve-
hicle.
— Always read and heed the important infor-
mation and WARNINGS about child safety
and the installation of child restraint sys-
tems > page 278, Child safety.
Using tether straps on rearward-facing
child restraints
Currently, few rear-facing child restraint systems
come with a tether. Please read and heed the
child restraint system manufacturer's instruc-
tions carefully to determine how to properly in-
stall the tether.
Z\ WARNING
A child in a rearward-facing child safety seat
installed on the front passenger seat will be
seriously injured and can be killed if the front
airbag inflates - even with an Advanced Airbag
System.
— The inflating airbag will hit the child safety
seat or infant carrier with great force and
will smash the child safety seat and child
against the backrest, center armrest, or
door.
— If you must install a rearward facing child
safety seat on the front passenger seat be-
cause of exceptional circumstances and the
PASSENGER AIR BAG OFF light does not
come on and stay on, immediately install
the rear-facing child safety seat in a rear
seating position and have the airbag system
inspected by your Audi dealer.
296
Page 299 of 400
8V2012721BK
Child safety
Additional information
Sources of information about child
restraints and their use
There are a number of sources of additional infor-
mation about child restraint selection, installa-
tion and use:
NHTSA advises that the best child safety seat is
the one that fits your child and fits in your vehi-
cle, and that you will use correctly and consis-
tently.
Try before you buy!
U.S. National Highway Traffic Safety Adminis-
tration
Tel.: 1-888-327-4236 (TTY: 1-800-424-9153)
http://www.nhtsa.gov
http://www.safercar.gov
National SAFE KIDS Campaign
Tel.: (202) 662-0600
http://www.safekids.org
Safety BeltSafe U.S.A.
Tel.: (800) 745-SAFE (English)
Tel.: (800) 747-SANO (Spanish)
http://www.carseat.org
Transport Canada Information Centre
Tel.: 1-800-333-0371 or call 1-613-998-8616 if
you are in the Ottawa area
http://www.tc.gc.ca/eng/roadsafety/menu.htm
Audi Customer Experience Center
Tel.: (800) 822-2834
297
Page 300 of 400

Checking and Filling
Fuel
Types of gasoline
The correct gasoline grade is stated on the inside
of the fuel filler door.
The vehicle is equipped with a catalytic converter
and must only be driven with unleaded gasoline.
Audi recommends using TOP TIER Detergent Gas-
oline. For additional information on TOP TIER De-
tergent Gasoline, visit www.toptiergas.com.
The individual gasoline grades are differentiated
by octane ratings. This value is given with (R
+M)/2 equating to AKI or in RON.
The headings below match the sticker in the fuel
filler door (examples):
UNLEADED FUEL ONLY MIN. (R+M)/2 87
Regular / MIN. RON 91 Regular
Use regular gasoline with minimum 87 AKI /
91 RON > ©.
Audi recommends using premium gasoline with
minimum 91 AKI / 95 RON to achieve the rated
horsepower and torque.
UNLEADED FUEL ONLY PREMIUM MIN. (R
+M)/2 91 / SUPER MIN. RON 95
Using premium gasoline with minimum 91 AKI /
95 RON is recommended.
If premium gasoline is not available, you can also
use regular gasoline 87 AKI / 91 RON. However
this does reduce the engine power slightly.
() Note
— Filling the tank just one time with leaded
fuel or other metallic additives will cause
permanent deterioration to the catalytic
converter function.
— When gasoline with an octane rating that is
too low is used, high speeds or heavy engine
load can lead to engine damage.
298
G) Tips
The vehicle may be filled with fuel that has a
higher octane rating than what is required by
the engine.
Gasoline mixture
Gasoline with alcohol or MTBE (Methyl-Tert-
Butyl-Ether)
You can use unleaded gasoline mixed with alco-
hol or MTBE (generally labeled as oxygenated
compounds) as long as the fuel meets the follow-
ing conditions:
Gasoline with methanol content (methyl alco-
hol
or methanol)
— Anti-Knock Index is at least 87 AKI
—No more than 3% methanol
— More than 2% solvent
Gasoline with ethanol content (ethyl alcohol or
ethanol)
— Anti-Knock Index is at least 87 AKI
—No more than 15% ethanol
Gasoline with MTBE content
— Anti-Knock Index is at least 87 AKI
—No more than 15% MTBE
Gasoline adapted to the season
Many gasoline fuels are adapted to the seasons.
When the season changes, we recommend refu-
eling at high-traffic gas stations. It is more likely
that the gasoline will be suitable for the season
there.
() Note
— Gasoline with methanol content that does
not meet the specified conditions may cause
corrosion damage and damage to plastic or
rubber components in the fuel system.
— Do not use gasoline that does not meet the
specifications.
— If you are unable to find out if a specific gas-
oline mixture meets the specifications, ask
the gas station operator or their fuel suppli-
er.
Page 301 of 400

8V2012721BK
Checking and Filling
— Do not use any gasoline mixture whose
composition cannot be identified.
— Audi does not assume any responsibility for
damage to the fuel system or for perform-
ance problems caused by using gasoline
mixtures different from those specified.
This type of damage also does not fall under
the New Vehicle Limited Warranty or under
the emissions control system warranty.
— If you notice a higher fuel consumption or
poor handling or performance problems due
to such gasoline mixtures, we recommend
fueling with unblended gasoline.
Gasoline additives
An important issue for many automobile manu-
facturers is combustion residue in the engine
that results from the use of certain fuels.
Although types of gasoline differ depending on
the manufacturer, there are similarities. Certain
substances in the gasoline may cause deposits in
the engine. Additives in the gasoline that should
keep the engine and fuel system clean do not all
function equally.
Audi recommends using TOP TIER Detergent Gas-
oline. For additional information on TOP TIER De-
tergent Gasoline, visit www.toptiergas.com.
If you use incorrect fuels over a long period of
time, the maximum engine performance may be
impaired by combustion residue.
@) Note
— Damage or malfunctions caused by the use
of incorrect types of gasoline are not cov-
ered by the New Vehicle Limited Warranty.
— Only gasoline additives that have been ap-
proved by Audi may be used.
Refueling
Fueling procedure
B8V-0111
Applies to: vehicles with conventional drive system
Fig. 239 Right rear side of vehicle: opening the fuel filler
door
B8V-0110
Applies to: vehicles with conventional drive system
Fig. 240 Fuel filler door with tank cap on
Plug-in hybrid drive*: refer to the information un-
der > page 302, Refueling.
The fuel filler door is unlocked or locked by the
central locking system.
> Plug-in hybrid drive: read and follow the in-
structions under > page 302, Opening the fuel
filler door.
>» Unlock the vehicle if necessary.
> Conventional drive system: press on the left
side of the fuel filler door to open it > fig. 239.
> Unscrew the tank cap counterclockwise.
» Place the cap from above on the open fuel filler
door > fig. 240.
> Insert the fuel pump nozzle all the way into the
fuel filler neck.
> Begin fueling. Once the fuel pump nozzle turns
off the first time, the fuel tank is full. Do not
continue fueling, or else the expansion space in
the tank will be filled with fuel. >
299
Page 302 of 400

Checking and Filling
> After the fuel pump has switched off, wait five
seconds before removing the nozzle to allow
the rest of the fuel to finish dripping into the
fuel tank.
> Turn the fuel cap clockwise until it clicks into
place.
> Close the fuel filler door and then press on the
left side until it latches.
The correct fuel type for your vehicle can be
found ona label located on the inside of the fuel
filler door. For additional information on fuel, see
=> page 298.
For the tank capacity in your vehicle, refer to the
Technical Data > page 380.
To reduce the risk of fuel leaking out or vapors
escaping, make sure that the fuel tank is closed
correctly. Otherwise the Ey indicator light will
turn on.
If the central locking system malfunctions, there
is a fuel filler door emergency release
= page 301.
Messages
Plug-in hybrid drive: for additional information
on refueling, see > page 302.
| Tank system: malfunction! Please contact
Service
There is a malfunction in the fuel tank system.
Drive to an authorized Audi dealer or authorized
Audi Service Facility immediately to have the
malfunction corrected.
— If you do not insert the fuel pump nozzle all
the way into the filler tube, then fuel can
leak out. Spilled fuel can ignite and start a
fire.
— Never get into the vehicle when refueling. If
there is an exceptional situation where you
must enter the vehicle, close the door and
touch a metal surface before touching the
fuel pump nozzle again. This will reduce the
risk of electrostatic discharge that can cause
flying sparks. Sparks can start a fire when
refueling.
ZA\ WARNING
Improper fueling procedures and improper
handling of fuel can lead to explosions, fires,
severe burns, and other injuries.
— Do not smoke. Keep away from open flames.
— The ignition must be switched off when re-
fueling.
— Mobile devices, radio devices, and other ra-
dio equipment should always be switched
off when refueling. Electromagnetic rays
ZA WARNING
Transporting fuel containers inside the vehicle
is not recommended. Fuel could leak out of
the container and ignite, especially during an
accident. This can cause explosions, fires, and
injuries.
— If you must transport fuel in a fuel contain-
er, note the following:
— Always place the fuel container on the
ground before filling. Never fill the fuel
container with fuel while it is inside or on
the vehicle. Electrostatic discharge can oc-
cur while refueling and the fuel vapors
could ignite.
— When using fuel containers made of met-
al, the fuel pump nozzle must always re-
main in contact with the container to re-
duce the risk of static charge.
— Insert the fuel pump nozzle as far as pos-
sible into the filler opening while refuel-
ing.
— Follow the applicable legal regulations in
the country where you are driving when
using, storing and transporting fuel con-
tainers.
— Make sure that the fuel container meets
the industry standards, for example ANSI
or ASTM F852-86.
could cause sparks and start a fire.
1) Depending on the engine and country
300
Page 303 of 400

8V2012721BK
Checking and Filling
— Remove fuel that has overflowed onto any If the central locking system malfunctions, the
vehicle components immediately to reduce fuel filler door can be unlocked manually.
the risk of damage to the vehicle.
— Never drive until the fuel tank is completely
empty. The irregular supply of fuel that re-
sults from that can cause engine misfires.
Uncombusted fuel may enter the exhaust
system and increase the risk of damage to
the catalytic converter.
a
s - a oO
— Do not overfill the fuel tank, or fuel could Raa SERS pplies to: version 1
leak out when the vehicle is warming up. Fig. 241 Right rear luggage compartment: emergency re-
— Fuel should never enter the sewer system or lease (example)
come into contact with the ground.
The fuel filler door on your vehicle does not
lock if you lock the vehicle from the inside us-
ing
the central locking switch.
Fuel can age and may lead to problems when
starting. Audi recommends replacing the fuel Applies to: version 2 ;
in your vehicle within six months. Fig. 242 Rear of the vehicle: right rear seat folded forward
Emergency release in the luggage
a compartment
Applies to: vehicles with plug-in hybrid drive Applies to: version 1
If the engine turned off because the fuel level
was too low, then you may need to refuel with
up to 4.0 gallons (15 liters) of fuel in order
for the vehicle to detect the new fuel level.
Otherwise, the engine may not restart. » Remove the cover in the side panel.
> To unlock the fuel filler door, loosen the loop
from the retainer and then pull on the loop
carefully in the direction of the arrow & fig. 241
>©.
> Conventional drive system: press on the left
side of the fuel filler door to open it
=> page 299, fig. 239.
The emergency opening mechanism is located
behind the right side trim panel in the luggage
compartment.
Plug-in hybrid drive*: read and follow the instruc-
tions under > page 302. >
301
Page 304 of 400

Checking and Filling
Emergency release behind the rear seat
backrest
Applies to: version 2
The emergency release is located behind the
right
rear seat.
The pull cable for the emergency release is locat-
ed on the cover.
> To access the emergency release, fold the right
backrest forward > page 63.
> Remove the cover fh) from the trim panel.
> To release the fuel filler door, pull the cover in
the direction of the arrow carefully at a 45° an-
gle toward the center of the vehicle > fig. 242
>). The tab on the cover must point forward
in the direction you are pulling when pulling on
the cover.
> Press on the left side of the fuel filler door to
open it > page 299, fig. 239.
© Note
Only pull on the loop/cover until you feel re-
sistance. You will not hear it release. If you
continue to pull, you could damage the emer-
gency
release mechanism.
Refueling
Opening the fuel filler door
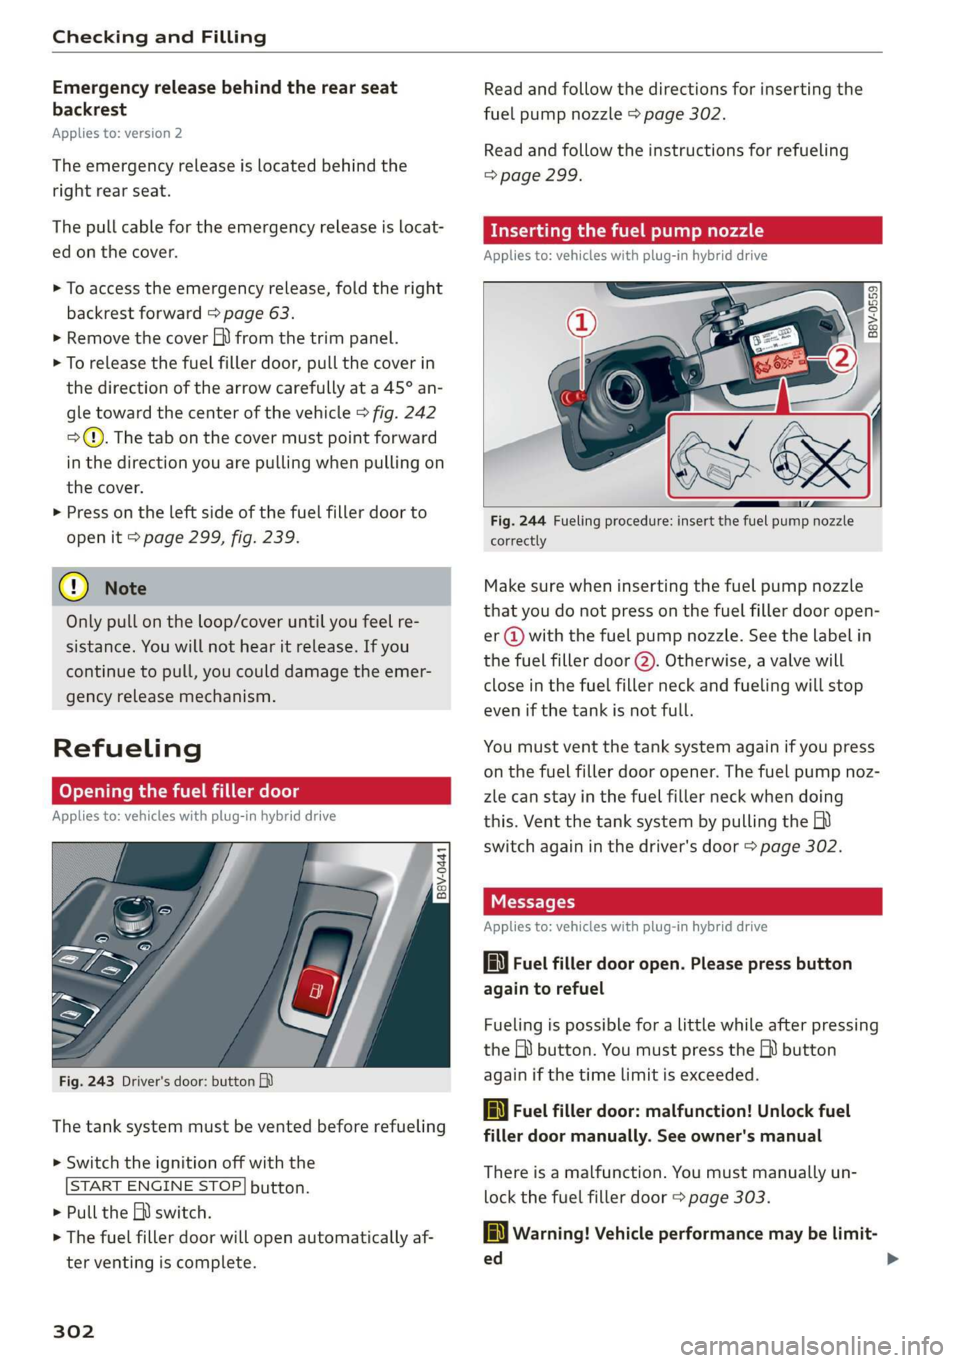
Applies to: vehicles with plug-in hybrid drive
B8V-0441
Fig. 243 Driver's door: button
The tank system must be vented before refueling
> Switch the ignition off with the
START ENGINE STOP] button.
> Pull the EN) switch.
> The fuel filler door will open automatically af-
ter venting is complete.
302
Read and follow the directions for inserting the
fuel pump nozzle > page 302.
Read and follow the instructions for refueling
=> page 299.
Inserting the fuel pump nozzle
Applies to: vehicles with plug-in hybrid drive
a o o 2
> fay oO
Fig. 244 Fueling procedure: insert the fuel pump nozzle
correctly
Make sure when inserting the fuel pump nozzle
that you do not press on the fuel filler door open-
er @ with the fuel pump nozzle. See the label in
the fuel filler door @). Otherwise, a valve will
close in the fuel filler neck and fueling will stop
even if the tank is not full.
You must vent the tank system again if you press
on the fuel filler door opener. The fuel pump noz-
zle can stay in the fuel filler neck when doing
this. Vent the tank system by pulling the
switch again in the driver's door > page 302.
Messages
Applies to: vehicles with plug-in hybrid drive
li Fuel filler door open. Please press button
again to refuel
Fueling is possible for a little while after pressing
the Gi) button. You must press the M button
again if the time limit is exceeded.
ly Fuel filler door: malfunction! Unlock fuel
filler door manually. See owner's manual
There is a malfunction. You must manually un-
lock the fuel filler door > page 303.
la Warning! Vehicle performance may be limit-
ed