Page 33 of 122

Special features
4-5
1
2
3
4
5
6
7
8
9
10
11
12
13
14
When the vehicle is turned on, traction
control is automatically turned on.
To turn the traction control system off,
see page 5-10.
TIP
Turn the traction control system off to
help free the rear wheel if the vehicle
gets stuck in mud, sand, or other soft
surfaces.
NOTICE
ECA16801
Use only the specified tires. (See
page 8-18.) Using different sized
tires will prevent the traction control
system from controlling tire rotation
accurately.
Resetting the traction control sys-
tem
The traction control system will auto-
matically disable under certain condi-
tions; such as when a sensor fault is
detected, or when only one wheel is al-
lowed to rotate for more than a few sec-
onds. Should this happen, the “ ”
indicator light will come on, and possi-
bly the “ ” warning light, too.
TIP
When the vehicle is on the centerstand,
do not rev the engine for an extended
period of time. Otherwise, the traction
control system will automatically dis-
able and need to be reset.
If the traction control system automati-
cally disables, try resetting it as follows.
1. Stop the vehicle and turn it off completely.
2. Wait a few seconds and then turn the vehicle power on.
3. The “ ” indicator light should turn off and the system be enabled.
TIP
If the “ ” indicator light remains on af-
ter resetting, the vehicle may still be rid-
den; however, have a Yamaha dealer
check the vehicle as soon as possible.
4. Have a Yamaha dealer check the vehicle and turn off the “ ” warn-
ing light.
BV1-9-E2.book 5 ページ 2018年8月28日 火曜日 午後5時28分
Page 34 of 122

5-1
1
2
3
4
5
6
7
8
9
10
11
12
13
14
Instrument and control functions
EAU77490
Handlebar switches
Left
Right
EAU85660Dimmer/Pass switch “ / /PASS”
Set this switch to “ ” for the high
beam and to “ ” for the low beam.
To flash the high beam, press the
switch down to “PASS” while the head-
lights are on low beam.
TIP
When the switch is set to low
beam, the inner two headlights
come on.
When the switch is set to high
beam, all four headlights come on.
EAU66040Turn signal switch “ / ”
To signal a right-hand turn, push this
switch to “ ”. To signal a left-hand
turn, push this switch to “ ”. When re-
leased, the switch returns to the center
position. To cancel the turn signal
lights, push the switch in after it has re-
turned to the center position.
EAU66030Horn switch “ ”
Press this switch to sound the horn.
EAU77450Engine stop switch “ / ”
Set this switch to “ ” before starting
the engine. Set this switch to “ ” to
stop the engine in case of an emergen-
cy, such as when the vehicle overturns
or when the throttle cable is stuck.
EAU77291Power on/Starter switch “ON/ ”
With the smart key turned on and within
range, press this switch to turn on the
power to the vehicle. Then with the sid-
estand up and while applying the front
or rear brake, push this switch to crank
the engine with the starter. See page
7-2 for starting instructions prior to
starting the engine.
EAU79601Hazard switch “ ”
With the vehicle power is on or in park-
ing mode, use this switch to turn on the
1. Select switch “ / ”
2. Menu switch “MENU”
3. Dimmer/Pass switch “ / /PASS”
4. Cruise control setting switch “RES+/SET–”
5. Turn signal switch “ / ”
6. Horn switch “ ”
7. Cruise control power switch “ ”
1. Engine stop switch “ / ”
2. Mode switch “MODE”
3. Hazard switch “ ”
4. Power on/Starter switch “ON/ ”
RE S
SETPA SS
1
2
3
4
5
6
7
M ODE
1
3
4
2
BV1-9-E2.book 1 ページ 2018年8月28日 火曜日 午後5時28分
Page 35 of 122
.
The hazard lights are used in case of
an emergency or to warn oth")
Instrument and control functions
5-2
1
2
3
4
5
6
7
8
9
10
11
12
13
14
hazard lights (simultaneous flashing of
all turn signal lights).
The hazard lights are used in case of
an emergency or to warn other drivers
when your vehicle is stopped where it
might be a traffic hazard.
NOTICE
ECA10062
Do not use the hazard lights for an
extended length of time with the en-
gine not running, otherwise the bat-
tery may discharge.
EAU73951Cruise control switches
See page 4-1 for an explanation of the
cruise control system.
EAU77301Menu switch “MENU”
This switch is used to make setting
changes within the multi-function dis-
play. (See page 5-5.)
EAU77311Select switch “ / ”
This switch is used to make setting
changes within the multi-function dis-
play. (See page 5-5.)
EAU73931Drive mode switch “MODE”
See page 4-3 for an explanation of the
drive mode.
EAU77122
Indicator ligh
ts and warning
lights
EAU11032Turn signal indicator lights “ ” and
“”
Each indicator light will flash when its
corresponding turn signal lights are
flashing.
EAU11081High beam indicator light “ ”
This indicator light comes on when the
high beam of the headlight is switched
on.
EAU77550Cruise control indicator lights
See page 4-1 for an explanation of
these indicator lights.
EAU77560Engine trouble warning light “ ”
This warning light comes on if a prob-
lem is detected in the engine or other
vehicle control system. If this occurs,
1. High beam indicator light “ ”
2. Traction control system indicator light “ ”
3. Turn signal indicator lights “ ” and “ ”
4. Smart key system indicator light “ ”
5. ABS warning light “ ”
6. Engine trouble warning light “ ”
7. Cruise control indicator lights (XP530D-A)
12 45 6
3
7
ABS
BV1-9-E2.book 2 ページ 2018年8月28日 火曜日 午後5時28分
Page 36 of 122

Instrument and control functions
5-3
1
2
3
4
5
6
7
8
9
10
11
12
13
14 have a Yamaha dealer check the on-
board diagnostic system.
The electrical circuit of the warning light
can be checked by turning the vehicle
power on. The warning light should
come on for a few seconds, and then
go off.
If the warning light does not come on at
all, or if the warning light remains on,
have a Yamaha dealer check the vehi-
cle.
EAU77073ABS warning light “ ”
This warning light comes on when a
problem is detected with the ABS. (See
page 5-18.)
When the vehicle power is turned on,
this light will come on and then go off af-
ter reaching a traveling speed of 10
km/h (6 mi/h). If the warning light:
does not come on when the vehi-
cle power is turned on
does not go off after traveling at a
speed of 10 km/h (6 mi/h) or higher
comes on or flashes while riding
the anti-lock brake system may not
work correctly. Have a Yamaha dealer
check the vehicle as soon as possible.
WARNING
EWA16041
If the ABS warning light does not go
off after traveling at a speed of 10
km/h (6 mi/h) or higher, or if the
warning light comes on or flashes
while riding, the brake system re-
verts to conventional braking. If ei-
ther of the above occurs, or if the
warning light does not come on at
all, use extra caution to avoid possi-
ble wheel lock during emergency
braking. Have a Yamaha dealer
check the brake system and electri-
cal circuits as soon as possible.
TIP
The ABS warning light may come on
when revving the engine with the scoot-
er on its centerstand, but this does not
indicate a malfunction.
EAU74082Traction control system indicator
light “ ”
This indicator light will flash when trac-
tion control has engaged.
If the traction control system is turned
off, this indicator light will come on.
TIP
When the vehicle is turned on, the light
should come on for a few seconds and
then go off. If the light does not come
on, or if the light remains on, have a
Yamaha dealer check the vehicle.
EAU78080Smart key system indicator light
“”
This indicator light will flash when com-
munication between the vehicle and
smart key takes place and when certain
smart key system operations are car-
ried out.
The indicator light may also flash when
there is an error in the smart key sys-
tem.
TIP
When the start switch is pushed, the in-
dicator light will come on for about one
second and then go off. If the indicator
light does not come on or go off as nor-
mal, have a Yamaha dealer check the
vehicle.
ABS
BV1-9-E2.book 3 ページ 2018年8月28日 火曜日 午後5時28分
Page 37 of 122
Instrument and control functions
5-4
1
2
3
4
5
6
7
8
9
10
11
12
13
14
EAU77131
Speedometer
The speedometer shows the vehicle’s
traveling speed.
When the vehicle power is turned on,
the speedometer needle will sweep
across the speed range and return to
zero in order to test the electrical circuit.
EAU77141
Tachometer
The tachometer shows the engine
speed in crankshaft revolutions per
minute (r/min).
When the vehicle power is turned on,
the tachometer needle will sweep
across the r/min range and return to
zero in order to test the electrical circuit.
NOTICE
ECA23050
Do not operate the engine in the ta-
chometer high-r/min zone.
High-r/min zone: 8250 r/min and
above
1. Speedometer
1
1. Tachometer
2. High-r/min zone
1 2
BV1-9-E2.book 4 ページ 2018年8月28日 火曜日 午後5時28分
Page 38 of 122

Instrument and control functions
5-5
1
2
3
4
5
6
7
8
9
10
11
12
13
14
EAU77338
Multi-function display
WARNING
EWA12313
Be sure to stop the vehicle before
making any setting changes to the
multi-function display. Changing
settings while riding can distract the
operator and increase the risk of an
accident.
TIP
Certain multi-function display items can be adjusted via the setting mode. (See
page 5-10.)
Fuel meter
The fuel meter indicates the amount of
fuel in the fuel tank. The display seg-
ments of the fuel meter disappear from
“F” (full) towards “E” (empty) as the fuel
level decreases. When the last seg-
ment starts flashing, refuel as soon as
possible.
TIP
If a problem is detected in the fuel me-
ter electrical circuit,
the fuel meter will
flash repeatedly. Have a Yamaha deal-
er check the vehicle.
Coolant temperature meter
The coolant temperature varies with
1. Information display
2. Function select icon
3. Fuel meter
4. Clock
5. Grip warmer/Seat heater icons
6. Drive mode display
7. Coolant temperature meter
1. Oil change indicator “Oil”
2. V-belt replacement indicator “V-Belt”
3. Eco indicator “ECO”
1 2 3 4 5
6
7
1 2
3
1. Fuel meter
1. Coolant temperature meter
1
1
BV1-9-E2.book 5 ページ 2018年8月28日 火曜日 午後5時28分
Page 39 of 122

Instrument and control functions
5-6
1
2
3
4
5
6
7
8
9
10
11
12
13
14
changes in the weather and engine
load. If the top segment starts flashing,
the information display automatically
changes to “C-TEMP” and “Hi” flashes.
Stop the vehicle and let the engine
cool. (See page 8-36.)
TIP
The information display cannot be
changed while the engine is overheat-
ing.
NOTICE
ECA10022
Do not continue to operate the en-
gine if it is overheating.
Eco indicator
This indicator comes on when the vehi-
cle is being operated in an environmen-
tally friendly, fuel-efficient manner. The
indicator goes off when the vehicle is
stopped.
TIP
Consider the following tips to reduce
fuel consumption:
Avoid high engine speeds during
acceleration.
Travel at a constant speed.
Drive mode display
This display indicates which drive
mode has been selected: “S” sporty or
“T” touring. (See page 4-3.)
V-belt replacement indicator
This indicator flashes every 20000 km
(12500 mi) when the V-belt needs to be
replaced.
After changing the V-belt, reset the V-
belt replacement indicator. (See page
5-13.)
TIP
If the V-belt is changed before the V-
belt replacement indicator flashes, the
indicator must be reset in order for the
next periodic V-belt change to be indi-
cated at the correct time.
1. Eco indicator “ECO”
1
1. Drive mode display
1. V-belt replacement indicator “V-Belt”
1
1
BV1-9-E2.book 6 ページ 2018年8月28日 火曜日 午後5時28分
Page 40 of 122
, then at 5000 km (3000 mi)
and every 5000 km (3000 mi)")
Instrument and control functions
5-7
1
2
3
4
5
6
7
8
9
10
11
12
13
14 Oil change indicator
This indicator flashes at the initial 1000
km (600 mi), then at 5000 km (3000 mi)
and every 5000 km (3000 mi) thereafter
to indicate that the engine oil should be
changed.
After changing the engine oil, reset the
oil change indicator. (See page 5-13.)
TIP
If the engine oil is changed before the
oil change indicator flashes, the indica-
tor must be reset in order for the next
periodic oil change to be indicated at
the correct time.
Grip warmer/Seat heater icons
Each icon will appear when the grip
warmer or seat heater is in use.
Function selection
Push the “MENU” switch for one sec-
ond to switch among the grip warmer
adjusting function, seat heater adjust-
ing function, and information display
selection function.
TIP
For XP530D-A: The windshield
adjusting function, grip warmer ad-
justing function, seat heater ad-
justing function can be selected.
For XP530-A: The grip warmer
and seat heater requires an acces-
sory part and cannot be selected.
Adjusting the windshield position
To move the windshield up, push the
“ ” side of the select switch. To move
the windshield down, push the “ ”
side of the select switch.
Adjusting the grip warmer
This vehicle can be equipped with grip
warmers, which can only be used when
the engine is running. There are 4 grip
warmer settings.
1. Oil change indicator “Oil”
1. Grip warmer/Seat heater icons
1
1
BV1-9-E2.book 7 ページ 2018年8月28日 火曜日 午後5時28分
 1
1 2
2 3
3 4
4 5
5 6
6 7
7 8
8 9
9 10
10 11
11 12
12 13
13 14
14 15
15 16
16 17
17 18
18 19
19 20
20 21
21 22
22 23
23 24
24 25
25 26
26 27
27 28
28 29
29 30
30 31
31 32
32 33
33 34
34 35
35 36
36 37
37 38
38 39
39 40
40 41
41 42
42 43
43 44
44 45
45 46
46 47
47 48
48 49
49 50
50 51
51 52
52 53
53 54
54 55
55 56
56 57
57 58
58 59
59 60
60 61
61 62
62 63
63 64
64 65
65 66
66 67
67 68
68 69
69 70
70 71
71 72
72 73
73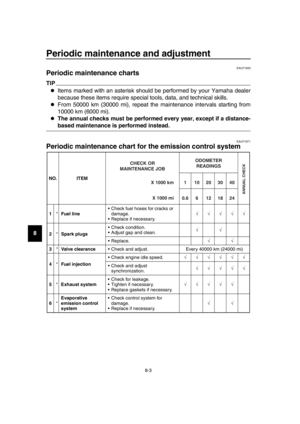 74
74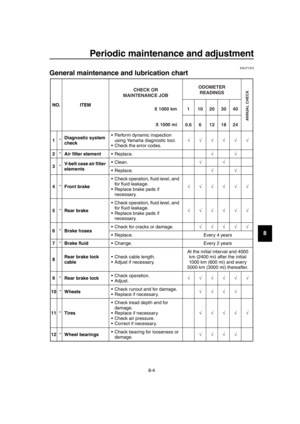 75
75 76
76 77
77 78
78 79
79 80
80 81
81 82
82 83
83 84
84 85
85 86
86 87
87 88
88 89
89 90
90 91
91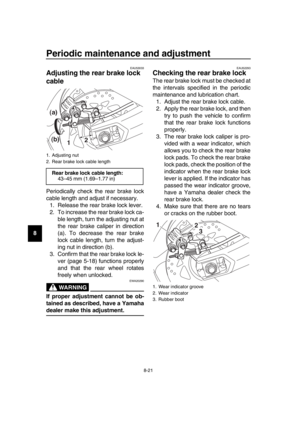 92
92 93
93 94
94 95
95 96
96 97
97 98
98 99
99 100
100 101
101 102
102 103
103 104
104 105
105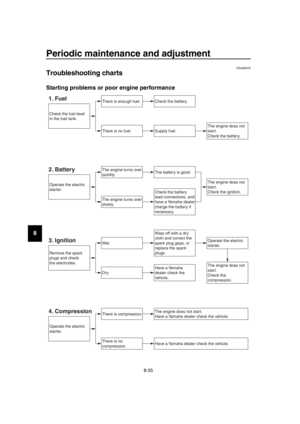 106
106 107
107 108
108 109
109 110
110 111
111 112
112 113
113 114
114 115
115 116
116 117
117 118
118 119
119 120
120 121
121