Page 41 of 122

Instrument and control functions
5-8
1
2
3
4
5
6
7
8
9
10
11
12
13
14
To increase the grip warmer tempera-
ture, push the “ ” side of the select
switch. To decrease the grip warmer
temperature, push the “ ” side of the
select switch.NOTICE
ECA17932
Be sure to wear gloves when us-
ing the grip warmers.
Do not use the grip warmers in
warm weather.
If the handlebar grip or throttle
grip becomes worn or damaged,
stop using the grip warmers and
replace the grips.
Adjusting the seat heater
This vehicle can be equipped with a
seat heater, which can only be used
when the vehicle is running. There are
4 seat heater settings.
To increase the seat heater tempera-
ture, push the “ ” side of the select switch. To decrease the seat heater
temperature, push the “ ” side of the
select switch.
NOTICE
ECA23980
Be sure to wear protective cloth-
ing that covers your hip and
legs when using the seat heater.
If the ambient temperature is 20
C (68 F) or higher, do not set
the seat heater to the high set-
ting.
If the seat becomes worn or
damaged, stop using the seat
heater and replace the seat.
Changing the information display
The information display items are
grouped into 3 display pages.
Push the “ ” or “ ” side of the select
switch to rotate among the 3 display
pages.
TIP
The items for each display page can be
customized. (See page 5-14.)
Odometer:
Off
Low
Middle Display
Setting
High
Off
Low
Middle Display
Setting
High
BV1-9-E2.book 8 ページ 2018年8月28日 火曜日 午後5時28分
Page 42 of 122

Instrument and control functions
5-9
1
2
3
4
5
6
7
8
9
10
11
12
13
14 The odometer shows the total distance
traveled by the vehicle.
Tripmeters:
“TRIP1” and “TRIP2” show the distance
traveled since they were last set to ze-
ro.
To reset a tripmeter, use the select
switch to select the information display
page that contains the tripmeter you
want to reset. Push the “ ” side of the
select switch for one second so that the
tripmeter flashes, and then push the
“ ” side of the select switch again for
one second while the tripmeter is flash-
ing.
TIP
The odometer will lock at 999999.
The tripmeters will reset and con-
tinue counting after 9999.9 is
reached.
When approximately 3.0 L (0.79 US gal,
0.66 Imp.gal) of fuel remains in the fuel
tank, the last segment of the fuel meter
starts flashing. In addition, the informa-
tion display will automatically change to
the fuel reserve tripmeter mode “F-
TRIP” and start counting the distance
traveled from that point.
In this case, push the select switch to switch the display in the following order:
F-TRIP Display–1 Display–2
Display–3 F-TRIP
If you do not reset the fuel reserve trip-
meter manually, it will reset automati-
cally after refueling and traveling 5 km
(3 mi).
TIP
You cannot enter setting mode (page
5-10) while “F-TRIP” is on.
Estimated traveling range:
The estimated distance that can be
traveled with the remaining fuel under
the current riding conditions is shown.
Ambient temperature:
This shows the ambient temperature
from –9 C to 50 C in 1 C increments.
The temperature displayed may vary
from the actual ambient temperature.
TIP
–9 C will be displayed even if the
detected temperature is lower.
50 C will be displayed even if the
detected temperature is higher.
The accuracy of the temperature
reading may be affected when rid-
ing under 20 km/h (12 mi/h) or
when stopped at traffic signals and
BV1-9-E2.book 9 ページ 2018年8月28日 火曜日 午後5時28分
Page 43 of 122

Instrument and control functions
5-10
1
2
3
4
5
6
7
8
9
10
11
12
13
14
railroad crossings.
Average fuel consumption:
The average fuel consumption mode
“F.AVE” can be set to “km/L” or
“L/100km”. For UK-spec vehicles:
“MPG”. (See page 5-13.)
To reset the average fuel consumption,
use the select switch to select the infor-
mation display page that contains the
average fuel consumption display.
Push the “ ” side of the select switch
so that the average fuel consumption
display flashes, and then push the “ ”
side of the select switch again for 1 sec-
ond while the display is flashing.
TIP
After resetting the average fuel con-
sumption display, “– –.–” will be shown
until the vehicle has traveled 1 km (0.6
mi).
NOTICE
ECA15474
If there is a malfunction, “– –.–” will
be continuously displayed. Have a
Yamaha dealer check the vehicle.
Instantaneous fuel consumption:
The instantaneous fuel consumption
mode “CRNT.F” can be set to “km/L” or
“L/100km”. For UK-spec vehicles:
“MPG”. (See page 5-13.)
TIP
Instantaneous fuel consumption
cannot be reset.
If traveling at speeds under 10
km/h (6 mi/h), “– –.–” will be dis-
played.
NOTICE
ECA15474
If there is a malfunction, “– –.–” will
be continuously displayed. Have a
Yamaha dealer check the vehicle.
Setting mode
Stop the vehicle and then push the
“MENU” switch for 2 seconds to enter
the setting mode. To exit the setting
mode and return to the standard dis-
play mode, push the “MENU” switch
again for 2 seconds or select
“”.
TIP
Starting off or turning the vehicle power
off saves all settings changes and exits
the setting mode.
1. Setting mode display
1
BV1-9-E2.book 10 ページ 2018年8月28日 火曜日 午後5時28分
Page 44 of 122

Instrument and control functions
5-11
1
2
3
4
5
6
7
8
9
10
11
12
13
14
Menu items
Grip warmer settings
1. Use the select switch to highlight “Grip Warmer”. 2. Push the “MENU” switch. The grip
warmer setting display will be
shown and “High” will flash in the
display.
3. Push the “MENU” switch. The tem- perature level for the high setting
will start flashing.
Use the select switch to set the
temperature level, and then push
the “MENU” switch. “High” will start
flashing.
4. Use the select switch to highlight “Mid” or “Low”, and then change
the setting using the same proce-
Category Description
This function allows you to
set the low, middle, and
high settings to 10
temperature levels.
This function allows you to
set the low, middle, and
high settings to 10
temperature levels.
This function allows you to
turn the traction control
system on or off.
This function allows you to
check and reset the oil
change interval (indicator),
V-Belt change interval
(indicator), and the “FREE”
maintenance interval.
This function allows you to
switch the fuel
consumption units
between “L/100km” and
“km/L”.
For UK-spec vehicles: this
function is not available.
This function allows you to
change the items shown in
3 information displays.
This function allows you to
adjust the brightness of the
instrument panel.
This function allows you to
set the clock.
This function allows you to
reset all items to their
factory preset or default
settings; excepting the
odometer, clock, and
maintenance counter items
“Oil” and “V-Belt”.
Grip Warmer
Seat Heater
Tr action Control
Maintenance
Unit
Display
Brightness
Clock
All Reset
BV1-9-E2.book 11 ページ 2018年8月28日 火曜日 午後5時28分
Page 45 of 122

Instrument and control functions
5-12
1
2
3
4
5
6
7
8
9
10
11
12
13
14
dure that was used for the high set-
ting.
5. When you finished changing the settings, use the select switch to
highlight “ ”, and then push the
“MENU” switch to return to the
menu screen.
Seat heater settings
1. Use the select switch to highlight “Seat Heater”.
2. Push the “MENU” switch. The seat heater setting display will be
shown and “High” will flash in the
display.
3. Push the “MENU” switch. The tem- perature level for the high setting
will start flashing.
Use the select switch to set the
temperature level, and then push
the “MENU” switch. “High” will start
flashing. 4. Use the select switch to highlight
“Mid” or “Low”, and then change
the setting using the same proce-
dure that was used for the high set-
ting.
5. When you finished changing the settings, use the select switch to
highlight “ ”, and then push the
“MENU” switch to return to the
menu screen.
Traction control system settings
1. Use the select switch to highlight “Traction Control”.
2. Push the “MENU” switch. The trac- tion control system setting display
will be shown and “ON” will flash in
the display.
BV1-9-E2.book 12 ページ 2018年8月28日 火曜日 午後5時28分
Page 46 of 122
Instrument and control functions
5-13
1
2
3
4
5
6
7
8
9
10
11
12
13
14 3. To set the traction control system
to “OFF”, push the select switch
“ ” side for 2 seconds.
4. To set the traction control system to “ON” again, push the select
switch “ ” for one second.
TIP
When the vehicle is powered on, the
traction control system is automatically
set to “ON”.
5. When you finished changing the settings, push the “MENU” switch
to return to the menu screen.
Resetting the maintenance coun-
ters 1. Use the select switch to highlight “Maintenance”. 2. Push the “MENU” switch, and then
use the select switch to select the
item to reset.
3. While the selected item is flashing, push the select switch “ ” for one
second.
4. When you finished resetting, use the select switch to highlight “ ”,
and then push the “MENU” switch
to return to the menu screen.
Selecting the units
TIP
U.K. specification vehicles only: This
BV1-9-E2.book 13 ページ 2018年8月28日 火曜日 午後5時28分
Page 47 of 122
Instrument and control functions
5-14
1
2
3
4
5
6
7
8
9
10
11
12
13
14
function does not indicate on setting
mode display and cannot be selected.
1. Use the select switch to highlight “Unit”.
2. Push the “MENU” switch. The unit setting display will be shown and
“L/100km” will flash in the display.
3. Use the select switch to select “L/100km” or “km/L”, and then
push the “MENU” switch again.
4. Push the “MENU” switch to return to the menu screen. Selecting the display items
1. Use the select switch to highlight “Display Change”.
2. Push the “MENU” switch, use the select switch to highlight the dis-
play to change, and then push the
“MENU” switch again.
3. Use the select switch to highlight the item to change, and then push
the “MENU” switch.
TIP
Display item order is as follows.
BV1-9-E2.book 14 ページ 2018年8月28日 火曜日 午後5時28分
Page 48 of 122
Instrument and control functions
5-15
1
2
3
4
5
6
7
8
9
10
11
12
13
14 4. Use the select switch to select the
item to show, and then push the
“MENU” switch.
5. When you finished changing the settings, use the select switch to
highlight “ ”, and then push the
“MENU” switch to return to the pre-
vious display.
6. Use the select switch to highlight “ ”, and then push the “MENU”
switch to return to the menu
screen.
Meter panel brightness
1. Use the select switch to highlight “Brightness”. 2. Push the “MENU” switch.
3. Use the select switch to select the
desired brightness level.
4. Push the “MENU” switch to return to the menu screen.
Setting the clock
TIP
The clock uses a 12-hour time system. 1. Use the select switch to highlight “Clock”.
2. Push the “MENU” switch.
3. When the hour digits start flashing,
A.TEMP TRIP-1 TRIP-2 ODO
CRNT.F F.AVG RANGE
BV1-9-E2.book 15 ページ 2018年8月28日 火曜日 午後5時28分
 1
1 2
2 3
3 4
4 5
5 6
6 7
7 8
8 9
9 10
10 11
11 12
12 13
13 14
14 15
15 16
16 17
17 18
18 19
19 20
20 21
21 22
22 23
23 24
24 25
25 26
26 27
27 28
28 29
29 30
30 31
31 32
32 33
33 34
34 35
35 36
36 37
37 38
38 39
39 40
40 41
41 42
42 43
43 44
44 45
45 46
46 47
47 48
48 49
49 50
50 51
51 52
52 53
53 54
54 55
55 56
56 57
57 58
58 59
59 60
60 61
61 62
62 63
63 64
64 65
65 66
66 67
67 68
68 69
69 70
70 71
71 72
72 73
73 74
74 75
75 76
76 77
77 78
78 79
79 80
80 81
81 82
82 83
83 84
84 85
85 86
86 87
87 88
88 89
89 90
90 91
91 92
92 93
93 94
94 95
95 96
96 97
97 98
98 99
99 100
100 101
101 102
102 103
103 104
104 105
105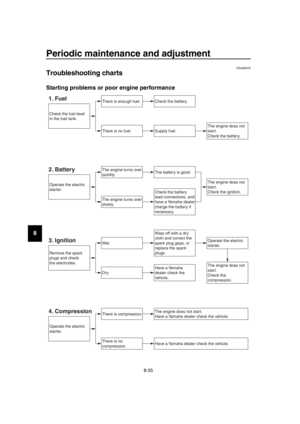 106
106 107
107 108
108 109
109 110
110 111
111 112
112 113
113 114
114 115
115 116
116 117
117 118
118 119
119 120
120 121
121

