Page 105 of 122
Periodic maintenance and adjustment
8-34
1
2
3
4
5
6
7
8
9
10
11
12
13
14
Is the smart key battery installed
correctly? (See page 3-6.)
Is the smart key being used in a lo-
cation with strong radio waves or
other electromagnetic noise? (See
page 3-1.)
Are you using the smart key that is
registered to the vehicle?
Is the vehicle battery discharged?
When the vehicle battery is dis-
charged, the smart key system will
not operate. Please have the vehi-
cle battery charged or replaced.
(See page 8-28.)
If the smart key system does not work
after checking the above items, have a
Yamaha dealer check the smart key
system.
TIP
See Emergency mode on page 8-37 for
information on starting the engine with-
out the smart key.
BV1-9-E2.book 34 ページ 2018年8月28日 火曜日 午後5時28分
Page 106 of 122

Periodic maintenance and adjustment
8-35
1
2
3
4
5
6
7
8
9
10
11
12
13
14
EAU63470
Troubleshooting charts
Starting problems or poor engine performance
1. FuelThere is enough fuel.
There is no fuel.
Check the battery.
Supply fuel.
The engine turns over
quickly.
The engine turns over
slowly.
The engine does not
start.
Check the battery.
Wipe off with a dry
cloth and correct the
spark plug gaps, or
replace the spark
plugs.
Check the battery
lead connections, and
have a Yamaha dealer
charge the battery if
necessary.
2. BatteryThe battery is good.
The engine does not
start.
Check the ignition.
3. IgnitionWetOperate the electric
starter.
Dry
There is compression.
There is no
compression.
The engine does not start.
Have a Yamaha dealer check the vehicle.
Have a Yamaha dealer check the vehicle.
The engine does not
start.
Check the
compression.Have a Yamaha
dealer check the
vehicle.
Remove the spark
plugs and check
the electrodes.
Operate the electric
starter.
Operate the electric
starter.
Check the fuel level
in the fuel tank.
4. Compression
BV1-9-E2.book 35 ページ 2018年8月28日 火曜日 午後5時28分
Page 107 of 122

Periodic maintenance and adjustment
8-36
1
2
3
4
5
6
7
8
9
10
11
12
13
14
Engine overheating
WARNING
EWAT1041
Do not remove the radiator cap when the engine and radiator are hot.
Scalding hot fluid and steam may be blown out under pressure, which
could cause serious injury. Be sure to wait until the engine has cooled.
Place a thick rag, like a towel, over the radiator cap, and then slowly ro-
tate the cap counterclockwise to the detent to allow any residual pres-
sure to escape. When the hissing sound has stopped, press down on the
cap while turning it counterclockwise, and then remove the cap.
TIP
If coolant is not available, tap water can be temporarily used instead, provided that
it is changed to the recommended
coolant as soon as possible.
Wait until the engine
has cooled.
Check the coolant
level in the reservoir
and radiator.Add coolant.
(See TIP.)
The coolant level is
OK.
There is no leakage.
There is leakage.
The coolant level is
low.
Check the cooling
system for leakage.
Have a Yamaha
dealer check and
repair the cooling
system.
Start the engine. If the engine overheats again,
have a Yamaha dealer check and repair the cooling
system.
BV1-9-E2.book 36 ページ 2018年8月28日 火曜日 午後5時28分
Page 108 of 122

Periodic maintenance and adjustment
8-37
1
2
3
4
5
6
7
8
9
10
11
12
13
14
EAU77372
Emergency mode
When the smart key is lost, damaged,
or its battery has discharged, the vehi-
cle can still be turned on and the engine
started. You will need a mechanical key
and the smart key system identification
number. To operate the vehicle in
emergency mode, carry out the follow-
ing steps.
TIP
Emergency mode operation will be
cancelled if the respective steps are not
carried out within the time set for each
operation or if the “OFF/LOCK” switch
is pushed. 1. Stop the vehicle in a safe place.
2. Unlock the seat by inserting the mechanical key into the lock locat-
ed right side of body and turn it
counter clockwise.
3. Open the seat and check that the trunk light comes on.
4. Push the “ON/ ” switch once.
5. Without completely shutting the seat, raise and lower it three times
within 10 seconds.
TIP
Use the rear storage compartment light
as a guide when raising and lowering
the seat. The smart key system indicator
light on the speedometer will come
on for three seconds to indicate
the transition to emergency mode.
6. After the smart key system indica- tor light goes off, use the “ / ”
switch to enter the identification
number.
7. Inputting the identification number is done by counting the number of
flashes of the smart key system in-
dicator light.
For example, if the identification
number is 123456:
Push and hold the “ / ” switch.
The smart key system indicator
light will start to flash.
1. Smart key system indicator light “ ”
1. Identification number
1
12345 6
1
BV1-9-E2.book 37 ページ 2018年8月28日 火曜日 午後5時28分
Page 109 of 122

Periodic maintenance and adjustment
8-38
1
2
3
4
5
6
7
8
9
10
11
12
13
14
Release the “ / ” switch after
the smart key system indicator
light flashes once.
The first digit of the identification
number has been set as “1”.
Push and hold the “ / ” switch
again.
Release the “ / ” switch after
the smart key system indicator
light flashes twice.
The second digit has been set as
“2”.
Repeat the above procedure until
all digits of the identification num-
ber have been set. The smart key
system indicator light will flash for
10 seconds if the correct identifica-
tion number was entered.
TIP
Emergency mode will be terminated
when either one of the following situa-
tions apply. In this case, start over
again from step 4.
When there are no “ / ” switch
operations for 10 seconds during
the identification number input pro-
cess.
When the smart key system indi-
cator light is allowed to flash 10 or
more times.
8. Press the “ON/ ” switch while the smart key system indicator light is
flashing to turn on the power to the
vehicle. The engine can now be
started.
TIP
If the identification number is not
correctly entered, the smart key
system indicator light will flash rap-
idly for 3 seconds and emergency
mode is terminated. In this case,
start over again from step 4.
To lock the handlebar after turning
on the vehicle in emergency mode,
turn the vehicle power off, wait 30
seconds, and then turn the handle-
bar to the left and press the
“OFF/LOCK” switch.
BV1-9-E2.book 38 ページ 2018年8月28日 火曜日 午後5時28分
Page 110 of 122

9-1
1
2
3
4
5
6
7
8
9
10
11
12
13
14
Scooter care and storage
EAU37834
Matte color caution
NOTICE
ECA15193
Some models are equipped with
matte colored finished parts. Be
sure to consult a Yamaha dealer for
advice on what products to use be-
fore cleaning the vehicle. Using a
brush, harsh chemical products or
cleaning compounds when cleaning
these parts will scratch or damage
their surface. Wax also should not
be applied to any matte colored fin-
ished parts.
EAU83443
Care
Frequent, thorough cleaning of the ve-
hicle will not only enhance its appear-
ance but also will improve its general
performance and extend the useful life
of many components. Washing, clean-
ing, and polishing will also give you a
chance to inspect the condition of the
vehicle more frequently. Be sure to
wash the vehicle after riding in the rain
or near the sea, because salt is corro-
sive to metals.
TIP
The roads of heavy snowfall areas
may be sprayed with salt as a de-
icing method. This salt can stay on
the roads well into spring, so be
sure to wash the underside and
chassis parts after riding in such
areas.
Genuine Yamaha care and main-
tenance products are sold under
the YAMALUBE brand in many
markets worldwide.
See your Yamaha dealer for addi-
tional cleaning tips.
NOTICE
ECA26280
Improper cleaning can cause cos-
metic and mechanical damage. Do
not use:
high-pressure washers or
steam-jet cleaners. Excessive
water pressure may cause water
seepage and deterioration of
wheel bearings, brakes, trans-
mission seals and electrical de-
vices. Avoid high-pressure
detergent applications such as
those available in coin-operated
BV1-9-E2.book 1 ページ 2018年8月28日 火曜日 午後5時28分
Page 111 of 122

Scooter care and storage
9-2
1
2
3
4
5
6
7
8
9
10
11
12
13
14
car washers.
harsh chemicals, including
strong acidic wheel cleaners,
especially on spoke or magne-
sium wheels.
harsh chemicals, abrasive
cleaning compounds, or wax on
matte-finished parts. Brushes
can scratch and damage the
matte-finish, use soft sponge or
towel only.
towels, sponges, or brushes
contaminated with abrasive
cleaning products or strong
chemicals such as, solvents,
gasoline, rust removers, brake
fluid, or antifreeze, etc.
Before washing 1. Park the vehicle out of direct sun- light and allow it to cool. This will
help avoid water spots.
2. Make sure all caps, covers, electri- cal couplers and connectors are
tightly installed.
3. Cover the muffler end with a plas- tic bag and a strong rubber band.
4. Pre-soak stubborn stains like in- sects or bird droppings with a wet
towel for a few minutes.
5. Remove road grime and oil stains with a quality degreasing agent
and a plastic-bristle brush or
sponge. NOTICE: Do not use de-
greasing agent on areas requir-
ing lubrication such as seals,
gaskets, and wheel axles. Fol-
low product instructions.
[ECA26290]
Washing 1. Rinse off any degreaser and spray down the vehicle with a garden hose. Use only enough pressure to
do the job. Avoid spraying water
directly into the muffler, instrument
panel, air inlet, or other inner areas
such as underseat storage com-
partments.
2. Wash the vehicle with a quality au- tomotive-type detergent mixed
with cool water and a soft, clean
towel or sponge. Use an old tooth-
brush or plastic-bristle brush for
hard-to-reach places. NOTICE:
Use cold water if the vehicle has
been exposed to salt. Warm wa-
ter will increase salt’s corrosive
properties.
[ECA26301]
3. For windshield-equipped vehicles:Clean the windshield with a soft
towel or sponge dampened with
water and a pH neutral detergent.
If necessary, use a high-quality
windshield cleaner or polish for
motorcycles. NOTICE: Never use
any strong chemicals to clean
the windshield. Additionally,
some cleaning compounds for
plastic may scratch the wind-
shield, so be sure to test all
cleaning products before gener-
al application.
[ECA26310]
4. Rinse off thoroughly with clean wa- ter. Be sure to remove all deter-
gent residues, as they can be
harmful to plastic parts.
After washing 1. Dry the vehicle with a chamois or absorbent towel, preferably micro-
fiber terrycloth.
2. For drive chain-equipped models: Dry and then lubricate the drive
chain to prevent rust.
BV1-9-E2.book 2 ページ 2018年8月28日 火曜日 午後5時28分
Page 112 of 122

Scooter care and storage
9-3
1
2
3
4
5
6
7
8
9
10
11
12
13
14 3. Use a chrome polish to shine
chrome, aluminum, and stainless
steel parts. Often the thermally in-
duced discoloring of stainless steel
exhaust systems can be removed
through polishing.
4. Apply a corrosion protection spray on all metal parts including chrome
or nickel-plated surfaces.
WARNING! Do not apply
silicone or oil spray to seats,
hand grips, rubber foot pegs or
tire treads. Otherwise these
parts will become slippery,
which could cause loss of con-
trol. Thoroughly clean the sur-
faces of these parts before
operating the vehicle.
[EWA20650]
5. Treat rubber, vinyl, and unpaintedplastic parts with a suitable care
product.
6. Touch up minor paint damage caused by stones, etc.
7. Wax all painted surfaces using a non-abrasive wax or use a detail
spray for motorcycles.
8. When finished cleaning, start the engine and let it idle for several
minutes to help dry any remaining
moisture.
9. If the headlight lens has fogged up, start the engine and turn on the
headlight to help remove the mois-
ture.
10. Let the vehicle dry completely be- fore storing or covering it.
NOTICE
ECA26320
Do not apply wax to rubber or
unpainted plastic parts.
Do not use abrasive polishing
compounds as they will wear away the paint.
Apply sprays and wax sparing-
ly. Wipe off excess afterwards.
WARNING
EWA20660
Contaminants left on the brakes or
tires can cause loss of control.
Make sure there is no lubricant
or wax on the brakes or tires.
If necessary, wash the tires with
warm water and a mild deter-
gent.
If necessary, clean the brake
discs and pads with brake
cleaner or acetone.
Before riding at higher speeds,
test the vehicle’s braking perfor-
mance and cornering behavior.
BV1-9-E2.book 3 ページ 2018年8月28日 火曜日 午後5時28分
 1
1 2
2 3
3 4
4 5
5 6
6 7
7 8
8 9
9 10
10 11
11 12
12 13
13 14
14 15
15 16
16 17
17 18
18 19
19 20
20 21
21 22
22 23
23 24
24 25
25 26
26 27
27 28
28 29
29 30
30 31
31 32
32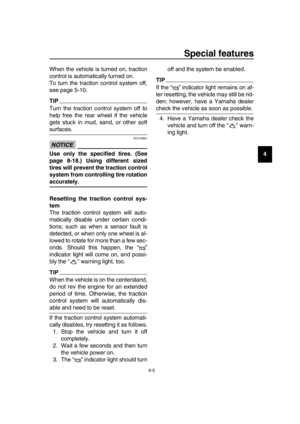 33
33 34
34 35
35 36
36 37
37 38
38 39
39 40
40 41
41 42
42 43
43 44
44 45
45 46
46 47
47 48
48 49
49 50
50 51
51 52
52 53
53 54
54 55
55 56
56 57
57 58
58 59
59 60
60 61
61 62
62 63
63 64
64 65
65 66
66 67
67 68
68 69
69 70
70 71
71 72
72 73
73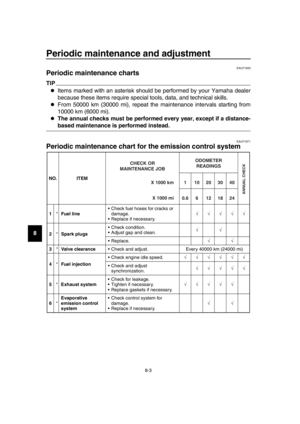 74
74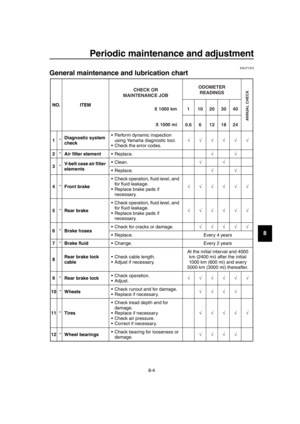 75
75 76
76 77
77 78
78 79
79 80
80 81
81 82
82 83
83 84
84 85
85 86
86 87
87 88
88 89
89 90
90 91
91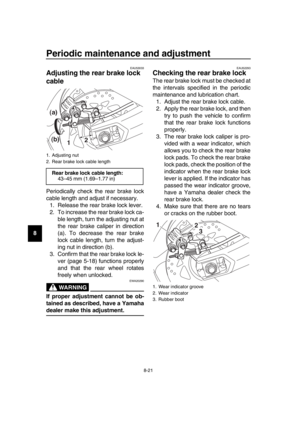 92
92 93
93 94
94 95
95 96
96 97
97 98
98 99
99 100
100 101
101 102
102 103
103 104
104 105
105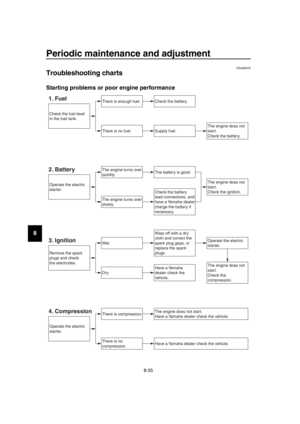 106
106 107
107 108
108 109
109 110
110 111
111 112
112 113
113 114
114 115
115 116
116 117
117 118
118 119
119 120
120 121
121
Is the smart key being used in a lo-
cation with strong ra")