2019 MERCEDES-BENZ SPRINTER airbag
[x] Cancel search: airbagPage 62 of 354
To
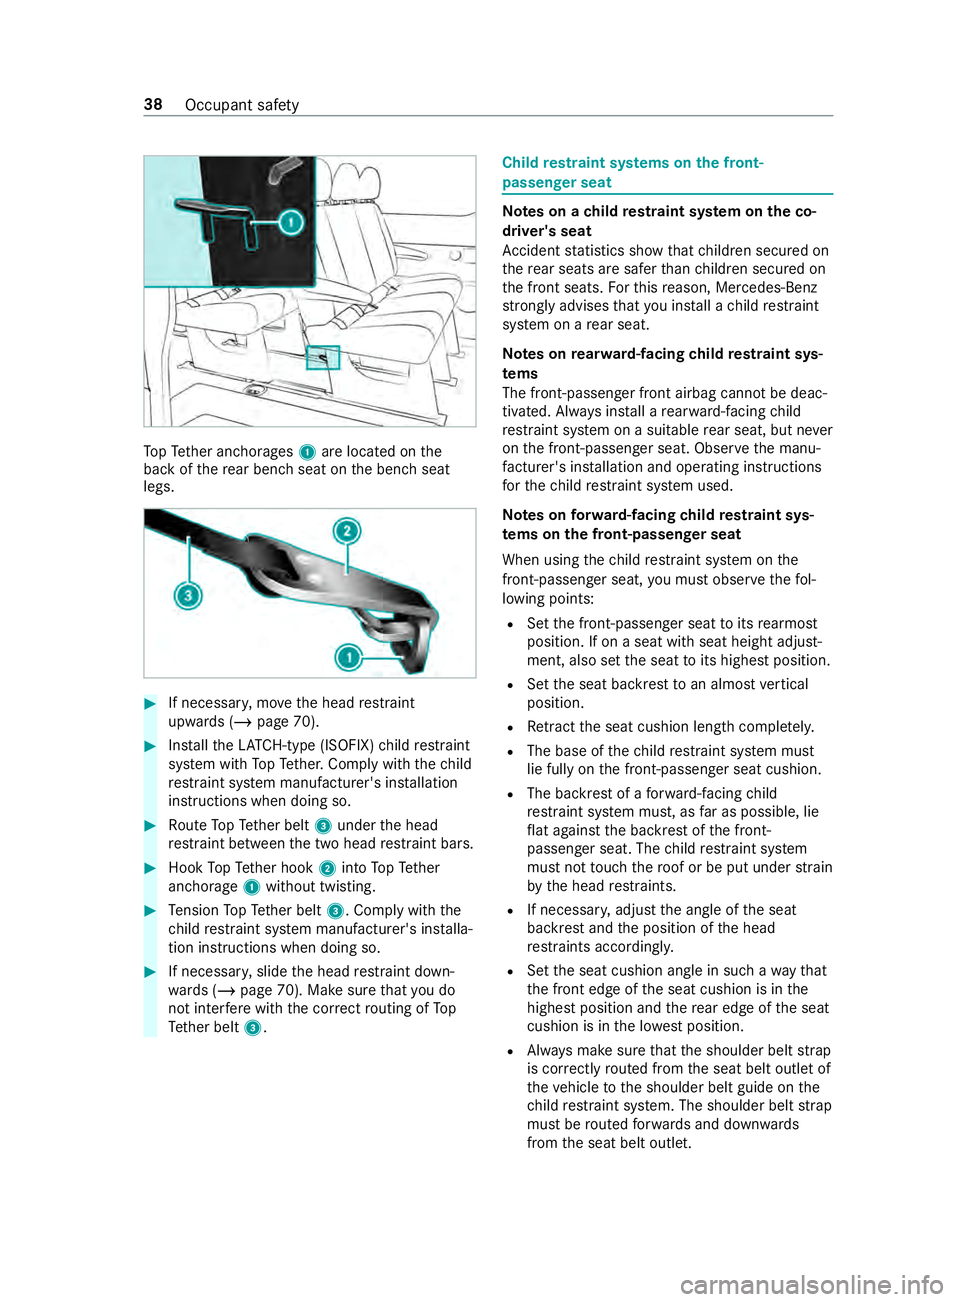
pTe ther anchorages 1are located on the
back of there ar ben chseat on the bench seat
legs. #
If necessar y,mo vethe head restra int
upwards (/ page 70). #
Installth eLA TC H-type (ISOFIX) child restra int
sy stem with TopTe ther. Comply with thech ild
re stra int sy stem manufacturer's ins tallation
instructions when doing so. #
Route TopTe ther belt 3under the head
re stra int between the two head restra int bars. #
Hook TopTe ther hook 2into TopTe ther
anchorage 1without twisting. #
Tension TopTe ther belt 3. Comply with the
ch ild restra int sy stem manufacturer's ins talla‐
tion instructions when doing so. #
If necessar y,slide the head restra int down‐
wa rds (/ page 70). Make sure that you do
not inter fere with the cor rect routing of To p
Te ther belt 3. Child
restra int sy stems on the front-
passenger seat Note
s on a child restra int sy stem on the co-
driver's seat
Ac cident statistics show that children secured on
th ere ar seats are safer than children secured on
th e front seats. Forth is reason, Mercedes-Benz
stro ngly advises that you ins tall a child restra int
sy stem on a rear seat.
Note s onrear wa rd-facing child restra int sys‐
te ms
The front-passen ger front airbag cannot be deac‐
tivated. Alw ays ins tall a rear wa rd-facing child
re stra int sy stem on a suitable rear seat, but ne ver
on the front-passen ger seat. Obser vethe manu‐
fa cturer's ins tallation and operating instructions
fo rth ech ild restra int sy stem used.
Note s onforw ard-facing child restra int sys‐
te ms on the front-passenger seat
When using thech ild restra int sy stem on the
front-passenger seat, you must obse rveth efo l‐
lowing points:
R Set the front-passen ger seat toits rearmost
position. If on a seat with seat height adjust‐
ment, also set the seat toits highest position.
R Set the seat backrest toan almost vertical
position.
R Retract the seat cushion length comple tely.
R The base of thech ild restra int sy stem must
lie fully on the front-passen ger seat cushion.
R The backrest of a forw ard-facing child
re stra int sy stem must, as far as possible, lie
fl at against the backrest of the front-
passenger seat. The child restra int sy stem
must not touch thero of or be put under stra in
by the head restra ints.
R If necessar y,adjust the angle of the seat
backrest and the position of the head
re stra ints acco rding ly.
R Set the seat cushion angle in such a wayth at
th e front edge of the seat cushion is in the
highest position and there ar edge of the seat
cushion is in the lo west position.
R Always make sure that the shoulder belt strap
is cor rectly routed from the seat belt outlet of
th eve hicle tothe shoulder belt guide on the
ch ild restra int sy stem. The shoulder belt strap
must be routed forw ards and down wards
from the seat belt outlet. 38
Occupant saf ety
Page 83 of 354

Cor
rect driver's seat position &
WARNING Risk of inju ryfrom adju sting
th eve hicle settings while theve hicle is in
motion
Yo u could lose control of theve hicle in the
fo llowing situations:
R ifyo u adjust the driver's seat, the head
re stra int, thesteering wheel or the mir ror
while theve hicle is in motion
R ifyo ufast enyour seat belt while theve hi‐
cle is in motion #
Before starting the engine: adjust the
driver's seat, the head restra int, the
st eering wheel or the mir ror and fasten
yo ur seat belt. Comply with
thefo llowing when adjusting steer‐
ing wheel 3, seat belt 2and driver's seat 1:
R Sit as faraw ay as possible from the driver's
airbag.
R Sit in an upright position.
R Your thighs are slight lysuppor tedby the seat
cushion.
R Your legs are not fully extended and you can
easily fully press on the pedals.
R The back of your head is suppo rted at eye
le ve lby the middle part of the head restra int.
R You can reach thesteering wheel with your
arms in a slightly bent position.
R You can mo veyour legs freel y.
R You can easily see all displ ays on the instru‐
ment displa y.
R You ha vea good overview of the traf fic situa‐
tion. R
Your seat belt fits securely around your body
and runs across the middle of your shoulder,
yo ur pelvic area and groin. Seats
Ad
justing the front seats manually (without
Seat Comfort Package) &
WARNING Risk of becoming trapped if
th e seats are adjus tedby children
Children could become trapped if they adjust
th e seats, particular lywhen unat tended. #
When le aving theve hicle, alw aysta ke
th e SmartK eywith you and lock the
ve hicle. #
Never lea vechildren unat tended in the
ve hicle. &
WARNING Risk of becoming trapped
when adjusting the seats
When you adjust a seat, you or other vehicle
occupants could become trapped, e.g. on the
seat guide rail. #
When adjusting a seat, make sure that
no one has any body parts in the sweep
of the seat. Obser
vethe saf ety no tes on "Airbags" and "Chil‐
dren in theve hicle". &
WARNING Risk of accident due tothe
driver's seat not being engaged
If th e driver's seat is not engaged, it could
mo veunexpectedly while theve hicle is in
motion.
This could cause youto lose control of the
ve hicle. #
Always make sure that the driver's seat
is engaged before starting theve hicle. &
WARNING Risk of inju ryfrom adju sting
th eve hicle settings while theve hicle is in
motion
Yo u could lose control of theve hicle in the
fo llowing situations:
R ifyo u adjust the driver's seat, the head
re stra int, thesteering wheel or the mir ror
while theve hicle is in motion Seats and
stowage 59
Page 85 of 354

Ad
justing the front seats manually (with Seat
Comfort Package) &
WARNING Risk of becoming trapped if
th e seats are adjus tedby children
Children could become trapped if they adjust
th e seats, particularly when unattended. #
When leaving theve hicle, alw aysta ke
th e SmartK eywith you and lock the
ve hicle. #
Never lea vechildren unat tended in the
ve hicle. &
WARNING Risk of becoming trapped
when adjusting the seats
When you adjust a seat, you or other vehicle
occupants could become trapped, e.g. on the
seat guide rail. #
When adjusting a seat, make sure that
no one has any body parts in the sweep
of the seat. Obser
vethe saf ety no tes on "Airbags" and "Chil‐
dren in theve hicle". &
WARNING Risk of accident due tothe
driver's seat not being engaged
If th e driver's seat is not engaged, it could
mo veunexpectedly while theve hicle is in
motion.
This could cause youto lose control of the
ve hicle. #
Always make sure that the driver's seat
is engaged before starting theve hicle. &
WARNING Risk of inju ryfrom adju sting
th eve hicle settings while theve hicle is in
motion
Yo u could lose control of theve hicle in the
fo llowing situations:
R ifyo u adjust the driver's seat, the head
re stra int, thesteering wheel or the mir ror
while theve hicle is in motion
R ifyo ufast enyour seat belt while theve hi‐
cle is in motion #
Before starting the engine: adjust the
driver's seat, the head restra int, the
st eering wheel or the mir ror and fasten
yo ur seat belt. &
WARNING Risk of becoming trapped if
th e seat height is adjus ted carelessly
If yo u adjust the seat height carelessly, you or
ot her vehicle occupants could be trapped and
th ereby injured.
Children in particular could accidentally press
th e electrical seat adjustment buttons and
become trapped. #
While moving the seats, make sure that
hands or other body parts do not get
under the le ver assembly of the seat
adjustment sy stem. &
WARNING Risk of inju rydue tohead
re stra ints which are not ins talled or are
adjus ted incor rectly
If head restra ints are not ins talled or are
adjus ted incor rectly, the head restra ints can‐
not pr ovide pr otection as intended.
There is an increased risk of injury in the
head and neck area, e.g. in theeve nt of an
accident or when braking. #
Always drive with the head restra ints
ins talled. #
Before driving off, make sure forev ery
ve hicle occupant that the center of the
head restra int supports the back of the
head at about eye le vel. Do not inter
change the head restra ints of the
front and rear seats. Otherwise, you will not be
able toadjust the height and angle of the head
re stra ints cor rectl y.
Ad just the head restra int fore -and-aft position so
th at it is as close as possible tothe back of your
head. &
WARNING Risk of inju ryor death due to
incor rect seat position
The seat belt does not of ferth e intended le vel
of pr otection if you ha venot mo vedth e seat
backrest toan almost vertical position.
When braking or in theeve nt of an accident,
yo u could slide unde rneath the seat belt and
sus tain abdominal or neck injuries, forex am‐
ple. #
Adjust the seat properly before begin‐
ning your journe y. #
Always ensure that the seat backrest is
in an almost vertical position and that Seats and
stowage 61
Page 86 of 354
th
e shoulder section of your seat belt is
ro uted across the center of your shoul‐
der. *
NO
TEDama getothe seats when moving
th e seats back The seats may be damaged
byobjects when
moving the seats bac k. #
When moving the seats bac k,make sure
th at there are no objects in thefo ot we ll,
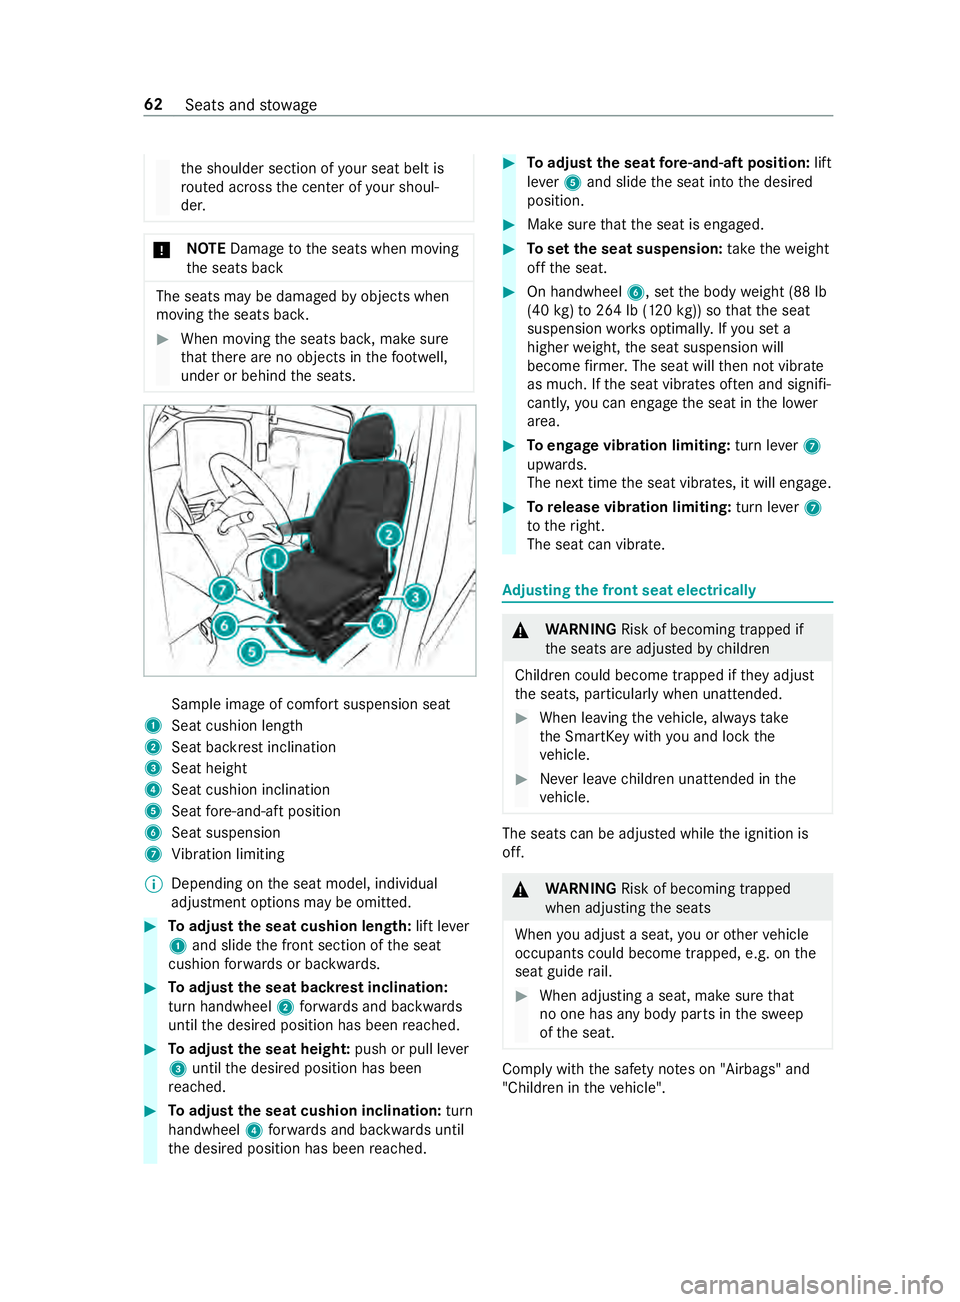
under or behind the seats. Sample image of comfort suspension seat
1 Seat cushion length
2 Seat backrest inclination
3 Seat height
4 Seat cushion inclination
5 Seat fore -and-aft position
6 Seat suspension
7 Vibration limiting
% Depending on
the seat model, individual
adjustment options may be omitted. #
Toadjust the seat cushion length: lift lever
1 and slide the front section of the seat
cushion forw ards or backwards. #
Toadjust the seat backrest inclination:
turn handwheel 2forw ards and backwards
until the desired position has been reached. #
Toadjust the seat heigh t:push or pull le ver
3 until the desired position has been
re ached. #
Toadjust the seat cushion inclination: turn
handwheel 4forw ards and backwards until
th e desired position has been reached. #
Toadjust the seat fore -and-aft position: lift
le ve r5 and slide the seat into the desired
position. #
Make sure that the seat is engaged. #
Toset the seat suspension: take thewe ight
off the seat. #
On handwheel 6, setthe body weight (88 lb
(40 kg)to 264 lb (120 kg)) so that the seat
suspension works optimall y.Ifyo u set a
higher weight, the seat suspension will
become firm er. The seat will then not vibrate
as much. If the seat vibrates of ten and signifi‐
cantly, you can engage the seat in the lo wer
area. #
Toengage vibration limiting: turn lever7
upwards.
The next time the seat vibrates, it will engage. #
Torelease vibration limiting: turn lever7
to theright.
The seat can vibrate. Ad
justing the front seat electrically &
WARNING Risk of becoming trapped if
th e seats are adjus tedby children
Children could become trapped if they adjust
th e seats, particularly when unattended. #
When leaving theve hicle, alw aysta ke
th e SmartK eywith you and lock the
ve hicle. #
Never lea vechildren unat tended in the
ve hicle. The seats can be adjus
ted while the ignition is
off. &
WARNING Risk of becoming trapped
when adjusting the seats
When you adjust a seat, you or other vehicle
occupants could become trapped, e.g. on the
seat guide rail. #
When adjusting a seat, make sure that
no one has any body parts in the sweep
of the seat. Comply with
the saf ety no tes on "Airbags" and
"Children in theve hicle". 62
Seats and stowage
Page 238 of 354
Note
s on cleaning and car ePreve nting damage totheve hicle
Ste ps
R
Clean the electrically operated steps
and their housing with a po wer
wa sher.
R After cleaning, spr aythe lateral
guides with silicone spr ay.
R Clean thesteps in the bumper with a
po we rwa sher. Do not use oil or grease as a lubricant.
Aluminum
dropsides R
Brush down the aluminum dropsides
with water and a neutral or mild alka‐
line cleaning agent. Do not use abrasive cleaning agents
to
clean the dropsides. Note
s on interior care &
WARNING Risk of inju ryfrom pla stic
parts breaking off af terth e use of sol‐
ve nt-based care products
Ca reand cleaning products con taining sol‐
ve nts can cause su rfaces in the cockpit to
become porous.
When the airbags are deplo yed, plastic parts
may break away. #
Do not use any care or cleaning prod‐
ucts containing sol vents toclean the
cockpit. &
WARNING Risk of inju ryor death from
bleached seat belts
Bleaching or dyeing seat belts can se verely
we aken them.
This can, forex ample, cause seat belts totear
or fail in an accident. #
Never blea chor dye seat belts. Obser
vethefo llowing no tes: Note
s on cleaning and car ePreve nting damage totheve hicle
Seat belts Clean with lukewarmsoapy water. R
Do not use chemical cleaning
agents.
R Do not dry the seat belt byheating
abo ve176 °F (80 °C) or in direct
sunlight.
Display Cleanthe sur face carefully wi tha mic ro‐
fi ber clo thand LCD/TFT displ aycare
product. R
Switch off the display and let it cool
down.
R Do not use any other agents.
Plastic trim R
Clean with a damp microfiber clo th.
R For heavy soiling: use care product
re commended for Mercedes-Benz . R
Do not af fix st icke rs,fi lms or similar.
R Do not allow tocome into contact
wi th cosmetics, insect repellent and
sun creams.
Re alwo od/
trim ele‐
ments R
Clean with a mic rofiber clo th.
R Blackpiano-lacquer look: clean with
a damp clo thand soapy water.
R For heavy soiling: use care product
re commended for Mercedes-Benz . Do not use sol
vent-based cleaning
agents, polishes or waxes. 214
Maintenance and care
Page 241 of 354

Message in
the media displa y:
SOS NOT READY :th e ignition is not on or eCall is
not available.
During an active emer gency call, 0053appears in
th e displa y.
Yo u can find more information on there gional
av ailability of eCall at: http://www.mercedes-
benz.com/connect_ecall
% If an emer
gency call is una vailable or mal‐
functioning, a message tothis ef fect also
appea rsinthe multifunction display of the
instrument clus ter. Tr
iggering an automatic emer gency call Re
quirements:
R The ignition is switched on.
R The star ter battery has suf ficient charge.
If re stra int sy stems such as airbags or Emer gency
Te nsioning Devices ha vebeen activated af ter an
accident, eCall may automatically initia tean
emer gency call.
The eme rgency call has been made:
R Avo ice connection is made tothe Mercedes-
Benz emer gency call center.
R A messa gewith accident data is transmitted
to the Mercedes-Benz emer gency call center.
The Mercedes-Benz emergency call center
can transmit theve hicle position data toone
of the emer gency call centers.
The SOS button in theove rhead cont rol panel
fl ashes until the emer gency call is finished.
It is not possible toimmediately end an auto‐
matic emer gency call.
If no connection can be made tothe emer gency
services ei ther, a cor responding message
appears inthe media displa y. #
Dial the local emer gency number on your
mobile phone.
If an emer gency call has been initia ted:
R Remain in theve hicle if thero ad and traf fic
conditions permit youto do so until a voice
connection is es tablished with the emer gency
call center service pr ovider.
R Based on the call, the operator decides
whe ther it is necessary tocall rescue teams
and/or the police tothe accident site.
R If no vehicle occupant answers, an ambu‐
lance is sent totheve hicle immediately. Tr
iggering a manual emer gency call #
Using the SOS but ton in theove rhead con‐
trol panel: pressthe SOS button at least one
second long.
The emer gency call has been made:
R Avo ice connection is made tothe Mercedes-
Benz emer gency call center.
R A messa gewith accident data is transmitted
to the Mercedes-Benz emer gency call center.
The Mercedes-Benz emergency call center
can transmit theve hicle position data toone
of the emer gency call centers.
R Remain in theve hicle if thero ad and traf fic
conditions permit youto do so until a voice
connection is es tablished with the emer gency
call center service pr ovider.
If no connection can be made tothe emer gency
services ei ther, a cor responding message
appears inthe media displa y. #
Dial the local emer gency number on your
mobile phone.
Ending an unin tentional emer gency call #
Select 0076onthe multifunction steering
wheel. Depress the button for se veral sec‐
onds. Tr
ansmitted data with the emer gency call Data transmit
tedby the eCall includes but is not
limited to:
R Vehicle's GPS position data
R GPS position data on thero ute (a few hun‐
dred me ters before the incident)
R Direction of tra vel
R Vehicle identification number
R Vehicle drive type
R Estimated number of people in theve hicle
R Whe ther Mercedes PRO connect is available
or not
R Whe ther the emer gency call was initiated
manually or automatically
R Time of the accident
R Language setting on the multimedia sy stem
Data transmit ted is vehicle information. For any
qu estions about the collection, use and sharing
of the eCall sy stem data, please contact MBU‐ Breakdown assis
tance 217
Page 301 of 354
Display messages
Int
roduction Fu
nction of display messages
The display messages appear on the multifunc‐
tion displa y.
The display messages with graphic displa yscan
be displa yed in simplified form at in the operating
instructions and may deviate from the display on
th e multifunction displa y.The multifunction dis‐
play sho wshigh-priority display messages in red.
In addition, a warning tone sounds for specific
display messa ges.
Ac t in accordance wi th the display messages and
comply with the additional instructions in this
operating instructions.
In addition, symbols are shown for some display
messa ges:
0091 Fu
rther information
0061 Hiding display messages
Yo u can use the left-hand Touch Control toselect
between the symbols byswiping tothe left or
ri ght. Pressing 0091displa ysfur ther information on
the multifunction displa y.Pressing 0061hides
th e display message.
Yo u can hide lo w-priority display messages by
pressing the¤ button or with the left-hand
To uch Control. The displ aymessages are sa ved in
th e message memor y.
Re ctify the cause of a display message as quickly
as possible.
Yo u cannot hide high-priority displ aymessages.
The multifunction display will show these display
messages until their causes ha vebeen rectified.
Calling up sa ved displ aymessages
On-boa rdcompu ter:
4 Service 5
1 Message
If th ere are no display messages, No Messages
appears on the multifunction displa y. #
Brows eth ro ugh the display messages by
swiping upwards or down wards on left-hand
To uch Control. #
Exiting the message memor y:press the
0038 button. Saf
ety sy stems Display messages
Possible causes/consequences and 0050 0050Solutions
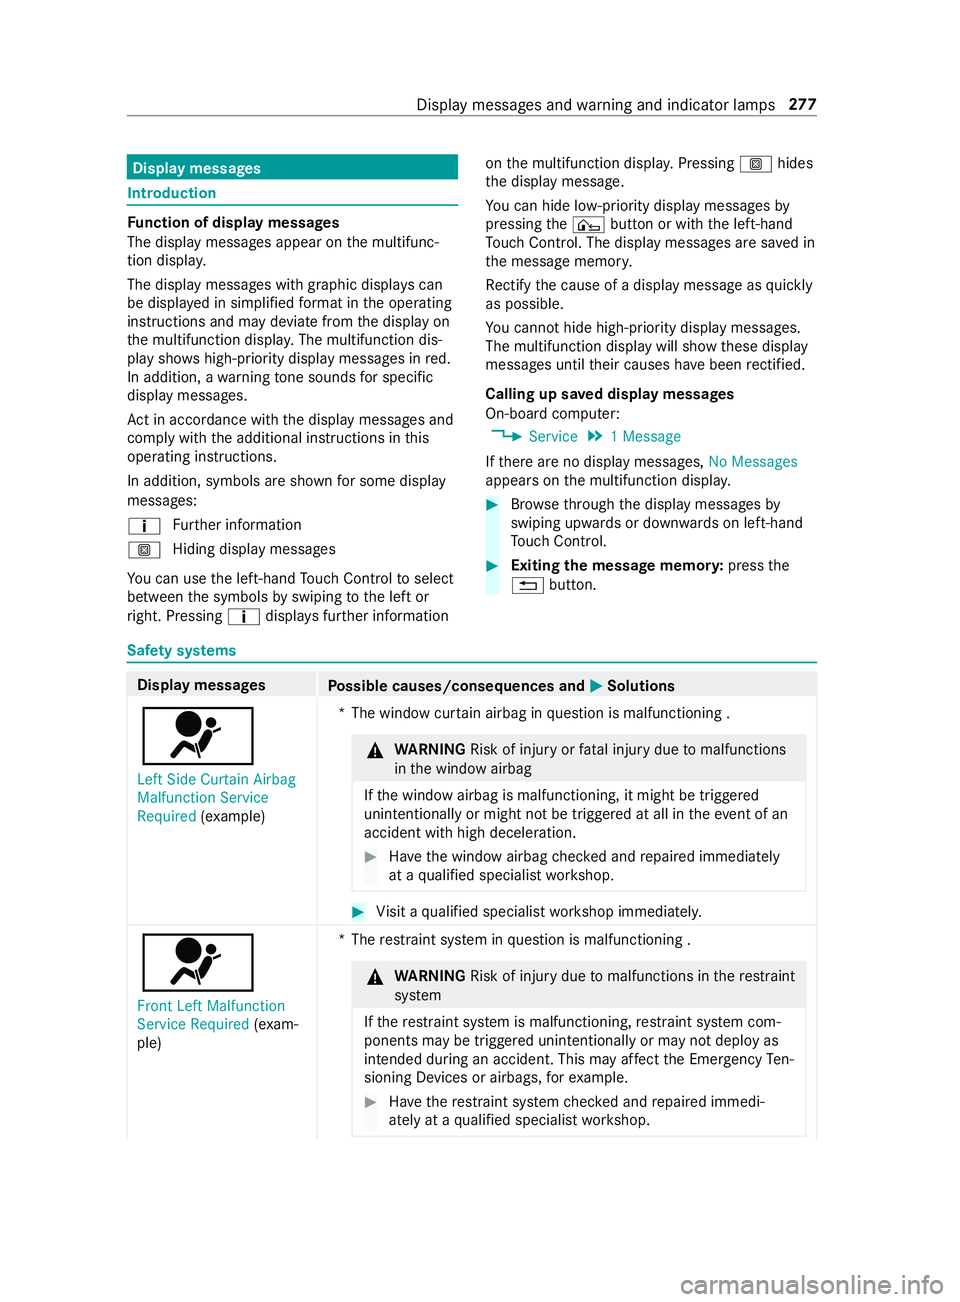
0075
Left Side Curtain Airbag
Malfunction Service
Required (exa mp le) *T
he window cur tain airbag in question is malfunctioning . &
WARNING Risk of inju ryor fata l injury due tomalfunctions
in the window airbag
If th e window airbag is malfunctioning, it might be triggered
unintentionally or might not be triggered at all in theeve nt of an
accident wi thhigh deceleration. #
Have the window airbag checked and repaired immediately
at a qualified specialist workshop. #
Visit a qualified specialist workshop immediately.
0075 Front Left Malfunction
Service Required (exa m‐
ple) *T
herestra int sy stem in question is malfunctioning . &
WARNING Risk of inju rydue tomalfunctions in there stra int
sy stem
If th ere stra int sy stem is malfunctioning, restra int sy stem com‐
ponents may be triggered unintentionally or may not deploy as
intended during an accident. This may af fect the Emer gency Ten‐
sioning Devices or airbags, forex ample. #
Have there stra int sy stem checked and repaired immedi‐
ately at a qualified specialist workshop. Display messages and
warning and indicator lamps 277
Page 302 of 354
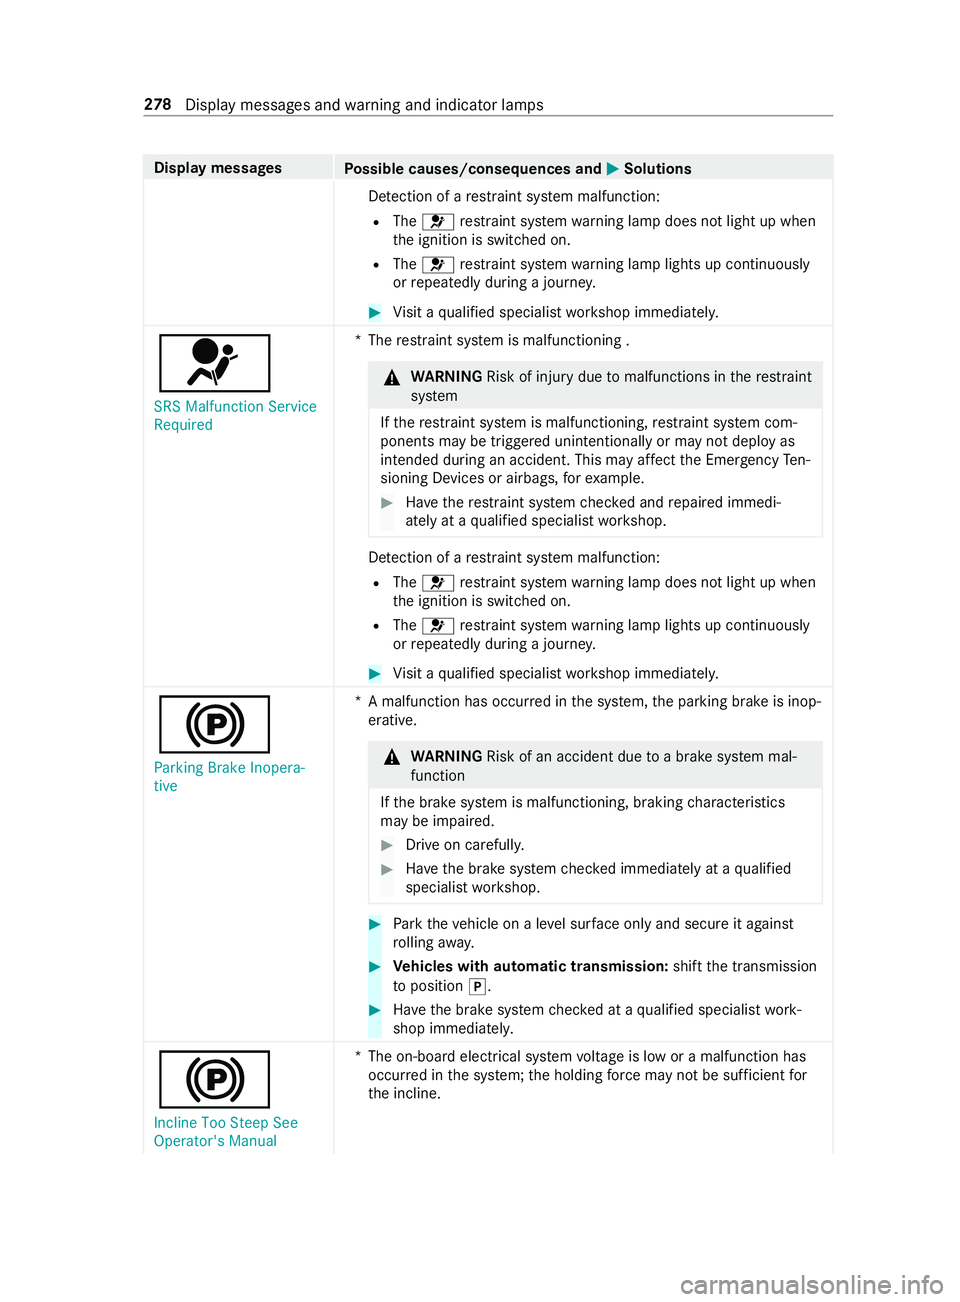
Display messages
Possible causes/consequences and 0050 0050Solutions
De tection of a restra int sy stem malfunction:
R The 0075 restra int sy stem warning lamp does not light up when
th e ignition is switched on.
R The 0075 restra int sy stem warning lamp lights up continuously
or repeatedly during a journe y. #
Visit a qualified specialist workshop immediately.
0075 SRS Malfunction Service
Required *T
herestra int sy stem is malfunctioning . &
WARNING Risk of inju rydue tomalfunctions in there stra int
sy stem
If th ere stra int sy stem is malfunctioning, restra int sy stem com‐
ponents may be triggered unintentionally or may not deploy as
intended during an accident. This may af fect the Emer gency Ten‐
sioning Devices or airbags, forex ample. #
Have there stra int sy stem checked and repaired immedi‐
ately at a qualified specialist workshop. De
tection of a restra int sy stem malfunction:
R The 0075 restra int sy stem warning lamp does not light up when
th e ignition is switched on.
R The 0075 restra int sy stem warning lamp lights up continuously
or repeatedly during a journe y. #
Visit a qualified specialist workshop immediately.
0024 Parking Brake Inopera-
tive *A
malfunction has occur red in the sy stem, the parking brake is inop‐
erative. &
WARNING Risk of an accident due toa brake sy stem mal‐
function
If th e brake sy stem is malfunctioning, braking characteristics
may be impaired. #
Drive on carefull y. #
Have the brake sy stem checked immediately at a qualified
specialist workshop. #
Park theve hicle on a le vel sur face only and secu reit against
ro lling away. #
Vehicles with automatic transmission: shiftthe transmission
to position 005D. #
Have the brake sy stem checked at a qualified specialist work‐
shop immediatel y.
0024 Incline Too Steep See
Operator's Manual *T
he on-board electrical sy stem voltage is low or a malfunction has
occur red in the sy stem; the holding forc e may not be suf ficient for
th e incline. 278
Displaymessa ges and warning and indicator lamps