2019 MERCEDES-BENZ EQC SUV display
[x] Cancel search: displayPage 120 of 629
#
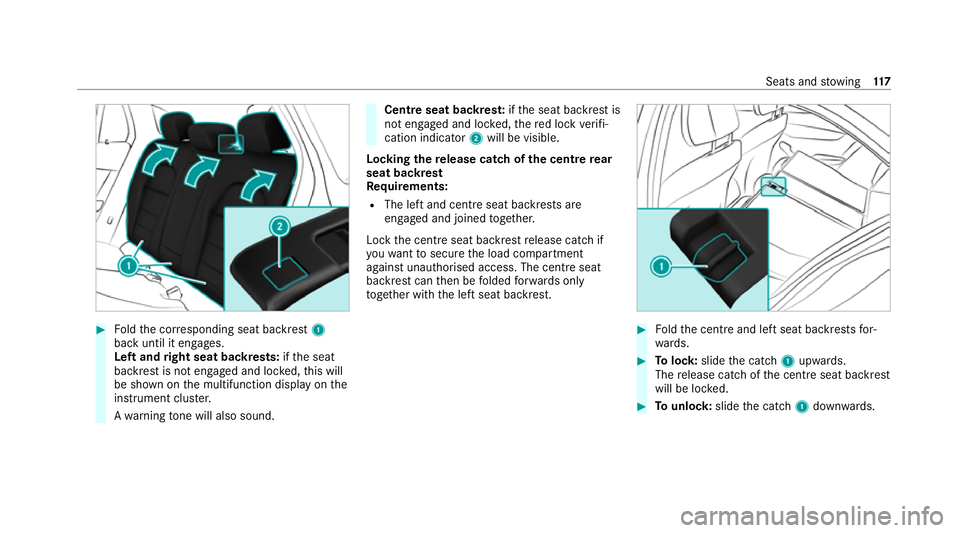
Foldthe cor responding seat backrest 1
back until it engages.
Left and right seat backrests: ifth e seat
backrest is not engaged and loc ked, this will
be shown on the multifunction display on the
instrument clus ter.
A wa rning tone will also sound. Centre seat backres
t:ifth e seat backrest is
not engaged and loc ked, there d lock verifi‐
cation indicator 2will be visible.
Lo cking there lease catch of the centre rear
seat backrest
Re quirements:
R The left and centre seat backrests are
engaged and joined toge ther.
Lock the cent reseat backrest release cat chif
yo uwa nttosecure the load compartment
against unauthorised access. The cent reseat
backrest can then be folded forw ards on ly
to get her with the left seat backrest. #
Foldthe cent reand left seat backrests for‐
wa rds. #
Tolock: slidethe catch 1upwards.
The release cat chofthe cent reseat backrest
will be loc ked. #
Tounlo ck:slide the catch 1down wards. Seats and
stowing 117
Page 135 of 629
R
The charging function and wireless connec‐
tion of the mobile phone totheve hicle's
ex terior aerial are only available if the ignition
is switched on.
R Small mobile phones may not be able tobe
ch arge d in everyposition of the mobile
phone stowage compartment.
R Largemobile phones which do not rest flat in
th e mobile phone stowage compartment may
not be able tobe charge d or connec ted with
th eve hicle's exterior aerial.
R The mobile phone may heat up during the
ch arging process. This may particular ly
depend on the applications (apps) cur rently
open in the bac kground.
R Toensure more ef ficient charging and con‐
nection with theve hicle's exterior aerial,
re mo vethe pr otective co ver from the mobile
phone. Pr otective co vers which are neces‐
sary for wireless charging are excluded. Wi
relessly charging a mobile phone Requ
irements: R
The mobile phone is suitable for wireless
ch arging. You can find a li stof compatible
mobile phones at:
http://www.mercedes-benz.com/connect #
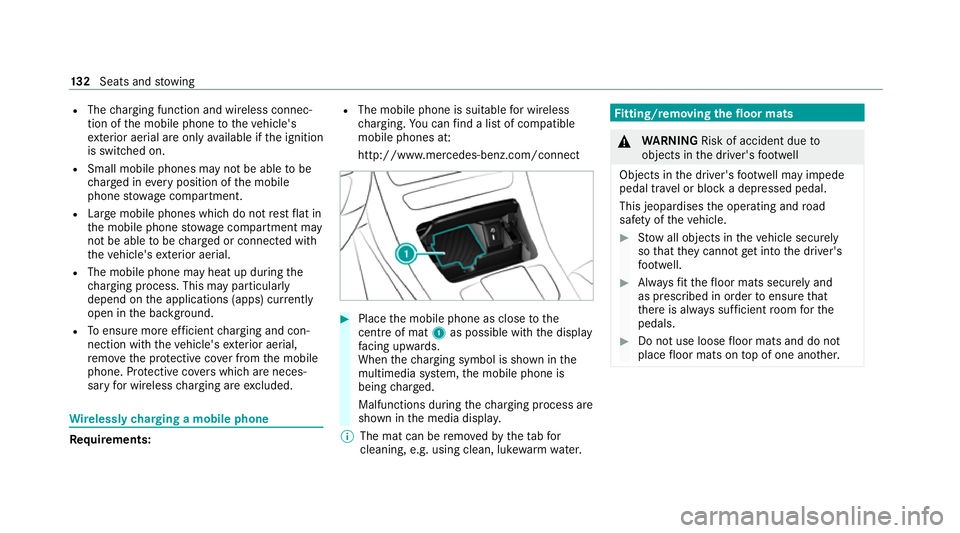
Place the mobile phone as close tothe
centre of mat 1as possible wi th the display
fa cing up wards.
When thech arging symbol is shown in the
multimedia sy stem, the mobile phone is
being charge d.
Malfunctions during thech arging process are
shown in the media displa y.
% The mat can be remo vedby theta bfor
cleaning, e.g. using clean, lu kewa rm wate r. Fi
tting/ removing the floormats &
WARNING Risk of accident due to
objects in the driver's foot we ll
Objects in the driver's foot we ll may impede
pedal tr avel or block a depressed pedal.
This jeopardises the operating and road
saf ety of theve hicle. #
Stow all objects in theve hicle securely
so that they cannot getinto the driver's
fo ot we ll. #
Alw aysfit th efloor mats securely and
as prescribed in order toensure that
th ere is alw ays suf ficient room forthe
pedals. #
Do not use loose floor mats and do not
place floor mats on top of one ano ther. 13 2
Seats and stowing
Page 143 of 629
Switching
Adaptive Highbeam Assist Plus
on/off #
Toswitch on: turnthe light switch tothe
à position. #
Switch on the main beam using the combina‐
tion switch.
When the main beam is switched on auto‐
matically in the dar k,the _ indicator
lamp on the multifunction display will light
up. #
Toswitch off: switch offthe main beam
using the combination switch. Setting
theex terior lighting switch-off delay
time Re
quirements:
R The light switch is in theà position. Multimedia sy
stem:
4 © 5
Settings 5
Lights
5 Ext. light. del. sw. off #
Set the switch-off delay time.
The exterior lighting is activated forth e set
time when theve hicle is par ked. Switching
the sur round lighting on/off Multimedia sy
stem:
4 © 5
Settings 5
Lights
5 Surround lighting
When Surround lighting is active,theex terior
lighting lights up for 40 seconds af terth eve hicle
is unloc ked. When youstart theve hicle, the sur‐
ro und lighting is deactivated and the automatic
driving lights are activated. #
Activate or deacti vate the function. Interior lighting
Ad
justing the in terior lighting Fr
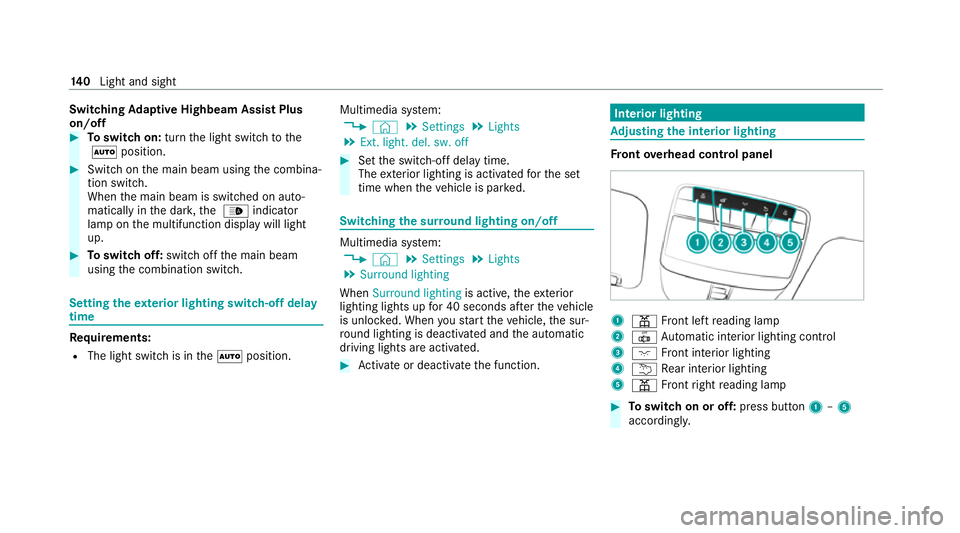
ont overhead control panel 1
p Front left reading lamp
2 | Automatic interior lighting control
3 c Front interior lighting
4 u Rear interior lighting
5 p Front right reading lamp #
Toswitch on or off: press button1–5
accordingly. 14 0
Light and sight
Page 148 of 629
#
Foldthe wiper arms back onto the wind‐
screen. #
Switch on the ignition. #
Press theî button on the combination
switch (/ page142).
The wiper arms will mo veinto the original
position.
Maintenance display #
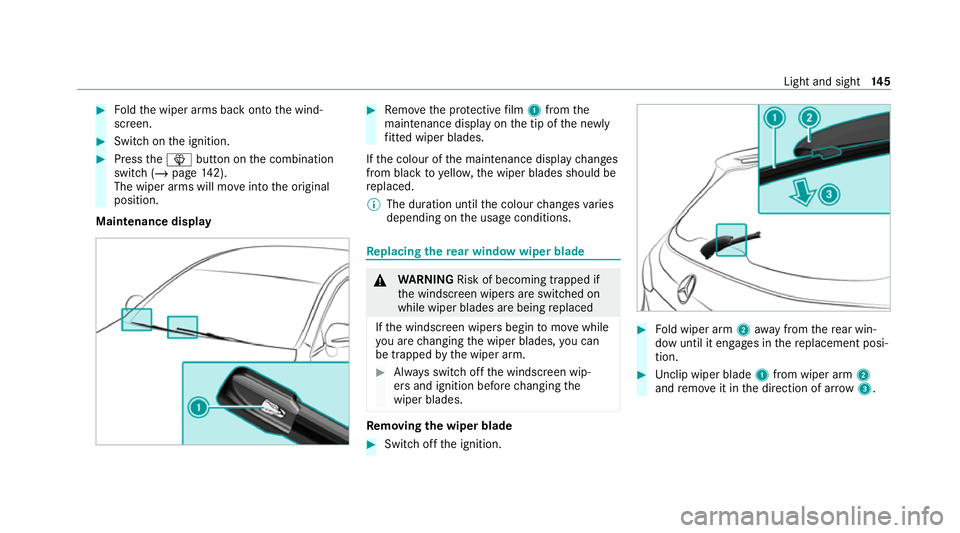
Remo vethe pr otective film 1 from the
maintenance display on the tip of the newly
fi tted wiper blades.
If th e colour of the maintenance display changes
from black to yellow, the wiper blades should be
re placed.
% The duration until the colour changes varies
depending on the usage conditions. Re
placing the rear window wiper blade &
WARNING Risk of becoming trapped if
th e windscreen wipers are switched on
while wiper blades are being replaced
If th e windscreen wipers begin tomo vewhile
yo u are changing the wiper blades, you can
be trapped bythe wiper arm. #
Alw ays switch off the windscreen wip‐
ers and ignition before changing the
wiper blades. Re
moving the wiper blade #
Switch off the ignition. #
Fold wiper arm 2away from there ar win‐
dow until it engages in there placement posi‐
tion. #
Unclip wiper blade 1from wiper arm 2
and remo veit in the direction of ar row 3. Light and sight
14 5
Page 153 of 629
Overview of climate control sy
stems Note
s on climate control An interior air
filter in combination with the pre‐
fi lter in the engine compartment must alw ays be
used so that the air conditioning sy stem, pollu‐
tion lebutton vel monitoring and the air filtration
wo rkcor rectly. Ma kesure that thefilter is ins tal‐
led cor rectly and thefilter housing in the engine
compartment is closed cor rectly using the cap
and alw ays tightly sealed when in operation. Use
fi lters recommended and appr ovedby
Mercedes-Benz. Alw ays ha veservice workcar‐
ri ed out at a qualified specialist workshop. THERMOTRONIC control panel
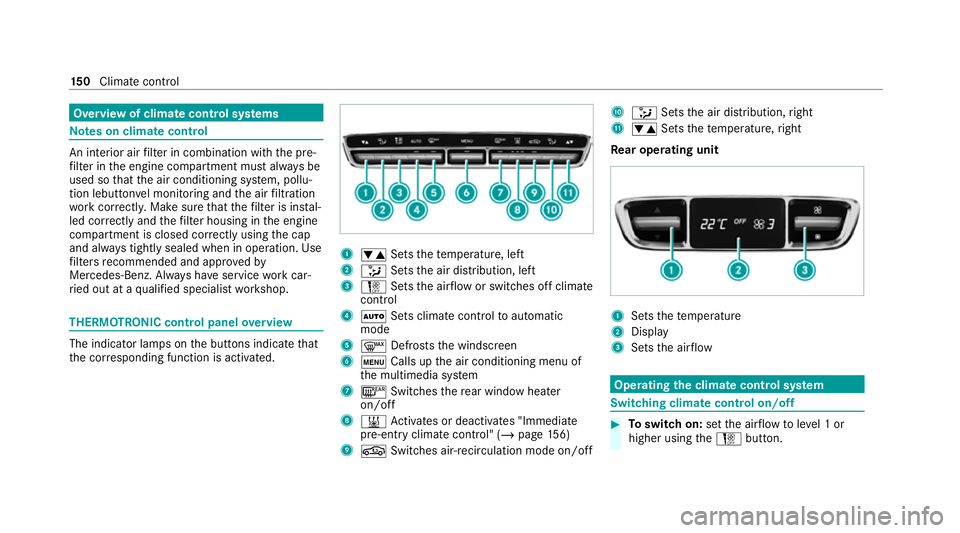
overview The indicator lamps on
the buttons indicate that
th e cor responding function is activated. 1
w Setsthete mp erature, left
2 _ Setsthe air distribution, left
3 H Setsthe air flow or switches off climate
control
4 Ã Sets climate control toautomatic
mode
5 ¬ Defrosts the windscreen
6 t Calls up the air conditioning menu of
th e multimedia sy stem
7 ¤ Switches there ar wind owheater
on/off
8 & Activates or deacti vates "Immediate
pre-entry climate contro l" (/page156)
9 g Switches ai r-re circulation mode on/off A
_ Setsthe air distribution, right
B w Setsthete mp erature, right
Re ar operating unit 1
Sets thete mp erature
2 Display
3 Sets the air flow Operating
the clima tecont rol sy stem Switching clima
tecont rol on/off #
Toswitch on: setthe air flow toleve l 1 or
higher using theH button. 15 0
Climate cont rol
Page 154 of 629
#
Toswitch off: setthe air flow toleve l 0 using
th eH button.
% If climate control is switched off, the win‐
do ws may mist up more quickl y.Switch off
climate control only brie fly. Calling up
the air conditioning menu Calling up
the air conditioning menu using
th e multimedia sy stem #
Select one of thete mp erature displa ysatthe
lo we r edge of the media displa y.
Calling up the air conditioning menu using
th e but ton on the control panel #
Press thet button on the control panel.
% The button on the control panel is not availa‐
ble on all equipment variants. In this case,
th e air conditioning menu can only be called
up using the multimedia sy stem. Ac
tivating/deactivating the A/C function via
the multimedia sy stem The A/C function heats, cools and dehumidifies
th
eve hicle's interior air. #
Call up the air conditioning menu
(/ page 151). #
Select First row of seats . #
Select A/C.
Depending on the pr evious status, the func‐
tion is activated or deactivated. Setting climate control
toautomatic mode In auto
matic mode, the set temp erature is con‐
trolled and maintained at a const ant levelby the
air suppl y. #
Press the à button. #
Toswitch tomanual mode: pressthe H
or _ button. Climate
style Climate
style function
In automatic mode, you can select thefo llowing
climate style settings forth e driver's and front
passenger areas:
R FOCUS: high air flow , slightly cooler setting
R MEDIUM: medium air flow ,st andard setting
R DIFFUSE: low airflow , slightly warmer and
draught-f ree setting Overview of
the air distribution settings The symbols on
the display indicate which vents
th e air flow is being directed thro ugh:
¯ def
rost ervents
P centre and side air
vents
O fo
ot we llve nts
S centre, side and
foot we llve nts
a defros
ter and foot we llve nts
_ all
vents
b defros
ter,middle and side air vents Clima
tecontrol 151
Page 163 of 629
#
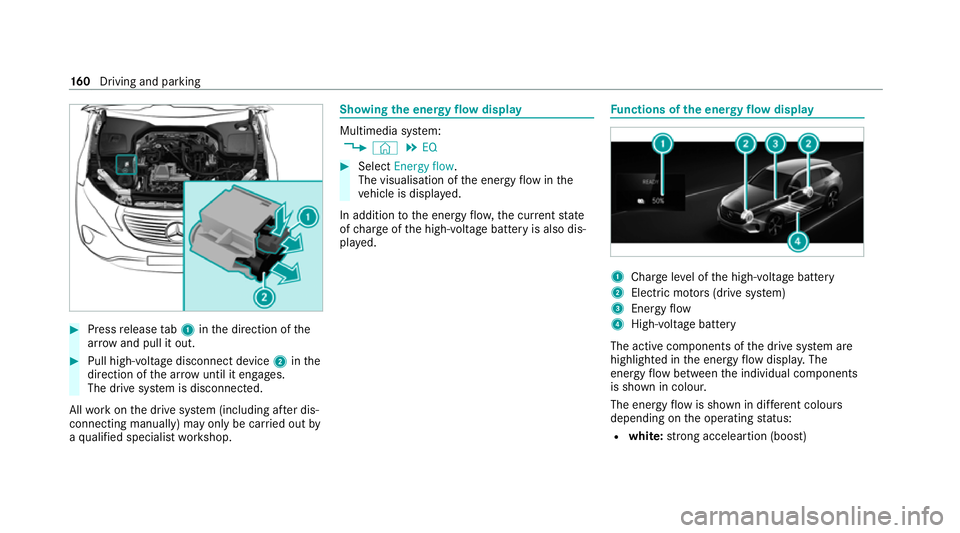
Press release tab1 inthe direction of the
ar row and pull it out. #
Pull high-voltage disconnect device 2inthe
direction of the ar row until it en gage s.
The drive sy stem is disconnected.
All workon the drive sy stem (including af ter dis‐
connecting manually) may only be car ried out by
a qu alified specialist workshop. Showing
the energy flow display Multimedia sy
stem:
4 © 5
EQ #
Select Energy flow.
The visualisation of the energy flow inthe
ve hicle is displa yed.
In addition tothe energy flow ,th e cur rent state
of charge ofthe high-voltage battery is also dis‐
pla yed. Fu
nctions of the energy flow displ ay 1
Char geleve l of the high-voltage battery
2 Elect ric mo tors (drive sy stem)
3 Energy flow
4 High-voltage battery
The active components of the drive sy stem are
highlighted in the energy flow displa y.The
energy flow between the individual components
is shown in colour.
The energy flow is shown in dif fere nt colou rs
depending on the operating status:
R white: strong acceleartion (boost) 16 0
Driving and pa rking
Page 166 of 629
#
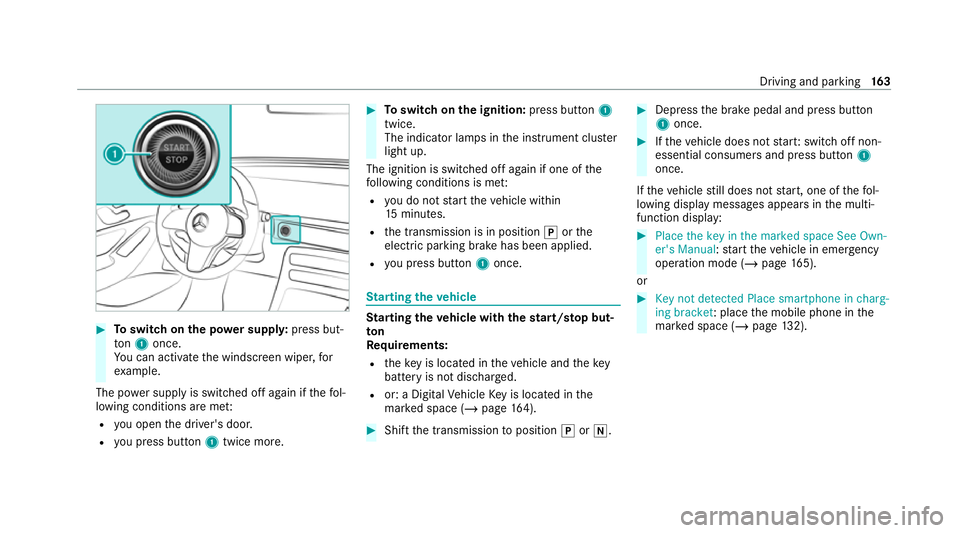
Toswitch on the po wer supp ly:press but‐
to n1 once.
Yo u can activate the windscreen wiper, for
ex ample.
The po wer supp lyis switched off again if thefo l‐
lowing conditions are me t:
R you open the driver's door.
R you press but ton1 twice more. #
Toswitch on the ignition: press button 1
twice.
The indicator lamps in the instrument clus ter
light up.
The ignition is switched off again if one of the
fo llowing conditions is me t:
R you do not start theve hicle within
15 minutes.
R the transmission is in position jorthe
electric parking brake has been applied.
R you press but ton1 once. St
arting theve hicle St
arting theve hicle with thest art/s top but‐
ton
Requ irements:
R theke y is located in theve hicle and thekey
battery is not dischar ged.
R or: a Digital Vehicle Key is located in the
mar ked space (/ page164). #
Shift the transmission toposition jori. #
Depress the brake pedal and press button
1 once. #
Ifth eve hicle does not star t:switch off non-
essential consumers and press button 1
once.
If th eve hicle still does not start, one of thefo l‐
lowing display messages appears in the multi‐
function display: #
Place the key in the marked space See Own-
er's Manual :st art theve hicle in emer gency
operation mode (/ page 165).
or #
Key not detected Place smartphone in charg-
ing bracket: place the mobile phone in the
mar ked space (/ page132). Driving and pa
rking 16 3