2019 MERCEDES-BENZ EQC SUV audio
[x] Cancel search: audioPage 21 of 629

#
Use recycled reconditioned compo‐
nents and pa rts from Daimler AG.*
NO
TEImpairment of the operating ef fi‐
ciency of there stra int sy stems from
ins talling accessory parts or from repairs
or we lding Airbags and seat belt
tensioners, as well as
control units and sensors forth ere stra int
sy stems, may be ins talled in thefo llowing
areas of your vehicle:
R doors
R door pillars
R door sills
R seats
R cockpit
R instrument clus ter
R centre console
R late ra lro of frame #
Do not ins tall accessory parts such as
audio sy stems in these areas. #
Do not car ryout repairs or welding. #
Have accesso ries retrofitted at a quali‐
fi ed specialist workshop. Yo
u could jeopardise the operating saf ety of your
ve hicle if you use parts, tyres and wheels as well
as accessories releva nt tosaf ety which ha venot
been appr ovedby Mercedes-Benz. Saf ety-re le‐
va nt sy stems, e.g. the brake sy stem, may mal‐
function. Only use Mercedes-Benz Genuine Parts
or parts of equal qualit y.Only use tyres, wheels
and accessories that ha vebeen specifically
appr ovedfo ryo ur vehicle model.
Mercedes-Benz tests original parts and con ver‐
sion parts and accessories that ha vebeen spe‐
cifically appr ovedfo ryo ur vehicle model forth eir
re liability, saf ety and suitabilit y.Despite ongoing
ma rket resear ch, Mercedes-Benz is unable to
assess other parts. Mercedes-Benz therefore
accepts no responsibility forth e use of such
parts in Mercedes-Benz vehicles, even if they
ha ve been of ficially appr oved or independently
appr ovedby ate sting centre. Cer
tain parts are only of ficially appr ovedfor
ins tallation or modification if they comply wi th
legal requirements. All Mercedes-Benz Genuine
Pa rts meet the appr oval requ irements. The use
of non-appr oved parts may in validate theve hi‐
cle's general operating pe rmit.
This is the case in thefo llowing situations:
R theve hicle type is dif fere nt from that for
which theve hicle's general operating pe rmit
wa s granted.
R other road users could be endangered.
R the noise le velget swo rse.
Alw ays specify theve hicle identification number
(VIN) (/ page511) when orde ring Mercedes-
Benz Genuine Parts. Owner's Manual
This Owner's Manual describes all models and
all standard and optional equipment available for
yo ur vehicle at the time of this Owner's Manual
going topress. Countr y-specific dif fere nces are
possible. No tethat your vehicle may not be fit‐
te d with all features desc ribed. This is also the18
General no tes
Page 31 of 629

Fa
ult memories in theve hicle can be reset by a
service outlet as part of repair or maintenance
wo rk.
Depending on the selected equipment, you can
import data into vehicle con venience and info‐
ta inment functions yourself.
This includes, forex ample:
R multimedia data such as music, films or pho‐
to sfo r playback in an integrated multimedia
sy stem
R address book data for use in connection with
an integrated hands-free sy stem or an inte‐
grated navigation sy stem
R entered navigation destinations
R data about the use of internet services
This data can be sa ved locally in theve hicle or it
is located on a device which you ha veconnected
to theve hicle (e.g. a smartphone, USB flash
drive or MP3 pla yer). If this data is stored in the
ve hicle, you can dele teit at any time. This data
is sent tothird parties only at your requ est, par‐
ticular lywhen you use online services in accord‐
ance with the settings that you ha veselected. Yo
u can store or change con venience settings/
individualisations in theve hicle at any time.
Depending on the equipment, this includes, for
ex ample:
R settings forth e seat and steering wheel posi‐
tions
R suspension and climate control settings
R customisations such as interior lighting
If yo ur vehicle is accordingly equipped, you can
connect your smartphone or ano ther mobile end
device totheve hicle. You can cont rolth is by
means of the control elements integrated in the
ve hicle. Images and audio from the smartphone
can be output via the multimedia sy stem. Cer‐
ta in information is simultaneously transfer redto
yo ur smartphone.
Depending on the type of integration, this can
include:
R general vehicle data
R position data
This allo wsyouto use selected apps on your
smartphone, such as navigation or music play‐ bac
k.There is no fur ther interaction between the
smartphone and theve hicle; in particular, vehi‐
cle data is not directly accessible. Which type of
fur ther data processing occurs is de term ined by
th e pr ovider of the specific app used. Which set‐
tings you can make, if an y,depends on the spe‐
cific app and the operating sy stem of your
smartphone. Online services
Wire
less network connection
If yo ur vehicle has a wireless network connec‐
tion, it enables data tobe exc hanged between
yo ur vehicle and additional sy stems. The wire‐
less network connection is enabled via theve hi‐
cle's transmission and reception unit or via con‐
nected mobile end devices (e.g. sma rtphones).
Online functions can be used via the wireless
network connection. This includes online serv‐
ices and applications/apps pr ovided bythe man‐
ufacturer or other pr oviders.
Manu factu rer's se rvices
Re garding online services of the manufacturer,
th e individual functions are described bythe 28
General no tes
Page 234 of 629
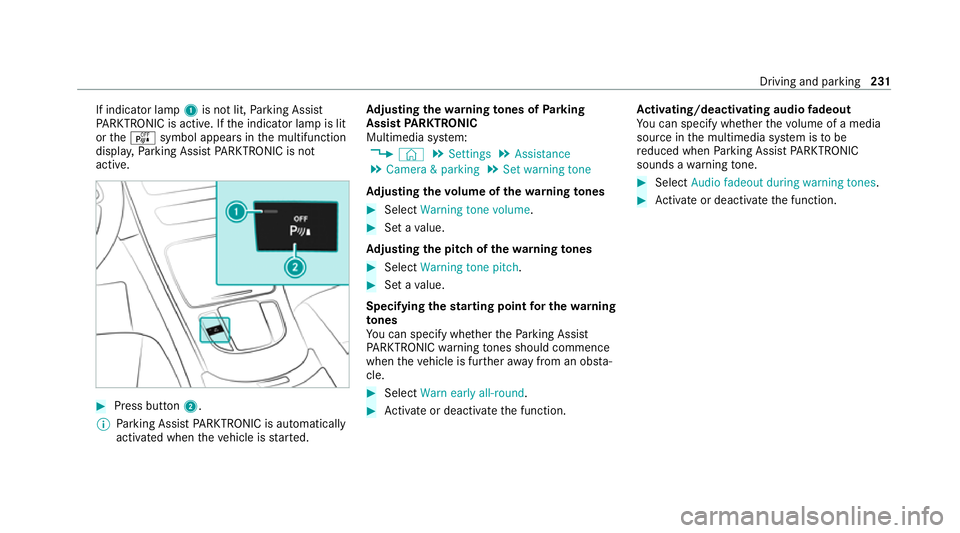
If indicator lamp
1is not lit, Parking Assist
PA RKTRONIC is active. If the indicator lamp is lit
or theé symbol appears in the multifunction
displa y,Pa rking Assist PARKTRONIC is not
active. #
Press but ton2.
% Parking Assist PARKTRONIC is automatical ly
activated when theve hicle is star ted. Ad
justing the warning tones of Parking
Assist PARKTRONIC
Multimedia sy stem:
4 © 5
Settings 5
Assistance
5 Camera & parking 5
Set warning tone
Ad justing the volume of thewa rning tones #
Select Warning tone volume. #
Set a value.
Ad justing the pitch of the warning tones #
Select Warning tone pitch. #
Set a value.
Specifying thest arting point for the warning
to nes
Yo u can specify whe ther thePa rking Assist
PA RKTRONIC warning tones should commence
when theve hicle is fur ther aw ay from an obs ta‐
cle. #
Select Warn early all-round. #
Activate or deacti vate the function. Ac
tivating/deactivating audio fadeout
Yo u can specify whe ther thevo lume of a media
source in the multimedia sy stem is tobe
re duced when Parking Assist PARKTRONIC
sounds a warning tone. #
Select Audio fadeout during warning tones. #
Activate or deacti vate the function. Driving and parking
231
Page 277 of 629
The
following head-up display settings can be
adjus ted:
R Position
R Brightness
R Display content #
Toselect a setting: swipe upwards or down‐
wa rds on the left-hand Touch Control. #
Press the left-hand Touch Control. #
Toadjust a value: swipe upwards or down‐
wa rds on the left-hand Touch Control. #
Press the left-hand Touch Control. Head-up Display
Fu
nction of the head-up display The head-up display projects
thefo llowing into
th e driver's field of vision:
R information from the navigation sy stem
R information from the driver assis tance sys‐
te ms
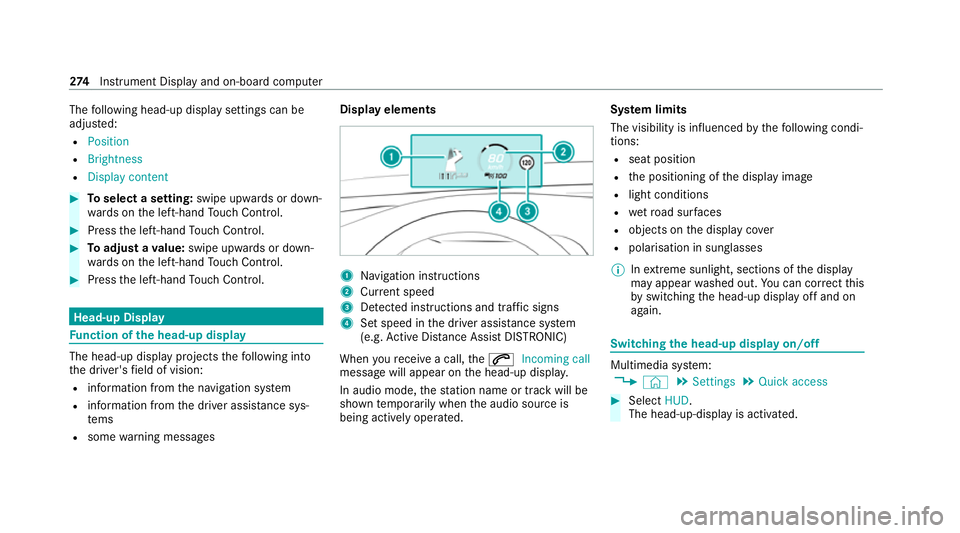
R some warning messages Display elements
1
Navigation instructions
2 Curr ent speed
3 Detected instructions and traf fic signs
4 Set speed in the driver assis tance sy stem
(e.g. Active Dis tance Assi stDISTRONIC)
When youre cei vea call, the6 Incoming call
message will appear on the head-up displa y.
In audio mode, thest ation name or track will be
shown temp orarily when the audio source is
being actively operated. Sy
stem limits
The visibility is influenced bythefo llowing condi‐
tions:
R seat position
R the positioning of the display image
R light conditions
R wetro ad sur faces
R objects on the display co ver
R polarisation in sunglasses
% Inextreme sunlight, sections of the display
may appear washed out. You can co rrect this
by switching the head-up display off and on
again. Switching
the head-up display on/off Multimedia sy
stem:
4 © 5
Settings 5
Quick access #
Select HUD.
The head-up-display is activated. 274
Instrument Display and on-board computer
Page 303 of 629

#
Tomo vethe digital map: swipe in any
direction. #
Touse handwriting toenter characters:
write thech aracter with one finger on the
to uchsc reen.
Tw o-finger swipe #
Tozoom in and out of the map: movetwo
fi ngers toget her or apart. #
Toenlar georreduce the size of a section
of a website: movetwo fingers toget her or
apart. #
Toturn the map: turn anti-clockwise or
clockwise using two fingers.
To uching, holding and moving #
Tomo vethe map: touch theto uchsc reen
and mo veyour finger in any di rection. #
Toset thevo lume on a scale: touch the
to uchsc reen and mo vethefinger tothe left
or right. To
uching and holding #
Tosave the destination in the map: touch
th eto uchsc reen and hold until a message is
shown. #
Tocall up a global menu in the applica‐
tions: touch theto uchsc reen and hold until
th eOPTIONS menu appears.
Setting acoustic operation feedba ckfor the
to uchscreen
Multimedia sy stem:
4 © 5
Settings 5
System
5 Controls
The function is suppor tedby the selection in a
list. #
Select Acoustic operating feedback. #
Set Normal, LoudorOff.
If th e function is activated you will hear a
clicking sound when sc rolling in a list. When
th e beginning or end of the list is reached
yo u will hear ano ther clicking sound. To
uchpad Operating
theto uchpad 1
% button
Pressing brief ly:re turns tothe pr evious dis‐
play
2 ~ button
Pressing: calls up the control menu of the
last active audio source 300
MBUX multimedia sy stem
Page 304 of 629
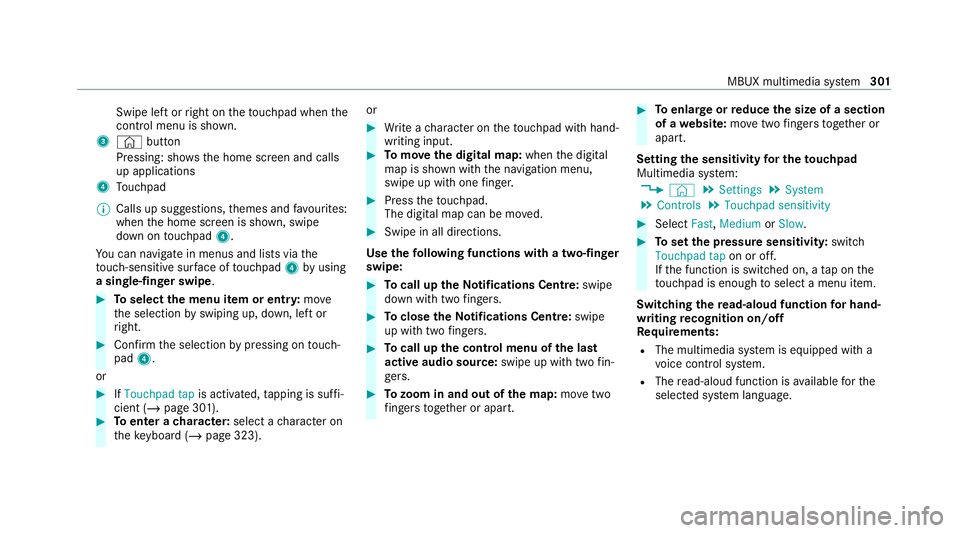
Swipe le
ftor right on theto uchpad when the
control menu is shown.
3 © button
Pressing: sho ws the home screen and calls
up applications
4 Touchpad
% Calls up suggestions, themes and favo urites:
when the home screen is shown, swipe
down on touchpad 4.
Yo u can navigate in menus and lists via the
to uch-sensitive sur face of touchpad 4byusing
a single-finger swipe .#
Toselect the menu item or entr y:mo ve
th e selection byswiping up, down, left or
ri ght. #
Confirm the selection bypressing on touch‐
pad 4.
or #
IfTouchpad tap is activated,tapping is suf fi‐
cient (/ page 301). #
Toenter a character: select acharacter on
th eke yboard ( /page 323). or #
Write a character on theto uchpad with hand‐
writing input. #
Tomo vethe digital map: whenthe digital
map is shown with the navigation menu,
swipe up with one finger. #
Press theto uchpad.
The digital map can be mo ved. #
Swipe in all directions.
Use thefo llowing functions with a two-finger
swipe: #
Tocall up theNo tifications Centre: swipe
down wi thtwo fingers. #
Toclose theNo tifications Centre: swipe
up wi thtwo fingers. #
Tocall up the control menu of the last
active audio source: swipe up with twofin‐
ge rs. #
Tozoom in and out of the map: movetwo
fi ngers toget her or apart. #
Toenlar georreduce the size of a section
of a website: movetwo fingers toget her or
apart.
Setting the sensitivity for the touchpad
Multimedia sy stem:
4 © 5
Settings 5
System
5 Controls 5
Touchpad sensitivity #
Select Fast,Medium orSlow . #
Toset the pressure sensitivit y:switch
Touchpad tap on or off.
If th e function is switched on, a tap on the
to uchpad is enough toselect a menu item.
Switching there ad-aloud function for hand‐
writing recognition on/off
Re quirements:
R The multimedia sy stem is equipped with a
vo ice control sy stem.
R The read-aloud function is available forthe
selected sy stem language. MBUX multimedia sy
stem 301
Page 305 of 629
Multimedia sy
stem:
4 © 5
Settings 5
System 5
Audio
5 System feedback #
Switch Read out handwriting recognition on
or off.
If th e function is activated, characters are
re ad aloud as they are written on theto uch‐
pad.
Ac tivating/deactivating haptic ope rating
fe edba ckfor the touchpad
Multimedia sy stem:
4 © 5
Settings 5
System
5 Controls
The function supports you when making entries
on theto uchpad and when selecting menus. #
Swit chHaptic operating feedback on or off.
When the function is activated, a tactile feed‐
back in thefo rm of a vibration is ef fected
when theto uchpad is operated. Setting acou
stic operating feedba ckfor the
to uchpad
Multimedia sy stem:
4 © 5
Settings 5
System
5 Controls
The function is suppor tedby the selection in a
list. #
Select Acoustic operating feedback. #
Set Normal, LoudorOff.
If th e function is activated you will hear a
clicking sound when sc rolling in a list. When
th e beginning or end of the list is reached
yo u will hear ano ther clicking sound.
Selecting a station and track using the
to uchpad #
Press the~ button on theto uchpad.
The cont rol menu appears forth e audio
source that wa s last selected. #
Swipe left or right using one finger.
Ra dio: the pr evious or next station is set.
Media source: the pr evious or next track is
selec ted. #
Tohide the control menu: pressthe~
button on theto uchpad. MBUX Interior Assistant
Note
s on lasers and laser classification &
WARNING Risk of inju ryfrom laser radi‐
ation from the camera
This product uses a laser sy stem. If the hous‐
ing is opened or damaged, invisible laser
beams can escape in an uncontrolled man‐
ner.
Laser radiation can damage your retina. #
Do not open the housing. #
Alw ays ha vemaintenance workand
re pairs car ried out byaqu alified spe‐
cialist workshop. This device is a class 1 laser product in accord‐
ance with DIN EN 60825-1:20
14302
MBUX multimedia sy stem
Page 315 of 629
%
During synchronisation the profile lis tand
th e profile functions are bloc ked.
% Note on data pr otection: ifyo u do not wish
to share your data with Mercedes me, make
sure that the automatic synchronisation is
switched off and do not select Synchronise
profiles now .
Showing the profile selection when entering
Re quirements:
R Atleast one profile has been created.
Multimedia sy stem:
4 © 5
f Profiles
If th e option is activated, you can see a profile as
soon as youget in. #
Select General settings. #
Activate Show profile selection when enter-
ing .
When theve hicle is star ted, the media dis‐
play sho wsthe active profile. Themes
Overview of
themes
Yo u can configure theve hicle settings according
to yo ur preferences and sa veas a theme. A
th eme can be called up any time via the home
screen. There is then no need tomake the
desired settings again.
There are pre-defined themes available, e.g.
Journe y,Efficiency and Lounge.
Example for the use of themes
Fo rre cur ring driving situations, su chas long
drives on the mo torw ay,yo u can sa veyour pre‐
fe rred settings in a theme in theve hicle.
Yo u can sa vethefo llowing settings in a theme,
fo rex ample:
R Displa ys(e.g. navigation map or tach ome ter)
R Prefer redra dio station
R Favo ured drive program
These settings are sa ved under the name you
wish when setting up a theme (/ page313). On
th e next mo torw ay jou rney yo u can select this
th eme and thereby restore your settings. Content of a
theme
Depending on vehicle equipment thefo llowing
settings can be sa ved in a theme:
R Setting of the Instrument Display
(/ page 263)
R Setting of the Head-up Display (/ page273)
R Setting of the ambient lighting (/ page141)
R Active audio sou rce, e.g. radio or USB
R Starting sc reen forth e media display
R Visual style (/ page 329)
R DYNA MIC SELECT drive program
(/ page 172)
R Navigation sy stem settings
% Atheme conta insthe cur rently acti veset‐
tings in theve hicle.
Calling up themes
Multimedia sy stem:
4 © #
When the home screen is shown, swipe up
until THEMES appears. #
Select a theme. 312
MBUX multimedia sy stem