2019 MERCEDES-BENZ EQC SUV ABS
[x] Cancel search: ABSPage 12 of 629
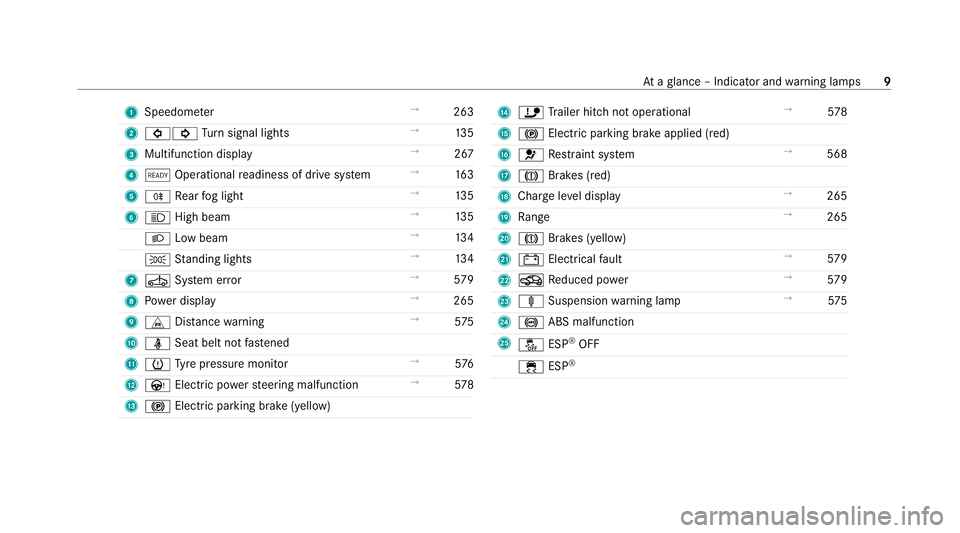
1
Speedom eter →
263
2 #! Turn signal lights →
13 5
3 Multifunction display →
267
4 õ Operational readiness of drive sy stem →
16 3
5 R Rear fog light →
13 5
6 K High beam →
13 5
L Low beam →
13 4
T Standing lights →
13 4
7 Ú System er ror →
579
8 Powe r display →
265
9 L Distance warning →
575
A ü Seat belt not fastened
B h Tyre pressure monitor →
576
C Ù Electric po werst eering malfunction →
578
D ! Electric pa rking brake (yellow) E
ï Trailer hit chnot operational →
578
F ! Electric pa rking brake applied (red)
G 6 Restra int sy stem →
568
H J Brakes (red)
I Charge le vel display →
265
J Range →
265
K J Brakes (yellow)
L # Electrical fault →
579
M O Reduced po wer →
579
N ä Suspension warning lamp →
575
O ! ABS malfunction
P å ESP®
OFF
÷ ESP® At
aglance – Indicator and warning lamps 9
Page 22 of 629
case
for sy stems and functions releva nt to
saf ety. Therefore, the equipment on your vehicle
may dif fer from that in the descriptions and illus‐
trations.
The original pur chase agreement foryo ur vehicle
contains a list of all of the sy stems in your vehi‐
cle.
Should you ha veany questions concerning
equipment and operation, please consult a
Mercedes-Benz Service Centre.
The Owner's Manual and Service Booklet are
impor tant documents and should be kept inthe
ve hicle. Operating saf
ety &
WARNING Risk of accident due tomal‐
functions or sy stem failures
If yo u do not ha vethe prescribed service/
maintenance workor any requiredrepairs
car ried out, this could result in malfunctions
or sy stem failures. #
Alw ays ha vethe prescribed service/
maintenance workas well any required
re pairs car ried out at a qualified spe‐
cialist workshop. &
WARNING Risk of accident and inju ryas
a re sult of incor rect modifications to
electronic component parts
Modification toelectronic components, their
software or wiring could impair their function
and/or the function of other networ ked com‐
ponent parts. In particular, sy stems releva nt
to saf ety could also be af fected.
As a result, they may no longer function as
intended and/or endanger the operating
saf ety of theve hicle. #
Neverta mp er with the wiring and elec‐
tronic component parts or their soft‐
wa re. #
You should ha veall workon electrical
and electronic components car ried out
at a qualified specialist workshop. If
yo u modify the on-board electronics, thege n‐
eral operating pe rmit is rende red in valid.
Obser vethe "On-board electronics" section in
"Technical data".
* NO
TEDama getotheve hicle In
thefo llowing situations, in particular, there
is a risk of damage totheve hicle:
R theve hicle becomes grounded, e.g. on a
high kerb or an unpa vedro ad
R theve hicle is driven toofast over an
obs tacle, e.g. a kerb, speed bump or pot‐
hole
R a heavy object strike sth e underbody or
ch assis components
In situations such as this, the body, the
underbody, chassis components, wheels or
tyres could be damaged without the damage
being visible. Components damaged in this
wa y can unexpec tedly fail or, in the case of
an accident, may not absorb the loads that
arise as intended. Gene
ral no tes 19
Page 67 of 629
Fr
ont passenger seat – NotesNote
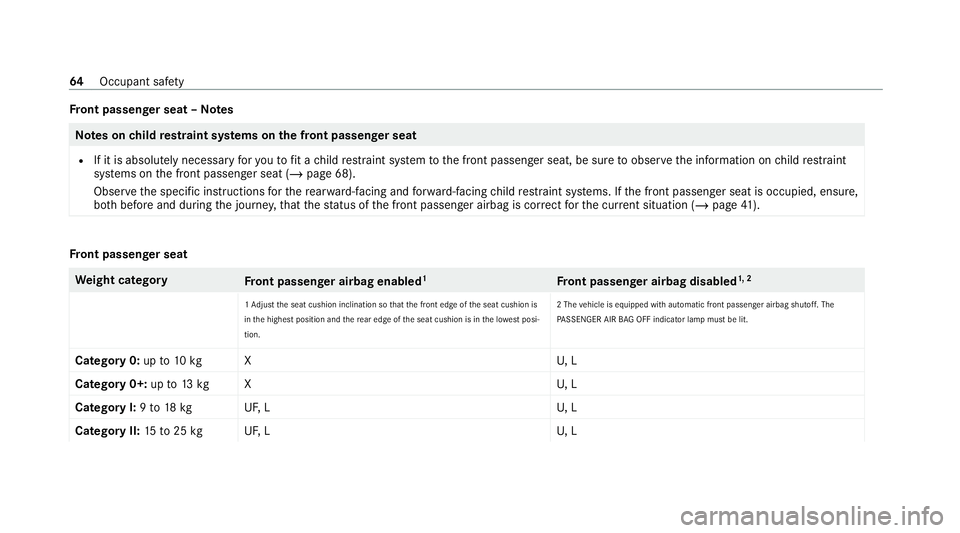
s onchild restra int sy stems on the front passenger seat
R If it is absolutely necessary foryo uto fit a child restra int sy stem tothe front passenger seat, be sure toobser vethe information on child restra int
sy stems on the front passenger seat (/ page 68).
Obser vethe specific instructions forth ere ar wa rd-facing and forw ard-facing child restra int sy stems. If the front passenger seat is occupied, ensure,
bo th before and during the journe y,that thest atus of the front passenger airbag is cor rect forth e cur rent situation (/ page 41). Fr
ont passenger seat We
ight category
Front passenger airbag enabled 1
Front passenger airbag disabled 1, 2
1 Ad just the seat cushion inclination so that the front edge of the seat cushion is
in the highest position and there ar edge of the seat cushion is in the lo west posi‐
tion. 2 The
vehicle is equipped with automatic front passenger airbag shutoff. The
PA SSENGER AIR BAG OFF indicator lamp must be lit.
Category 0: upto10 kg XU , L
Category 0+: upto13 kg XU , L
Category I: 9to 18 kg UF,LU , L
Category II: 15to25 kg UF,LU , L64
Occupant saf ety
Page 70 of 629
Make sure
you obse rveth efo llowing informa‐
tion:
R Neverfit a rear wa rd-facing child restra int
sy stem tothe front passenger seat
R Alw aysfit a rear wa rd-facing child restra int
sy stem toa suitable rear seat
- Suitability of seats for attaching belt-
secured child restra int sy stems
(/ page 63)
- Secure thech ild restra int sy stem with the
seat belt on there ar seat (/ page 65).
R Notes on rear wa rd-facing and forw ard-facing
ch ild restra int sy stems on the front
passenger seat (/ page67 ) Note
s onrear wa rd-facing and forw ard-facing
ch ild restra int sy stems on the front
passenger seat &
WARNING Risk of inju ryor death from
using a rear wa rd-facing child restra int
sy stem when the front passenger front
airbag is enabled
If yo u secure a child in a rear wa rd-facing
ch ild restra int sy stem on the front passenger
seat and thePA SSENGER AIR BAG OFF indi‐
cator lamp is off, the front passenger airbag
can deploy in theev ent of an accident.
The child could be stru ck bythe airbag.
Alw ays ensure that the front passenger air‐
bag is disabled. The PASSENGER AIR BAG
OFF indicator lamp must be lit.
NEVER use a rear wa rd-facing child restra int
sy stem on a seat pr otected byan ENABLED
FRONT AIRB AGin front of it, DE ATH or SERI‐
OUS INJU RYtotheCH ILD can occur. Obser
vethe specific instructions forth ere ar‐
wa rd-facing and forw ard-facing child restra int
sy stems (/ page 68). Wa
rning notice on the front passenger sun visor
Alw ays obser vethest atus of the front passenger
airbag on thePA SSENGER AIR BAG OFF indica‐
to r lamp:
R If it is absolutely necessary tofit a child
re stra int sy stem tothe front passenger seat,
alw ays obser vethe information on automatic
front passenger airbag shutoff (/ page 40).
R When using a rear wa rd-facing child restra int
sy stem on the front passenger seat, the front Occupant saf
ety67
Page 200 of 629

R
The electric parking brake is not applied. Driving and driving saf
ety sy stems Driving sy
stems and your responsibility Yo
ur vehicle is equipped with driving sy stems
which assist you in driving, parking and manoeu‐
vring theve hicle. The driving sy stems are aids
and do not relie ve you of your responsibility per‐
ta ining toroad traf fic la w.Pay attention tothe
traf fic conditions at all times and inter vene
when necessa ry. Be aware of the limitations
re ga rding the safe use of these sy stems. Information on
radar and ultrasonic senso rsSome driving and driving sa
fety sy stems use
ra dar or ultrasonic sensors tomonitor the area
in front of, behind or next totheve hicle (depend‐
ing on theve hicle's equipment).
Depending on theve hicle's equipment, thera dar
sensors are integ rated behind the bumpers
and/or behind the Mercedes star. The ultrasonic
sensors are located in the front and rear bump‐
ers. Keep these parts free of dirt, ice and slush (/
page 469). The sensors must not be cov‐
ered, forex ample bybicycle rack s, overhanging
loads, sticke rs,fo il or foils toprotect against
st one chipping. Additional license plate brac kets
can li kewise impair the function of the ultrasonic
sensors. In theeve nt of dama getothe bumpers
or radiator grille, or following a collision impact‐
ing the bumpers or radiator grille, ha vethe func‐
tion of the sensors checked at a qualified spe‐
cialist workshop. If the sensors are damaged,
some driving sy stems and driving saf ety sy stems
may no longer function properly. Overview of driving sy
stems and driving
saf ety sy stems In
this section, you will find information about
th efo llowing driving sy stems and driving saf ety
sy stems:
R 360° Camera (/ page 235)
R ABS (Anti-lock Braking System)
(/ page 198)
R Active Dis tance Assi stDISTRONIC
(/ page 212) R
Adaptive Brake Lights (/ page 208)
R Active Brake Assi st (/ page 202)
R Active Lane Keeping Assist (/ page 253)
R ATTENTION ASSIST (/ page245)
R BAS (Bra keAssist System) (/ page198)
R Hill Start Assist (/ page 224)
R EBD (Elect ronic Brakeforc eDistribution)
(/ page 201)
R ESP ®
(Elect ronic Stability Program)
(/ page 198)
R ESP ®
Crosswind Assist (/ page 201)
R ESP ®
trailer stabilisation (/ page 201)
R Speed Limit Assist (/ page246)
R Active Speed Limit Assi st (/ page 216)
R HOLD fu nction (/ page 225)
R STEER CONTROL (/ page 202)
R Active Steering Assist with rescue lane func‐
tion (/ page219)
R Limi ter (/ page 209)
R Active Emergency Stop Assist (/ page 222) Driving and parking
197
Page 201 of 629
R
Active Parking Assist (/ page 239)
R Parking Assist PARKTRONIC ( /page 227)
R Reversing camera (/ page 232)
R Active Lane Change Assi st (/ page 221)
R Cruise control (/ page 208)
R Blind Spot Assist and Active Blind Spot Assi st
with exitwa rning (/ page 250)
R Traf fic Sign Assi st (/ page 248) Fu
nction of ABS (Anti-lock Braking Sy stem) ABS
regulates the brake pressure in critical driv‐
ing situations:
R During braking, e.g. at full brake application
or insuf ficient tyre traction, the wheels are
pr eve nted from lo cking.
R Vehicle steerability while braking is ensured.
If ABS inter venes when braking, you will feel a
pulsing in the brake pedal. The pulsating brake
pedal can be an indication of hazardous road
conditions and can ser veas a reminder totake
ex tra care while driving. Sy
stem limitations
R ABS is active from speeds of appr ox.
8 km/h.
R ABS may be impai red or may not function if a
malfunction has occur red and theye l‐
low ! ABSwarning lamp lights up contin‐
uously in the instrument clus ter af terthe
drive sy stem is star ted. Fu
nction of BAS (Brake Assist Sy stem) &
WARNING Risk of an accident caused by
a malfunction in BAS (Brake Assi stSys‐
te m)
If BA S is malfunctioning, the braking dis tance
in an eme rgency braking situation is
increased. #
Depress the brake pedal with full force
in emer gency braking situations. ABS
pr eve nts the wheels from locking. BA
S suppo rts yo ur eme rgency braking situation
with additional brake forc e. If
yo u depress the brake pedal quickl y,BA S is
acti vated:
R BAS au tomatical lyboosts the brake pres‐
sure.
R BAS can sho rten the braking dis tance.
R ABS pr events the wheels from locking.
The brakes will function as usual once you
re lease the brake pedal. BAS is deactivated. Fu
nction of ESP ®
(Electronic Stability Pro‐
gr am) &
WARNING Risk of skidding if ESP ®
is
malfunctioning
If ESP ®
is malfunctioning, ESP ®
cannot car ry
out vehicle stabilisation. In addition, other
driving saf ety sy stems are switched off. #
Drive on carefull y. #
Have ESP ®
ch ecked at a qualified spe‐
cialist workshop. 19 8
Driving and pa rking
Page 398 of 629
%
For older mobile phone models, enter a one
to sixteen-digit number code on the mobile
phone and on the multimedia sy stem for
authorisation.
% Upto15 mobile phones can be auth orised
on the multimedia sy stem.
Auth orised mobile phones are reconnected
au tomatical ly.
% The connected mobile phone can also be
used as Blue tooth®
audio equipment
(/ page 440).
Connec ting a second mobile phone (two
phone mode)
Requ irements:
R Atleast one mobile phone is already connec‐
te dto the multimedia sy stem via Blue tooth®
.
Multimedia sy stem:
4 © 5
Phone #
Select í. #
Select Connect new device. #
Select the mobile phone. #
Select Device name 1 + Device name 2 .
The selected mobile phone is connected to
th e multimedia sy stem.
Fu nctions of the mobile phone in two phone
mode
Fu nctions overview Mobile phone in
the
fo re gr ound Mobile phone in
the
bac kground
Fu llra nge of func‐
tions Incoming calls and
messa ges Inter
changing mobile phones (two phone
mode)
Multimedia sy stem:
4 © 5
Phone
Bo th mobile phones are shown individually in
sepa rate tabs. #
Select theta b with the desired mobile
phone.
The mobile phone in the selected tab is the
mobile phone in thefo re ground. Wi
th th eexc eption of telephone settings, the
submenus in thete lephone menu relate to
th e mobile phone in thefo re ground. In the
te lephone settings, settings can be made for
bo th mobile phones.
Changing the function of a mobile phone
Re quirements:
R Atleast one mobile phone is connec tedto
th e multimedia sy stem via Blue tooth®
( / page 394).
Multimedia sy stem:
4 © 5
Phone
Ac tivating a function #
Select theí device manager. #
Select a gr eysymbol in the line of a mobile
phone.
The cor responding function is activated.
Deactivating a function #
Select theí device manager. MBUX multimedia sy
stem 395
Page 471 of 629
Obser
vethefo llowing information: Cleaning
Avoiding dama getothe decorative foil
R For cleaning, use plenty of water and a mild cleaning agent without
additives or abrasive substances, e.g. a car sha mpoo appr ovedfor
Mercedes-Benz.
R Remo vedirt immediately, where possible, whilst avoiding rubbing
to o hard. There is otherwise a risk of damaging the decorative foil
ir re parably.
R Ifth ere is dirt on thefinish or if the decorative foil is dull: use the
Pa int Cleaner recommended and appr ovedfo r Mercedes-Benz.
R Insect remains: soak with insect remo ver and rinse off the treated
areas af terw ards.
R Bird droppings: soak with water and rinse off af terw ards.
R Toprev ent waterst ains, dry a foil-wrapped vehicle with a soft,
absorbent clo thafte reve rycar wash. R
The service life and colouring of decorative foils are impaired by:
- sunlight
- temp erature, e.g. hot air blo wer
- weather conditions
- stone chippings and dirt
- chemical cleaning agents
- oily products
R Do not use polish on matt decorative foil. Po lishing will ha vethe ef fect of
shining thefo il-wrapped sur face.
R Do not treat matt or stru ctured deco rative foils with wax.Pe rm anent
st ains may occur. Sc
ratches, cor rosive deposits, areas af fected by
cor rosion and damage caused byincor rect care
cannot al ways be comple tely repaired. In such
cases, visit a qualified specialist workshop.
Yo u can obtain more information on care and
cleaning products from the manufacturer. In
the case of foil-wrapped sur faces, optical dif‐
fe re nces may occur between the sur faces that
we renot pr otected bya decorative foil af ter
re moving a decorative foil. %
Have wo rkor repairs todecorative foils car‐
ri ed out at a qualified specialist workshop,
e.g. in a Mercedes-Benz Service Centre. 468
Maintenance and care