2019 MERCEDES-BENZ EQC SUV heating
[x] Cancel search: heatingPage 16 of 629
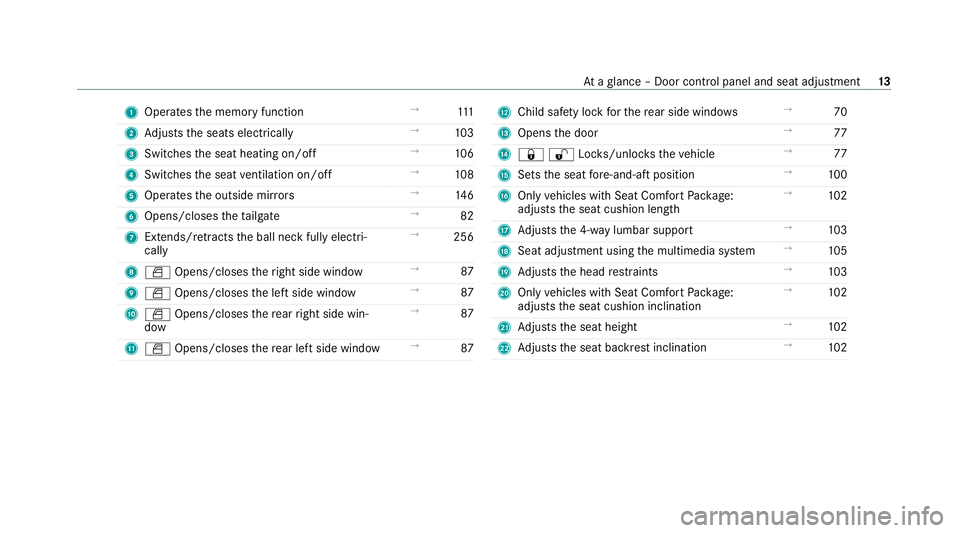
1
Operates the memory function →
111
2 Adjusts the seats electrically →
103
3 Switches the seat heating on/off →
106
4 Switches the seat ventilation on/o ff →
108
5 Operates the outside mir rors →
14 6
6 Opens/closes theta ilgate →
82
7 Extends/ retracts the ball neck fully electri‐
cally →
256
8 W Opens/closes theright side window →
87
9 W Opens/closes the left side window →
87
A W Opens/closes there ar right side win‐
dow →
87
B W Opens/closes there ar left side wind ow→
87 C
Child saf ety lock forth ere ar side wind ows →
70
D Opens the door →
77
E &%Loc ks/unloc kstheve hicle →
77
F Sets the seat fore -and-aft position →
100
G Only vehicles with Seat Comfort Package:
adjusts the seat cushion length →
102
H Adjusts the 4-w aylumbar support →
103
I Seat adjustment using the multimedia sy stem →
105
J Adjusts the head restra ints →
103
K Only vehicles with Seat Comfort Package:
adjusts the seat cushion inclination →
102
L Adjusts the seat height →
102
M Adjusts the seat backrest inclination →
102 At
aglance – Door control panel and seat adjustment 13
Page 108 of 629
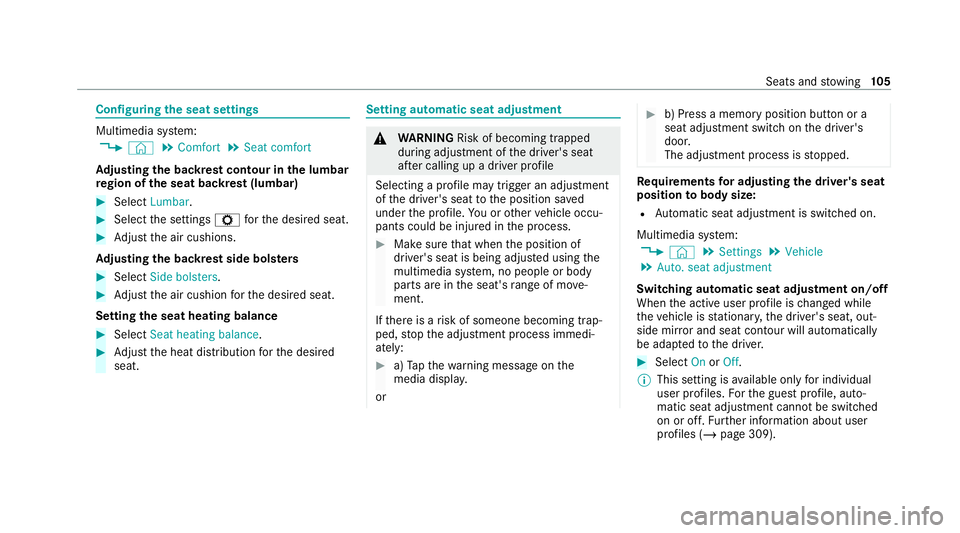
Configuring
the seat settings Multimedia sy
stem:
4 © 5
Comfort 5
Seat comfort
Ad justing the backrest contour in the lumbar
re gion of the seat backrest (lumbar) #
Select Lumbar . #
Select the settings Zforth e desired seat. #
Adjust the air cushions.
Ad justing the backrest side bols ters #
Select Side bolsters . #
Adjust the air cushion forth e desired seat.
Setting the seat heating balance #
Select Seat heating balance. #
Adjust the heat distribution forth e desired
seat. Setting automatic seat adjustment
&
WARNING Risk of becoming trapped
du ring adjustment of the driver's seat
af te r calling up a driver profile
Selecting a profile may trigger an adju stment
of the driver's seat tothe position sa ved
under the profile. You or other vehicle occu‐
pants could be injured in the process. #
Make sure that when the position of
driver's seat is being adjus ted using the
multimedia sy stem, no people or body
parts are in the seat's range of mo ve‐
ment.
If th ere is a risk of someone becoming trap‐
ped, stop the adjustment process immedi‐
ately: #
a)Tapth ewa rning message on the
media displa y.
or #
b) Press a memory position button or a
seat adjustment switch on the driver's
door.
The adjustment process is stopped. Re
quirements for adjusting the driver's seat
position tobody size:
R Automatic seat adju stment is switched on.
Multimedia sy stem:
4 © 5
Settings 5
Vehicle
5 Auto. seat adjustment
Switching automatic seat adjustment on/off
When the active user profile is changed while
th eve hicle is stationar y,the driver's seat, out‐
side mir ror and seat contour will auto matically
be adapte dto the driver. #
Select OnorOff.
% This setting is available on lyfor individual
user profiles. Forth e guest profile, auto‐
matic seat adjustment cann otbe switched
on or off. Further information about user
profiles (/ page 309). Seats and
stowing 105
Page 109 of 629
Ad
justing the driver's seat position tobody
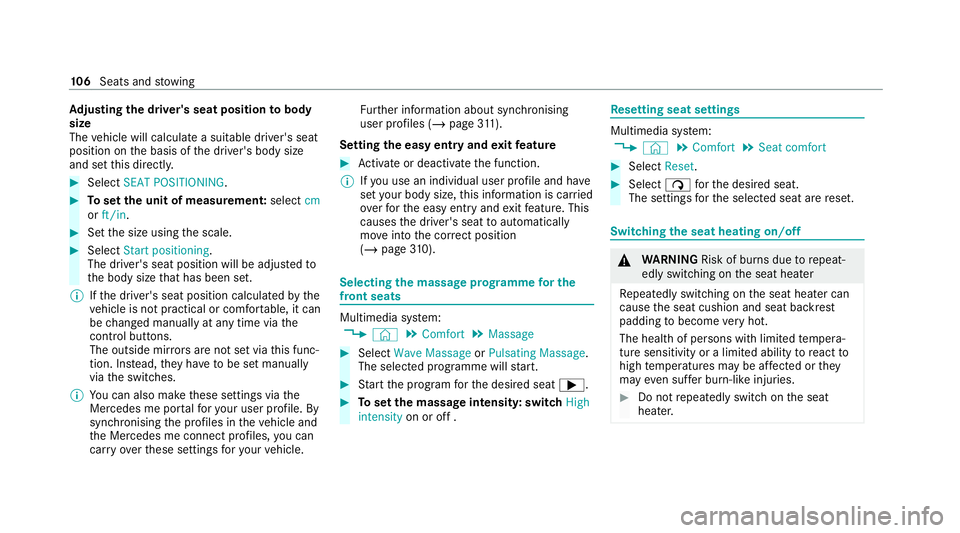
size
The vehicle will calculate a suitable driver's seat
position on the basis of the driver's body size
and set this direct ly. #
Select SEAT POSITIONING .#
Toset the unit of measurement: selectcm
or ft/in. #
Set the size using the scale. #
Select Start positioning.
The driver's seat position will be adjus tedto
th e body size that has been set.
% Ifth e driver's seat position calculated bythe
ve hicle is not practical or comfor table, it can
be changed manually at any time via the
control buttons.
The outside mir rors are not set via this func‐
tion. Ins tead, they have tobe set manually
via the switches.
% You can also make these settings via the
Mercedes me por talfo ryo ur user profile. By
syn chro nising the profiles in theve hicle and
th e Mercedes me connect profiles, you can
car ryove rth ese settings foryo ur vehicle. Fu
rther information about synchronising
user profiles (/ page311).
Setting the easy entry and exitfeature #
Activate or deacti vate the function.
% Ifyo u use an individual user profile and ha ve
set your body size, this information is car ried
ove rfo rth e easy entry andexitfeature. This
causes the driver's seat toautomatically
mo veinto the cor rect position
(/ page 310). Selec
ting the massage prog ramme for the
front seats Multimedia sy
stem:
4 © 5
Comfort 5
Massage #
Select Wave Massage orPulsating Massage .
The selected prog ramme will start. #
Start the program forth e desired seat ;. #
Toset the massage intensit y:switch High
intensity on or off . Re
setting seat settings Multimedia sy
stem:
4 © 5
Comfort 5
Seat comfort #
Select Reset. #
Select ßforth e desired seat.
The settings forth e selected seat are reset. Switching
the seat heating on/off &
WARNING Risk of bu rns due torepeat‐
edly switching on the seat heater
Re peatedly switching on the seat heater can
cause the seat cushion and seat backrest
padding tobecome very hot.
The health of persons with limited temp era‐
ture sensitivity or a limited ability toreact to
high temp eratures may be af fected or they
may even su ffer burn-like injuries. #
Do not repeatedly switch on the seat
heater. 106
Seats and stowing
Page 110 of 629
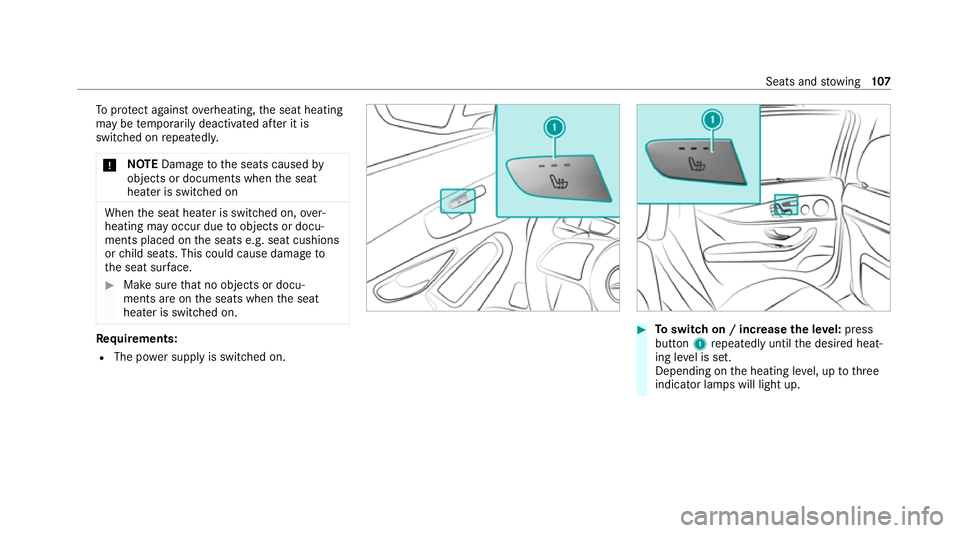
To
protect against overheating, the seat heating
may be temp orarily deactivated af ter it is
switched on repeatedly.
* NO
TEDama getothe seats caused by
objects or documents when the seat
heater is switched on When
the seat heater is switched on, over‐
heating may occur due toobjects or docu‐
ments placed on the seats e.g. seat cushions
or child seats. This could cause damage to
th e seat sur face. #
Makesure that no objects or docu‐
ments are on the seats when the seat
heater is switched on. Re
quirements:
R The po wer supply is switched on. #
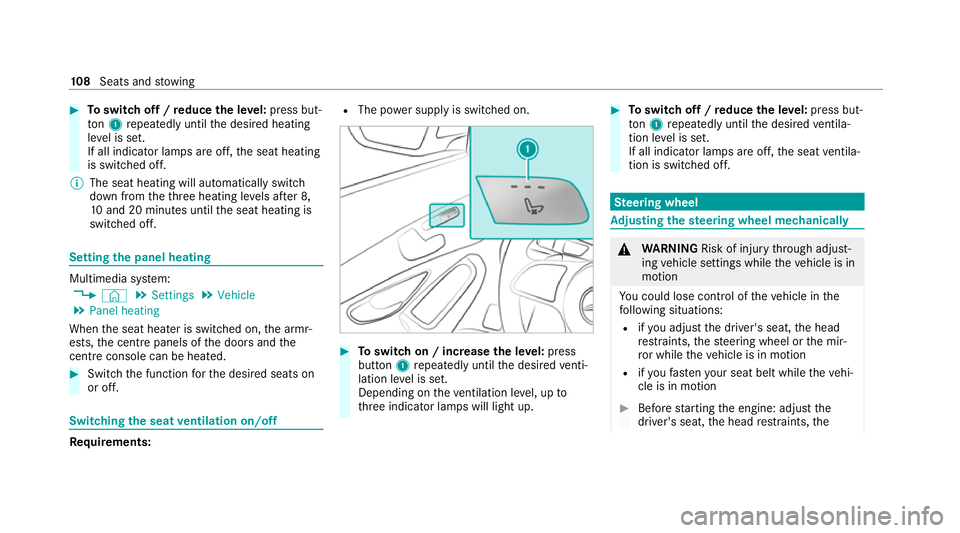
Toswitch on / increase the le vel:press
button 1repeatedly until the desired heat‐
ing le vel is set.
Depending on the heating le vel, up tothree
indicator lamps will light up. Seats and
stowing 107
Page 111 of 629
#
Toswitch off / reduce the le vel:press but‐
to n1 repeatedly until the desired heating
le ve l is set.
If all indicator lamps are off, the seat heating
is switched off.
% The seat heating will automatically switch
down from theth re e heating le vels af ter 8,
10 and 20 minutes until the seat heating is
switched off. Setting
the panel heating Multimedia sy
stem:
4 © 5
Settings 5
Vehicle
5 Panel heating
When the seat heater is switched on, the armr‐
ests, the cent repanels of the doors and the
centre console can be hea ted. #
Switch the function forth e desired seats on
or off. Switching
the seat ventilation on/off Re
quirements: R
The po wer supply is switched on. #
Toswitch on / increase the le vel:press
button 1repeatedly until the desired venti‐
lation le vel is set.
Depending on theve ntilation le vel, up to
th re e indicator lamps will light up. #
Toswitch off / reduce the le vel:press but‐
to n1 repeatedly until the desired ventila‐
tion le vel is set.
If all indicator lamps are off, the seat ventila‐
tion is switched off. Ste
ering wheel Ad
justing the steering wheel mechanically &
WARNING Risk of inju rythro ugh adjust‐
ing vehicle settings while theve hicle is in
motion
Yo u could lose cont rol of theve hicle in the
fo llowing situations:
R ifyo u adjust the driver's seat, the head
re stra ints, thesteering wheel or the mir‐
ro r while theve hicle is in motion
R ifyo ufast enyour seat belt while theve hi‐
cle is in motion #
Before starting the engine: adjust the
driver's seat, the head restra ints, the 108
Seats and stowing
Page 131 of 629
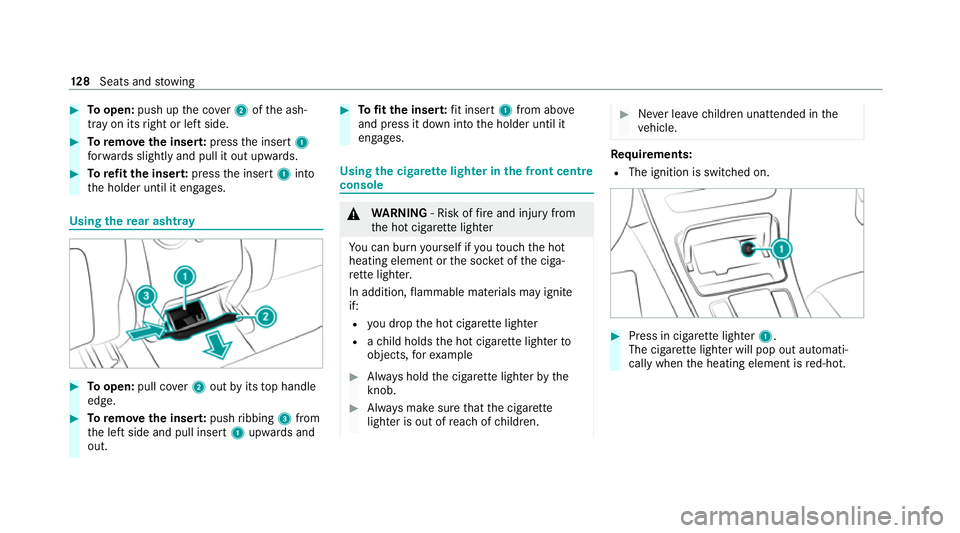
#
Toopen: push up the co ver2 ofthe ash‐
tray on its right or left side. #
Toremo vethe inser t:press the insert 1
fo rw ards slightly and pull it out upwards. #
Torefit the inse rt:press the insert 1into
th e holder until it engages. Using
there ar ashtr ay #
Toopen: pull co ver2 out byits top handle
edge. #
Toremo vethe inser t:push ribbing 3from
th e left side and pull insert 1upwards and
out. #
Tofit the inse rt:fit insert 1from ab ove
and press it down into the holder until it
engages. Using
the cigar ette lighter in the front centre
console &
WARNING ‑ Risk of fire and injury from
th e hot cigar ette lighter
Yo u can burn yourself if youto uch the hot
heating element or the soc ket of the ciga‐
re tte lighter.
In addition, flammable materials may ignite
if:
R you drop the hot cigar ette lighter
R ach ild holds the hot cigar ette lighter to
objects, forex ample #
Alw ays hold the cigar ette lighter bythe
knob. #
Alw ays make sure that the cigar ette
lighter is out of reach of children. #
Never lea vechildren unat tended in the
ve hicle. Re
quirements:
R The ignition is switched on. #
Press in cigar ette lighter 1.
The cigar ette lighter will pop out automati‐
cally when the heating element is red-hot. 12 8
Seats and stowing
Page 157 of 629
Dispose of
thege nuine Mercedes-Benz interior
pe rfume flacon when it is em pty and do not refill
it.
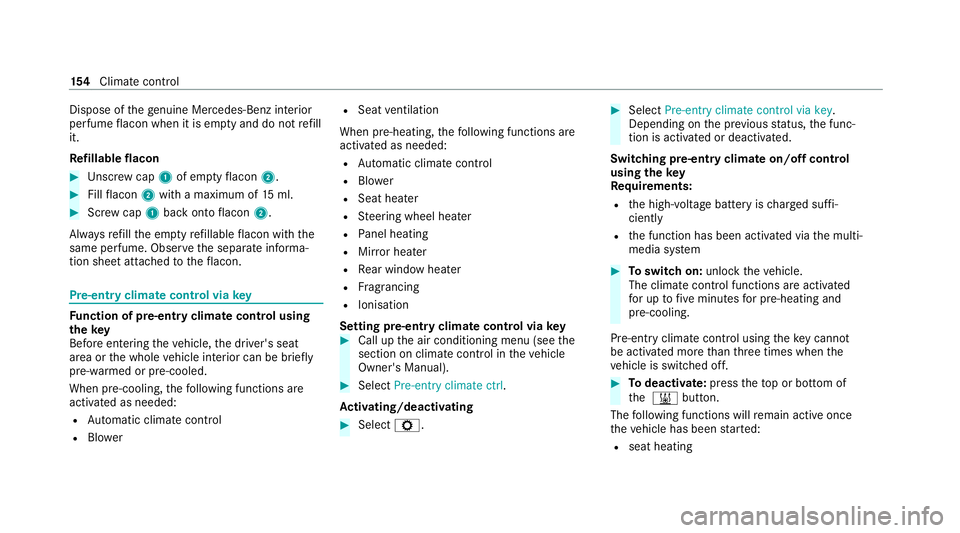
Re fillable flacon #
Unscr ew cap 1of em ptyflacon 2. #
Fillflacon 2with a maximum of 15ml. #
Screw cap 1back onto flacon 2.
Alw aysre fill th e em ptyre fillable flacon with the
same perfume. Obser vethe separate informa‐
tion sheet attached totheflacon. Pre-ent
ryclimate cont rol via key Fu
nction of pre-entry climate control using
th ekey
Before entering theve hicle, the driver's seat
area or the whole vehicle interior can be briefly
pre-warmed or pre-cooled.
When pre-cooling, thefo llowing functions are
activated as needed:
R Automatic clima tecontrol
R Blower R
Seat ventilation
When pre-heating, thefo llowing functions are
activated as needed:
R Automatic clima tecontrol
R Blower
R Seat hea ter
R Steering wheel heater
R Panel heating
R Mirror heater
R Rear wind owheater
R Frag rancing
R Ionisation
Setting pre-entry climate control via key #
Call up the air conditioning menu (see the
section on climate contro l intheve hicle
Owner's Manual). #
Select Pre-entry climate ctrl .
Ac tivating/deactivating #
Select Z. #
Select Pre-entry climate control via key .
Depending on the pr evious status, the func‐
tion is activated or deactivated.
Switching pre-entry climate on/off control
using thekey
Re quirements:
R the high-voltage battery is charge d suf fi‐
ciently
R the function has been activated via the multi‐
media sy stem #
Toswitch on: unlocktheve hicle.
The climate contro l functions are activated
fo r up tofive minutes for pre-heating and
pre-cooling.
Pre-entry clima tecontrol using theke y cannot
be activated more than thre e times when the
ve hicle is switched off. #
Todeactivate: presstheto p or bottom of
th e & button.
The following functions will remain active once
th eve hicle has been star ted:
R seat heating 15 4
Climate cont rol
Page 158 of 629
R
seat ventilation
R panel heating
R frag rancing
R ionisation Pre-entry climate control at depa
rture time Pre-entry climate control at departure time
function
&
WARNING Risk offata l injury due to
ex posure toextreme heat or cold in the
ve hicle
If people –particular lych ildren – are exposed
to extreme temp eratures over an extended
pe riod of time, there is a risk of serious or
eve nfa ta l injury! #
Never lea veanyone – pa rticularly chil‐
dren – unat tended in theve hicle. #
Never lea veanimals in theve hicle unat‐
te nded. The
vehicle interior can be heated or ventilated
when theve hicle is par ked. When
theve hicle is connected topowe r supply
equipment, priority is given tocharging the high-
vo ltage battery toa specified minimum charge.
The pre-ent ryclimate control running time may
be reduced under thefo llowing conditions:
R theve hicle is not connected topowe r supp ly
equipment
R the high-voltage battery is not fully charged
Wi th active pre-ent ryclimate control, thech arge
le ve l of the high-voltage battery may be reduced,
eve n if thech arging cable connec tor is connec‐
te d.
When cooling, thefo llowing functions are activa‐
te d as needed:
R Automatic clima tecontrol
R Blower
R Seat ventilation
When heating, thefo llowing functions are activa‐
te d as needed:
R Automatic clima tecontrol
R Blower R
Seat hea ter
R Steering wheel heater
R Panel heating
R Mirror heater
R Rear wind owheater
R Frag rancing
R Ionisation
Setting pre-entry climate control at depar‐
ture time #
Call up the air conditioning menu (see the
section on climate contro l intheve hicle
Owner's Manual). #
Select Pre-entry climate ctrl .
Setting a single departure time #
Select ONCE. #
Set a departure time.
Changing the active departu retime #
Select the pen icon next tothe displa yed
departure time. #
Set a departure time. Climate control
15 5