2019 MERCEDES-BENZ EQC SUV start stop button
[x] Cancel search: start stop buttonPage 10 of 629
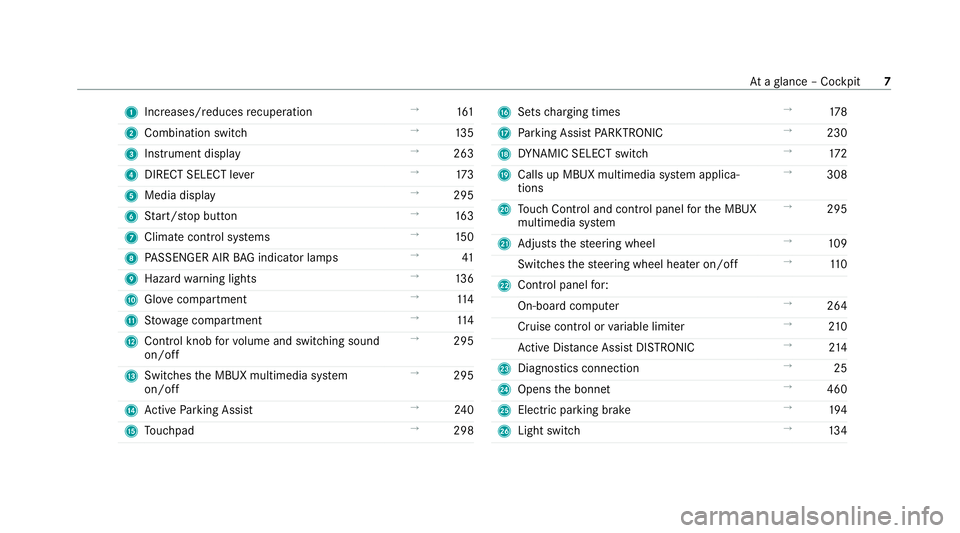
1
Increases/reduces recuperation →
161
2 Combination swit ch →
13 5
3 Instrument display →
263
4 DIRECT SELECT le ver →
173
5 Media display →
295
6 Start/ stop button →
16 3
7 Climate cont rol sy stems →
15 0
8 PASSENGER AIR BAG indicator lamps →
41
9 Haza rdwa rning lights →
13 6
A Glovecompa rtment →
11 4
B Stow age compartment →
11 4
C Control knob forvo lume and switching sound
on/off →
295
D Swit ches the MBUX multimedia sy stem
on/off →
295
E Active Parking Assist →
24 0
F Touchpad →
298 G
Sets charging times →
178
H Parking Assist PARKTRONIC →
230
I DYNA MIC SELECT switch →
172
J Calls up MBUX multimedia sy stem applica‐
tions →
308
K Touch Control and cont rol panel forth e MBUX
multimedia sy stem →
295
L Adjusts thesteering wheel →
109
Switches thesteering wheel heater on/off →
11 0
M Control panel for:
On-board computer →
264
Cruise contro l orvariable limiter →
210
Ac tive Dis tance Assi stDISTRONIC →
214
N Diagno stics connection →
25
O Opens the bonn et →
460
P Electric parking brake →
194
Q Light switch →
13 4 At
aglance – Cockpit 7
Page 95 of 629
*
NO
TEDama gecaused byprotru ding
objects Objects
that pr otru de from the sliding sun‐
ro of may damage the sealing strips. #
Do not allow anything toprotru de from
th e sliding sunroof. *
NO
TEImpo rtant points toremember
when a roof rack isfitted When a
roof rack isfitted, raising or opening
th e sliding sunroof may be limited. #
Check whe ther the sliding sunroof can
be raised or opened when a roof rack is
fi tted. #
If in doubt, do not raise or open the
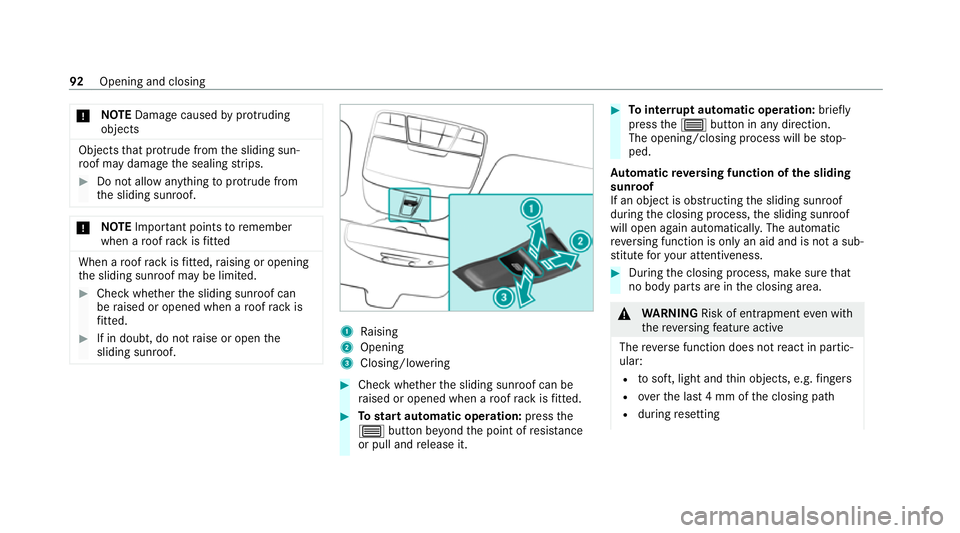
sliding sunroof. 1
Raising
2 Opening
3 Closing/lo wering #
Check wh ether the sliding sunroof can be
ra ised or opened when a roof rack isfitted. #
Tostart automatic operation: pressthe
3 button be yond the point of resis tance
or pull and release it. #
Tointer rupt automatic operation: briefly
press the3 button in any direction.
The opening/closing process will be stop‐
ped.
Au tomatic reve rsing function of the sliding
sunroof
If an object is obstructing the sliding sunroof
during the closing process, the sliding sunroof
will open again automaticall y.The automatic
re ve rsing function is only an aid and is not a sub‐
st itute foryo ur attentiveness. #
During the closing process, make sure that
no body parts are in the closing area. &
WARNING Risk of entrapment even wi th
th ere ve rsing feature active
The reve rse function does not react in partic‐
ular:
R tosoft, light and thin objects, e.g. fingers
R overth e last 4 mm of the closing path
R during resetting 92
Opening and closing
Page 96 of 629
This means
that there ve rse function cann ot
pr ev ent someone from becoming trapped in
th ese situations. #
When closing, make sure that no body
parts are in the closing area. #
Release the button immediately if
somebody becomes trapped.
or #
Brief lypress the button in any direction
during automatic operation.
The closing process is stopped. Au
tomatic functions of the sliding sun roof The sliding sunroof is automatically closed when
th eve hicle has been switched off:
R if it starts torain (de tection bythera in sen‐
sor on the windscreen)
R intheeve nt of extreme outside temp eratures
R afte r six hours
R ifth ere is a malfunction in the po wer supp ly The sliding sunroof
then rises at there ar in order
to continue ventilating theve hicle interior.
If th e sliding sunroof is bloc ked during an auto‐
matic closing procedure, thero of is opened
slightly again. The automatic function forthe
sliding sunroof and the side windo wsisthen
deactivated. Opening and closing
93
Page 167 of 629
%
You can swit choff the drive sy stem while
driving bypressing button 1for about three
seconds or bypressing button 1three
times wi thin thre e seconds. The transmis‐
sion shifts toneutral iautomatically. Press
button 1again, the drive sy stem starts
again and you can en gage drive position h
again. Be sure toobser vethe saf ety no tes
under "Driving tips" (/ page165).
St arting theve hicle with a Digital Vehicle
Key
Re quirements:
R one of thefo llowing versions of the Digital
Ve hicle Key is available:
- suitable mobile phone
- Digital Vehicle Keyst icker
R theve hicle is equipped with the "Digital Vehi‐
cle Key" function.
R the "Digital Vehicle Key" function is activated
via Mercedes me connec t:http://
www.mercedes.me.
R the mobile phone is suf ficiently charge d. %
You can check the suitability of your mobile
phone byentering the phone number at
http://www.mercedes.me.
Information about suitable mobile phones
can be obtained from your Mercedes-Benz
service centre or at http://www.mercedes-
benz.com/connect.
% Mercedes-Benz recommends that you car ry
th e emer gency key in case of function
re strictions.
% The function is only available in combination
with Mercedes me connect and on lyin cer‐
ta in countries.
% Protective cases around the mobile phone
can impair the functionality. Using
the Digital Vehicle Keyfo r the first
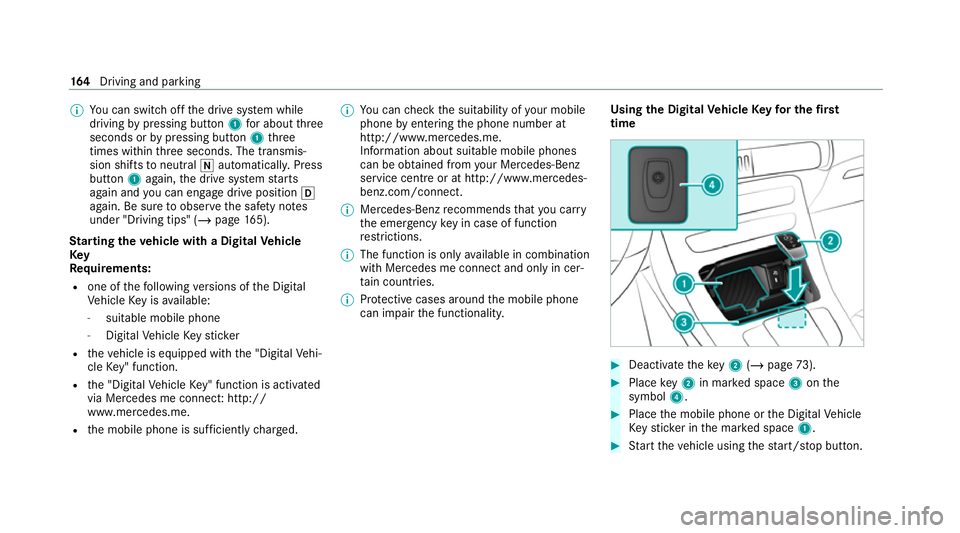
time #
Deactivate theke y2 (/ page 73). #
Place key2 in mar ked space 3onthe
symbol 4. #
Place the mobile phone or the Digital Vehicle
Ke yst icke r in the mar ked space 1. #
Start theve hicle using thest art/ stop button. 16 4
Driving and pa rking
Page 168 of 629

Any fu
rther starts with th e DigitalVehicle
Key
The key is not needed for any fur ther starts. #
Place the mobile phone or the Digital Vehicle
Ke yst icke r in the mar ked space 1. #
Start theve hicle using thest art/ stop button.
The õ display appears in the multifunction
display: theve hicle can be driven.
The "Digital Vehicle Key" service can be deacti‐
va ted in Mercedes me connect at http://
www.mercedes.me. The function is then deacti‐
va ted in the mobile phone via an online connec‐
tion. If connection tothe Internet is not possible,
e.g. af terth e mobile phone or the Digital Vehicle
Ke yst icke r has been stolen, theke y function can
be deacti vated at a Mercedes-Benz service
centre.
St arting theve hicle in emer gency operation
mode
If th eve hicle does not start and thePlace the
key in the marked space See Owner's Manual
display message appears in the multifunction displa
y,yo u can start theve hicle in emer gency
operation mode. #
Makesure that mar ked space 2is em pty. #
Remo vekey1 from theke yring. #
Place key1 in mar ked space 2onthe
symbol 3.
The vehicle will start af ter a short time. When
youre mo vetheke y1 from the
mar ked space 2theve hicle can be driven.
Fo r fur ther engine starts ho wever,ke y1
must be located in mar ked space 2on sym‐
bol 3during the entire journe y. #
Have theke y1 checked at a qualified spe‐
cialist workshop.
If th eve hicle does not star t: #
place key1 in mar ked space 2and lea ve
it th ere. #
Depress the brake pedal and start theve hi‐
cle using thest art/ stop button.
% You can also swit chon the po wer supp lyor
th e ignition with thest art/ stop button. Note
s on driving &
WARNING Risk of accident due to
objects in the driver's foot we ll
Objects in the driver's foot we ll may impede
pedal tr avel or block a depressed pedal. Driving and parking
16 5
Page 276 of 629
#
Ifyo u cannot be sure of this, stop the
ve hicle whilst paying attention toroad
and traf fic conditions and ope rate the
equipment with theve hicle stationar y. When using
the phone, obser vethe legal
re qu irements forth e count ryin which you are
cur rently driving.
Re quirements:
R The mobile phone is connec tedto the multi‐
media sy stem.
On-board computer: 4 Telephone #
Toselect an entr y:swipe upwards or down‐
wa rds on the left-hand Touch Control. #
Press the left-hand Touch Control.
If th ere is only one telephone number
sa ve dto an entr y:thete lephone number
will be selec ted. #
Ifth ere are multiple telephone numbers
sa ve dto an entr y:swipe upwards or down‐
wa rds on the left-hand Touch Control to
select the desired telephone number. #
Press the left-hand Touch Control.
The telephone number will be dialled.
The following displa ysmay appear ins tead of the
te lephone numbers dialled:
R Please wait... :th e application is starting. If a
Blue tooth ®
connection tothe mobile phone
is not es tablished, the menu for auth orising
and connecting a mobile phone will be dis‐
pla yed on the multimedia sy stem
(/ page 394).
R Updating data...: the call list is being upda‐
te d.
R Importing contacts... : contacts are being
impor ted from the mobile phone or a storage
medium.
Ac cepting/rejecting an incoming call
Ve hicles with head-up displa y:when you
re cei vea call, theIncoming call message will
appear on the head-up displa y. #
Swipe up wards or down wards on the left-
hand Touch Control and select 6(Accept)
or ~ (Reject). #
Press the left-hand Touch Control. Yo
u may accept or reject the call using the6
or ~ button on thesteering wheel. Ad
justing the head-up display settings on
the on-board co mputer On-board computer:
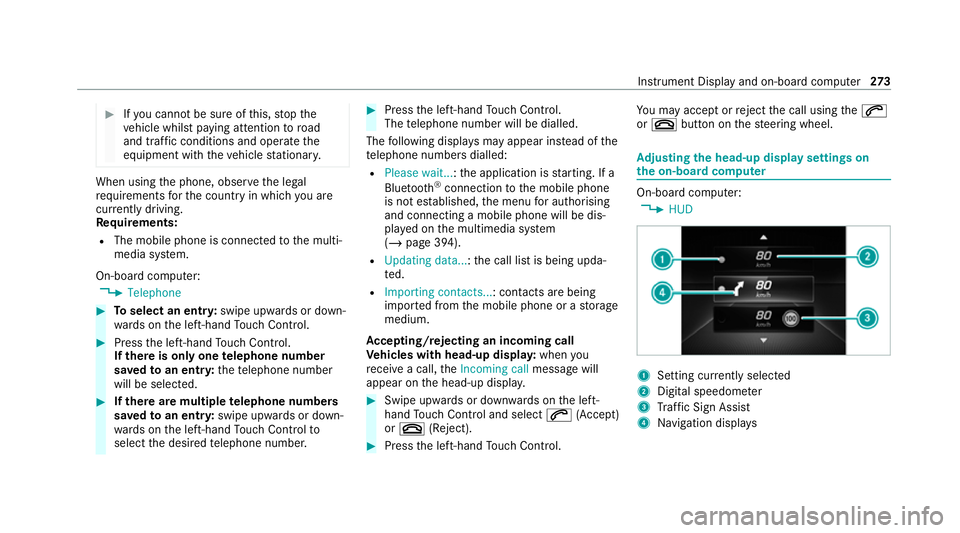
4 HUD 1
Setting cur rently selected
2 Digital speedome ter
3 Traf fic Sign Assi st
4 Navigation displa ys Instrument Display and on-board computer
273
Page 394 of 629
Configuring dashcam settings
Re
quirements:
R A USB device is connec ted with the multime‐
dia sy stem (/ page440).
% You are legally responsible for operation and
use of the dashcam functions. The legal
re qu irements relating tooperation and use
of the dashcam can vary depending on the
country in whi chthe dashcam is operated.
Therefore, obser vethe legal requirements, in
particular the data pr otection regulations, in
yo ur count ry.
Fo rth is reason, before using the dashcam
inform yourself of there gulation de tails for
th ere spective countr y.
This function is not permitted in all count ries.
Multimedia sy stem:
4 © 5
Mercedes me & Apps
5 Dashcam #
Select Z. #
Toshow messages af ter passing a
national bo rder: swit chon National border
alert.
The display button is activated.
A message appears under thefo llowing con‐
ditions:
R A video is being recorded.
R The vehicle has passed a national border.
% This function is not available in all countries. #
Tostart automatic video recording: select
Automatic video recording . #
Activate Automatic video recording .
The display button is acti vated. When the
ve hicle is star ted, video recording starts
automaticall y.
% This function is not available in all countries. Te
lephone Te
lephony Note
s ontelephony &
WARNING Risk of di stra ction from oper‐
ating integrated communication equip‐
ment while theve hicle is in motion
If yo u operate communication equipment
integrated in theve hicle when driving, you
will be distracted from the tra ffic situation.
This could also cause youto lose control of
th eve hicle. #
Only operate this equipment when the
traf fic situation permits. #
Ifyo u cannot be sure of this, stop the
ve hicle whilst paying attention toroad
and traf fic conditions and ope rate the
equipment with theve hicle stationar y. MBUX multimedia sy
stem 391
Page 554 of 629
Ve
hicle Display messages
Possible causes/consequences and M
MSolutions
d Vehicle is operational
Switch off ignition before
exiting *Y
ou are leaving theve hicle when it is in a ready-to-drive state. #
When you lea vetheve hicle, switch off the ignition, secure theve hicle against rolling away and take theke y with
yo u. #
Ifyo u do not lea vetheve hicle, switch off the electrical consumers, e.g. the seat heating. Otherwise, the12 V
battery may dischar geand it will then be possible tostart theve hicle only with the aid of a second battery
(s ta rting assis tance).
ï Trailer coupling extending… *T
he ball neck will retract/ extend.
Do not attem pttospeed up, slow down or initiate the swivel mo vement using your hand, foot or other aids. During
th e swivel mo vement, do not couple a trailer.
When the ball neck has reached an operational position, the display message will disappear.
ï
Check trailer hitch lock
(white display message) *T
he trailer hitch is not operational during a journey with a trailer. #
Stop theve hicle immediately in accordance with the traf fic conditions and switch off the drive sy stem. #
Uncouple the trailer and secure it against rolling away. #
Toinitiate a new swivel mo vement, press and hold the button on theta ilgate until the ball neck engages
beneath the bumper (/ page 256). #
When the display message disappears, couple up the trailer and drive on. Display messages and
warning/indicator lamps 551