2019 MERCEDES-BENZ EQC SUV seat memory
[x] Cancel search: seat memoryPage 5 of 629

Symbols
........................................................ 5At
agl ance .................................................... 6
Cockpit ........................................................... 6
Indica tor and warning lamps .......................... .8
Overhead contro l panel ................................ 10
Door control panel and seat adjustment ....... 12
Emergencies and breakdowns ...................... 14Digital Owner's Manual
.............................16
Calling up the Digital Owner's Manual ..........16 Genera
l notes............................................. 17
Pr otection of the environment ......................17
Ta ke -ba ckof end-of-life vehicles ...................17
Mercedes-Benz Genuine Parts ......................17
Owner's Manual ............................................ 18
Operating saf ety .......................................... .19
Declaration of Conformity ............................. 21
Diagno stics connection ................................ 25
Qualified specialist workshop ....................... 25
Ve hicle registration ....................................... 26
Cor rect use of theve hicle ............................26 Information on
the REA CHregulation ........... 26
Implied warranty .......................................... .26
QR code forre scue card ...............................27
Data storage .................................................27
Copyrights .................................................... 29 Occupant saf
ety......................................... 30
Re stra int sy stem ...........................................30
Seat belts ..................................................... 32
Airbags ......................................................... 37
PRE-SAFE ®
sy stem ....................................... 44
Safely transporting children in theve hi‐
cle ................................................................45
No tes on pets in theve hicle .........................70 Opening and closing
.................................. 72
Ke y .............................................................. .72
Doo rs............................................................ 76
Load compartment ....................................... 82
Side windo ws................................................ 87
Sliding sunroof .............................................. 91
Ro ller sunblinds ............................................ 95
Anti- theft pr otection .....................................96 Seats and
stowing ..................................... 99
Cor rect driver's seat position ....................... 99
Seats .......................................................... 100
St eering wheel ............................................ 108
Easy entry and exitfeature ........................ .110
Operating the memory function .................. 111
St ow age areas ............................................ .113
Cup holders ................................................ 12 6
Ashtr ayand cigar ette lighter ...................... .127
Soc kets ....................................................... 12 9
Wi reless charging of the mobile phone
and connection with theex terior aerial .......1 31
Fitting/removing thefloor mats ................. 13 2 Light and sight
......................................... 134
Exterior lighting .......................................... 13 4
Interior lighting ........................................... 14 0
Wi ndsc reen wipers and windscreen
wa sher sy stem ............................................ 14 2
Mir rors ........................................................ 14 6
Operating the sun visors ............................. 14 9 Climate control
........................................ 15 0
Overview of climate contro l systems ..........1 502
Contents
Page 16 of 629
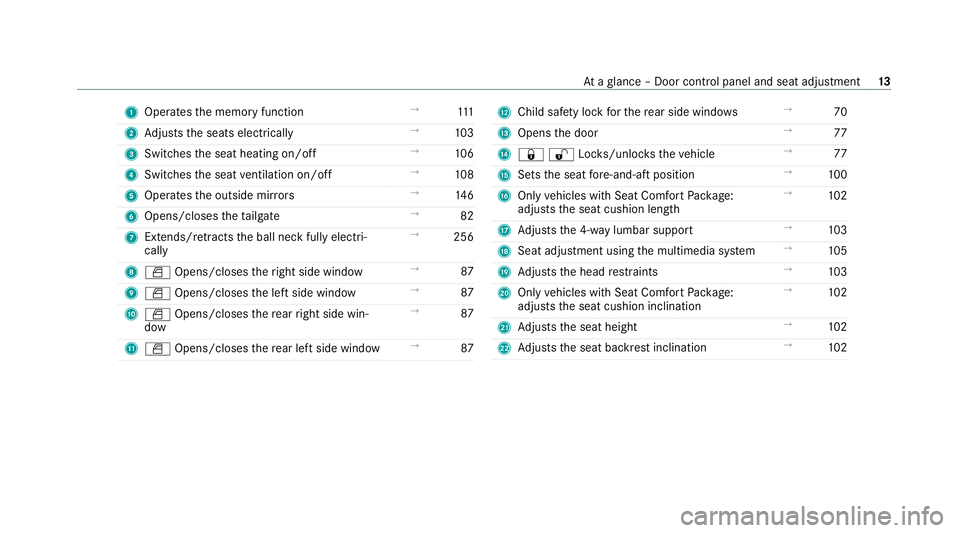
1
Operates the memory function →
111
2 Adjusts the seats electrically →
103
3 Switches the seat heating on/off →
106
4 Switches the seat ventilation on/o ff →
108
5 Operates the outside mir rors →
14 6
6 Opens/closes theta ilgate →
82
7 Extends/ retracts the ball neck fully electri‐
cally →
256
8 W Opens/closes theright side window →
87
9 W Opens/closes the left side window →
87
A W Opens/closes there ar right side win‐
dow →
87
B W Opens/closes there ar left side wind ow→
87 C
Child saf ety lock forth ere ar side wind ows →
70
D Opens the door →
77
E &%Loc ks/unloc kstheve hicle →
77
F Sets the seat fore -and-aft position →
100
G Only vehicles with Seat Comfort Package:
adjusts the seat cushion length →
102
H Adjusts the 4-w aylumbar support →
103
I Seat adjustment using the multimedia sy stem →
105
J Adjusts the head restra ints →
103
K Only vehicles with Seat Comfort Package:
adjusts the seat cushion inclination →
102
L Adjusts the seat height →
102
M Adjusts the seat backrest inclination →
102 At
aglance – Door control panel and seat adjustment 13
Page 47 of 629
-
Ifth ePA SSENGER AIR BAG OFF indicator
lamp is lit continuously: the person of
smaller stature should not use the front
passenger seat. &
WARNING Risk of inju ryor death when
th ePA SSENGER AIR BAG OFF indicator
lamp is lit
If th ePA SSENGER AIR BAG OFF indicator
lamp remains lit af terth e sy stem self-test,
th e front passenger airbag is disabled. It will
not be deplo yed in theeve nt of an accident.
In this case, the front passenger airbag can‐
not per form its intended pr otective function,
e.g. when a person is seated in the front
passenger seat.
That person could, forex ample, come into
con tact wi th theve hicle interior, especially if
th e person is sitting too close tothe cockpit.
If th e front passenger seat is occupied,
alw ays ensure that:
R The classification of the person in the
front passenger seat is cor rect and the front passenger airbag is enabled or disa‐
bled in accordance with
the person in the
front passenger seat.
R The person is sea ted proper lywith a cor‐
re ctly fastened seat belt.
R The front passenger seat has been mo ved
as far back as possible. Be sure
toalso obse rveth efo llowing fur ther
re lated subjects:
R Child restra int sy stem on the front passenger
seat (/ page67).
R Suitable positioning of thech ild restra int sys‐
te m (/ page 52). PRE-SAFE
®
sy stem PRE-
SAFE®
(anticipa tory occupant pr otec‐
tion) PRE-
SAFE®
is able todetect cer tain critical driv‐
ing situations and implement pre-em ptive meas‐
ures toprotect theve hicle occupants. PRE-SAFE
®
can implement thefo llowing meas‐
ures independently of each other:
R Tightening the seat belts on the driver's seat
and front passenger seat.
R Closing the side windo ws.
R Vehicles with sliding sunroof: closingthe
sliding sunroof.
R Vehicles with memory function: moving
th e front passenger seat toa more favo ura‐
ble seat position.
R PRE-SAFE ®
Sound: pr ovided that the multi‐
media sy stem is switched on, generates a
brief noise signal tostimulate the innate pro‐
te ctive mechanism of a person's hea ring.
* NO
TEDama gecaused byobjects in the
fo ot we ll or behind the seat The automatic adjustment of
the seat posi‐
tion may result in damage tothe seat and/or
th e object. #
Stow objects in a suitable place. 44
Occupant saf ety
Page 106 of 629
Ad
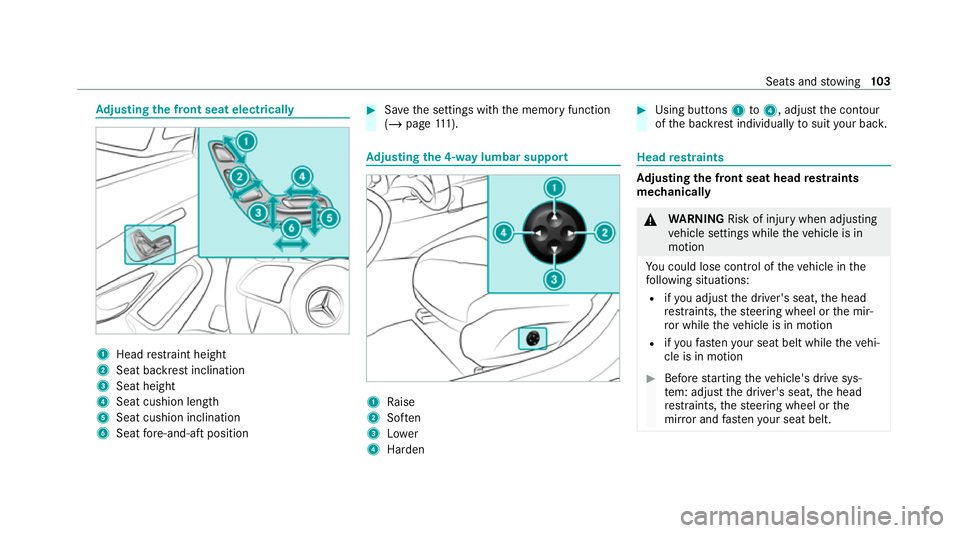
justing the front seat electrically 1
Head restra int height
2 Seat backrest inclination
3 Seat height
4 Seat cushion length
5 Seat cushion inclination
6 Seat fore -and-aft position #
Save the settings with the memory function
(/ page 111). Ad
justing the 4-w aylumbar support 1
Raise
2 Soften
3 Lower
4 Harden #
Using buttons 1to4 , adjust the conto ur
of the backrest individually tosuit your bac k. Head
restra ints Ad
justing the front seat head restra ints
mechanically &
WARNING Risk of inju rywhen adjusting
ve hicle settings while theve hicle is in
motion
Yo u could lose cont rol of theve hicle in the
fo llowing situations:
R ifyo u adjust the driver's seat, the head
re stra ints, thesteering wheel or the mir‐
ro r while theve hicle is in motion
R ifyo ufast enyour seat belt while theve hi‐
cle is in motion #
Before starting theve hicle's drive sys‐
te m: adju stthe driver's seat, the head
re stra ints, thesteering wheel or the
mir ror and fastenyour seat belt. Seats and
stowing 103
Page 108 of 629
Configuring
the seat settings Multimedia sy
stem:
4 © 5
Comfort 5
Seat comfort
Ad justing the backrest contour in the lumbar
re gion of the seat backrest (lumbar) #
Select Lumbar . #
Select the settings Zforth e desired seat. #
Adjust the air cushions.
Ad justing the backrest side bols ters #
Select Side bolsters . #
Adjust the air cushion forth e desired seat.
Setting the seat heating balance #
Select Seat heating balance. #
Adjust the heat distribution forth e desired
seat. Setting automatic seat adjustment
&
WARNING Risk of becoming trapped
du ring adjustment of the driver's seat
af te r calling up a driver profile
Selecting a profile may trigger an adju stment
of the driver's seat tothe position sa ved
under the profile. You or other vehicle occu‐
pants could be injured in the process. #
Make sure that when the position of
driver's seat is being adjus ted using the
multimedia sy stem, no people or body
parts are in the seat's range of mo ve‐
ment.
If th ere is a risk of someone becoming trap‐
ped, stop the adjustment process immedi‐
ately: #
a)Tapth ewa rning message on the
media displa y.
or #
b) Press a memory position button or a
seat adjustment switch on the driver's
door.
The adjustment process is stopped. Re
quirements for adjusting the driver's seat
position tobody size:
R Automatic seat adju stment is switched on.
Multimedia sy stem:
4 © 5
Settings 5
Vehicle
5 Auto. seat adjustment
Switching automatic seat adjustment on/off
When the active user profile is changed while
th eve hicle is stationar y,the driver's seat, out‐
side mir ror and seat contour will auto matically
be adapte dto the driver. #
Select OnorOff.
% This setting is available on lyfor individual
user profiles. Forth e guest profile, auto‐
matic seat adjustment cann otbe switched
on or off. Further information about user
profiles (/ page 309). Seats and
stowing 105
Page 112 of 629
st
eering wheel or the mir ror and fasten
yo ur seat belt. &
WARNING Risk of entrapment forch il‐
dren when adjusting thesteering wheel
Children could injure themselves if they
adjust thesteering wheel. #
Never lea vechildren unat tended in the
ve hicle. #
When leaving theve hicle, alw aysta ke
th eke y with you and lock theve hicle.
This also applies tothe digital vehicle
ke y if the "Digital Vehicle Key" function
is activated via Mercedes me connect. #
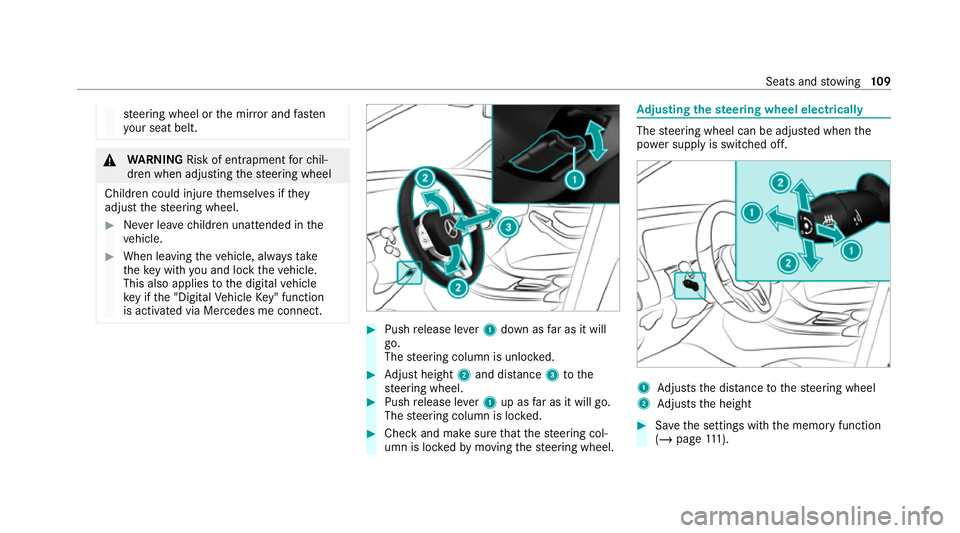
Push release le ver1 down as far as it will
go.
The steering column is unloc ked. #
Adjust height 2and di stance 3tothe
st eering wheel. #
Push release le ver1 up as far as it will go.
The steering column is loc ked. #
Check and make sure that thesteering col‐
umn is loc kedby moving thesteering wheel. Ad
justing the steering wheel electrically The
steering wheel can be adjus ted when the
po we r supp lyis switched off. 1
Adjusts the dis tance tothesteering wheel
2 Adjusts the height #
Save the settings with the memory function
(/ page 111). Se
ats and stowing 109
Page 114 of 629
Ve
hicles with memory function: you can stop
th e adjustment process bypressing one of the
memory function position switches. &
WARNING Risk of becoming trapped
du ring acti vation of the easy entry and
ex itfeature bychildren
If ch ildren activate the easy entry andexit
fe ature, they can become trapped, pa rticu‐
lar lywhen unat tended. #
Never lea vechildren unat tended in the
ve hicle. #
When leaving theve hicle, alw aysta ke
th eke y with you and lock theve hicle. This also applies
tothe Digital Vehicle Key if the
"Digital Vehicle Key" function is activated via
Mercedes me connect.
If th e easy entry andexitfeature is active, the
st eering wheel will mo veupwards and the driv‐
er's seat will mo veback in thefo llowing situa‐
tions:
R you swit chthe ignition off with the driver's
door open R
you open the driver's door with the ignition
switched off
% The steering wheel will mo veupwards on lyif
it is not already as high as it will go. The driv‐
er's seat will mo vebackwards only if it is not
already in there armost position.
The steering wheel and the driver's seat will
mo veback tothe last drive position in thefo l‐
lowing cases:
R you swit chthe po wer supp lyor the ignition
on when the driver's door is closed
R you close the driver's door with the ignition
switched on
The last drive position will be stored when:
R you swit chthe ignition off
R vehicles with memory function: you call
up the seat settings via the memory function.
R vehicles with memory function: you sa ve
th e seat settings via the memory function.
Ve hicles with memory function: press one of
th e memory function sa ved position buttons to
st op the adjustment process. Operating
the memory function &
WARNING Risk of an accident if the
memory function is used while driving
If yo u use the memory function on the driv‐
er's side while driving, you could lose cont rol
of theve hicle as a result of the adjustments
being made. #
Only use the memory function on the
driver's side when theve hicle is station‐
ar y. &
WARNING Risk of entrapment when set‐
ting the seat with the memory function
When the memory function adjusts the seat
or steering wheel, you and other vehicle
occupants – particularly children – could
become trapped. #
During the setting procedure of the
memory function, ensure that no body
parts are in the sweep of the seat or
th esteering wheel. Seats and
stowing 111
Page 115 of 629
#
If somebody becomes trapped, immedi‐
ately release the memory function posi‐
tion button.
The adjustment process is stopped. &
WARNING Risk of entrapment if the
memory function is activated bychildren
Children could become trapped if they acti‐
va te the memory function, particularly when
unattended. #
Never lea vechildren unat tended in the
ve hicle. #
When leaving theve hicle, alw aysta ke
th eke y with you and lock theve hicle. This also applies
tothe Digital Vehicle Key if the
"Digital Vehicle Key" function is activated via
Mercedes me connect.
The memory function can be used when the igni‐
tion is switched off.
St oring
Seat adjustments for up tothre e people can be
st ored and called up using the memory function. The
following sy stems can be selected:
R Seat, backrest and head restra int
R Steering wheel
R Outside mir rors
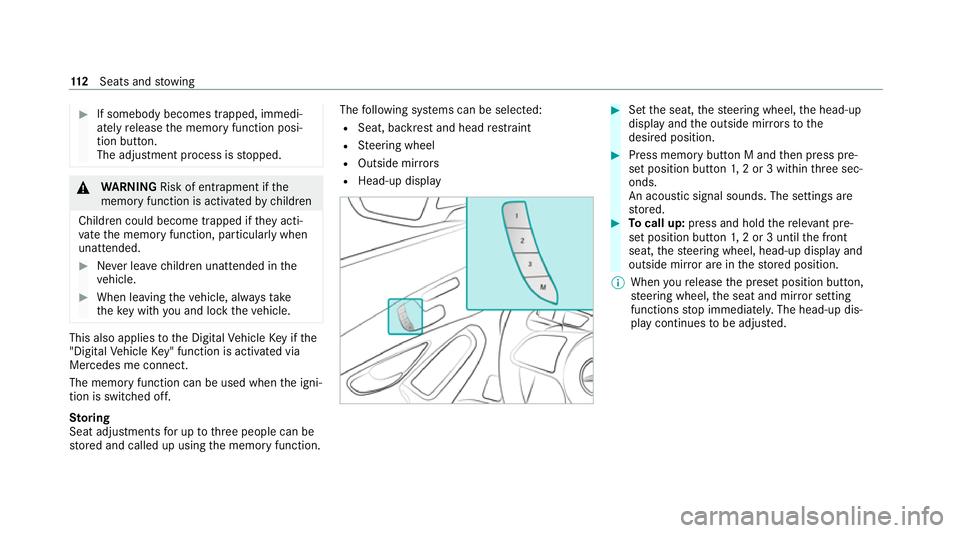
R Head-up display #
Set the seat, thesteering wheel, the head-up
display and the outside mir rors to the
desired position. #
Press memory button M and then press pre‐
set position button 1,2 or 3 within thre e sec‐
onds.
An acoustic signal sounds. The settings are
st ored. #
Tocall up: press and hold there leva nt pre‐
set position button 1,2 or 3 until the front
seat, thesteering wheel, head-up display and
outside mir ror are in thestored position.
% When youre lease the preset position button,
st eering wheel, the seat and mir ror setting
functions stop immediatel y.The head-up dis‐
play continues tobe adjus ted. 11 2
Seats and stowing