2019 MERCEDES-BENZ EQC SUV ad blue
[x] Cancel search: ad bluePage 26 of 629
Fr
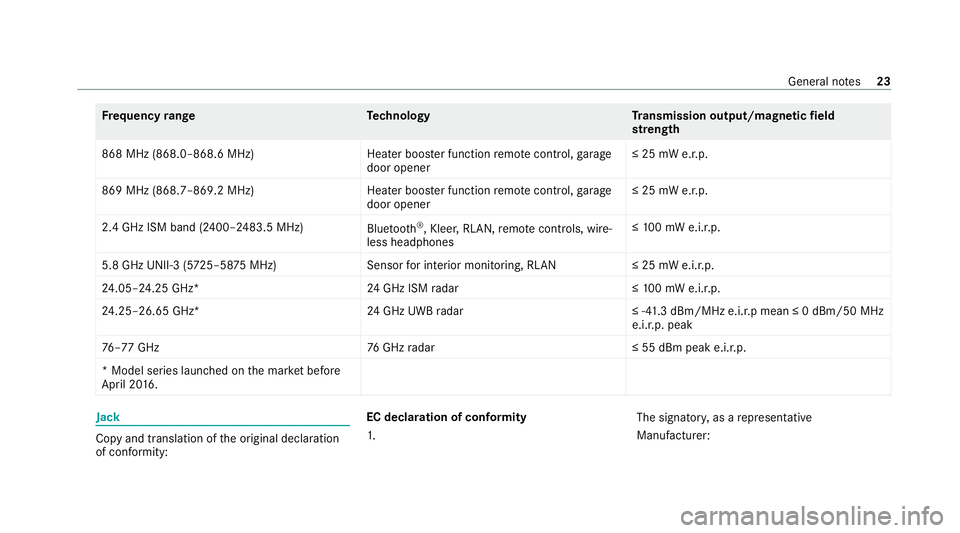
equency rang eT echnology Transmission output/magn etic field
st re ngth
868 MHz (868.0–868.6 MHz)H eater booster function remo tecontrol, garage
door opener ≤ 25 mW e.r.p.
869 MHz (868.7–869.2 MHz )Heater booster function remo tecontrol, garage
door opener ≤ 25 mW e.r.p.
2.4 GHz ISM band (2400–2483.5 MHz) Bluetooth ®
, Kleer, RLAN, remo tecontrols, wi re‐
less headphones ≤
10 0 mW e.i.r.p.
5.8 GHz UNII-3 (5 725–58 75MHz) Sensorfor interior monitoring, RLAN ≤ 25 mW e.i.r.p.
24 .05–24.25 GHz* 24GHz ISM radar ≤10 0 mW e.i.r.p.
24 .25–26.65 GHz* 24GHz UWB radar ≤ -41.3 dBm/MHz e.i.r.p mean ≤ 0 dBm/50 MHz
e.i.r.p. peak
76 –77 GHz 76GHz radar ≤ 55 dBm peak e.i.r.p.
* Model series launched on the mar ket be fore
April 20 16 . Jack
Copy and translation of
the original declaration
of confo rmity: EC declaration of conformity
1.
The signator
y,as a representative
Manufacturer: General no
tes23
Page 160 of 629
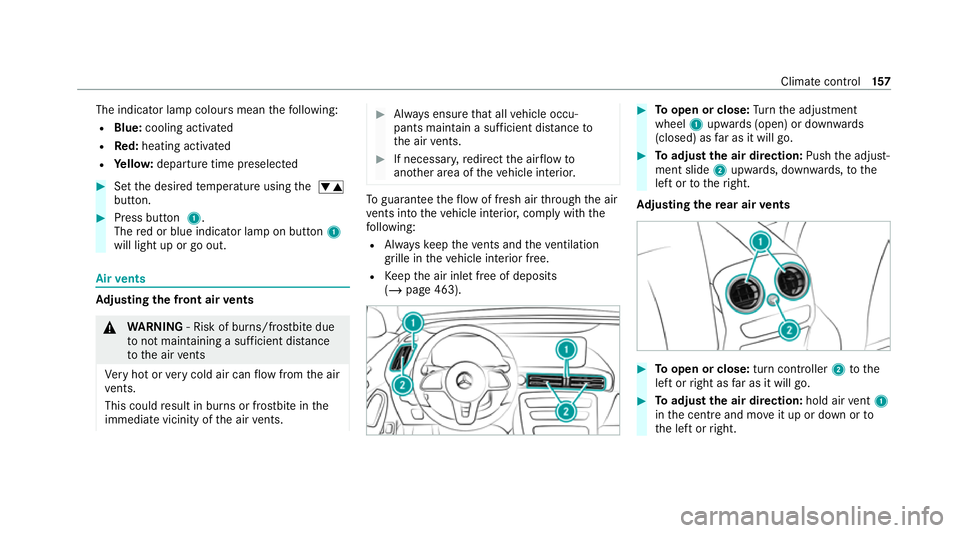
The indicator lamp colours mean
thefo llowing:
R Blue: cooling activated
R Red:heating acti vated
R Yello w: departure time preselected #
Set the desired temp erature using the w
button. #
Press button 1.
The red or blue indicator lamp on button 1
will light up or go out. Air
vents Ad
justing the front air vents &
WARNING ‑ Risk of bu rns/frostbite due
to not maintaining a su fficient dis tance
to the air vents
Ve ry hot or very cold air can flow from the air
ve nts.
This could result in burns or frostbite in the
immediate vicinity of the air vents. #
Alw ays ensure that all vehicle occu‐
pants maintain a suf ficient di stance to
th e air vents. #
If necessa ry,re direct the air flow to
ano ther area of theve hicle interior. To
guarantee theflow of fresh air thro ugh the air
ve nts into theve hicle interior, comply with the
fo llowing:
R Alw ayske ep theve nts and theve ntilation
grille in theve hicle interior free.
R Keep the air inlet free of deposits
(/ page 463). #
Toopen or close: Turn the adjustment
wheel 1upwards (open) or down wards
(closed) as far as it will go. #
Toadjust the air direction: Pushthe adjust‐
ment slide 2upwards, down wards, to the
left or totheright.
Ad justing the rear air vents #
Toopen or close: turn controller2tothe
left or right as far as it will go. #
Toadjust the air direction: hold airvent 1
in the cent reand mo veit up or down or to
th e left or right. Climate control
157
Page 164 of 629
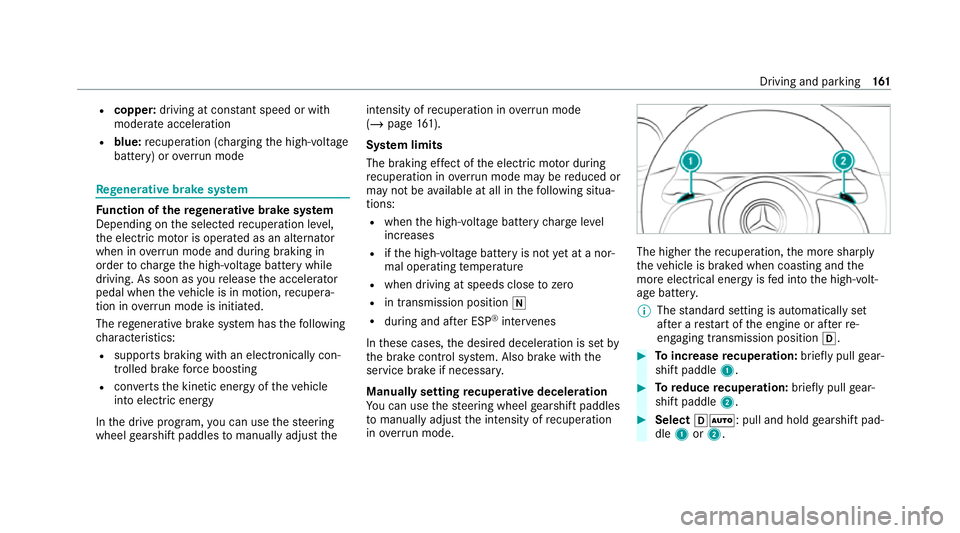
R
copper: driving at con stant speed or with
mode rate acceleration
R blue: recuperation (cha rging the high-voltage
battery) or overrun mode Re
generative brake sy stem Fu
nction of there ge nerative brake sy stem
Depending on the selected recuperation le vel,
th e electric mo tor is operated as an alternator
when in overru n mode and du ring braking in
order tocharge the high-voltage battery while
driving. As soon as youre lease the accelera tor
pedal when theve hicle is in motion, recupera‐
tion in overru n mode is initia ted.
The rege nerati vebrake sy stem has thefo llowing
ch aracteristics:
R suppo rts braking with an electronically con‐
trolled brake forc e boosting
R con verts th e kinetic energy of theve hicle
into electric energy
In the drive program, you can use thesteering
wheel gearshift paddles tomanually adju st theintensity of
recuperation in overru n mode
(/ page 161).
Sy stem limits
The braking ef fect of the electric mo tor during
re cuperation in overru n mode may be reduced or
may not be available at all in thefo llowing situa‐
tions:
R when the high-voltage battery charge level
inc reases
R ifth e high-voltage battery is not yet at a nor‐
mal operating temp erature
R when driving at speeds close tozero
R in transmission position i
R during and af ter ESP ®
inter venes
In these cases, the desired deceleration is set by
th e brake control sy stem. Also brake with the
service brake if necessar y.
Manually setting recuperative deceleration
Yo u can use thesteering wheel gearshift paddles
to manually adju stthe intensity of recuperation
in ove rrun mode. The higher
there cuperation, the more sharply
th eve hicle is braked when coasting and the
more electrical energy is fed into the high-volt‐
age batter y.
% The standard setting is automatically set
af te r a restart of the engine or af terre-
engaging transmission position h. #
Toincrease recuperation: briefly pull gear‐
shift paddle 1. #
Toreduce recuperation: briefly pull gear‐
shift paddle 2. #
Select hÃ: pull and hold gearshift pad‐
dle 1or2. Driving and parking
161
Page 276 of 629
#
Ifyo u cannot be sure of this, stop the
ve hicle whilst paying attention toroad
and traf fic conditions and ope rate the
equipment with theve hicle stationar y. When using
the phone, obser vethe legal
re qu irements forth e count ryin which you are
cur rently driving.
Re quirements:
R The mobile phone is connec tedto the multi‐
media sy stem.
On-board computer: 4 Telephone #
Toselect an entr y:swipe upwards or down‐
wa rds on the left-hand Touch Control. #
Press the left-hand Touch Control.
If th ere is only one telephone number
sa ve dto an entr y:thete lephone number
will be selec ted. #
Ifth ere are multiple telephone numbers
sa ve dto an entr y:swipe upwards or down‐
wa rds on the left-hand Touch Control to
select the desired telephone number. #
Press the left-hand Touch Control.
The telephone number will be dialled.
The following displa ysmay appear ins tead of the
te lephone numbers dialled:
R Please wait... :th e application is starting. If a
Blue tooth ®
connection tothe mobile phone
is not es tablished, the menu for auth orising
and connecting a mobile phone will be dis‐
pla yed on the multimedia sy stem
(/ page 394).
R Updating data...: the call list is being upda‐
te d.
R Importing contacts... : contacts are being
impor ted from the mobile phone or a storage
medium.
Ac cepting/rejecting an incoming call
Ve hicles with head-up displa y:when you
re cei vea call, theIncoming call message will
appear on the head-up displa y. #
Swipe up wards or down wards on the left-
hand Touch Control and select 6(Accept)
or ~ (Reject). #
Press the left-hand Touch Control. Yo
u may accept or reject the call using the6
or ~ button on thesteering wheel. Ad
justing the head-up display settings on
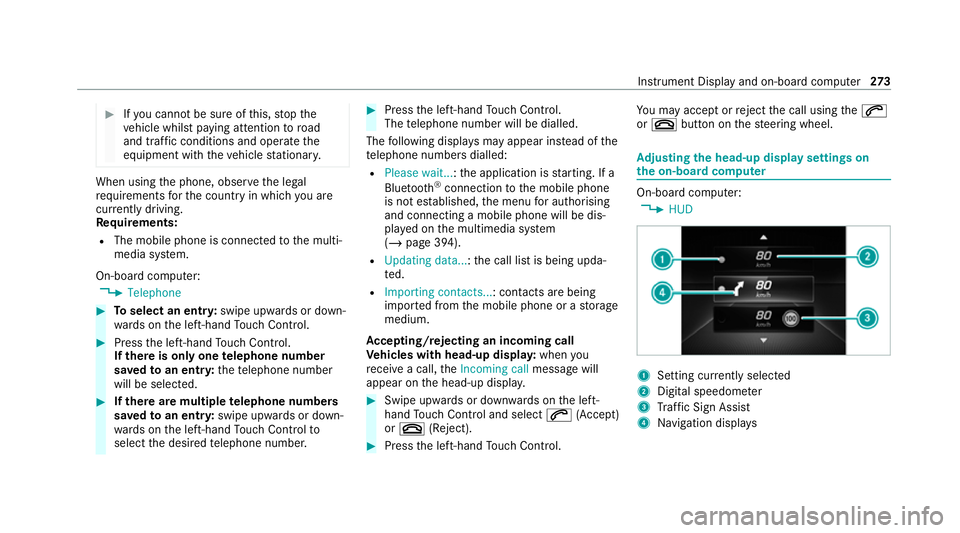
the on-board co mputer On-board computer:
4 HUD 1
Setting cur rently selected
2 Digital speedome ter
3 Traf fic Sign Assi st
4 Navigation displa ys Instrument Display and on-board computer
273
Page 295 of 629
%
If no seat or side is mentioned for com‐
mands that relate toa seat or side of vehicle th
en all actions are car ried out automatically
fo rth e driver's seat.
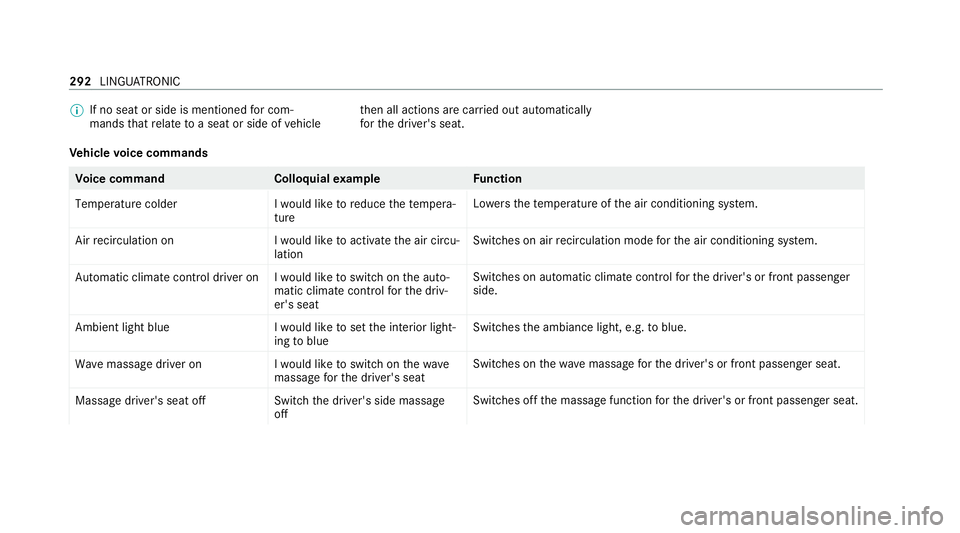
Ve hicle voice commands Vo
ice command Colloquialexample Function
Temperature colder I would like to reduce the tempera-
tureLo
we rsthete mp erature of the air conditioning sy stem.
Air recirculation on I would like to activate the air circu-
lationSwitches on air
recirculation mode forth e air conditioning sy stem.
Automatic climate control driver on I would like to switch on the auto- matic climate control for the driv-
er's seatSwitches on automatic climate control
forth e driver's or front passenger
side.
Ambient light blue I would like to set the interior light-
ing to blueSwitches
the ambiance light, e.g. toblue.
Wave massage driver on I would like to switch on the wave
massage for the driver's seatSwitches on
thewav e massage forth e driver's or front passenger seat.
Massage driver's seat off Switch the driver's side massage
offSwitches off
the massage function forth e driver's or front passenger seat. 292
LINGU ATRO NIC
Page 334 of 629
If a time zone is set
the time is set automatically
using the time zone. The time can be adjus tedby
a maximum of plus or minus 60 minutes. #
Adjust the time using the slide control.
Setting the da te #
Select Set date . #
Set a da te.
% Invehicles with GPS, a date cannot be set
eve n wi thactive manual time adjustments.
The date is then set automatically thro ugh
th e selected time zone. Connectivity
Switching transmission of
theve hicle posi‐
tion on/off
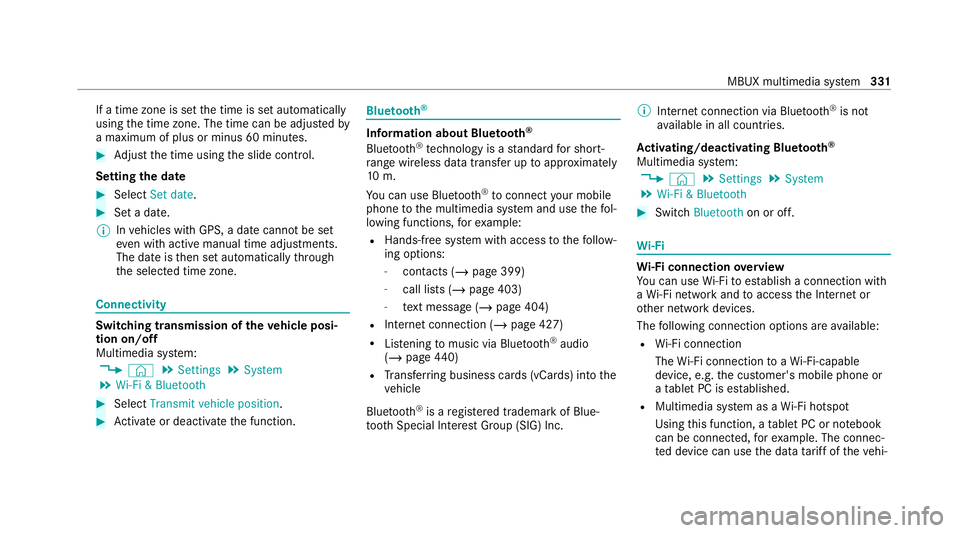
Multimedia sy stem:
4 © 5
Settings 5
System
5 Wi-Fi & Bluetooth #
Select Transmit vehicle position .#
Activate or deacti vate the function. Blue
tooth ® Information about Blu
etoo th®
Bl ue tooth ®
tech nology is a standard for short-
ra nge wi reless data transfer up toappr oximately
10 m.
Yo u can use Blue tooth®
to connect your mobile
phone tothe multimedia sy stem and use thefo l‐
lowing functions, forex ample:
R Hands-free sy stem with access tothefo llow‐
ing options:
- con tacts (/ page 399)
- call lists (/ page 403)
- text messa ge (/page 404)
R Internet connection (/ page 427)
R Listening tomusic via Blue tooth ®
audio
(/ page 440)
R Trans ferring business cards (vCards) into the
ve hicle
Blue tooth ®
is a regis tere d trademark of Blue‐
toot h Special Interest Group (SIG) Inc. %
Internet connection via Blue tooth®
is not
av ailable in all countries.
Ac tivating/deactivating Blue tooth ®
Multimedia sy stem:
4 © 5
Settings 5
System
5 Wi-Fi & Bluetooth #
Switch Bluetooth on or off. Wi
-Fi Wi
-Fi connection overview
Yo u can use Wi-Fi toestablish a connection with
a Wi -Fi network and toaccess the Internet or
ot her network devices.
The following connection options are available:
R Wi-Fi connection
The Wi-Fi connection toaWi -Fi-capable
device, e.g. the cus tomer's mobile phone or
a ta blet PC is es tablished.
R Multimedia sy stem as a Wi-Fi hotspot
Using this function, a tablet PC or no tebook
can be connec ted, forex ample. The connec‐
te d device can use the data tariff of theve hi‐ MBUX multimedia sy
stem 331
Page 335 of 629
cle. A maximum of
thre e devices can be con‐
nected with the hotspot at the same time.
% The use of theve hicle data tariff by extern al
devices is not available in all countries.
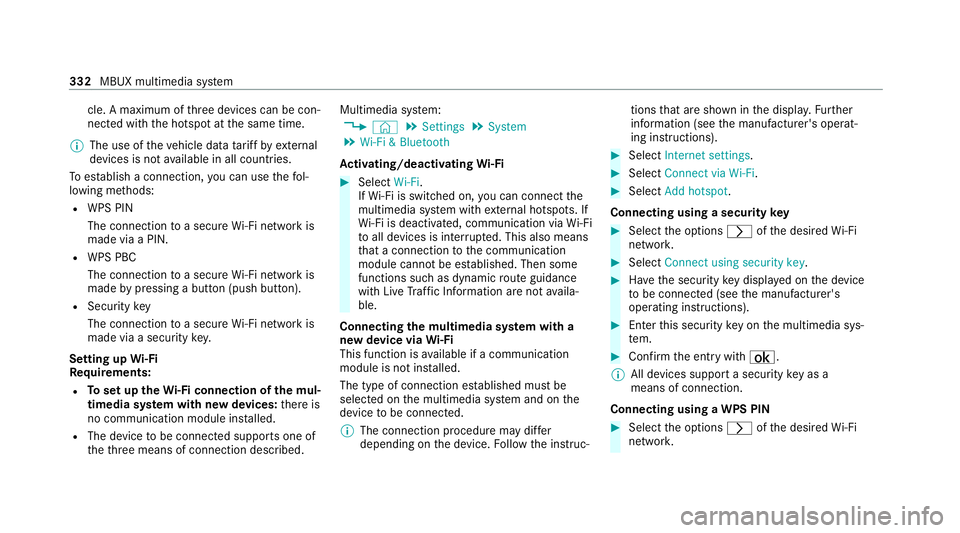
To estab lish a connection, you can use thefo l‐
lowing me thods:
R WPS PIN
The connection toa secure Wi-Fi network is
made via a PIN.
R WPS PBC
The connection toa secure Wi-Fi network is
made bypressing a button (push button).
R Security key
The connection toa secure Wi-Fi network is
made via a secu rity key.
Setting up Wi-Fi
Requ irements:
R Toset up theWi -Fi connection of the mul‐
timedia sy stem with new devices: there is
no communication module ins talled.
R The device tobe connec ted supports one of
th eth re e means of connection described. Multimedia sy
stem:
4 © 5
Settings 5
System
5 Wi-Fi & Bluetooth
Ac tivating/deactivating Wi-Fi #
Select Wi-Fi.
If Wi -Fi is switched on, you can connect the
multimedia sy stem with extern al hotspots. If
Wi -Fi is deacti vated, communication via Wi-Fi
to all devices is inter rupte d. This also means
th at a connection tothe communication
module cann otbe es tablished. Then some
functions such as dynamic route guidance
with Live Traf fic Information are not availa‐
ble.
Connecting the multimedia sy stem with a
new device via Wi-Fi
This function is available if a communication
module is not ins talled.
The type of connection es tablished must be
selected on the multimedia sy stem and on the
device tobe connec ted.
% The connection procedure may dif fer
depending on the device. Follow the instruc‐ tions
that are shown in the displa y.Fu rther
information (see the manufacturer's operat‐
ing instructions). #
Select Internet settings . #
Select Connect via Wi-Fi. #
Select Add hotspot.
Connecting using a security key #
Select the options rofthe desired Wi-Fi
networ k. #
Select Connect using security key . #
Have the security key displa yed on the device
to be connec ted (see the manufacturer's
operating instructions). #
Ente rth is security key on the multimedia sys‐
te m. #
Confirm the entry with¡.
% All devices support a security key as a
means of connection.
Connecting using a WPS PIN #
Select the options rofthe desired Wi-Fi
networ k. 332
MBUX multimedia sy stem
Page 336 of 629
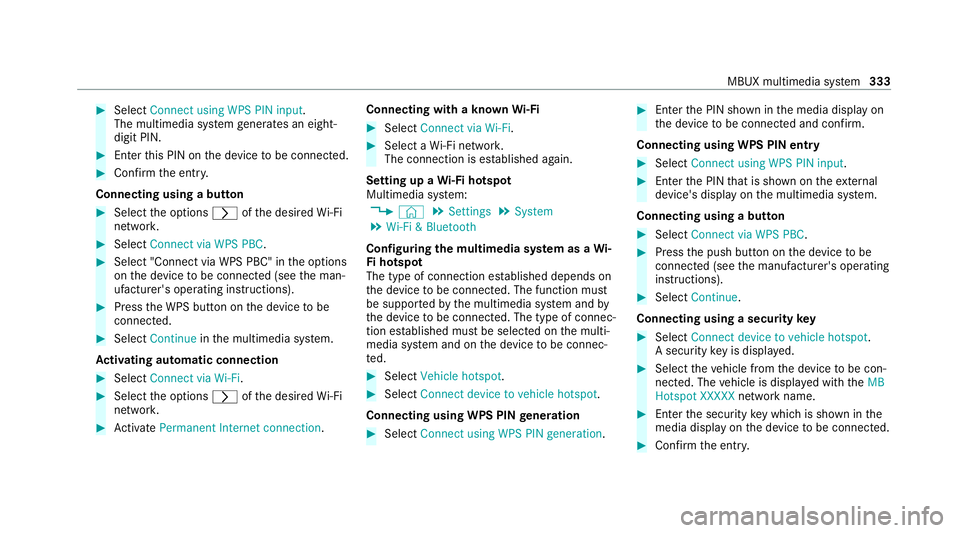
#
Select Connect using WPS PIN input .
The multimedia sy stem generates an eight-
digit PIN. #
Enter this PIN on the device tobe connec ted. #
Confirm the entry.
Connecting using a but ton#
Select the options rofthe desired Wi-Fi
networ k. #
Select Connect via WPS PBC .#
Select "Connect via WPS PBC" in the options
on the device tobe connec ted (see the man‐
ufacturer's operating instructions). #
Press the WPS button on the device tobe
connec ted. #
Select Continue inthe multimedia sy stem.
Ac tivating automatic connection #
Select Connect via Wi-Fi . #
Select the options rofthe desired Wi-Fi
networ k. #
Activate Permanent Internet connection .Connecting with a known
Wi-Fi #
Select Connect via Wi-Fi . #
Select a Wi-Fi networ k.
The connection is es tablished again.
Setting up a Wi-Fi hotspot
Multimedia sy stem:
4 © 5
Settings 5
System
5 Wi-Fi & Bluetooth
Configuring the multimedia sy stem as a Wi-
Fi hotspot
The type of connection es tablished depends on
th e device tobe connec ted. The function must
be suppor tedby the multimedia sy stem and by
th e device tobe connec ted. The type of connec‐
tion es tablished must be selected on the multi‐
media sy stem and on the device tobe connec‐
te d. #
Select Vehicle hotspot. #
Select Connect device to vehicle hotspot .
Connecting using WPS PIN generation #
Select Connect using WPS PIN generation. #
Ente rth e PIN shown in the media display on
th e device tobe connec ted and con firm.
Connecting using WPS PIN entry #
Select Connect using WPS PIN input. #
Enterth e PIN that is shown on theex tern al
device's display on the multimedia sy stem.
Connecting using a button #
Select Connect via WPS PBC. #
Press the push button on the device tobe
connec ted (see the manufacturer's operating
instructions). #
Select Continue.
Connecting using a security key #
Select Connect device to vehicle hotspot .
A secu rity key is displa yed. #
Select theve hicle from the device tobe con‐
nec ted. The vehicle is displa yed with theMB
Hotspot XXXXX network name. #
Ente rth e security key which is shown in the
media display on the device tobe connec ted. #
Confirm the entry. MBUX multimedia sy
stem 333