2019 MERCEDES-BENZ AMG GT ROADSTER engine
[x] Cancel search: enginePage 77 of 298
!
If the SmartKey is within the rear detection
range of KEYLESS-GO, the following situa-
tions, for example, could lead to the uninten-
tional opening of the trunk lid:
R when using an automatic car wash
R when using a power washer
Make sure that the SmartKey is at least 10 ft
(3 m) away from the vehicle.
General notes Vehicles with KEYLESS-GO without carbon
package: you can unlock the trunk lid without
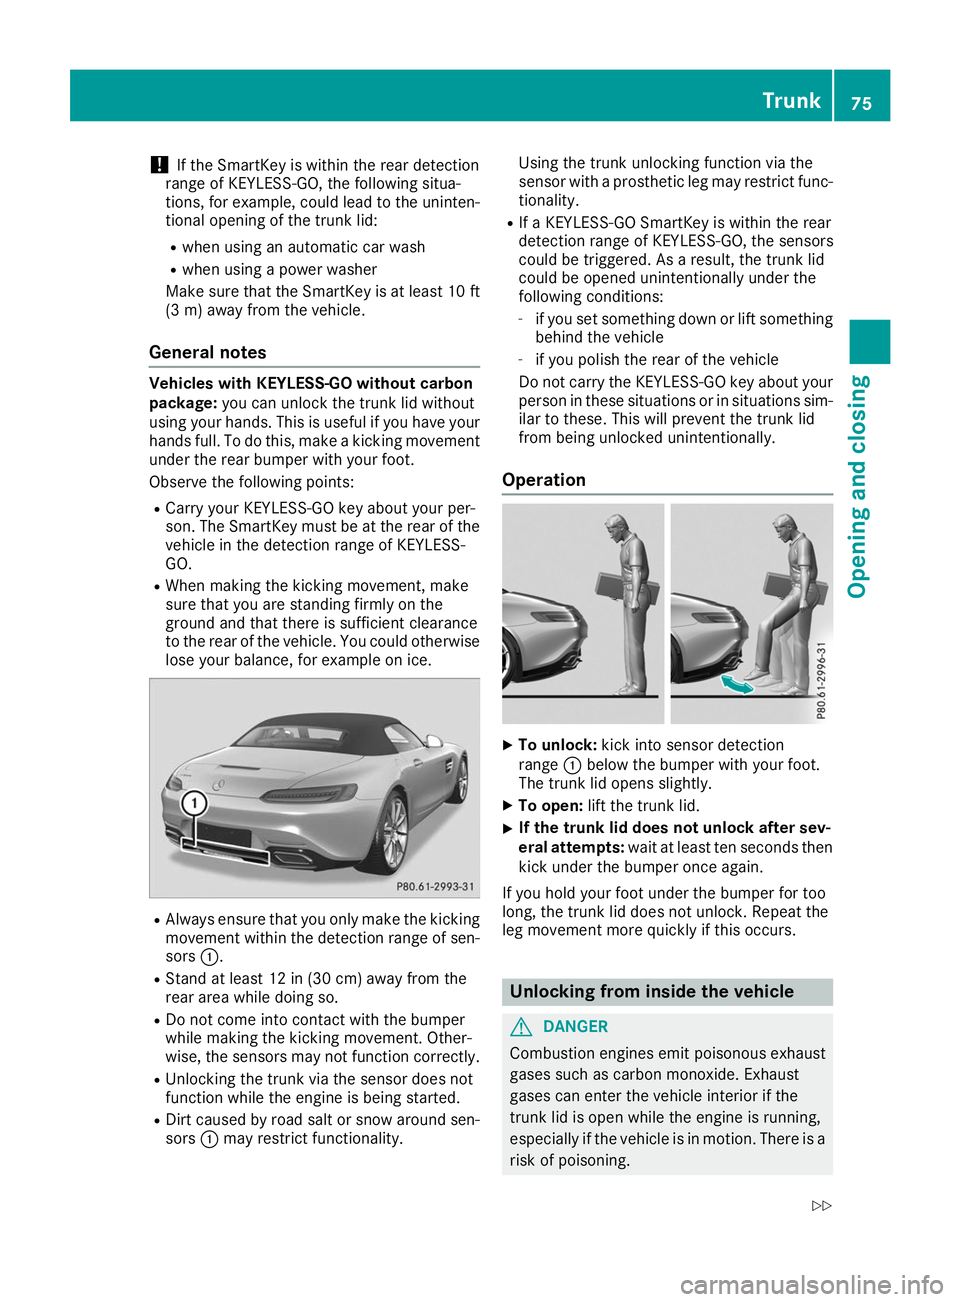
using your hands. This is useful if you have your hands full. To do this, make a kicking movement
under the rear bumper with your foot.
Observe the following points:
R Carry your KEYLESS-GO key about your per-
son. The SmartKey must be at the rear of the
vehicle in the detection range of KEYLESS-
GO.
R When making the kicking movement, make
sure that you are standing firmly on the
ground and that there is sufficient clearance
to the rear of the vehicle. You could otherwise lose your balance, for example on ice. R
Always ensure that you only make the kicking
movement within the detection range of sen- sors 0043.
R Stand at least 12 in (30 cm) away from the
rear area while doing so.
R Do not come into contact with the bumper
while making the kicking movement. Other-
wise, the sensors may not function correctly.
R Unlocking the trunk via the sensor does not
function while the engine is being started.
R Dirt caused by road salt or snow around sen-
sors 0043may restrict functionality. Using the trunk unlocking function via the
sensor with a prosthetic leg may restrict func-
tionality.
R If a KEYLESS-GO SmartKey is within the rear
detection range of KEYLESS-GO, the sensors
could be triggered. As a result, the trunk lid
could be opened unintentionally under the
following conditions:
- if you set something down or lift something
behind the vehicle
- if you polish the rear of the vehicle
Do not carry the KEYLESS-GO key about your
person in these situations or in situations sim-
ilar to these. This will prevent the trunk lid
from being unlocked unintentionally.
Operation X
To unlock: kick into sensor detection
range 0043below the bumper with your foot.
The trunk lid opens slightly.
X To open: lift the trunk lid.
X If the trunk lid does not unlock after sev-
eral attempts:
wait at least ten seconds then
kick under the bumper once again.
If you hold your foot under the bumper for too
long, the trunk lid does not unlock. Repeat the
leg movement more quickly if this occurs. Unlocking from inside the vehicle
G
DANGER
Combustion engines emit poisonous exhaust
gases such as carbon monoxide. Exhaust
gases can enter the vehicle interior if the
trunk lid is open while the engine is running,
especially if the vehicle is in motion. There is a risk of poisoning. Trunk
75Opening and closing
Z
Page 78 of 298
Always switch off the engine before opening
the trunk lid. Never drive with the trunk lid
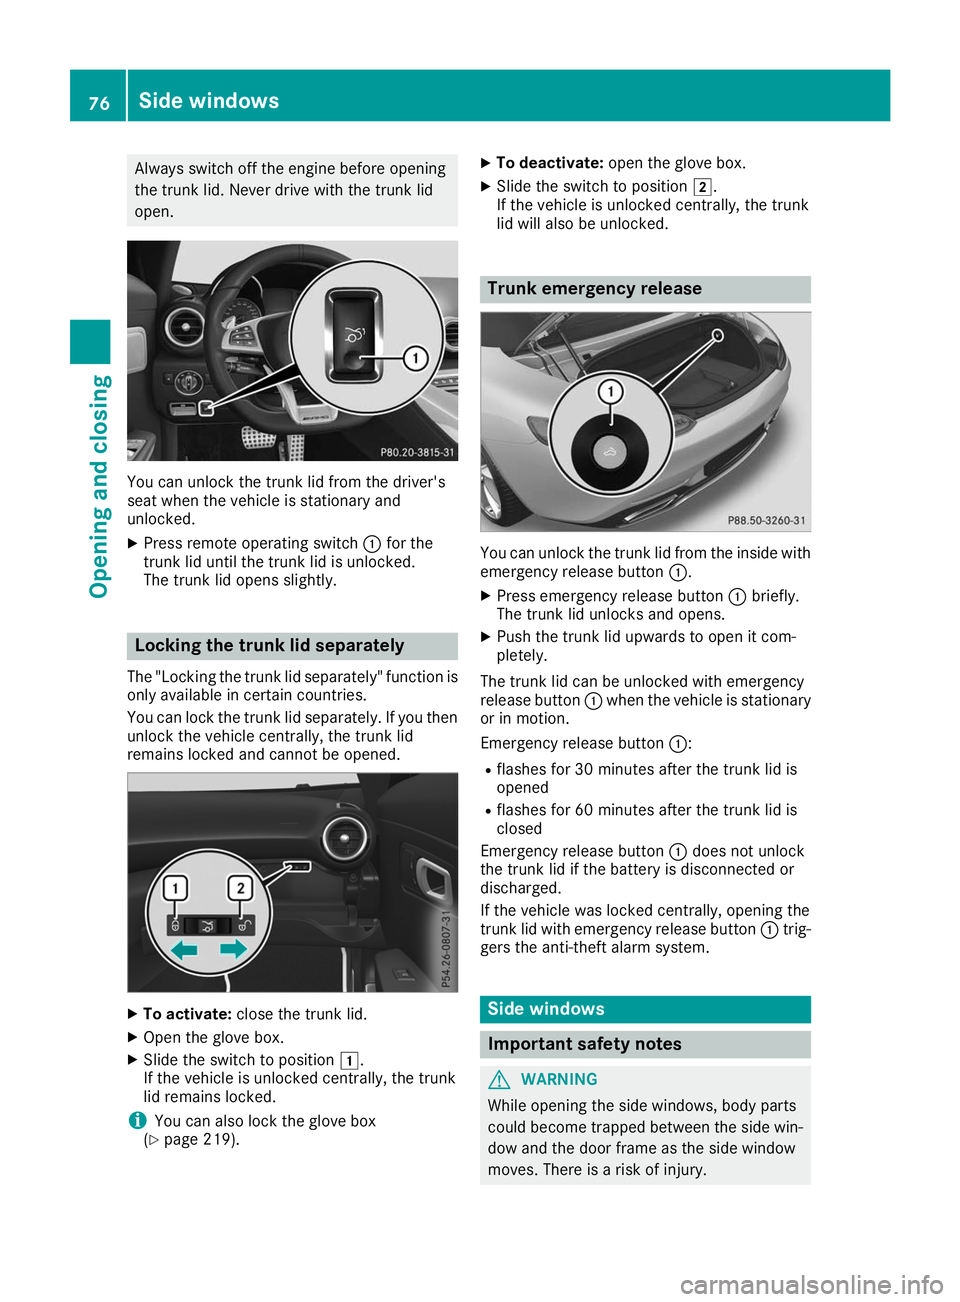
open. You can unlock the trunk lid from the driver's
seat when the vehicle is stationary and
unlocked.
X Press remote operating switch 0043for the
trunk lid until the trunk lid is unlocked.
The trunk lid opens slightly. Locking the trunk lid separately
The "Locking the trunk lid separately" function is only available in certain countries.
You can lock the trunk lid separately. If you then
unlock the vehicle centrally, the trunk lid
remains locked and cannot be opened. X
To activate: close the trunk lid.
X Open the glove box.
X Slide the switch to position 0047.
If the vehicle is unlocked centrally, the trunk
lid remains locked.
i You can also lock the glove box
(Y page 219). X
To deactivate: open the glove box.
X Slide the switch to position 0048.
If the vehicle is unlocked centrally, the trunk
lid will also be unlocked. Trunk emergency release
You can unlock the trunk lid from the inside with
emergency release button 0043.
X Press emergency release button 0043briefly.
The trunk lid unlocks and opens.
X Push the trunk lid upwards to open it com-
pletely.
The trunk lid can be unlocked with emergency
release button 0043when the vehicle is stationary
or in motion.
Emergency release button 0043:
R flashes for 30 minutes after the trunk lid is
opened
R flashes for 60 minutes after the trunk lid is
closed
Emergency release button 0043does not unlock
the trunk lid if the battery is disconnected or
discharged.
If the vehicle was locked centrally, opening the
trunk lid with emergency release button 0043trig-
gers the anti-theft alarm system. Side windows
Important safety notes
G
WARNING
While opening the side windows, body parts
could become trapped between the side win- dow and the door frame as the side window
moves. There is a risk of injury. 76
Side windowsOpening and closing
Page 86 of 298
Correct driver's seat position
G
WARNING
You could lose control of your vehicle if you do the following while driving:
R adjust the driver's seat, head restraint,
steering wheel or mirrors
R fasten the seat belt
There is a risk of an accident.
Adjust the driver's seat, head restraint, steer-
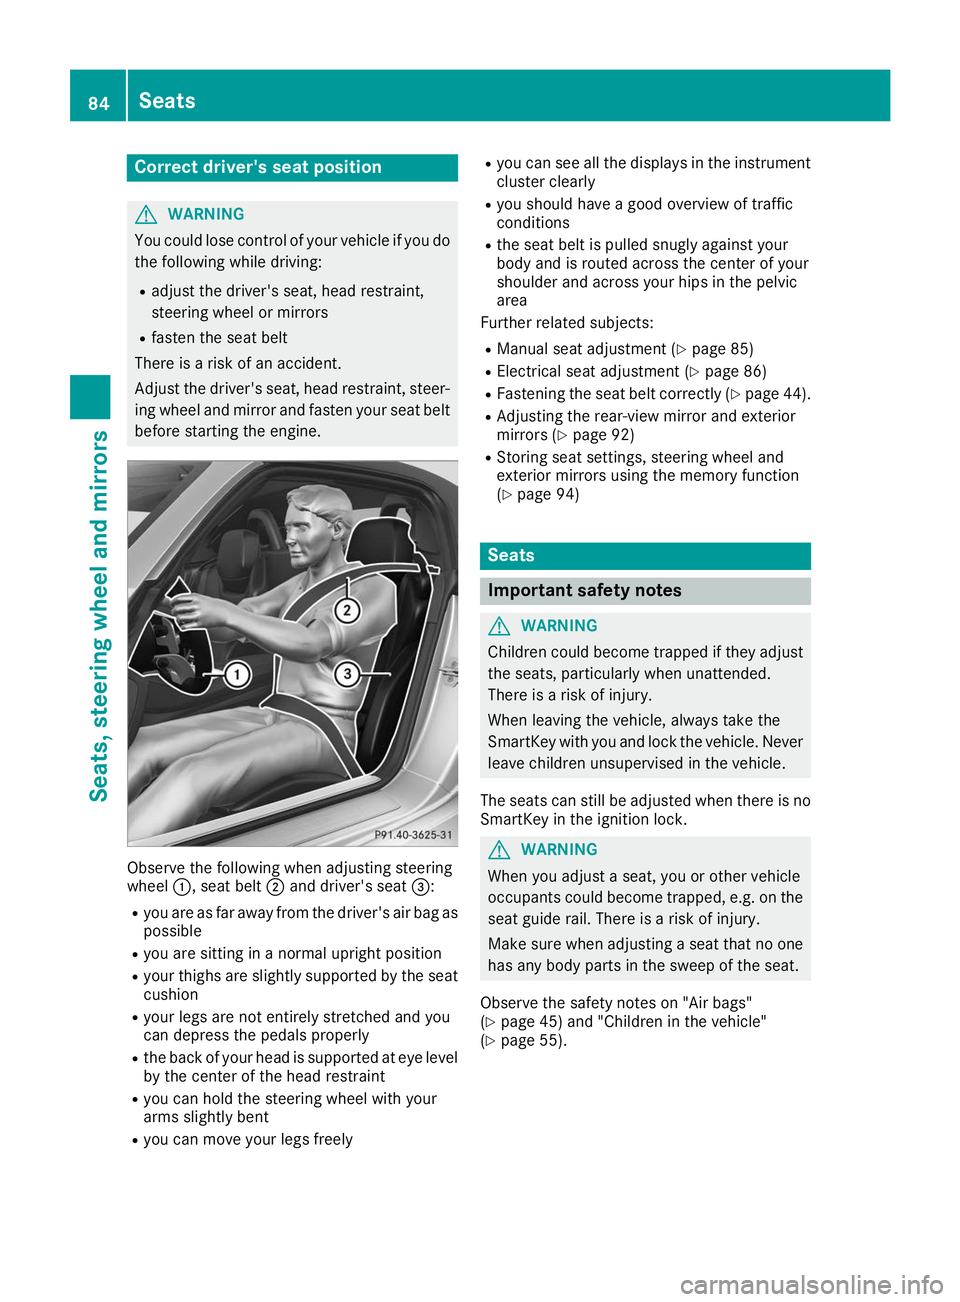
ing wheel and mirror and fasten your seat belt before starting the engine. Observe the following when adjusting steering
wheel
0043, seat belt 0044and driver's seat 0087:
R you are as far away from the driver's air bag as
possible
R you are sitting in a normal upright position
R your thighs are slightly supported by the seat
cushion
R your legs are not entirely stretched and you
can depress the pedals properly
R the back of your head is supported at eye level
by the center of the head restraint
R you can hold the steering wheel with your
arms slightly bent
R you can move your legs freely R
you can see all the displays in the instrument
cluster clearly
R you should have a good overview of traffic
conditions
R the seat belt is pulled snugly against your
body and is routed across the center of your
shoulder and across your hips in the pelvic
area
Further related subjects:
R Manual seat adjustment (Y page 85)
R Electrical seat adjustment (Y page 86)
R Fastening the seat belt correctly (Y page 44).
R Adjusting the rear-view mirror and exterior
mirrors (Y page 92)
R Storing seat settings, steering wheel and
exterior mirrors using the memory function
(Y page 94) Seats
Important safety notes
G
WARNING
Children could become trapped if they adjust the seats, particularly when unattended.
There is a risk of injury.
When leaving the vehicle, always take the
SmartKey with you and lock the vehicle. Neverleave children unsupervised in the vehicle.
The seats can still be adjusted when there is no
SmartKey in the ignition lock. G
WARNING
When you adjust a seat, you or other vehicle
occupants could become trapped, e.g. on the seat guide rail. There is a risk of injury.
Make sure when adjusting a seat that no one
has any body parts in the sweep of the seat.
Observe the safety notes on "Air bags"
(Y page 45) and "Children in the vehicle"
(Y page 55). 84
SeatsSeats, steering wheel and
mirrors
Page 87 of 298
G
WARNING
You could lose control of your vehicle if you do the following while driving:
R adjust the driver's seat, head restraint,
steering wheel or mirrors
R fasten the seat belt
There is a risk of an accident.
Adjust the driver's seat, head restraint, steer-
ing wheel and mirror and fasten your seat belt before starting the engine.
For safety reasons, seat fore-and-aft adjustment on electrically adjustable seats is only possible
for a maximum of two seconds when the vehicleis in motion. The seat fore-and-aft adjustment
can then no longer be set. G
WARNING
If you adjust the seat height carelessly, you or other vehicle occupants could be trapped andthereby injured. Children in particular could
accidentally press the electrical seat adjust-
ment buttons and become trapped. There is a
risk of injury.
While moving the seats, make sure that your
hands or other body parts do not get under the
lever assembly of the seat adjustment sys-
tem. G
WARNING
If head restraints are not adjusted correctly,
they cannot provide protection as intended.
There is an increased risk of injury in the head
and neck area, e.g. in the event of an accident or when braking.
Before driving off, make sure for every vehicle
occupant that the center of the head restraint supports the back of the head at about eye
level.
Using the fore-and-aft adjustment, adjust the
head restraint so that it is as close as possible to your head. G
WARNING
The seat belt does not offer the intended level of protection if you have not moved the back-
rest to an almost vertical position. When brak- ing or in the event of an accident, you could
slide underneath the seat belt and sustain
abdomen or neck injuries, for example. This
poses an increased risk of injury or even fatal
injury.
Adjust the seat properly before beginning
your journey. Always ensure that the backrestis in an almost vertical position and that the
shoulder section of your seat belt is routed
across the center of your shoulder.
! To prevent damage to the seats and the seat
heating, observe the following notes:
R Do not spill liquids onto the seats. Dry the
seats as soon as possible if liquid does get
spilled on the seats.
R If the seat covers are damp or wet, do not
switch on the seat heating. Also, do not use
the seat heating to dry the seats.
R Clean the seat covers as recommended;
see keyword "Care".
R Do not transport heavy loads on the seats.
Do not place pointed objects on the seat
cushions such as knives, nails or tools.
Where possible, use the seats only for car-
rying passengers.
R When operating the seat heating, do not
cover the seats with insulating materials,
e.g. blankets, coats, bags, protective cov-
ers, child seats or booster seats.
! Make sure that there are no objects in the
footwell under or behind the seats when mov- ing the seats back. There is a risk that the
seats and/or the objects could be damaged. Adjusting the seats manually
General notes The manually adjustable seat is only available in
Canada. Seats
85Seats, steering wheel and mirrors Z
Page 92 of 298
Problems with AIRSCARF
Problem
Possible causes/consequences and
0050
0050Solutions AIRSCARF has switched
off prematurely or will
not switch on. The on-board voltage is too low because too many electrical consum-
ers are switched on.
X Switch off electrical consumers that you do not need, such as the
rear window defroster or interior lighting.
X Switch on AIRSCARF again. Steering wheel
Important safety notes
G
WARNING
You could lose control of your vehicle if you do the following while driving:
R adjust the driver's seat, head restraint,
steering wheel or mirrors
R fasten the seat belt
There is a risk of an accident.
Adjust the driver's seat, head restraint, steer-
ing wheel and mirror and fasten your seat belt before starting the engine. G
WARNING
If the steering wheel is unlocked while the
vehicle is in motion, it could change position
unexpectedly. This could cause you to lose
control of the vehicle. There is a risk of an
accident.
Before starting off, make sure the steering
wheel is locked. Never unlock the steering
wheel while the vehicle is in motion. G
WARNING
Children could injure themselves if they
adjust the steering wheel. There is a risk of
injury.
When leaving the vehicle, always take the
SmartKey with you and lock the vehicle. Never leave children unsupervised in the vehicle.
The electrically adjustable steering wheel can
still be adjusted when there is no SmartKey in
the ignition lock. Adjusting the steering wheel
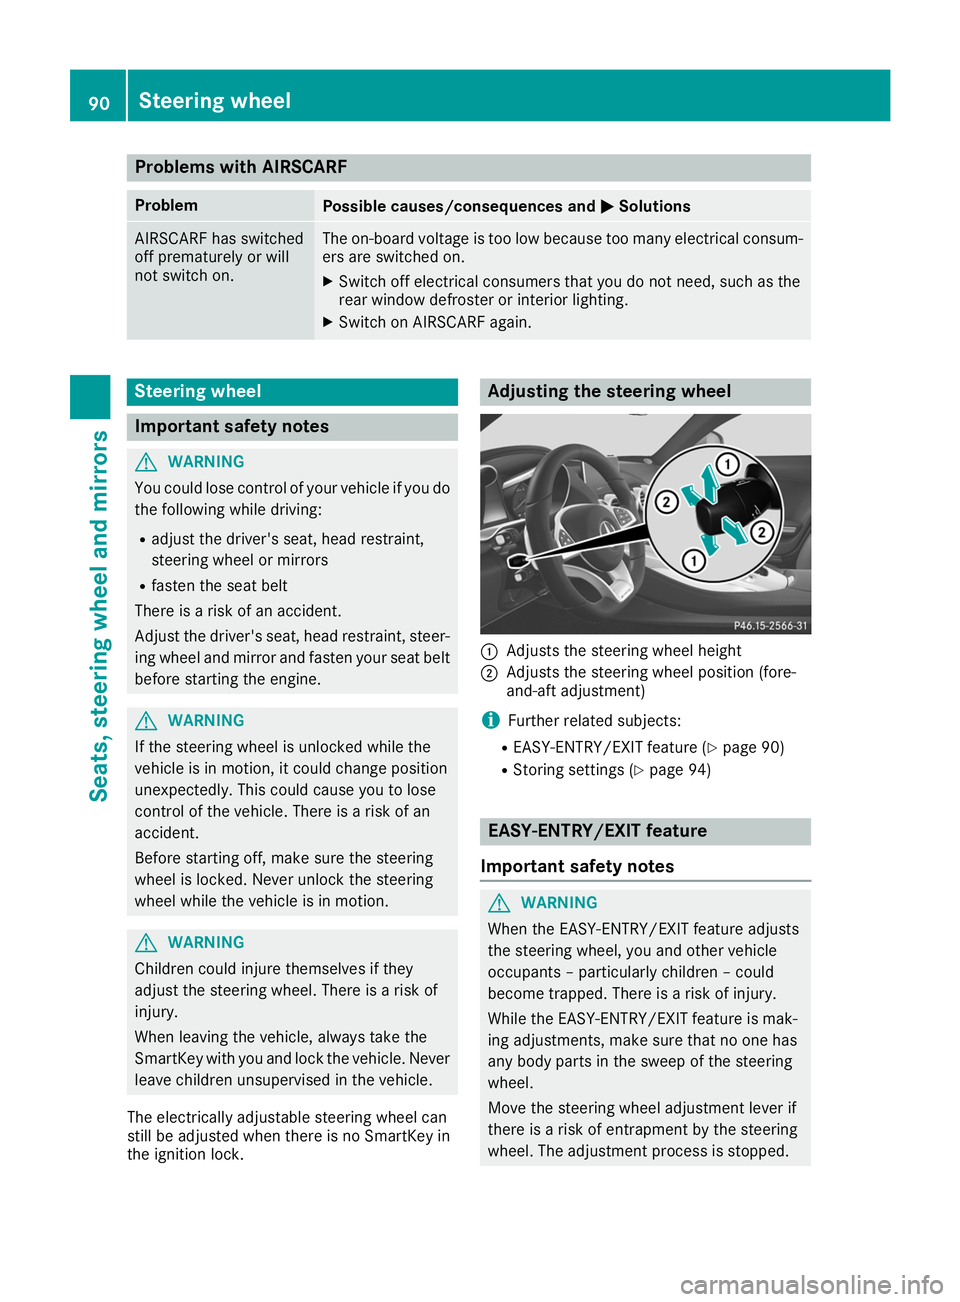
0043
Adjusts the steering wheel height
0044 Adjusts the steering wheel position (fore-
and-aft adjustment)
i Further related subjects:
R EASY-ENTRY/EXIT feature (Y page 90)
R Storing settings (Y page 94) EASY-ENTRY/EXIT feature
Important safety notes G
WARNING
When the EASY-ENTRY/EXIT feature adjusts
the steering wheel, you and other vehicle
occupants – particularly children – could
become trapped. There is a risk of injury.
While the EASY-ENTRY/EXIT feature is mak-
ing adjustments, make sure that no one has
any body parts in the sweep of the steering
wheel.
Move the steering wheel adjustment lever if
there is a risk of entrapment by the steering
wheel. The adjustment process is stopped. 90
Steering wheelSeats, steering wheel and mirrors
Page 93 of 298
Press one of the memory function position but-
tons. The adjustment process is stopped. This
function is only available on vehicles with mem-
ory function. G
WARNING
If children activate the EASY-ENTRY/EXIT fea- ture, they can become trapped, particularly
when unattended. There is a risk of injury.
When leaving the vehicle, always take the
SmartKey with you and lock the vehicle. Never leave children unsupervised in the vehicle. G
WARNING
If you drive off while the EASY-ENTRY/EXIT
feature is making adjustments, you could lose
control of the vehicle. There is a risk of an
accident.
Always wait until the adjustment process is
complete before driving off.
The EASY-ENTRY/EXIT feature makes getting in
and out of your vehicle easier.
You can activate and deactivate the EASY-
ENTRY/EXIT feature using the multimedia sys-
tem (see the Digital Operator's Manual)
Position of the steering wheel when the
EASY-ENTRY/EXIT feature is active The steering wheel swings up when you:
R remove the SmartKey from the ignition lock
R open the driver's door with the Start/Stop
button in position 0047
i The steering wheel only moves up if it has
not already reached the upper stop.
Position of the steering wheel for driv-
ing The steering wheel is moved to the previously
set position if you:
R close the driver's door and
R press the Start/Stop button once
When you close the driver's door with the igni-
tion switched on, the steering wheel is also
automatically moved to the previously set posi- tion.
The last position of the steering wheel column is
stored after each manual setting or when you store the setting with the memory function
(Y
page 94).
Crash-responsive EASY-EXIT feature If the crash-responsive EASY-EXIT feature is trig-
gered in an accident, the steering column will
move upwards in the following situations:
R when you open the driver's door
R when you remove the key
This makes it easier to exit the vehicle and res-
cue the occupants. Mirrors
Inside rearview mirror
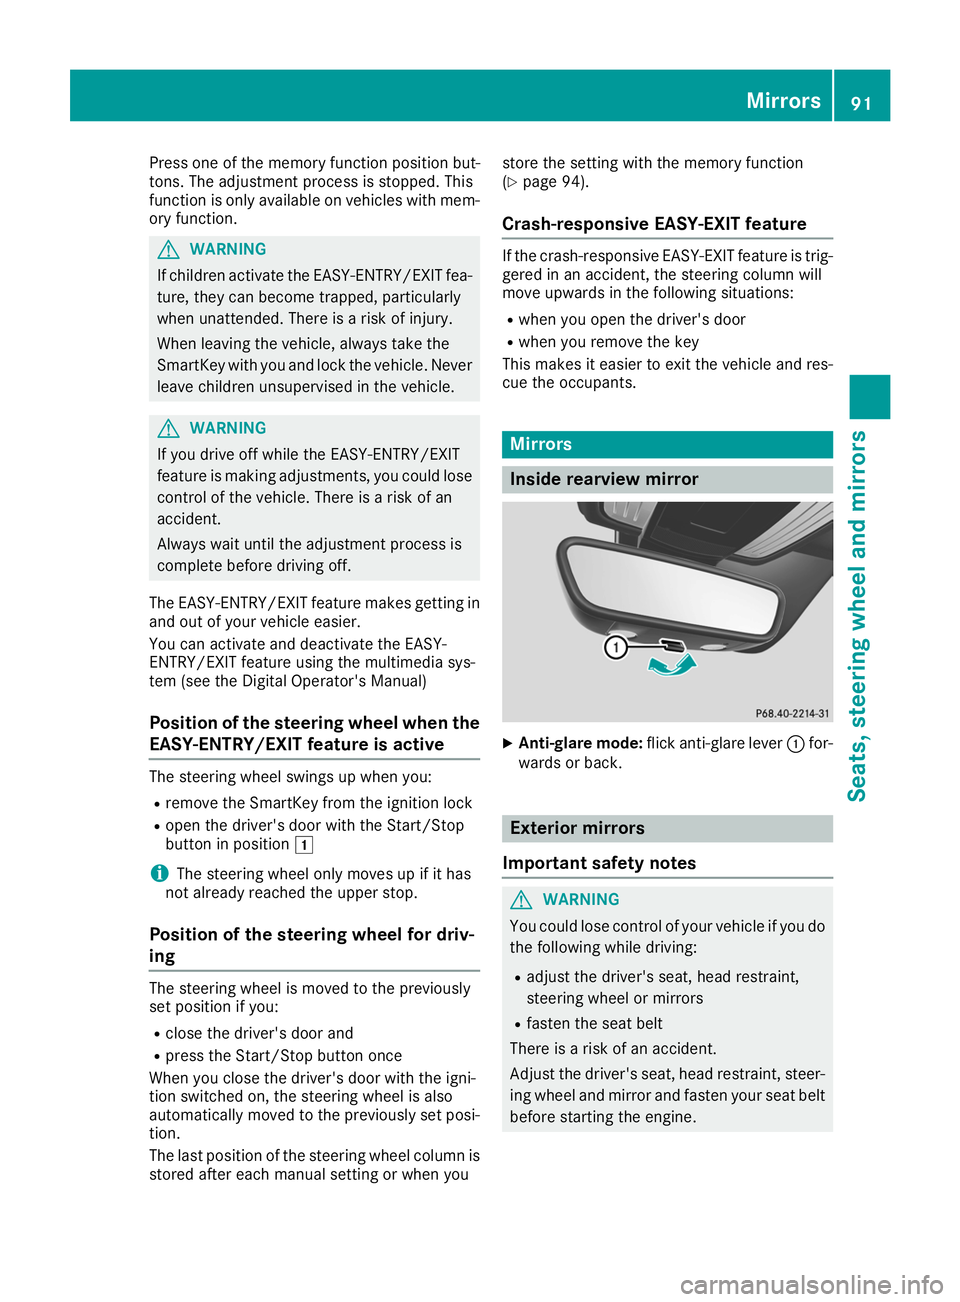
X
Anti-glare mode: flick anti-glare lever 0043for-
wards or back. Exterior mirrors
Important safety notes G
WARNING
You could lose control of your vehicle if you do the following while driving:
R adjust the driver's seat, head restraint,
steering wheel or mirrors
R fasten the seat belt
There is a risk of an accident.
Adjust the driver's seat, head restraint, steer-
ing wheel and mirror and fasten your seat belt before starting the engine. Mirrors
91Seats, steering wheel and mirrors Z
Page 94 of 298
G
WARNING
The exterior mirror on the front-passenger
side reduces the size of the image. Visible
objects are actually closer than they appear.
This means that you could misjudge the dis-
tance from road users traveling behind, e.g.
when changing lane. There is a risk of an acci-
dent.
For this reason, always make sure of the
actual distance from the road users traveling
behind by glancing over your shoulder.
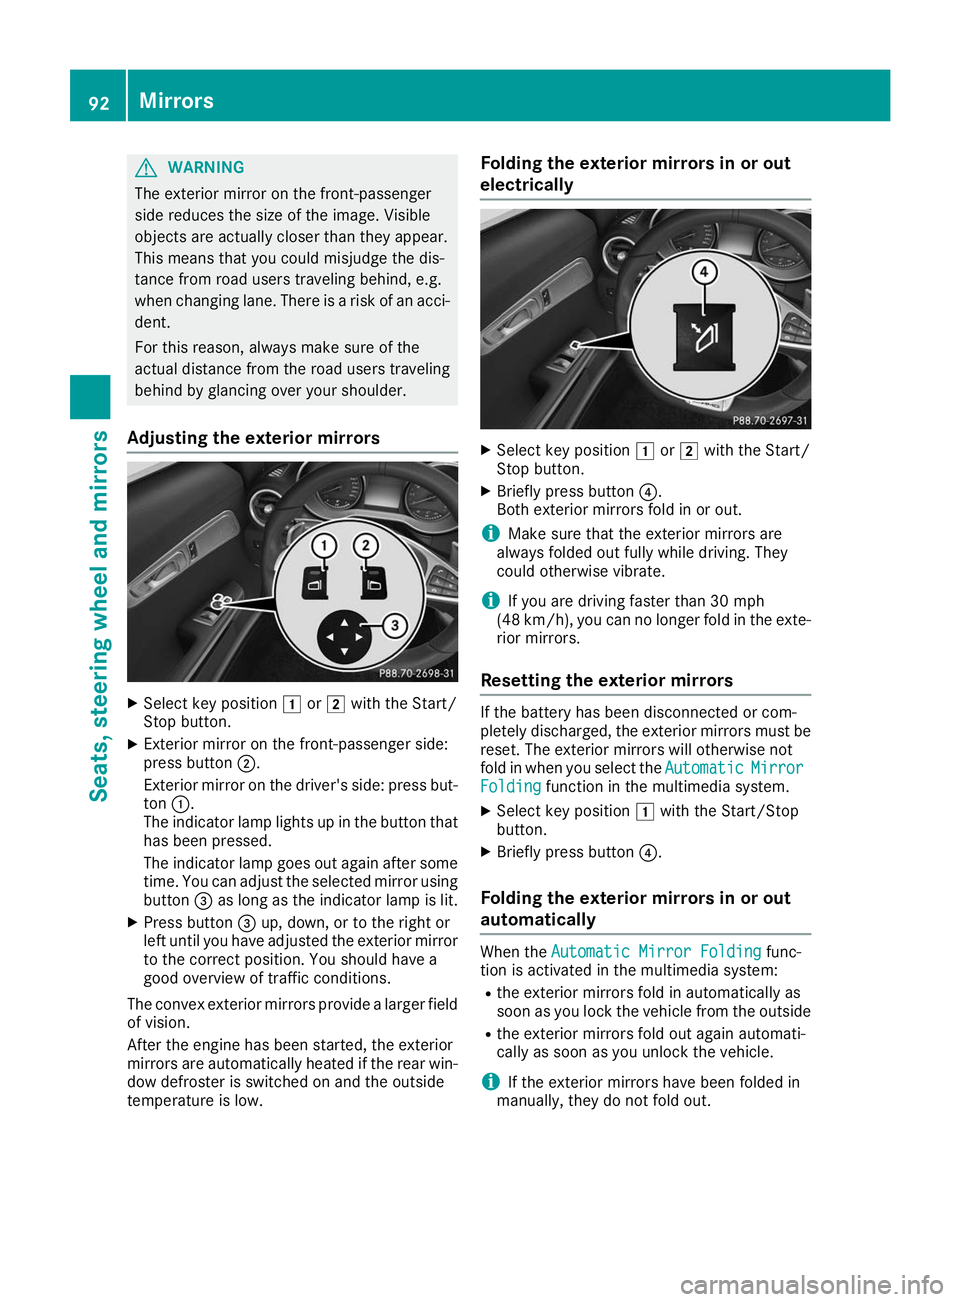
Adjusting the exterior mirrors X
Select key position 0047or0048 with the Start/
Stop button.
X Exterior mirror on the front-passenger side:
press button 0044.
Exterior mirror on the driver's side: press but- ton 0043.
The indicator lamp lights up in the button that has been pressed.
The indicator lamp goes out again after some
time. You can adjust the selected mirror using
button 0087as long as the indicator lamp is lit.
X Press button 0087up, down, or to the right or
left until you have adjusted the exterior mirror to the correct position. You should have a
good overview of traffic conditions.
The convex exterior mirrors provide a larger field
of vision.
After the engine has been started, the exterior
mirrors are automatically heated if the rear win- dow defroster is switched on and the outside
temperature is low. Folding the exterior mirrors in or out
electrically X
Select key position 0047or0048 with the Start/
Stop button.
X Briefly press button 0085.
Both exterior mirrors fold in or out.
i Make sure that the exterior mirrors are
always folded out fully while driving. They
could otherwise vibrate.
i If you are driving faster than 30 mph
(48 km/h), you can no longer fold in the exte-
rior mirrors.
Resetting the exterior mirrors If the battery has been disconnected or com-
pletely discharged, the exterior mirrors must be reset. The exterior mirrors will otherwise not
fold in when you select the Automatic AutomaticMirror
Mirror
Folding
Folding function in the multimedia system.
X Select key position 0047with the Start/Stop
button.
X Briefly press button 0085.
Folding the exterior mirrors in or out
automatically When the
Automatic Mirror Folding
Automatic Mirror Folding func-
tion is activated in the multimedia system:
R the exterior mirrors fold in automatically as
soon as you lock the vehicle from the outside
R the exterior mirrors fold out again automati-
cally as soon as you unlock the vehicle.
i If the exterior mirrors have been folded in
manually, they do not fold out. 92
MirrorsSeats, steering wheel and mirrors
Page 95 of 298
Exterior mirror pushed out of position
If an exterior mirror has been pushed out of
position, proceed as follows:
X
Press and hold button 0085until you hear a click
and the mirror engages audibly into position
(Y page 92).
The mirror housing is engaged again and you
can adjust the exterior mirrors as usual
(Y page 92). Automatic anti-glare mirrors
G
WARNING
Electrolyte may escape if the glass in an auto- matic anti-glare mirror breaks. The electrolyte
is harmful and causes irritation. It must not
come into contact with your skin, eyes, res-
piratory organs or clothing or be swallowed.
There is a risk of injury.
If you come into contact with the electrolyte,
observe the following:
R Rinse off the electrolyte from your skin
immediately with water.
R Immediately rinse the electrolyte out of
your eyes thoroughly with clean water.
R If the electrolyte is swallowed, immediately
rinse your mouth out thoroughly. Do not
induce vomiting.
R If electrolyte comes into contact with your
skin or hair or is swallowed, seek medical
attention immediately.
R Immediately change out of clothing which
has come into contact with electrolyte.
R If an allergic reaction occurs, seek medical
attention immediately.
The rear-view mirror and the exterior mirror on
the driver's side automatically go into anti-glare
mode if the following conditions are met simul-
taneously:
R the ignition is switched on
R incident light from headlamps strikes the sen-
sor in the rear-view mirror
The mirrors do not go into anti-glare mode if
reverse gear is engaged or if the interior lighting is switched on. Parking position for the exterior mir-
ror on the front passenger side
Storing the parking position You can position the front-passenger side exte-
rior mirror in such a way that you can see the
rear wheel on that side as soon as you engage
reverse gear. You can store this position.
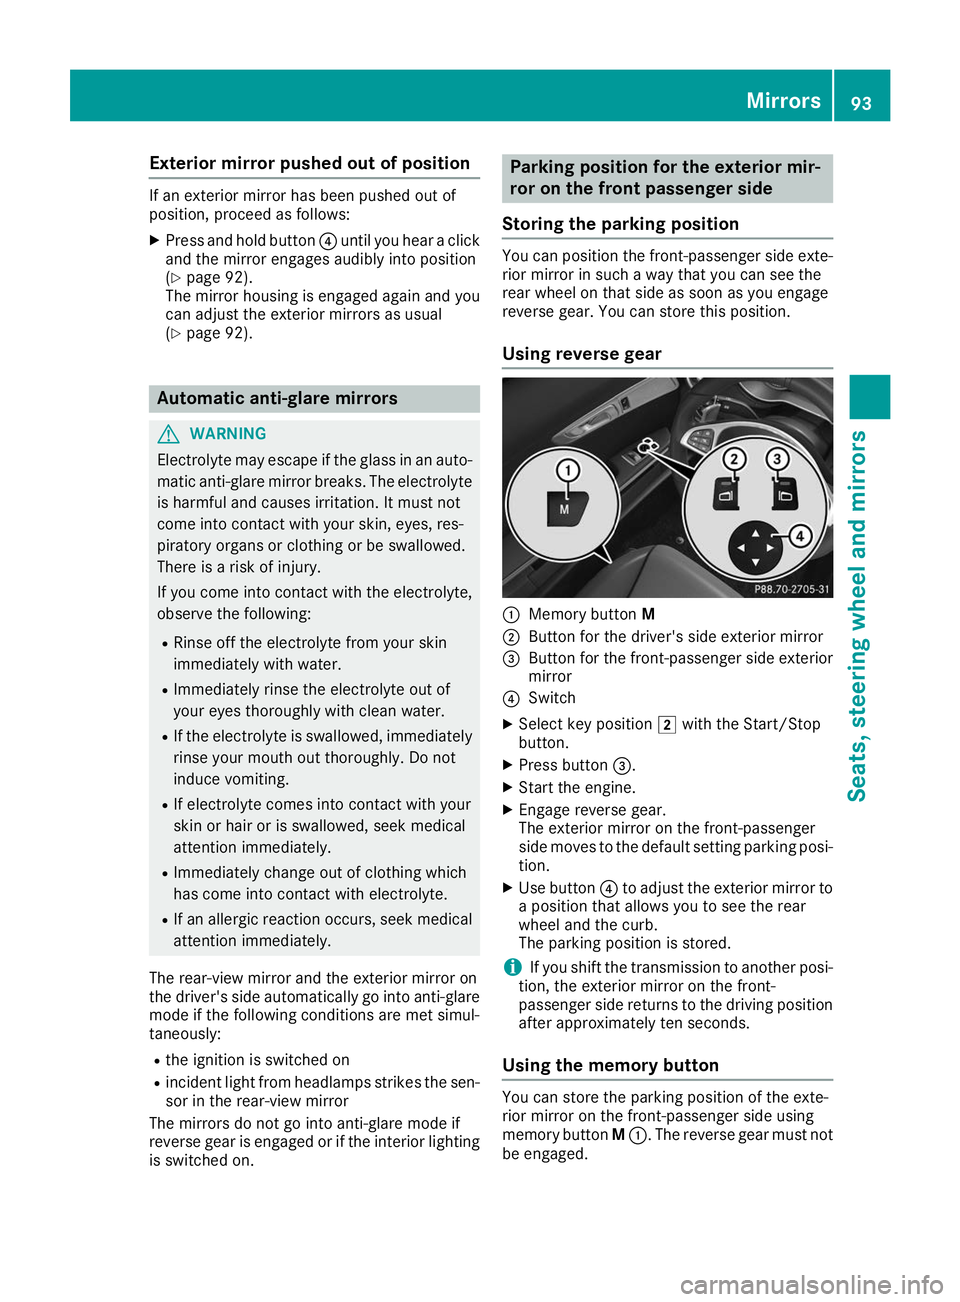
Using reverse gear 0043
Memory button M
0044 Button for the driver's side exterior mirror
0087 Button for the front-passenger side exterior
mirror
0085 Switch
X Select key position 0048with the Start/Stop
button.
X Press button 0087.
X Start the engine.
X Engage reverse gear.
The exterior mirror on the front-passenger
side moves to the default setting parking posi-
tion.
X Use button 0085to adjust the exterior mirror to
a position that allows you to see the rear
wheel and the curb.
The parking position is stored.
i If you shift the transmission to another posi-
tion, the exterior mirror on the front-
passenger side returns to the driving position
after approximately ten seconds.
Using the memory button You can store the parking position of the exte-
rior mirror on the front-passenger side using
memory button
M0043. The reverse gear must not
be engaged. Mirrors
93Seats, steering wheel and mirrors Z