2019 MERCEDES-BENZ AMG GT ROADSTER wheel size
[x] Cancel search: wheel sizePage 22 of 298
PSI (pounds per square inch) (def-
inition) ...........................................2 80
Replacing ....................................... 281
Service life ..................................... 264
Sidewall (definition) ....................... 280
Speed rating (definition) ................ 280
Storing .......................................... .282
Structure and characteristics
(definition) ..................................... 279
Summer tires in winter .................. 265
Temperature .................................. 275
TIN (Tire Identification Number)
(definition) ..................................... 281
Tire bead (definition) ..................... .280
Tire pressure (definition) ................ 280
Tire pressures (recommended) ...... 279
Tire size (data) ............................... 285
Tire size designation, load-bearing capacity, speed rating .................... 276
Tire tread ....................................... 264
Tire tread (definition) ..................... 280
Total load limit (definition) ............. 281
Traction ......................................... 275
Traction (definition) ....................... 281
Tread wea r..................................... 275
Uniform Tire Quality Grading
Standards ...................................... 274
Uniform Tire Quality Grading
Standards (definition) .................... 279
Wear indicator (definition) ............. 281
Wheel and tire combination ........... 285
Wheel rim (definition) .................... 279
see Flat tire
Tool
see Vehicle tool kit
Touchpad
Changing the station/music
track .............................................. 212
Character suggestions ................... 211
Deleting characters ....................... 211
Entering a space ............................ 211
Entering characters ....................... 211
Gesture control .............................. 211
Handwriting recognition ................ 211
Operating the touchpad ................. 211
Overview ........................................ 211
Quick access for Audio .................. 212
Switching ....................................... 211 Switching input line ....................... 211
Tow-starting
Emergency engine starting ............ 261
Towing
Permitted towing methods ............ 259
Towing away
Important safety guidelines ........... 258
Installing the towing eye ................ 259
Removing the towing eye ............... 260
Transporting the vehicle ................ 260
With both axles on the ground ....... 260
Towing eye ......................................... 249
Traction system
see ETS (Electronic Traction System)
Traffic reports
see also Digital Operator's Man-
ual .................................................. 209
Transmission
Driving tips .................................... 120
Selector lever ................................ 117
see Automatic transmission
Transmission position display ......... 119
Transmission positions
General notes ................................ 117
Overview ........................................ 118
Transporting the vehicle .................. 260
Trim pieces (cleaning instruc-
tions) .................................................. 247
Trip computer (on-board com-
puter) .................................................. 162
Trip odometer
Calling up ....................................... 161
Resetting (on-board computer) ...... 162
Trunk lid
Display message ............................ 196
Important safety notes .................... 74
Locking separately ........................... 76
Opening (automatically from
inside) .............................................. 75
Opening dimensions ...................... 293
Opening/closing (from the out-
side) ................................................. 74
Unlocking with KEYLESS-GO ............ 74
Trunk load (maximum) ...................... 293
Turn signals
Display message ............................ 186
Switching on/of f.............................. 97 20
Index
Page 24 of 298
Wheel chock
...................................... 282
Wheels
Changing a wheel .......................... 281
Checking ........................................ 264
Cleaning ......................................... 245
Important safety notes .................. 263
Information on driving .................... 263
Interchanging/changing ................ 281
Mounting a new wheel .................. .284
Mounting a wheel .......................... 282
Notes on sport tires ....................... 263
Removing a wheel .......................... 284
Storing .......................................... .282
Tightening torque ........................... 285
Wheel size/tire size ....................... 285
Wind screen ......................................... 82
Window curtain air bag
Display message ............................ 183
Windows
see Side windows
Windshield
Defrosting ...................................... 106
Windshield washer fluid
see Windshield washer system
Windshield washer system
Adding washer fluid ....................... 240
Important safety notes .................. 292
Windshield wipers
Problem (malfunction) ................... 102
Replacing the wiper blades ............ 101
Switching on/off ........................... 100
Winter driving
Slippery road surfaces ................... 134
Snow chains .................................. 265
Winter operation
General notes ................................ 265
Summer tires ................................. 265
Winter tires
M+S tires ....................................... 265
Wiper blades
Cleaning ......................................... 246
Important safety notes .................. 101
Replacing ....................................... 101
Replacing (windshield )................... 101
Workshop
see Qualified specialist workshop 22
Index
Page 57 of 298
If the seat belt pre-tensioning is not reduced:
X Move the seat backrest or seat back slightly
when the vehicle is stationary.
The seat belt pre-tensioning is reduced and
the locking mechanism is released.
The seat-belt adjustment is an integral part of
the PRE-SAFE ®
convenience function. Informa-
tion about the convenience function can be
found under "Belt adjustment" (Y page 44).Automatic measures after an acci-
dent
Immediately after an accident, the following
measures are implemented, depending on the
type and severity of the impact:
R the hazard warning lamps are switched on
R the emergency lighting is activated
R the vehicle doors are unlocked
R the front side windows are lowered
R vehicles with a memory function: the electri-
cally adjustable steering wheel is raised when
the driver's door is opened
R the engine is switched off and the fuel supply
is cut off
R vehicles with Mercedes me connect: auto-
matic emergency call Children in the vehicle
Important safety notes
If a child younger than twelve years old and
under 5 ft (1.50 m) in height is traveling in the
vehicle: R always secure the child in a child restraint
system suitable for Mercedes-Benz vehicles.
The child restraint system must be appropri-
ate to the age, weight and size of the child.
R be sure to observe the instructions and safety
notes in this section in addition to the child
restraint system manufacturer's installation
instructions.
R always observe the instructions and safety
notes on the "Occupant classification system
(OCS)". (Y page 48) G
WARNING
If you leave children unsupervised in the vehi- cle, they could set it in motion, for example by:
R releasing the parking brake
R shifting the transmission to the neutral
position
R starting the engine
In addition, they may operate vehicle equip-
ment and become trapped. There is a risk of
an accident and injury.
When leaving the vehicle, always take the
SmartKey with you and lock the vehicle. Never leave children unsupervised in the vehicle. G
WARNING
If persons, particularly children are subjected to prolonged exposure to extreme heat or
cold, there is a risk of injury, possibly even
fatal. Never leave children unattended in the
vehicle. G
WARNING
If the child restraint system is subjected to
direct sunlight, parts may get very hot. Chil-
dren may burn themselves on these parts,
particularly on the metal parts of the child
restraint system. There is a risk of injury.
If you leave the vehicle, taking the child with
you, always ensure that the child restraint
system is not exposed to direct sunlight. Pro- tect it with a blanket, for example. If the child
restraint system has been exposed to direct
sunlight, let it cool down before securing the
child in it. Never leave children unattended in the vehicle.
Always ensure that all vehicle occupants have
their seat belts fastened correctly and are sitting properly. Particular attention must be paid to
children.
Observe the safety notes on the seat belt
(Y page 42) and the notes on correct use of seat
belts (Y page 43).
A booster seat may be necessary to achieve
proper seat belt positioning for children over
40 lbs (18 kg) until they reach a height where a Children in the vehicle
55Safety Z
Page 64 of 298
ESP
®
(Electronic Stability Program)
General notes i
Observe the "Important safety notes" sec-
tion (Y page 58).
ESP ®
monitors driving stability and traction, i.e.
power transmission between the tires and the
road surface.
If ESP ®
detects that the vehicle is deviating from
the direction desired by the driver, one or more
wheels are braked to stabilize the vehicle. The
engine output is also modified to keep the vehi- cle on the desired course within physical limits.
ESP ®
assists the driver when pulling away on
wet or slippery roads. ESP ®
can also stabilize
the vehicle during braking.
ETS (Electronic Traction System) i
Observe the "Important safety notes" sec-
tion (Y page 58).
ETS traction control is part of ESP ®
.
Traction control brakes the drive wheels indi-
vidually if they spin. This enables you to pull
away and accelerate on slippery surfaces, for
example if the road surface is slippery on one
side. In addition, more drive torque is transfer-
red to the wheel or wheels with traction.
Traction control remains active, even if you
deactivate ESP ®
.
Important safety notes i
Observe the "Important safety notes" sec-
tion (Y page 58). G
WARNING
If ESP ®
is malfunctioning, ESP ®
is unable to
stabilize the vehicle. Additionally, further driv- ing safety systems are deactivated. This
increases the risk of skidding and an accident.
Drive on carefully. Have ESP ®
checked at a
qualified specialist workshop.
ESP ®
is only deactivated if the 00BBwarning
lamp is lit continuously.
When SPORT handling mode is activated, the
0074 warning lamp lights up in the instrument
panel. When the
00BBand0089 warning lamps light up
continuously, ESP ®
is not available due to a mal-
function.
Observe the information on warning lamps
(Y page 201) and display messages which may
be shown in the instrument cluster
(Y page 175).
Only use wheels with the recommended tire
sizes. Only then will ESP ®
function properly.
Characteristics of ESP ® General information
If the 00E5 ESP®
warning lamp goes out before
beginning the journey, ESP ®
is automatically
active.
If ESP ®
intervenes, the 00E5ESP®
warning lamp
flashes in the instrument cluster.
If ESP ®
intervenes:
X Do not deactivate ESP ®
under any circum-
stances.
X Only depress the accelerator pedal as far as
necessary when pulling away.
X Adapt your driving style to suit the prevailing
road and weather conditions.
ECO start/stop function
The ECO start/stop function switches the
engine off automatically when the vehicle stops moving. The engine starts automatically when
the driver wants to pull away again. ESP ®
remains in its previously selected status. Exam-
ple: if ESP ®
was deactivated before the engine
was switched off, ESP ®
remains deactivated
when the engine is switched on again.
Deactivating/activating ESP ® Important safety notes
i Observe the "Important safety notes" sec-
tion (Y page 58).
You can select between the following states of
ESP ®
:
R ESP ®
is activated
R SPORT handling mode is activated
R ESP ®
is deactivated 62
Driving safety systemsSafety
Page 94 of 298
G
WARNING
The exterior mirror on the front-passenger
side reduces the size of the image. Visible
objects are actually closer than they appear.
This means that you could misjudge the dis-
tance from road users traveling behind, e.g.
when changing lane. There is a risk of an acci-
dent.
For this reason, always make sure of the
actual distance from the road users traveling
behind by glancing over your shoulder.
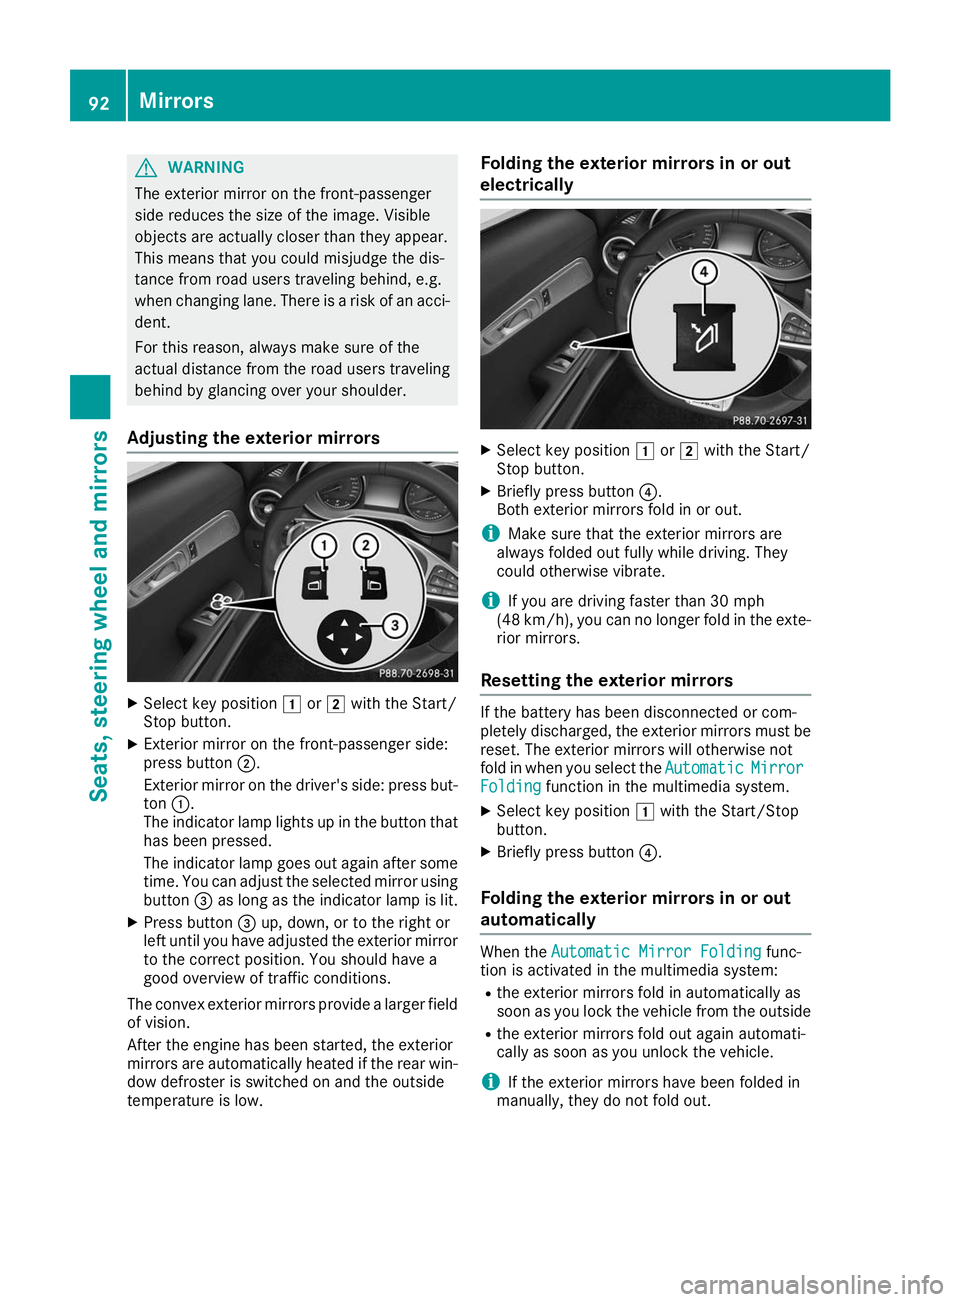
Adjusting the exterior mirrors X
Select key position 0047or0048 with the Start/
Stop button.
X Exterior mirror on the front-passenger side:
press button 0044.
Exterior mirror on the driver's side: press but- ton 0043.
The indicator lamp lights up in the button that has been pressed.
The indicator lamp goes out again after some
time. You can adjust the selected mirror using
button 0087as long as the indicator lamp is lit.
X Press button 0087up, down, or to the right or
left until you have adjusted the exterior mirror to the correct position. You should have a
good overview of traffic conditions.
The convex exterior mirrors provide a larger field
of vision.
After the engine has been started, the exterior
mirrors are automatically heated if the rear win- dow defroster is switched on and the outside
temperature is low. Folding the exterior mirrors in or out
electrically X
Select key position 0047or0048 with the Start/
Stop button.
X Briefly press button 0085.
Both exterior mirrors fold in or out.
i Make sure that the exterior mirrors are
always folded out fully while driving. They
could otherwise vibrate.
i If you are driving faster than 30 mph
(48 km/h), you can no longer fold in the exte-
rior mirrors.
Resetting the exterior mirrors If the battery has been disconnected or com-
pletely discharged, the exterior mirrors must be reset. The exterior mirrors will otherwise not
fold in when you select the Automatic AutomaticMirror
Mirror
Folding
Folding function in the multimedia system.
X Select key position 0047with the Start/Stop
button.
X Briefly press button 0085.
Folding the exterior mirrors in or out
automatically When the
Automatic Mirror Folding
Automatic Mirror Folding func-
tion is activated in the multimedia system:
R the exterior mirrors fold in automatically as
soon as you lock the vehicle from the outside
R the exterior mirrors fold out again automati-
cally as soon as you unlock the vehicle.
i If the exterior mirrors have been folded in
manually, they do not fold out. 92
MirrorsSeats, steering wheel and mirrors
Page 251 of 298
Where will I find...?
Reflective safety jacket
Removing/replacing the reflective
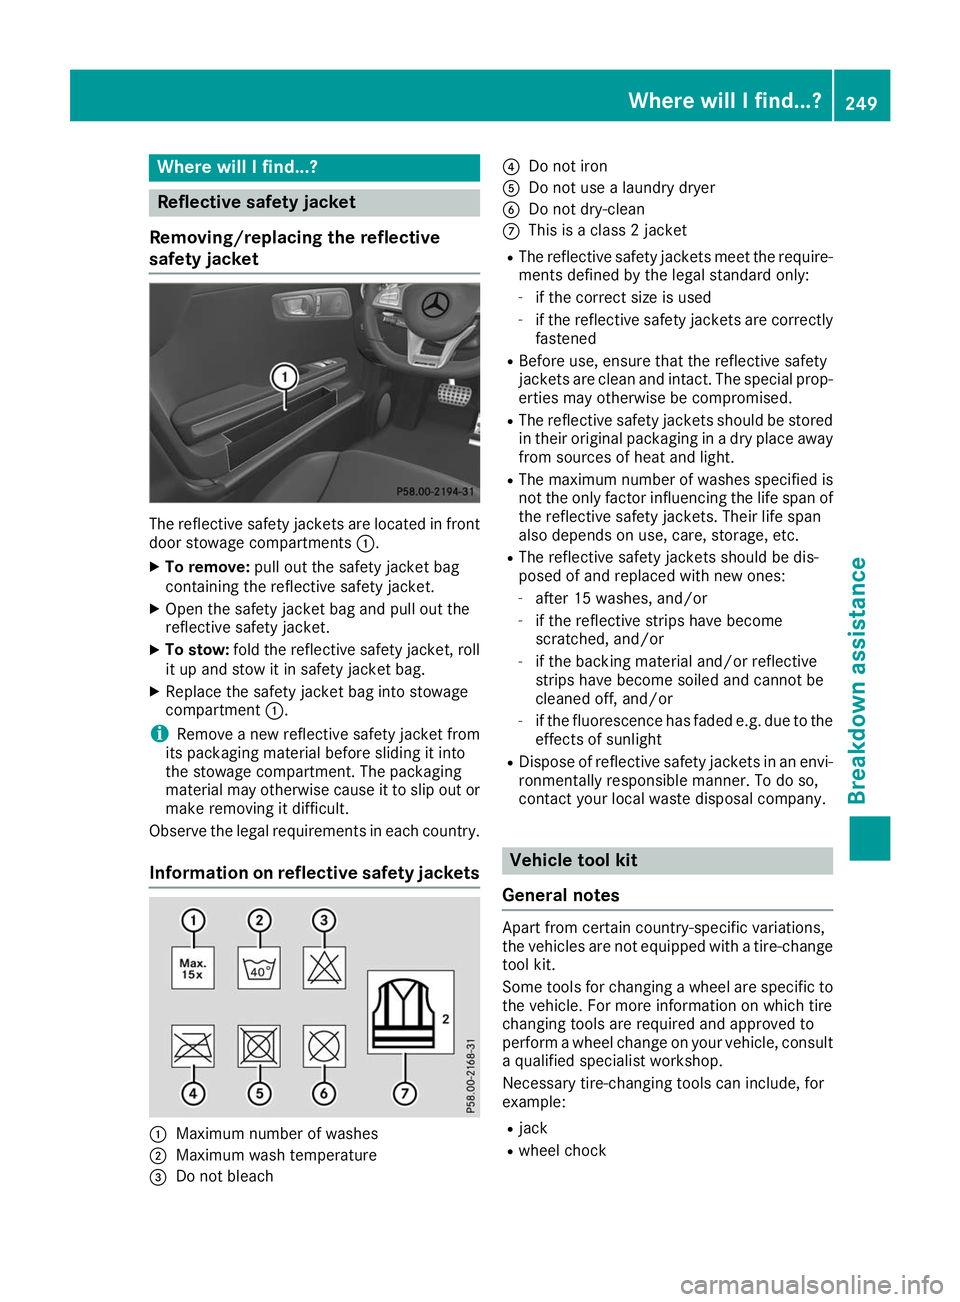
safety jacket The reflective safety jackets are located in front
door stowage compartments 0043.
X To remove: pull out the safety jacket bag
containing the reflective safety jacket.
X Open the safety jacket bag and pull out the
reflective safety jacket.
X To stow: fold the reflective safety jacket, roll
it up and stow it in safety jacket bag.
X Replace the safety jacket bag into stowage
compartment 0043.
i Remove a new reflective safety jacket from
its packaging material before sliding it into
the stowage compartment. The packaging
material may otherwise cause it to slip out or
make removing it difficult.
Observe the legal requirements in each country.
Information on reflective safety jackets 0043
Maximum number of washes
0044 Maximum wash temperature
0087 Do not bleach 0085
Do not iron
0083 Do not use a laundry dryer
0084 Do not dry-clean
006B This is a class 2 jacket
R The reflective safety jackets meet the require-
ments defined by the legal standard only:
- if the correct size is used
- if the reflective safety jackets are correctly
fastened
R Before use, ensure that the reflective safety
jackets are clean and intact. The special prop-
erties may otherwise be compromised.
R The reflective safety jackets should be stored
in their original packaging in a dry place away
from sources of heat and light.
R The maximum number of washes specified is
not the only factor influencing the life span of
the reflective safety jackets. Their life span
also depends on use, care, storage, etc.
R The reflective safety jackets should be dis-
posed of and replaced with new ones:
- after 15 washes, and/or
- if the reflective strips have become
scratched, and/or
- if the backing material and/or reflective
strips have become soiled and cannot be
cleaned off, and/or
- if the fluorescence has faded e.g. due to the
effects of sunlight
R Dispose of reflective safety jackets in an envi-
ronmentally responsible manner. To do so,
contact your local waste disposal company. Vehicle tool kit
General notes Apart from certain country-specific variations,
the vehicles are not equipped with a tire-change
tool kit.
Some tools for changing a wheel are specific to the vehicle. For more information on which tire
changing tools are required and approved to
perform a wheel change on your vehicle, consult
a qualified specialist workshop.
Necessary tire-changing tools can include, for
example:
R jack
R wheel chock Where will I find...?
249Breakdown assistance
Page 265 of 298
Important safety notes
G
WARNING
If wheels and tires of the wrong size are used, the wheel brakes or suspension components
may be damaged. There is a risk of an acci-
dent.
Always replace wheels and tires with those
that fulfill the specifications of the original
part.
When replacing wheels, make sure to use the
correct:
R designation
R model
When replacing tires, make sure to use the
correct:
R designation
R manufacturer
R model G
WARNING
A flat tire severely impairs the driving, steer-
ing and braking characteristics of the vehicle.
There is a risk of accident.
Tires without run-flat characteristics:
R do not drive with a flat tire.
R immediately replace the flat tire with your
emergency spare wheel or spare wheel, or
consult a qualified specialist workshop.
Tires with run-flat characteristics:
R pay attention to the information and warn-
ing notices on MOExtended tires (tires with
run-flat characteristics).
Accessories that are not approved for your vehi-
cle by Mercedes-Benz or are not being used cor- rectly can impair the operating safety.
Before purchasing and using non-approved
accessories, visit a qualified specialist work-
shop and inquire about:
R suitability
R legal stipulations
R factory recommendations Information on the sizes and types of wheels and
tires for your vehicle can be found under
"Wheel/tire combinations" (Y page 285).
Tire pressure information can be found:
R on the Tire and Loading Information placard
on the B-pillar on the driver's side
(Y page 271)
R in the tire pressure table in the fuel filler flap
(Y page 126)
R in the "Tire pressure" section Operation
Information on driving
Check the tire pressure when the vehicle is
heavily laden and adjust prior to a trip.
While driving, pay attention to vibrations, noises
and unusual handling characteristics, e.g. pull-
ing to one side. This may indicate that the
wheels or tires are damaged. If you suspect that a tire is defective, reduce your speed immedi-
ately. Stop the vehicle as soon as possible to
check the wheels and tires for damage. Hidden
tire damage could also be causing the unusual
handling characteristics. If you find no signs of
damage, have the tires and wheels checked at a
qualified specialist workshop.
When parking your vehicle, make sure that the
tires do not get deformed by the curb or other
obstacles. If they cannot be avoided, drive over obstacles such as curbs slowly and at an obtuse
angle. Otherwise, you may damage the wheels
or tires. Notes on high performance tires
G
WARNING
Due to the special tire tread in combination
with the optimized rubber compound, there is an increased risk of hydroplaning and skid-
ding on damp or wet road surfaces. In addi-
tion, tire traction is significantly reduced at
low outside temperatures and low tire-oper-
ating temperatures. There is a risk of an acci-
dent.
Activate ESP ®
and adapt your driving style. At
outside temperatures below 50 ‡(10 †), use
M+S tires. Operation
263Wheels and tires Z
Page 267 of 298
Exception: it is permissible to mount a differ-
ent type or make in the event of a flat tire.
R Only mount tires of the correct size onto the
wheels.
R Break in new tires at moderate speeds for the
first 60 miles (100 km). The new tires only
reach their full performance after this dis-
tance.
R Do not drive with tires which have too little
tread depth. This significantly reduces the
traction on wet roads (hydroplaning).
R Replace the tires after six years at the latest,
regardless of wear. Winter operation
General notes
Have your vehicle winter-proofed at a qualified
specialist workshop at the onset of winter.
Observe the notes in the "Changing a wheel"
section (Y page 281). Driving with summer tires
At temperatures below 45 ‡ (+7 †), summer
tires lose elasticity and therefore traction and
braking power. Change the tires on your vehicle to M+S tire s. Using summer tires at very cold
temperatures could cause cracks to form,
thereby damaging the tires permanently.
Mercedes-Benz cannot accept responsibility for
this type of damage. M+S tires
G
WARNING
M+S tires with a tire tread depth of less than
00CF in (4 mm) are not suitable for use in winter
and do not provide sufficient traction. There is
a risk of an accident.
M+S tires with a tread depth of less than 00CFin
(4 mm) must be replaced immediately.
At temperatures below 45 ‡(+7 †), use winter
tires or all-season tires. Both types of tire are
identified by the M+S marking.
Only winter tires bearing the 004Dsnowflake
symbol in addition to the M+S marking provide the best possible grip in wintry road conditions.
Only these tires will allow driving safety systems
such as ABS and ESP ®
to function optimally in
winter. These tires have been developed specif-
ically for driving in snow.
Use M+S tires of the same make and tread on all wheels to maintain safe handling characteris-
tics.
Always observe the maximum permissible
speed specified for the M+S tires you have
mounted.
When you have mounted the M+S tires:
X Check the tire pressures (Y page 266).
X Restart the tire pressure monitor
(Y page 271). Snow chains
G
WARNING
If snow chains are installed to the front
wheels, they may drag against the vehicle
body or chassis components. This could
cause damage to the vehicle or the tires.
There is a risk of an accident.
To avoid hazardous situations:
R never install snow chains to the front
wheels
R always install snow chains in pairs to the
rear wheels.
For safety reasons, Mercedes-Benz recom-
mends that you only use snow chains that have been specially approved for your vehicle by
Mercedes-Benz, or are of a corresponding
standard of quality. For more information,
please contact a qualified specialist workshop.
If you intend to mount snow chains, please bear
the following points in mind:
R Snow chains may not be mounted on all
wheel/tire combinations. Permissible
wheel/tire combinations (Y page 285).
R Only use snow chains when driving on roads
completely covered by snow. Remove the
snow chains as soon as possible when you
come to a road that is not snow-covered. Winter operation
265Wheels and tires Z