2019 MERCEDES-BENZ AMG GT ROADSTER jump cable
[x] Cancel search: jump cablePage 258 of 298
for further information and availability. Read the
battery charger's operating instructions before
charging the battery.
Do not charge a battery which has been
removed at low temperatures with a battery
charger. Allow the battery to warm up gently
first, if necessary. Otherwise, the service life can be shortened and the starting characteristics
impaired, especially at low temperatures. Replacing the 12 V battery
Observe the notes on the 12 V battery
(Y page 254).
Mercedes-Benz recommends that you have the
12 V battery replaced at a qualified specialist
workshop, e.g. at an authorized Mercedes-Benz
Center.
If you want to replace the battery yourself,
observe the following notes:
R Always replace a defective battery with a bat-
tery which meets the specific requirements of
the vehicle. The vehicle is equipped with an AGM (Absorb-
ent Glass Mat) technology battery or a lith-
ium-ion battery. Full vehicle functionality is
only guaranteed with an AGM or lithium-ion
battery. For safety reasons, Mercedes-Benz
recommends that you only use batteries
which have been tested and approved for yourvehicle by Mercedes-Benz.
R Use detachable parts such as breather hoses,
angled connecting pieces or terminal covers
from the battery which is to be replaced.
R Make sure that the vent hose is always con-
nected to the original opening on the battery
side.
Install any existing or supplied stop plugs.
Otherwise, gases or battery acid could
escape.
R Make sure that the detachable parts are con-
nected again in the same way. Jump-starting
X For the jump-starting procedure, use only the jump-starting connection point in the engine com-
partment, consisting of a positive terminal and a ground point.
! Avoid repeated and lengthy starting attempts. Otherwise, the catalytic converter could be
damaged by the non-combusted fuel.
X Do not start the vehicle using a rapid charging device.
If your vehicle's battery is discharged, the engine can be jump-started from another vehicle or
from a donor battery using jumper cables.
The battery is not accessible in all vehicles. If the other vehicle's battery is not accessible, jump-start the vehicle using a donor battery or a jump-starting device.
Observe the following during the jump-starting procedure:
R the jumper cables must not come into contact with parts that can move when the engine is
running, such as the V-belt pulley or the fan.
R non-insulated parts of the terminal clamps must not come into contact with other metal parts
while the jumper cables are connected to the battery and the jump-starting connection point.
R only use jumper cables that are not damaged and have a sufficient cross-section and insulated
terminal clamps.
R jump-starting may be performed only using batteries with a nominal voltage of 12 V.
R you may only jump-start the vehicle when the engine and exhaust system are cold.
R the vehicles must not touch each other.
R If the battery is fully discharged, leave the battery that is being used to jump-start connected for
a few minutes before attempting to start. This charges the battery slightly. 256
Jump-startingBreakdown assistance
Page 259 of 298
X
Secure the vehicle by applying the electric parking brake.
X Shift the transmission to position 005D.
X Make sure the ignition and all electrical consumers are switched off.
All indicator lamps in the instrument cluster must be off. When using the SmartKey, turn the
SmartKey to position 0092in the ignition lock and remove it (Y page 111).
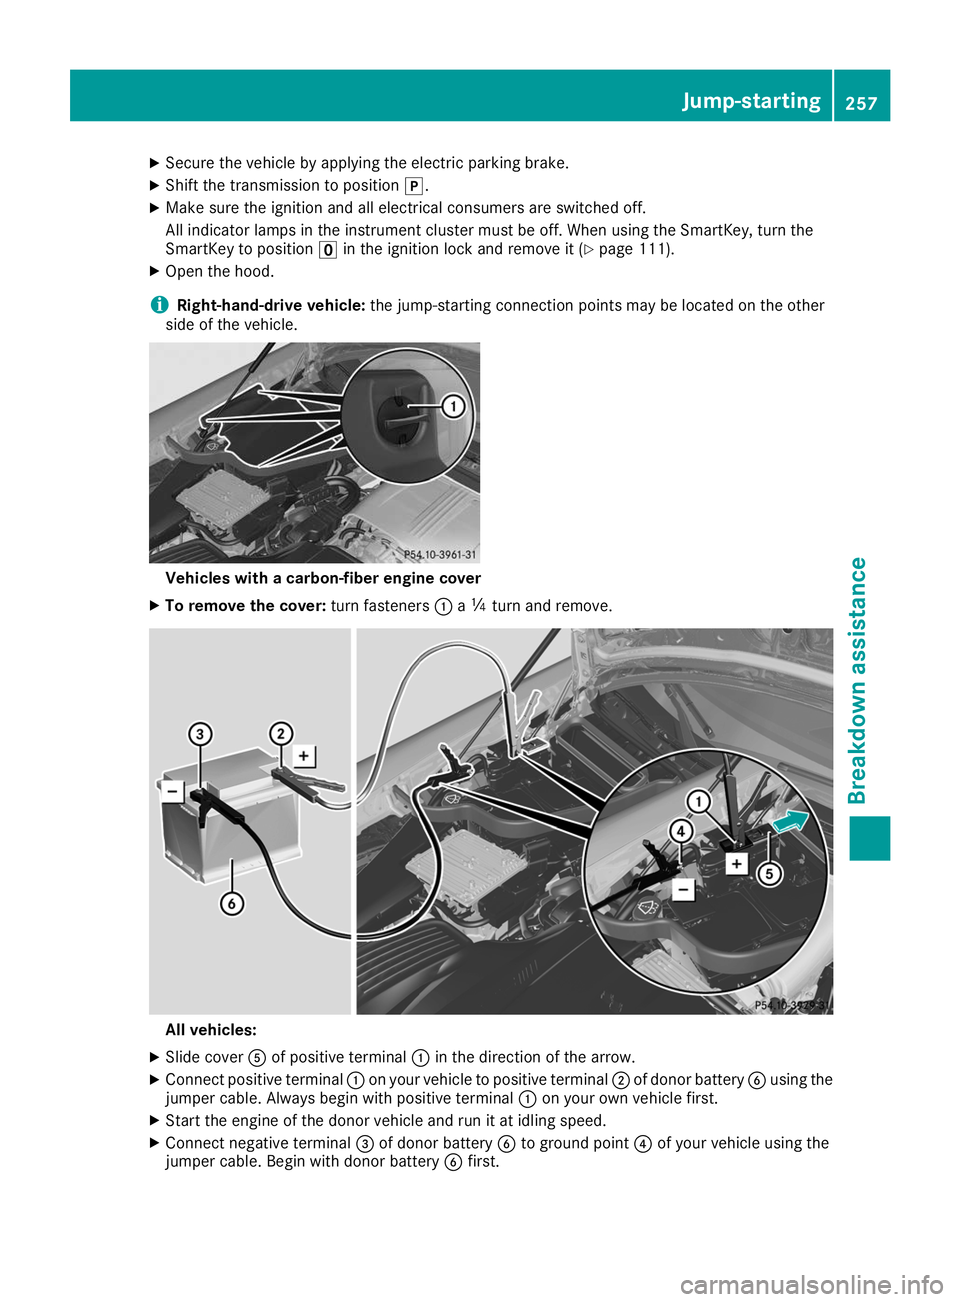
X Open the hood.
i Right-hand-drive vehicle:
the jump-starting connection points may be located on the other
side of the vehicle. Vehicles with a carbon-fiber engine cover
X To remove the cover: turn fasteners0043a00C4 turn and remove. All vehicles:
X Slide cover 0083of positive terminal 0043in the direction of the arrow.
X Connect positive terminal 0043on your vehicle to positive terminal 0044of donor battery 0084using the
jumper cable. Always begin with positive terminal 0043on your own vehicle first.
X Start the engine of the donor vehicle and run it at idling speed.
X Connect negative terminal 0087of donor battery 0084to ground point 0085of your vehicle using the
jumper cable. Begin with donor battery 0084first. Jump-starting
257Breakdown assistance Z
Page 260 of 298
X
Start the engine of your own vehicle.
X Let the engines run for several minutes.
X Before disconnecting the jumper cables, switch on an electrical consumer in your own vehicle,
e.g. the rear window heating or the lighting.
X When the jump-starting procedure is finished: first, remove the jumper cables from ground
point 0085and from negative terminal 0087of the donor battery, and then from positive terminal 0043
and positive terminal 0044of the donor battery. Begin each time at the contacts on your own vehicle
first.
X After removing the jumper cables, close cover 0083of positive terminal 0043.
X Only for vehicles with a carbon-fiber engine cover: insert the cover of the jump-starting
connection point. Make sure all mountings for the fasteners are positioned precisely behind the corresponding recesses in the cover.
Press the fasteners into the mountings. Turn the fasteners by 00C4of a turn to engage.
X Have the battery checked at a qualified specialist workshop.
Jump-starting is not considered to be a normal operating condition.
i Jumper cables and further information regarding jump-starting can be obtained at a qualified
specialist workshop. Towing and tow-starting
Important safety notes
G
WARNING
The rear axle locks when:
R the engine is not running
R the engine stalls while the vehicle is being
towed
R there is a malfunction in the power supply
or the vehicle's electrical system
There is a risk of an accident.
In the event of a breakdown, you should
always have the vehicle transported. G
WARNING
If the brake system or power steering is mal-
functioning and your vehicle is then towed
away, significantly more effort may be
required to steer and brake than is normally
required. There is a risk of an accident.
In such cases, use a tow bar. Before towing,
make sure that the steering moves freely. G
WARNING
When towing or tow-starting another vehicle
and its weight is greater than the permissible gross weight of your vehicle, the:
R the towing eye could detach itself
R the vehicle/trailer combination could roll-
over.
There is a risk of an accident.
When towing or tow-starting another vehicle,
its weight should not be greater than the per- missible gross weight of your vehicle.
Details on the permissible gross vehicle weight
of your vehicle can be found on the vehicle iden-
tification plate (Y page 287).
! Use the SmartKey instead of the Start/Stop
button when towing the vehicle.
Start the engine and keep it running. The
SmartKey is in position 0048in the ignition lock.
Set the transmission to 005Cusing the E-
SELECT selector lever. Make sure that you
then leave the SmartKey in position 0048.
Check the transmission position in the instru-
ment cluster.
! Make sure that the electric parking brake is
released. If the electric parking brake is faulty,
visit a qualified specialist workshop. 258
Towing and tow-startingBreakdown assistance
Page 263 of 298
X
Turn the SmartKey to key position 0092in the
ignition lock and remove it.
X Secure the vehicle. Tow-starting (emergency engine
starting)
! Vehicles with automatic transmission must
not be tow-started. You could otherwise dam- age the automatic transmission.
i You can find information on "Jump-starting"
under (Y page 256). Fuses
Important safety notes
G
WARNING
If you manipulate or bridge a faulty fuse or if
you replace it with a fuse with a higher amper- age, the electric cables could be overloaded.
This could result in a fire. There is a risk of an
accident and injury.
Always replace faulty fuses with the specified
new fuses having the correct amperage.
Blown fuses must be replaced with fuses of the
same rating, which you can recognize by the
color and value. The fuse ratings are listed in the
fuse allocation chart.
The fuse allocation chart is on the fuse box in the trunk (Y page 262).
If a newly inserted fuse also blows, have the
cause traced and rectified at a qualified special-
ist workshop, e.g. an authorized Mercedes-Benz Center.
! Only use fuses that have been approved for
Mercedes-Benz vehicles and which have the
correct fuse rating for the system concerned.
Otherwise, components or systems could be
damaged.
! Make sure that no moisture can enter the
fuse box when the cover is open.
! When closing the cover, make sure that it is
lying correctly on the fuse box. Moisture seep-
ing in or dirt could otherwise impair the oper- ation of the fuses. The fuses in your vehicle serve to close down
faulty circuits. If a fuse blows, all the compo-
nents on the circuit and their functions stop
operating. Before changing a fuse
X Switch off the engine.
X Switch off all electrical consumers.
X Open the driver's door.
The on-board electronics are now in key posi-
tion 0092. This is the same as the key having
been removed.
or, if the SmartKey is inserted in the ignition
lock: X Remove the SmartKey from the ignition lock.
X Secure the vehicle against rolling away
(Y page 127).
All indicator lamps in the instrument cluster
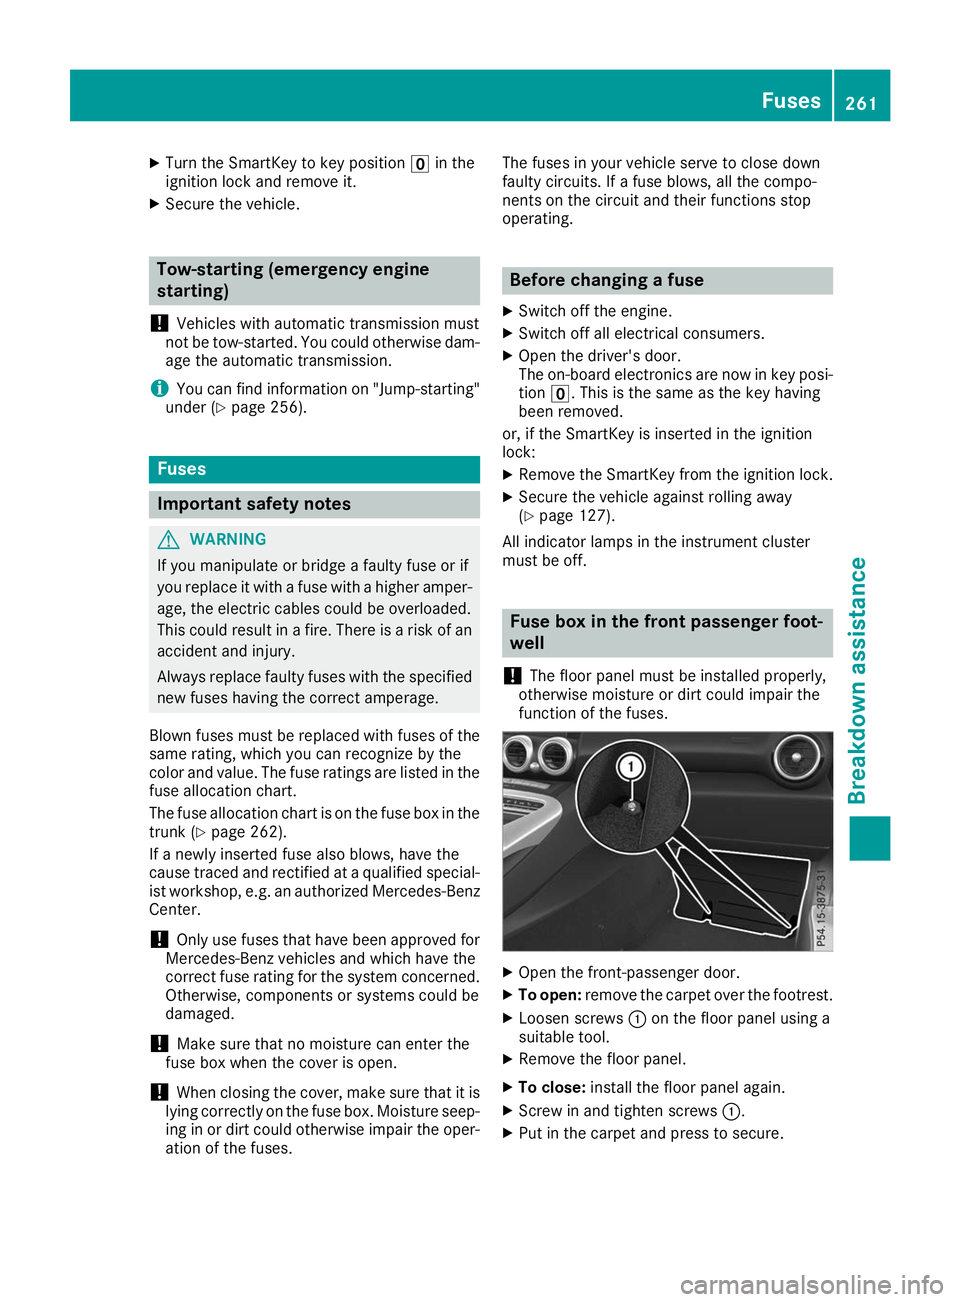
must be off. Fuse box in the front passenger foot-
well
! The floor panel must be installed properly,
otherwise moisture or dirt could impair the
function of the fuses. X
Open the front-passenger door.
X To open: remove the carpet over the footrest.
X Loosen screws 0043on the floor panel using a
suitable tool.
X Remove the floor panel.
X To close: install the floor panel again.
X Screw in and tighten screws 0043.
X Put in the carpet and press to secure. Fuses
261Breakdown assistance Z