2019 MERCEDES-BENZ AMG GT ROADSTER wheel torque
[x] Cancel search: wheel torquePage 23 of 298
Two-way radio
Frequencies ................................... 287
Installation ..................................... 287
Transmission output (maximum) .... 287
Type identification plate
see Vehicle identification plate U
Unlocking Emergency unlocking ....................... 73
From inside the vehicle (central
unlocking button) ............................. 72
USB devices
Connecting to the Media Inter-
face .............................................. .217 V
Vanity mirror (in the sun visor) ........221
Vehicle
Correct use ...................................... 28
Data acquisition ............................... 29
Display message ............................ 194
Electronics ..................................... 287
Equipment ....................................... 25
Individual settings .......................... 168
Limited Warranty ............................ .29
Loading .......................................... 271
Locking (in an emergency) ............... 73
Locking (SmartKey) .......................... 66
Lowering ........................................ 285
Maintenance .................................... 26
Operating safety .............................. 26
Parking .......................................... 127
Parking for a long period ................ 130
Pulling away ................................... 112
Raising ........................................... 282
Reporting problems ......................... 28
Securing from rolling away ............ 282
Towing away .................................. 258
Transporting .................................. 260
Unlocking (in an emergency) ........... 73
Unlocking (SmartKey )...................... 66
Vehicle data ................................... 293
Vehicle battery
see Battery (vehicle)
Vehicle data
Trunk load (maximum) ................... 293 Vehicle dimensions
........................... 293
Vehicle emergency locking ................ 73
Vehicle identification number
see VIN
Vehicle identification plate .............. 287
Vehicle maintenance
see ASSYST PLUS
Vehicle tool kit .................................. 249
Ventilation
see Climate control
Video
Operating the DVD ......................... 166
see also Digital Operator's Man-
ual .................................................. 209
VIN
Seat ............................................... 288
Type plate ...................................... 287 W
Warning and indicator lamps ABS ................................................ 201
Active Brake Assist ........................ 206
Brakes ........................................... 200
Check Engine ................................. 204
Coolant .......................................... 204
Distance warning ........................... 206
ESP ®
.............................................. 201
ESP ®
OFF ....................................... 202
Fuel tank ........................................ 204
Overview .......................................... 34
Parking brake ................................ 203
PASSENGER AIR BAG ...................... 41
Reserve fue l................................... 204
Restraint system ............................ 203
Seat belt ........................................ 199
SPORT handling mod e................... 203
Steering ......................................... 208
Tire pressure monitor .................... 207
Warranty .............................................. 25
Washer fluid
Display message ............................ 197
Weather display (COMAND)
see also Digital Operator's Man-
ual.................................................. 209
Wheel and tire combinations
Tires ............................................... 285
Wheel bolt tightening torque ........... 285 Index
21
Page 24 of 298
Wheel chock
...................................... 282
Wheels
Changing a wheel .......................... 281
Checking ........................................ 264
Cleaning ......................................... 245
Important safety notes .................. 263
Information on driving .................... 263
Interchanging/changing ................ 281
Mounting a new wheel .................. .284
Mounting a wheel .......................... 282
Notes on sport tires ....................... 263
Removing a wheel .......................... 284
Storing .......................................... .282
Tightening torque ........................... 285
Wheel size/tire size ....................... 285
Wind screen ......................................... 82
Window curtain air bag
Display message ............................ 183
Windows
see Side windows
Windshield
Defrosting ...................................... 106
Windshield washer fluid
see Windshield washer system
Windshield washer system
Adding washer fluid ....................... 240
Important safety notes .................. 292
Windshield wipers
Problem (malfunction) ................... 102
Replacing the wiper blades ............ 101
Switching on/off ........................... 100
Winter driving
Slippery road surfaces ................... 134
Snow chains .................................. 265
Winter operation
General notes ................................ 265
Summer tires ................................. 265
Winter tires
M+S tires ....................................... 265
Wiper blades
Cleaning ......................................... 246
Important safety notes .................. 101
Replacing ....................................... 101
Replacing (windshield )................... 101
Workshop
see Qualified specialist workshop 22
Index
Page 64 of 298
ESP
®
(Electronic Stability Program)
General notes i
Observe the "Important safety notes" sec-
tion (Y page 58).
ESP ®
monitors driving stability and traction, i.e.
power transmission between the tires and the
road surface.
If ESP ®
detects that the vehicle is deviating from
the direction desired by the driver, one or more
wheels are braked to stabilize the vehicle. The
engine output is also modified to keep the vehi- cle on the desired course within physical limits.
ESP ®
assists the driver when pulling away on
wet or slippery roads. ESP ®
can also stabilize
the vehicle during braking.
ETS (Electronic Traction System) i
Observe the "Important safety notes" sec-
tion (Y page 58).
ETS traction control is part of ESP ®
.
Traction control brakes the drive wheels indi-
vidually if they spin. This enables you to pull
away and accelerate on slippery surfaces, for
example if the road surface is slippery on one
side. In addition, more drive torque is transfer-
red to the wheel or wheels with traction.
Traction control remains active, even if you
deactivate ESP ®
.
Important safety notes i
Observe the "Important safety notes" sec-
tion (Y page 58). G
WARNING
If ESP ®
is malfunctioning, ESP ®
is unable to
stabilize the vehicle. Additionally, further driv- ing safety systems are deactivated. This
increases the risk of skidding and an accident.
Drive on carefully. Have ESP ®
checked at a
qualified specialist workshop.
ESP ®
is only deactivated if the 00BBwarning
lamp is lit continuously.
When SPORT handling mode is activated, the
0074 warning lamp lights up in the instrument
panel. When the
00BBand0089 warning lamps light up
continuously, ESP ®
is not available due to a mal-
function.
Observe the information on warning lamps
(Y page 201) and display messages which may
be shown in the instrument cluster
(Y page 175).
Only use wheels with the recommended tire
sizes. Only then will ESP ®
function properly.
Characteristics of ESP ® General information
If the 00E5 ESP®
warning lamp goes out before
beginning the journey, ESP ®
is automatically
active.
If ESP ®
intervenes, the 00E5ESP®
warning lamp
flashes in the instrument cluster.
If ESP ®
intervenes:
X Do not deactivate ESP ®
under any circum-
stances.
X Only depress the accelerator pedal as far as
necessary when pulling away.
X Adapt your driving style to suit the prevailing
road and weather conditions.
ECO start/stop function
The ECO start/stop function switches the
engine off automatically when the vehicle stops moving. The engine starts automatically when
the driver wants to pull away again. ESP ®
remains in its previously selected status. Exam-
ple: if ESP ®
was deactivated before the engine
was switched off, ESP ®
remains deactivated
when the engine is switched on again.
Deactivating/activating ESP ® Important safety notes
i Observe the "Important safety notes" sec-
tion (Y page 58).
You can select between the following states of
ESP ®
:
R ESP ®
is activated
R SPORT handling mode is activated
R ESP ®
is deactivated 62
Driving safety systemsSafety
Page 65 of 298
G
WARNING
If you deactivate ESP ®
, ESP ®
no longer sta-
bilizes the vehicle. There is an increased risk
of skidding and an accident.
Only deactivate ESP ®
in the situations descri-
bed in the following. G
WARNING
When SPORT handling mode is activated,
there is a greater risk of skidding and acci-
dents.
Only activate SPORT handling mode in the sit- uations described in the following.
In the following situations, it may be better to
activate SPORT handling mode or deactivate
ESP ®
:
R when using snow chains
R in deep snow
R on sand or gravel
R on specially designated roads when the vehi-
cle's own oversteering and understeering
characteristics are desired
Driving in SPORT handling mode or without
ESP ®
requires an extremely qualified and expe-
rienced driver.
Activate ESP ®
as soon as the situations descri-
bed above no longer apply. ESP ®
will otherwise
not be able to stabilize the vehicle if the vehicle starts to skid or a wheel starts to spin.
! Avoid spinning the driven wheels for an
extended period with ESP ®
deactivated. You
could otherwise damage the drivetrain.
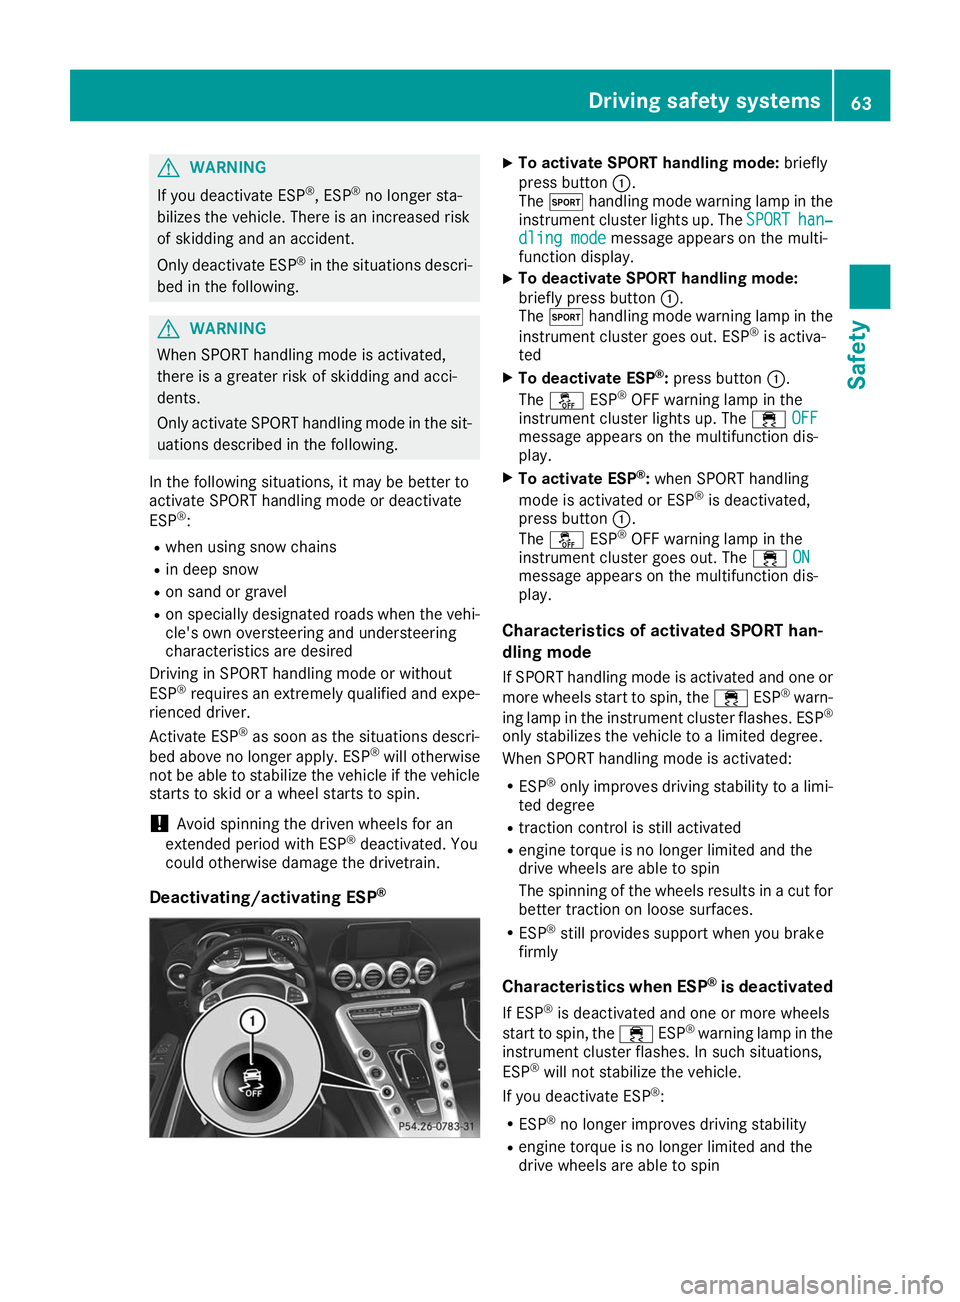
Deactivating/activating ESP ® X
To activate SPORT handling mode: briefly
press button 0043.
The 0074 handling mode warning lamp in the
instrument cluster lights up. The SPORT SPORThan‐
han‐
dling mode
dling mode message appears on the multi-
function display.
X To deactivate SPORT handling mode:
briefly press button
0043.
The 0074 handling mode warning lamp in the
instrument cluster goes out. ESP ®
is activa-
ted
X To deactivate ESP ®
:press button 0043.
The 00BB ESP®
OFF warning lamp in the
instrument cluster lights up. The 00E5OFF OFF
message appears on the multifunction dis-
play.
X To activate ESP ®
:when SPORT handling
mode is activated or ESP ®
is deactivated,
press button 0043.
The 00BB ESP®
OFF warning lamp in the
instrument cluster goes out. The 00E5ON ON
message appears on the multifunction dis-
play.
Characteristics of activated SPORT han-
dling mode
If SPORT handling mode is activated and one or more wheels start to spin, the 00E5ESP®
warn-
ing lamp in the instrument cluster flashes. ESP ®
only stabilizes the vehicle to a limited degree.
When SPORT handling mode is activated:
R ESP ®
only improves driving stability to a limi-
ted degree
R traction control is still activated
R engine torque is no longer limited and the
drive wheels are able to spin
The spinning of the wheels results in a cut for better traction on loose surfaces.
R ESP ®
still provides support when you brake
firmly
Characteristics when ESP ®
is deactivated
If ESP ®
is deactivated and one or more wheels
start to spin, the 00E5ESP®
warning lamp in the
instrument cluster flashes. In such situations,
ESP ®
will not stabilize the vehicle.
If you deactivate ESP ®
:
R ESP ®
no longer improves driving stability
R engine torque is no longer limited and the
drive wheels are able to spin Driving safety systems
63Safety Z
Page 285 of 298
R
Before raising the vehicle, secure it from roll-
ing away by applying the parking brake and
inserting wheel chocks. Do not disengage the parking brake while the vehicle is raised.
R The jack must be placed on a firm, flat and
non-slip surface. On a loose surface, a large,
flat, load-bearing underlay must be used. On a slippery surface, a non-slip underlay must be
used, e.g. rubber mats.
R Do not use wooden blocks or similar objects
as a jack underlay. Otherwise, the jack will not
be able to achieve its load-bearing capacity
due to the restricted height.
R Make sure that the distance between the
underside of the tires and the ground does not
exceed 1.2 in (3 cm).
R Do not place your hands or feet under the
raised vehicle.
R Do not lie under the vehicle.
R Do not start the engine when the vehicle is
raised.
R Do not open or close a door or the trunk lid
when the vehicle is raised.
R Make sure that no persons are present in the
vehicle when the vehicle is raised.
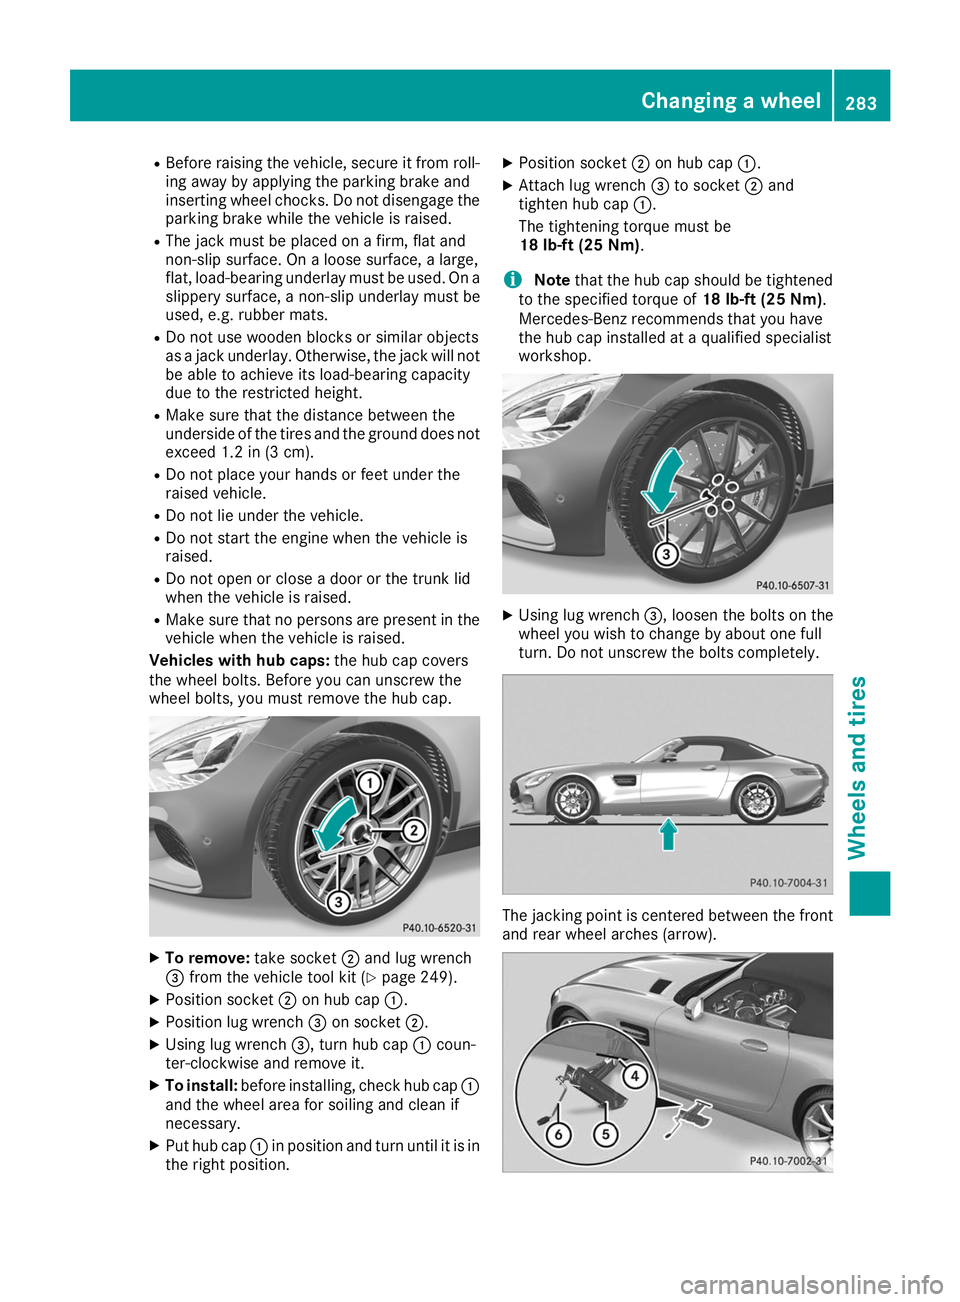
Vehicles with hub caps: the hub cap covers
the wheel bolts. Before you can unscrew the
wheel bolts, you must remove the hub cap. X
To remove: take socket0044and lug wrench
0087 from the vehicle tool kit (Y page 249).
X Position socket 0044on hub cap 0043.
X Position lug wrench 0087on socket 0044.
X Using lug wrench 0087, turn hub cap0043coun-
ter-clockwise and remove it.
X To install: before installing, check hub cap 0043
and the wheel area for soiling and clean if
necessary.
X Put hub cap 0043in position and turn until it is in
the right position. X
Position socket 0044on hub cap 0043.
X Attach lug wrench 0087to socket 0044and
tighten hub cap 0043.
The tightening torque must be
18 lb-ft (25 Nm).
i Note
that the hub cap should be tightened
to the specified torque of 18 lb-ft (25 Nm).
Mercedes-Benz recommends that you have
the hub cap installed at a qualified specialist
workshop. X
Using lug wrench 0087, loosen the bolts on the
wheel you wish to change by about one full
turn. Do not unscrew the bolts completely. The jacking point is centered between the front
and rear wheel arches (arrow). Changing a wheel
283Wheels and tires Z
Page 287 of 298
0043
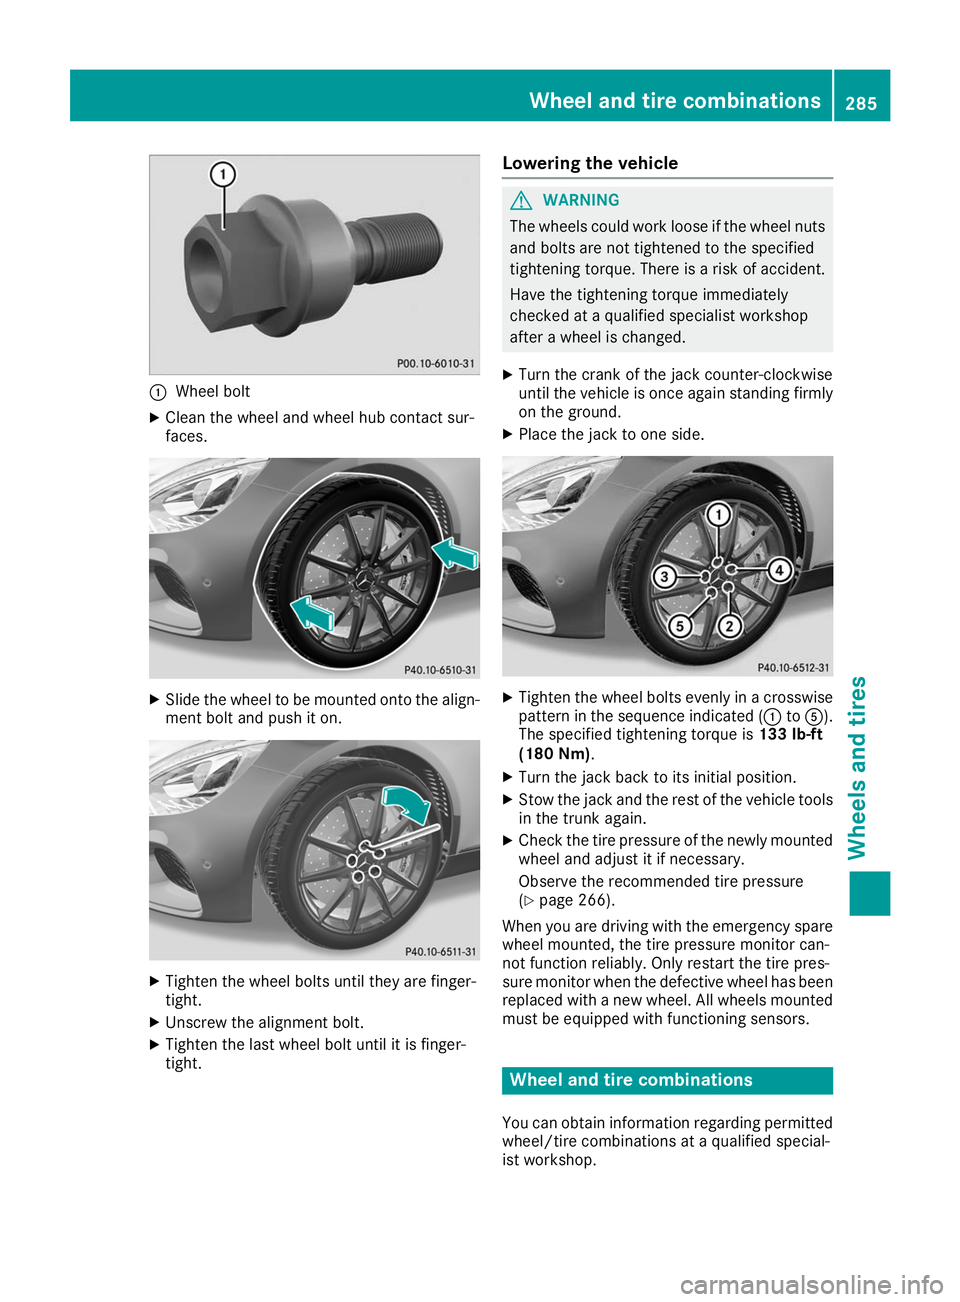
Wheel bolt
X Clean the wheel and wheel hub contact sur-
faces. X
Slide the wheel to be mounted onto the align-
ment bolt and push it on. X
Tighten the wheel bolts until they are finger-
tight.
X Unscrew the alignment bolt.
X Tighten the last wheel bolt until it is finger-
tight. Lowering the vehicle G
WARNING
The wheels could work loose if the wheel nuts and bolts are not tightened to the specified
tightening torque. There is a risk of accident.
Have the tightening torque immediately
checked at a qualified specialist workshop
after a wheel is changed.
X Turn the crank of the jack counter-clockwise
until the vehicle is once again standing firmly
on the ground.
X Place the jack to one side. X
Tighten the wheel bolts evenly in a crosswise
pattern in the sequence indicated (0043 to0083).
The specified tightening torque is 133 lb-ft
(180 Nm).
X Turn the jack back to its initial position.
X Stow the jack and the rest of the vehicle tools
in the trunk again.
X Check the tire pressure of the newly mounted
wheel and adjust it if necessary.
Observe the recommended tire pressure
(Y page 266).
When you are driving with the emergency spare
wheel mounted, the tire pressure monitor can-
not function reliably. Only restart the tire pres-
sure monitor when the defective wheel has been replaced with a new wheel. All wheels mounted
must be equipped with functioning sensors. Wheel and tire combinations
You can obtain information regarding permitted wheel/tire combinations at a qualified special-
ist workshop. Wheel and tire combinations
285Wheels and tires Z