2019 MERCEDES-BENZ AMG GT ROADSTER radiator cap
[x] Cancel search: radiator capPage 240 of 298
Display messages
Possible causes/consequences and
0050
0050Solutions Engine Oil Level
Engine Oil Level
Correct Correct
Measurement
Measurement
Only if Vehicle Is
Only if Vehicle Is
on Level Ground on Level Ground The vehicle is not parked on a level surface.
X Park the vehicle on a level surface. Engine Oil Level
Engine Oil Level
Not Measurable Not Measurable Oil level measurement with the oil dipstick is possible. The measuring
system is malfunctioning.
X Visit a qualified specialist workshop. Adding engine oil
G
WARNING
Certain components in the engine compart-
ment, such as the engine, radiator and parts
of the exhaust system, can become very hot.
Working in the engine compartment poses a
risk of injury.
Where possible, let the engine cool down and touch only the components described in the
following. G
WARNING
If engine oil comes into contact with hot com- ponents in the engine compartment, it may
ignite. There is a risk of fire and injury.
Make sure that engine oil is not spilled next to
the filler neck. Let the engine cool down and
thoroughly clean the engine oil off the com-
ponents before starting the engine. H
Environmental note
When adding oil, take care not to spill any. If
oil enters the soil or waterways, it is harmful to the environment.
! Use only engine oils and oil filters that are
approved for vehicles with a service system. A list of the engine oils and oil filters that have
been tested and approved in accordance with
Mercedes-Benz Specifications for Service
Products is available at any authorized
Mercedes-Benz Center. The following cause engine failure or damage
to the exhaust system:
R Use of engine oils and oil filters that have
not been expressly approved for the service
system
R Replacement of engine oil and oil filter after
the replacement interval specified by the
service system has expired
R Use of engine oil additives
! Do not add too much oil. If the oil level is
above the "max" mark on the dipstick, too
much oil has been added. This can lead to
damage to the engine or the catalytic con-
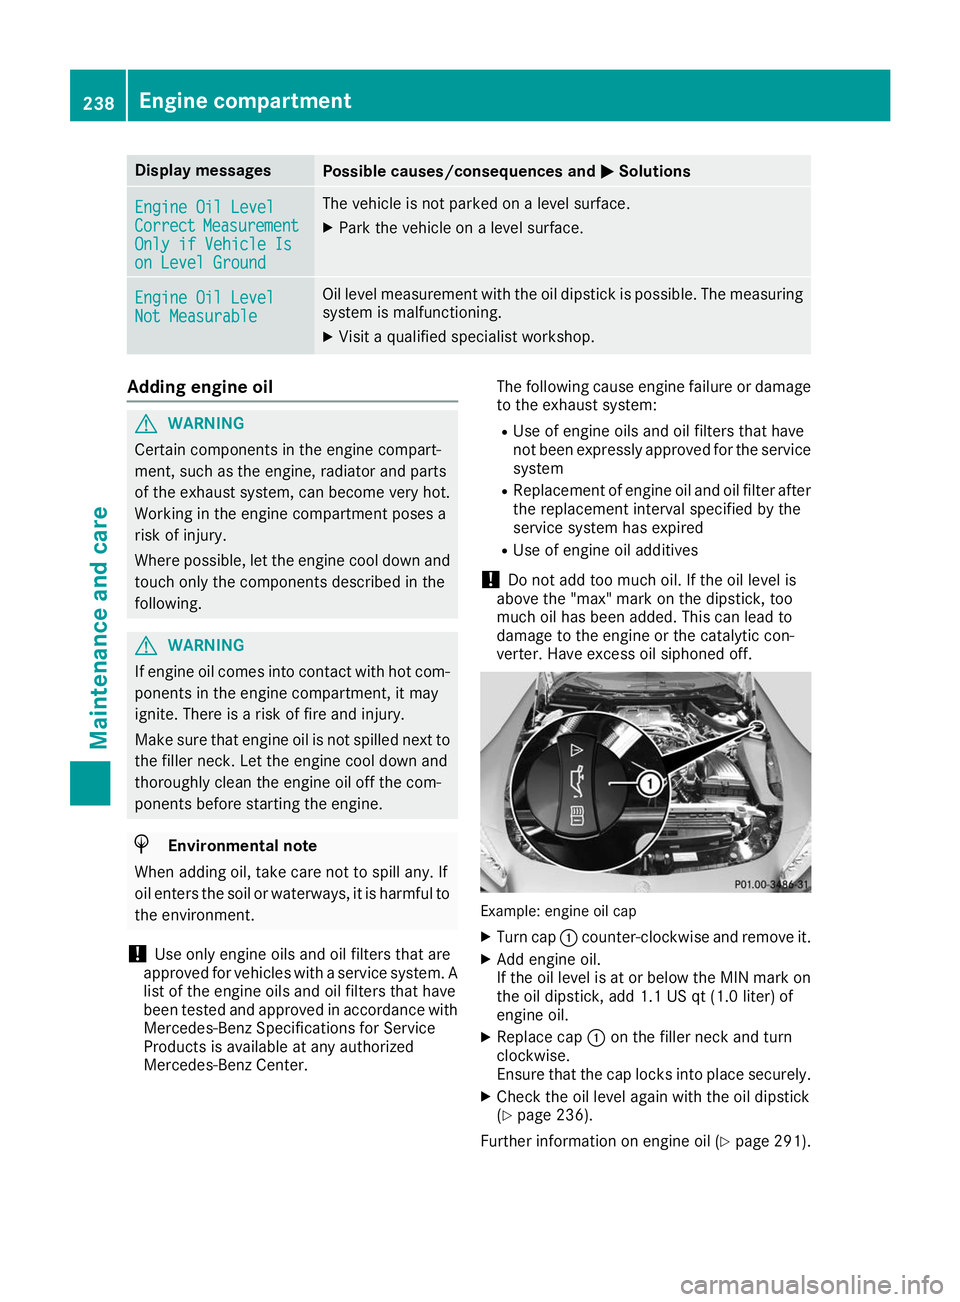
verter. Have excess oil siphoned off. Example: engine oil cap
X Turn cap 0043counter-clockwise and remove it.
X Add engine oil.
If the oil level is at or below the MIN mark on
the oil dipstick, add 1.1 US qt (1.0 liter) of
engine oil.
X Replace cap 0043on the filler neck and turn
clockwise.
Ensure that the cap locks into place securely.
X Check the oil level again with the oil dipstick
(Y page 236).
Further information on engine oil (Y page 291).238
Engine compartmentMaintenance and care
Page 241 of 298
Additional service products
Checking coolant level G
WARNING
Certain components in the engine compart-
ment, such as the engine, radiator and parts
of the exhaust system, can become very hot.
Working in the engine compartment poses a
risk of injury.
Where possible, let the engine cool down and touch only the components described in the
following. G
WARNING
Opening the hood when the engine is over-
heated or when there is a fire in the engine
compartment could expose you to hot gases
or other service products. There is a risk of
injury.
Let an overheated engine cool down before
opening the hood. If there is a fire in the
engine compartment, keep the hood closed
and contact the fire department. G
WARNING
The cooling system is pressurized, particularly when the motor is warm. If you open the cap, you could be scalded if hot coolant sprays out.
There is a risk of injury.
Let the engine cool down before you open the
cap. Wear protective gloves and protective
eyewear when opening. Open the cap slowly
to release pressure.
! Before starting your journey, make sure that
all engine covers are installed. Otherwise, the engine can be damaged, e.g. through over-
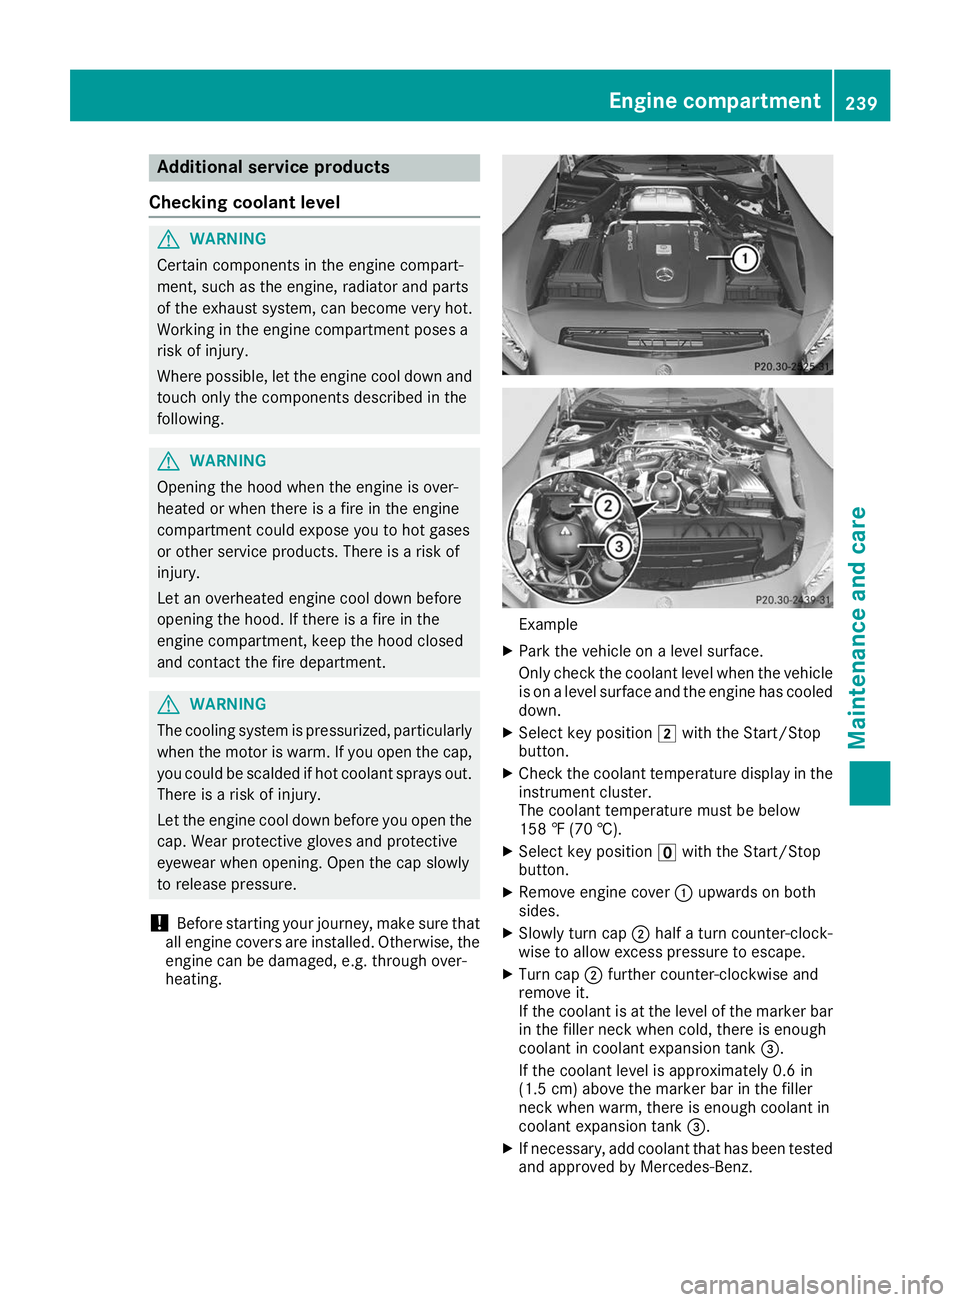
heating. Example
X Park the vehicle on a level surface.
Only check the coolant level when the vehicle
is on a level surface and the engine has cooled
down.
X Select key position 0048with the Start/Stop
button.
X Check the coolant temperature display in the
instrument cluster.
The coolant temperature must be below
158 ‡ (70 †).
X Select key position 0092with the Start/Stop
button.
X Remove engine cover 0043upwards on both
sides.
X Slowly turn cap 0044half a turn counter-clock-
wise to allow excess pressure to escape.
X Turn cap 0044further counter-clockwise and
remove it.
If the coolant is at the level of the marker bar in the filler neck when cold, there is enough
coolant in coolant expansion tank 0087.
If the coolant level is approximately 0.6 in
(1.5 cm) above the marker bar in the filler
neck when warm, there is enough coolant in
coolant expansion tank 0087.
X If necessary, add coolant that has been tested
and approved by Mercedes-Benz. Engine compartment
239Maintenance and care Z
Page 242 of 298
X
Replace cap 0044and turn it clockwise as far as
it will go.
X Replace engine cover 0043.
For further information on coolant, see
(Y page 292).
Windshield washer system G
WARNING
Certain components in the engine compart-
ment, such as the engine, radiator and parts
of the exhaust system, can become very hot.
Working in the engine compartment poses a
risk of injury.
Where possible, let the engine cool down and touch only the components described in the
following. G
WARNING
Windshield washer concentrate is highly flam- mable. If windshield washer concentrate getsonto hot components of the engine or the
exhaust system, it can ignite. There is a risk of
fire and injury.
Make sure that windshield washer concen-
trate is not spilled in the vicinity of the filler
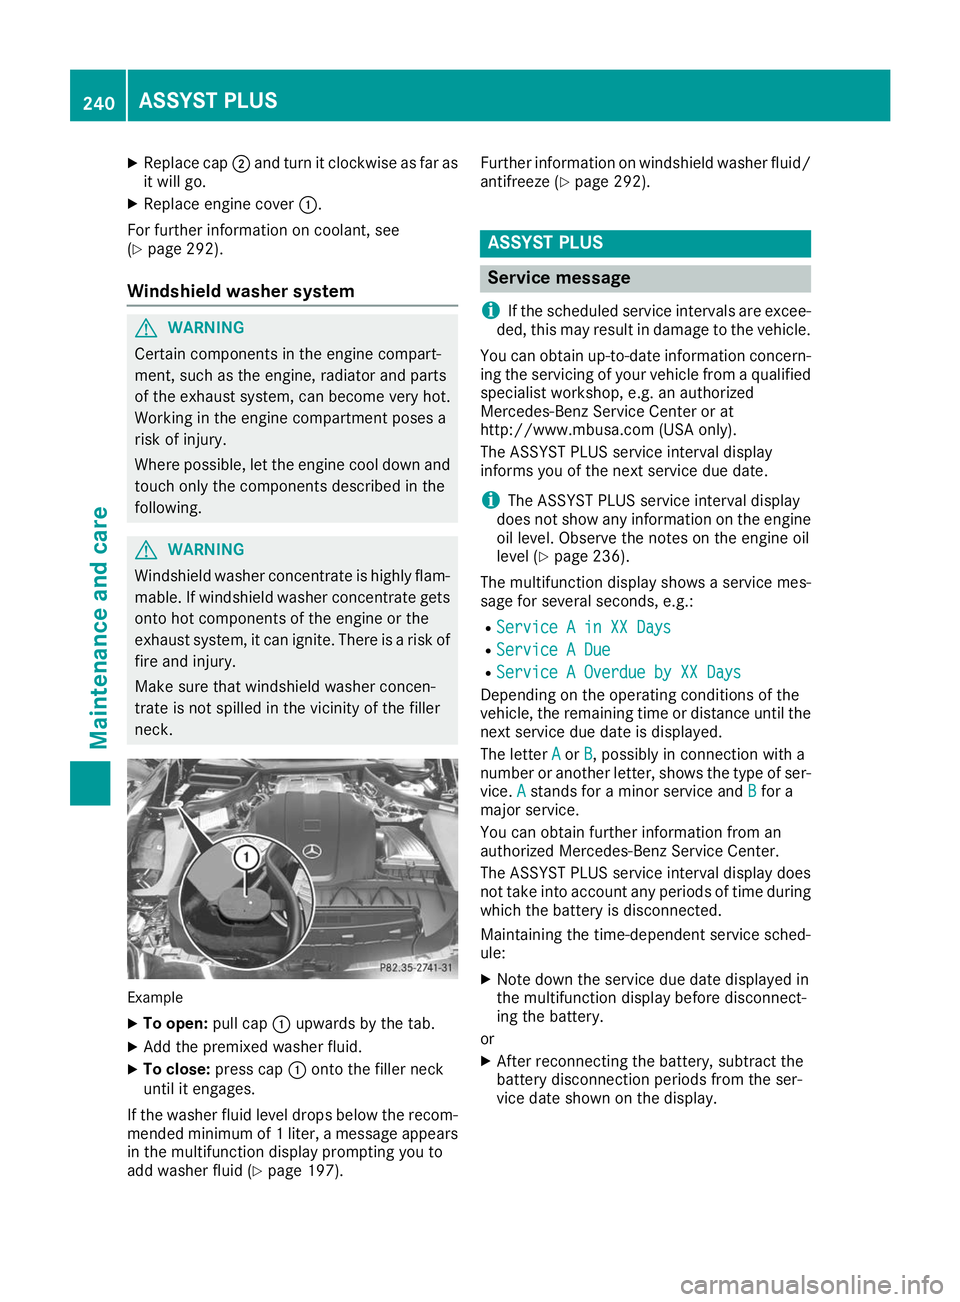
neck. Example
X To open: pull cap0043upwards by the tab.
X Add the premixed washer fluid.
X To close: press cap 0043onto the filler neck
until it engages.
If the washer fluid level drops below the recom- mended minimum of 1 liter, a message appears
in the multifunction display prompting you to
add washer fluid (Y page 197). Further information on windshield washer fluid/
antifreeze (Y page 292). ASSYST PLUS
Service message
i If the scheduled service intervals are excee-
ded, this may result in damage to the vehicle.
You can obtain up-to-date information concern-
ing the servicing of your vehicle from a qualified specialist workshop, e.g. an authorized
Mercedes-Benz Service Center or at
http://www.mbusa.com (USA only).
The ASSYST PLUS service interval display
informs you of the next service due date.
i The ASSYST PLUS service interval display
does not show any information on the engine oil level. Observe the notes on the engine oil
level (Y page 236).
The multifunction display shows a service mes-
sage for several seconds, e.g.: R Service A in XX Days Service A in XX Days
R Service A Due
Service A Due
R Service A Overdue by XX Days
Service A Overdue by XX Days
Depending on the operating conditions of the
vehicle, the remaining time or distance until the
next service due date is displayed.
The letter A Aor B
B, possibly in connection with a
number or another letter, shows the type of ser-
vice. A
Astands for a minor service and B
Bfor a
major service.
You can obtain further information from an
authorized Mercedes-Benz Service Center.
The ASSYST PLUS service interval display does
not take into account any periods of time during
which the battery is disconnected.
Maintaining the time-dependent service sched-
ule:
X Note down the service due date displayed in
the multifunction display before disconnect-
ing the battery.
or
X After reconnecting the battery, subtract the
battery disconnection periods from the ser-
vice date shown on the display. 240
ASSYST PLUSMaintenance and care
Page 295 of 298
!
Only MB SummerFit and MB WinterFit
washer fluid should be mixed together. The
spray nozzles may otherwise become
blocked.
Do not use distilled or de-ionized water. Other-
wise, the level sensor may give a false reading.
At temperatures above freezing:
X Fill the washer fluid reservoir with a mixture of
water and windshield washer fluid, e.g. MB
SummerFit.
Add 1 part MB SummerFit to 100 parts water.
At temperatures below freezing:
X Fill the washer fluid reservoir with a mixture of
water and washer fluid, e.g. MB WinterFit.
For the correct mixing ratio refer to the infor-mation on the antifreeze reservoir.
i Add windshield washer fluid, e.g. MB Sum-
merFit or MB WinterFit, to the washer fluid all
year round. Climate control system refrigerant
Important safety notes The instruction label regarding the refrigerant
type used can be found on the radiator cross
member. Further information can be found in
the currently valid service information.
Service work, such as refilling with refrigerant or
replacing component parts, may only be carried out by a qualified specialist workshop. All appli-
cable regulations must be adhered to, SAE
standard J639 included.
Always have work on the climate control system
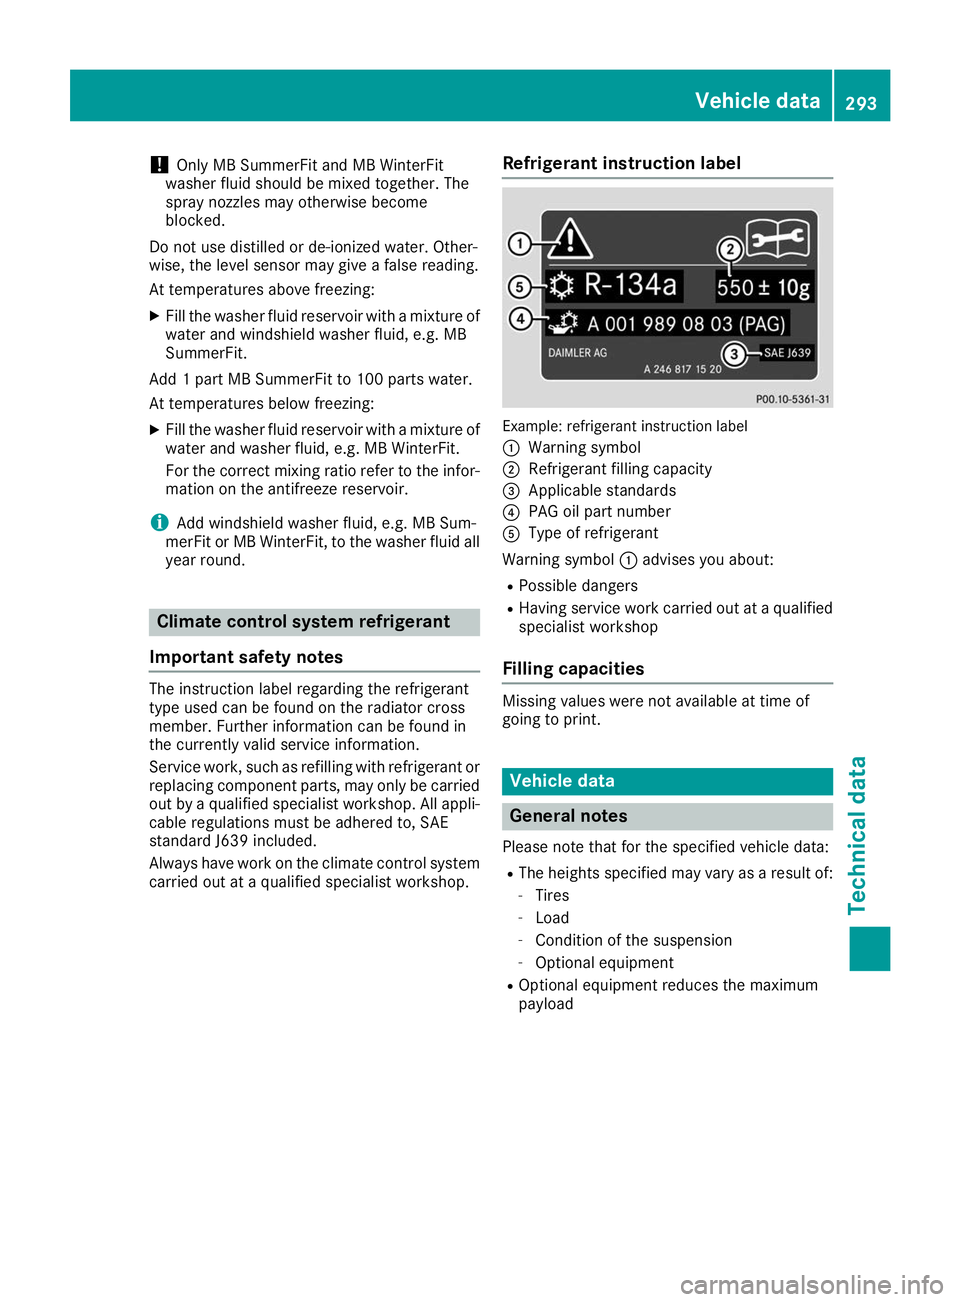
carried out at a qualified specialist workshop. Refrigerant instruction label Example: refrigerant instruction label
0043
Warning symbol
0044 Refrigerant filling capacity
0087 Applicable standards
0085 PAG oil part number
0083 Type of refrigerant
Warning symbol 0043advises you about:
R Possible dangers
R Having service work carried out at a qualified
specialist workshop
Filling capacities Missing values were not available at time of
going to print. Vehicle data
General notes
Please note that for the specified vehicle data:
R The heights specified may vary as a result of:
- Tires
- Load
- Condition of the suspension
- Optional equipment
R Optional equipment reduces the maximum
payload Vehicle data
293Technical data Z