2019 MERCEDES-BENZ AMG GT ROADSTER fuel cap
[x] Cancel search: fuel capPage 12 of 298
Electronic Traction System
see ETS (Electronic Traction System)
Emergency
Automatic measures after an acci-
dent ................................................ .55
Emergency braking
see BAS (Brake Assist System)
Emergency release
Driver's door .................................... 73
Trunk .............................................. .76
Vehicle .............................................73
Emergency Tensioning Devices
Activation ........................................ .52
Emissions control
Service and warranty information .... 25
Engine
Check Engine warning lamp .......... .204
Display message ............................ 187
ECO start/stop function ................ 113
Engine number ............................... 288
Irregular running ............................ 115
Jump-starting ................................. 256
Starting problems .......................... 115
Starting the engine with the
SmartKey ....................................... 112
Starting with the Start/Stop but-
ton ................................................. 112
Switching off .................................. 128
Tow-starting (vehicle) ..................... 261
Engine electronics
Notes ............................................. 287
Problem (malfunction) ................... 115
Engine oil
Adding .......................................... .238
Additives ........................................ 291
Checking the oil level ..................... 236
Checking the oil level using the
dipstick .......................................... 236
Checking the oil level using the
on-board computer ........................ 237
Display message ............................ 188
Filling capacity ............................... 291
Notes about oil grades ................... 291
Notes on oil level/consumption .... 236
Temperature (on-board com-
puter) ............................................. 170
Engine oil additives
see Additives (engine oil) Entering an address
see also Digital Operator's Man-
ual ................................................. .209
ESC (Electronic Stability Control)
see ESP ®
(Electronic Stability Program)
ESP ®
(Electronic Stability Pro-
gram)
AMG menu (on-board computer) ... 171
Characteristics ................................. 62
Deactivating/activating ................... 62
Deactivating/activating (button
in AMG vehicles) .............................. 63
Display message ............................ 175
Function/notes ................................ 62
General notes .................................. 62
Important safety information ........... 62
Warning lamp ................................. 201
ETS (Electronic Traction System) ....... 62
Exhaust check ................................... 131
Exhaust pipe (cleaning instruc-
tions) ................................................. .247
Exterior lighting
Cleaning ......................................... 246
see Lights
Exterior mirror
Calling up a stored setting (mem-
ory function) ................................... .95
Exterior mirrors
Adjusting ........................................ .92
Dipping (automatic) ........................ .93
Folding in/out (automatically )......... 92
Folding in/out (electrically) ............. 92
Out of position (troubleshooting) ..... 93
Setting ............................................. 92
Storing settings (memory func-
tion) ................................................. 94
Storing the parking position ............. 93 F
Favorites Overview ........................................ 212
Features ............................................. 220
Filler cap
see Refueling
Flat tire
Changing a wheel/mounting the
spare wheel ................................... 281 10
Index
Page 13 of 298
Preparing the vehicle ..................... 250
TIREFIT kit ...................................... 251
Floormats ...........................................2 34
Frequencies
Mobile phone ................................. 287
Two-way radio ................................ 287
Front passenger seat
see Seat
Fuel
Additives ........................................ 290
Consumption statistics .................. 162
Displaying the current consump-
tion ................................................ 162
Displaying the range ..................... .162
Driving tips ................................... .131
E10 ................................................ 290
Fuel gauge ....................................... 34
Grade (gasoline) ............................ 290
Important safety notes .................. 289
Problem (malfunction) ................... 127
Refueling ........................................ 125
Tank content/reserve fuel ............. 289
Fuel filler flap
Closing .......................................... .126
General information ....................... 126
Opening ......................................... 126
Problem (malfunction) ................... 127
Fuel level
Calling up the range (on-board
computer) ...................................... 162
Fuel tank
Capacity ........................................ 289
Problem (malfunction) ................... 127
Fuses
Allocation chart ............................ .262
Before changing ............................ .261
Fuse box in the front-passenger
footwell .......................................... 261
Fuse box in the rear compartment .. 262
Important safety notes .................. 261 G
G-Meter (on-board computer) .......... 171
Garage door opener
Clearing the memory ..................... 234
General notes ................................ 231
Important safety notes .................. 231 Opening/closing the garage door .. 233
Problems when programming .......
.233
Programming (button in the rear-
view mirror) ................................... 231
Synchronizing the rolling code ....... 232
Gasoline ............................................. 290
Gear indicator (on-board com-
puter) ................................................. .170
Genuine parts ...................................... 24
Glove box .......................................... .219
Google™ Local Search
see also Digital Operator's Man-
ual ................................................. .209 H
Handling control system see ESP ®
(Electronic Stability Program)
Handwriting recognition
Switching text reader function
on/off ............................................ 212
Touchpad ....................................... 211
Hazard warning lamps ........................ 98
Head bags
Operation ......................................... 47
Head level heating (AIRSCARF) .......... 89
Head restraints
Adjusting ......................................... 86
Headlamps
Cleaning system (notes) ................ 292
Fogging up ....................................... 99
see Automatic headlamp mode
Heating
see Climate control
High beam flasher ............................... 97
High-beam headlamps
Display message ............................ 186
Switching on/off .............................. 97
Hill start assist .................................. 112
HOLD function
Activating ....................................... 145
Activation conditions ..................... 145
Deactivating ................................... 145
Display message ............................ 190
General notes ................................ 144
Home address
see also Digital Operator's Man-
ual ................................................. .209 Index
11
Page 20 of 298
Sockets
General notes ................................ 222
Trunk ............................................. 222
Soft top
Cleaning ......................................... 245
Important safety notes .................... 80
Opening/closing (SmartKey) ........... 81
Opening/closing (with soft-top
switch) ............................................. 80
Problem (malfunction) ..................... 83
Relocking ......................................... 81
Wind screen .....................................82
Soft-top switch .................................... 80
Sound
Switching on/off ........................... 210
Special seat belt retractor .................. 56
Specialist workshop ............................28
Speed, controlling
see Cruise control
Speedometer
Activating/deactivating the addi-
tional speedometer ........................ 170
Digital ............................................ 162
Segments ...................................... 159
Selecting the display unit ............... 169
SPORT handling mode
Activating/deactivating ...................62
Warning lamp ................................. 203
Sports exhaust system
see AMG sports exhaust system
Standing lamps
Display message ............................1 86
Switching on/off .............................. 97
Start/Stop button
General notes ................................ 110
Key positions ................................. 110
Starting the engine ........................ 112
Start/stop function
see ECO start/stop function
Starting (engine) ................................ 111
Steering
Display message ............................ 197
Warning lamps ............................... 208
Steering wheel
Adjusting (electrically) ..................... 90
Button overview ............................... 35
Buttons (on-board computer) ......... 160 Calling up a stored setting (mem-
ory function) ...................................
.95
Cleaning ........................................ .247
EASY ENTRY/EXIT feature .............. .90
Important safety notes .................... 90
Paddle shifters ............................... 121
Storing settings (memory func-
tion) .................................................94
Steering wheel paddle shifters ........ 121
Stopwatch (RACETIMER) ...................172
Stowage areas ................................... 218
Stowage compartments
Armrest (front) ............................... 219
Armrest (under) ............................ .219
Cup holders ................................... 220
Glove box ....................................... 219
Important safety information ......... 218
Stowage net ................................... 219
see Stowage areas
Stowage net ....................................... 219
Summer opening
see Side windows
Summer tires
In winter ........................................ 265
Sun visor ............................................ 220
Suspension setting
AMG adaptive sport suspension
system .......................................... .147
Suspension tuning
SETUP (on-board computer,
Mercedes-AMG vehicles) .............. .171
Switching air-recirculation mode
on/off ................................................. 107
Switching on media mode
Via the device lis t.......................... 217 T
Tachometer ........................................ 159
Tail lamps
Display message ............................ 186
see Lights
Tank
see Fuel tank
Tank content
Fuel gauge ....................................... 34
Technical data
Capacities ...................................... 289 18
Index
Page 127 of 298
Problems with the transmission
Problem
Possible causes/consequences and
0050
0050Solutions The transmission has
problems shifting gear. There is a malfunction in the transmission.
The transmission no longer shifts into the next gear.
X
Have the transmission checked at a qualified specialist workshop
immediately. The acceleration ability
is deteriorating.
The transmission no lon-
ger shifts into all of the
gears. A sub-transmission has failed.
The smoothness of the gear change is restricted.
X Have the transmission checked at a qualified specialist workshop
immediately. Refueling
Important safety notes
G
WARNING
Fuel is highly flammable. Risk of fire and
explosion by improper handling of fuel.
You must avoid fire, open flames, smoking
and creating sparks. Switch off the ignition
before refueling and, if present, switch off the auxiliary heating. G
WARNING
Fuel is poisonous and hazardous to health.
There is a risk of injury.
You must make sure that fuel does not come into contact with your skin, eyes or clothing
and that it is not swallowed. Do not inhale fuel
vapors. Keep fuel away from children.
If you or others come into contact with fuel,
observe the following:
R Wash away fuel from skin immediately
using soap and water.
R If fuel comes into contact with your eyes,
immediately rinse them thoroughly with
clean water. Seek medical assistance with-
out delay.
R If fuel is swallowed, seek medical assis-
tance without delay. Do not induce vomit-
ing.
R Immediately change out of clothing which
has come into contact with fuel. G
WARNING
Electrostatic charge can cause sparks and
thereby ignite fuel vapors. There is a risk of
fire and explosion.
Before you open the fuel filler cap or take hold of the pump nozzle, touch the metallic vehicle
body. This discharges any electrostatic
charge that may have built up.
Do not get into the vehicle again during the
refueling process. Otherwise, electrostatic
charge could build up again.
Do not get into the vehicle again during the refu-
eling process. Otherwise, electrostatic charge
could build up again.
! Do not use diesel to refuel vehicles with a
gasoline engine. Do not switch on the ignition if you accidentally refuel with the wrong fuel.
Otherwise, the fuel will enter the fuel system. Even small amounts of the wrong fuel could
result in damage to the fuel system and the
engine. Notify a qualified specialist workshop
and have the fuel tank and fuel lines drained
completely.
! Overfilling the fuel tank could damage the
fuel system.
! Take care not to spill any fuel on painted
surfaces. You could otherwise damage the
paintwork.
! Use a filter when adding fuel from a fuel can.
The fuel lines and/or the fuel injection system could otherwise be blocked by particles fromthe fuel can. Refueling
125Driving and parking Z
Page 128 of 298
If you overfill the fuel tank, fuel could spray out
when the fuel pump nozzle is removed.
For further information on fuel and fuel quality
(Y page 289). Refueling
General information Pay attention to the important safety notes
(Y page 125).
If you unlock/lock the vehicle from the outside,
the fuel filler flap also unlocks/locks.
The position of the fuel filler cap is displayed
00B6 in the instrument cluster. The arrow next
to the filling pump indicates the side of the vehi-
cle.
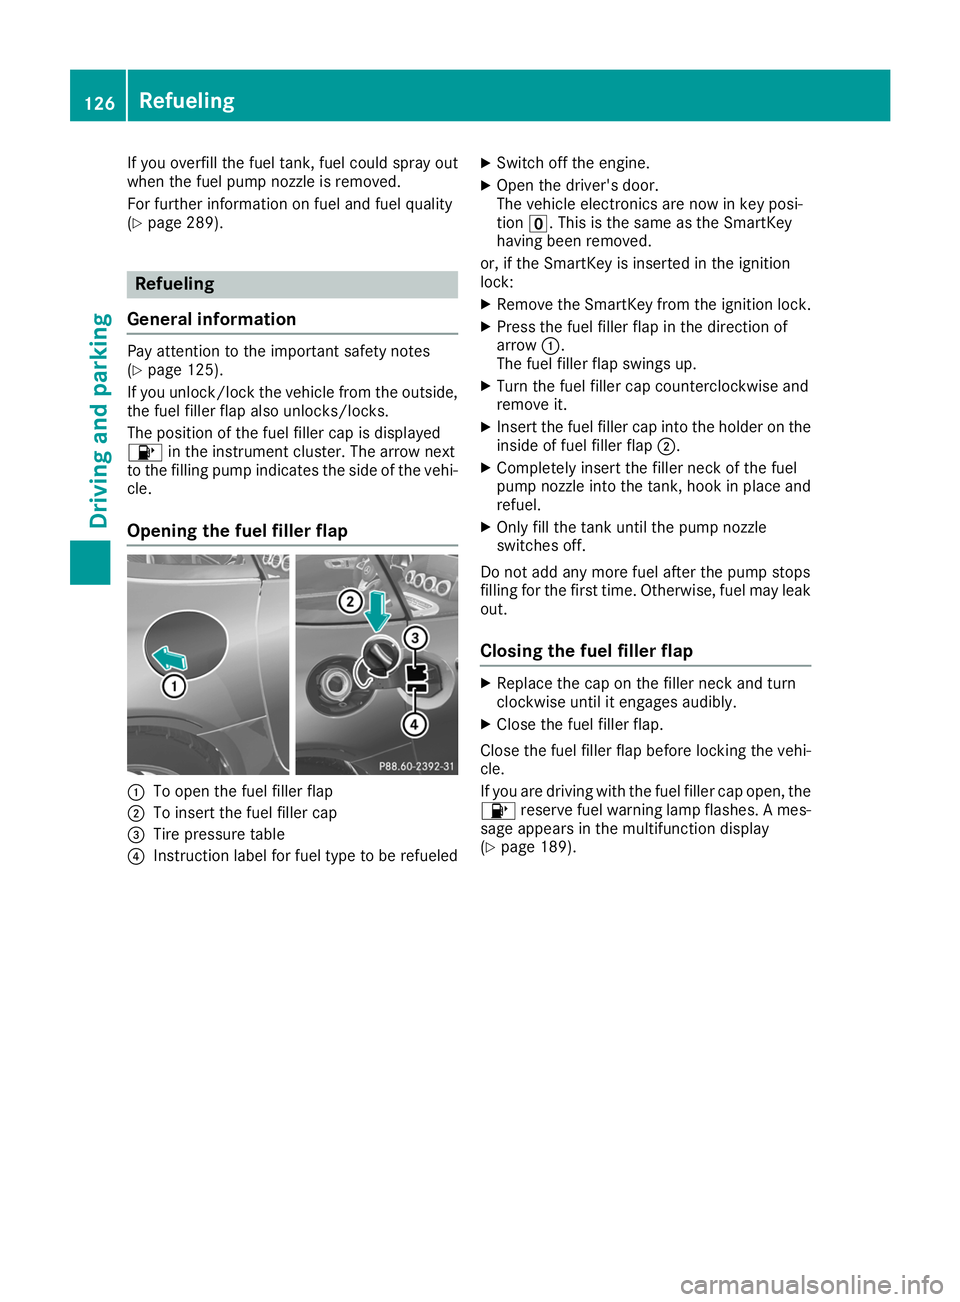
Opening the fuel filler flap 0043
To open the fuel filler flap
0044 To insert the fuel filler cap
0087 Tire pressure table
0085 Instruction label for fuel type to be refueled X
Switch off the engine.
X Open the driver's door.
The vehicle electronics are now in key posi-
tion 0092. This is the same as the SmartKey
having been removed.
or, if the SmartKey is inserted in the ignition
lock: X Remove the SmartKey from the ignition lock.
X Press the fuel filler flap in the direction of
arrow 0043.
The fuel filler flap swings up.
X Turn the fuel filler cap counterclockwise and
remove it.
X Insert the fuel filler cap into the holder on the
inside of fuel filler flap 0044.
X Completely insert the filler neck of the fuel
pump nozzle into the tank, hook in place and
refuel.
X Only fill the tank until the pump nozzle
switches off.
Do not add any more fuel after the pump stops
filling for the first time. Otherwise, fuel may leak out.
Closing the fuel filler flap X
Replace the cap on the filler neck and turn
clockwise until it engages audibly.
X Close the fuel filler flap.
Close the fuel filler flap before locking the vehi-
cle.
If you are driving with the fuel filler cap open, the 00B6 reserve fuel warning lamp flashes. A mes-
sage appears in the multifunction display
(Y page 189). 126
RefuelingDriving and parking
Page 191 of 298
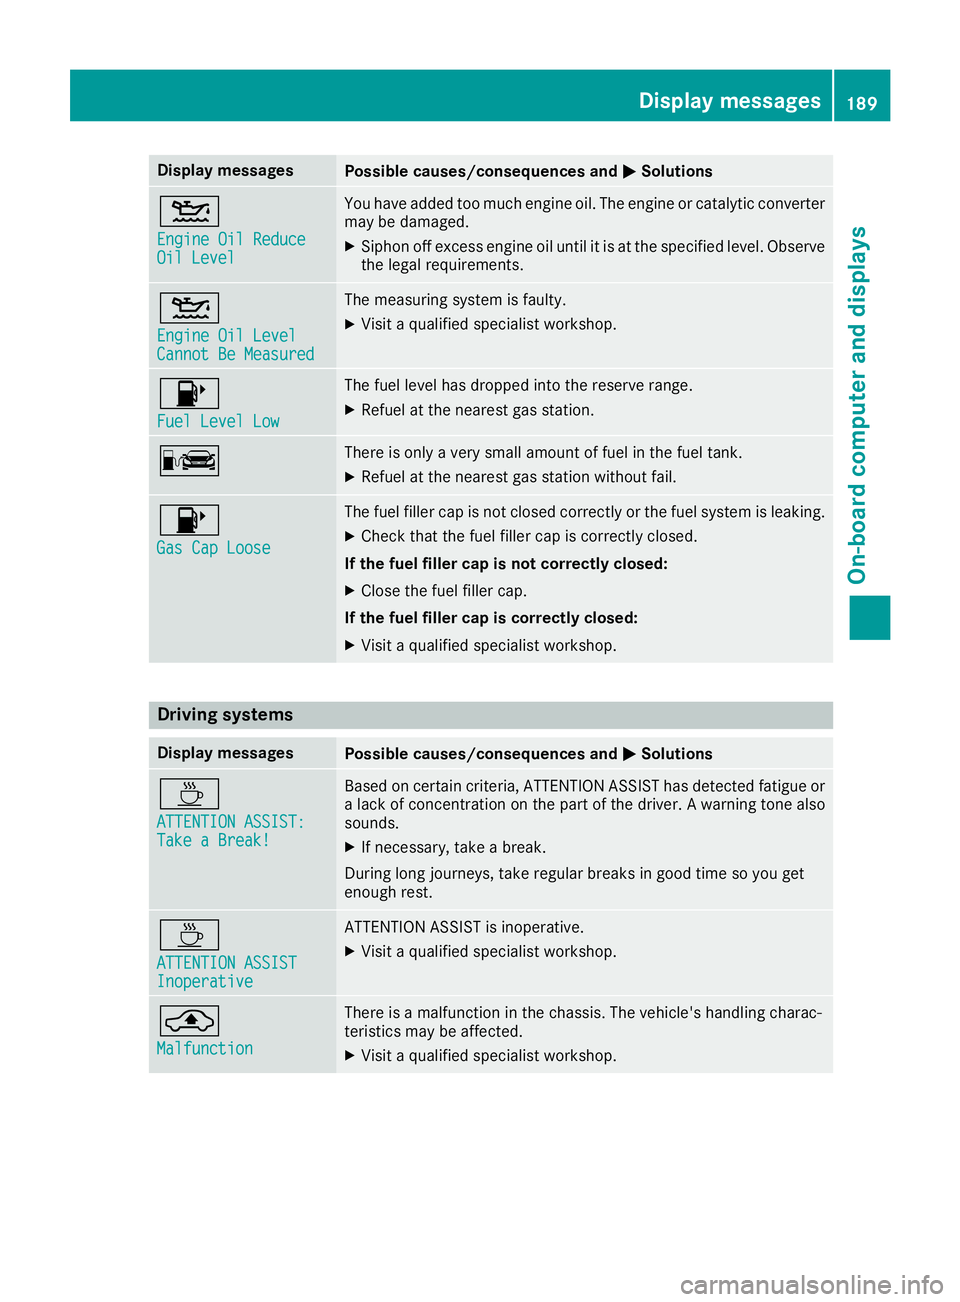
Display messages
Possible causes/consequences and
0050
0050Solutions 00B2
Engine Oil Reduce Engine Oil Reduce
Oil Level Oil Level You have added too much engine oil. The engine or catalytic converter
may be damaged.
X Siphon off excess engine oil until it is at the specified level. Observe
the legal requirements. 00B2
Engine Oil Level Engine Oil Level
Cannot Be Measured Cannot Be Measured The measuring system is faulty.
X
Visit a qualified specialist workshop. 00B6
Fuel Level Low Fuel Level Low The fuel level has dropped into the reserve range.
X Refuel at the nearest gas station. 00A8 There is only a very small amount of fuel in the fuel tank.
X Refuel at the nearest gas station without fail. 00B6
Gas Cap Loose Gas Cap Loose The fuel filler cap is not closed correctly or the fuel system is leaking.
X Check that the fuel filler cap is correctly closed.
If the fuel filler cap is not correctly closed:
X Close the fuel filler cap.
If the fuel filler cap is correctly closed:
X Visit a qualified specialist workshop. Driving systems
Display messages
Possible causes/consequences and
0050 0050Solutions 00AD
ATTENTION ASSIST: ATTENTION ASSIST:
Take a Break! Take a Break! Based on certain criteria, ATTENTION ASSIST has detected fatigue or
a lack of concentration on the part of the driver. A warning tone also
sounds.
X If necessary, take a break.
During long journeys, take regular breaks in good time so you get
enough rest. 00AD
ATTENTION ASSIST ATTENTION ASSIST
Inoperative Inoperative ATTENTION ASSIST is inoperative.
X Visit a qualified specialist workshop. 00AB
Malfunction Malfunction There is a malfunction in the chassis. The vehicle's handling charac-
teristics may be affected.
X Visit a qualified specialist workshop. Display
messages
189On-board computer and displays Z
Page 206 of 298
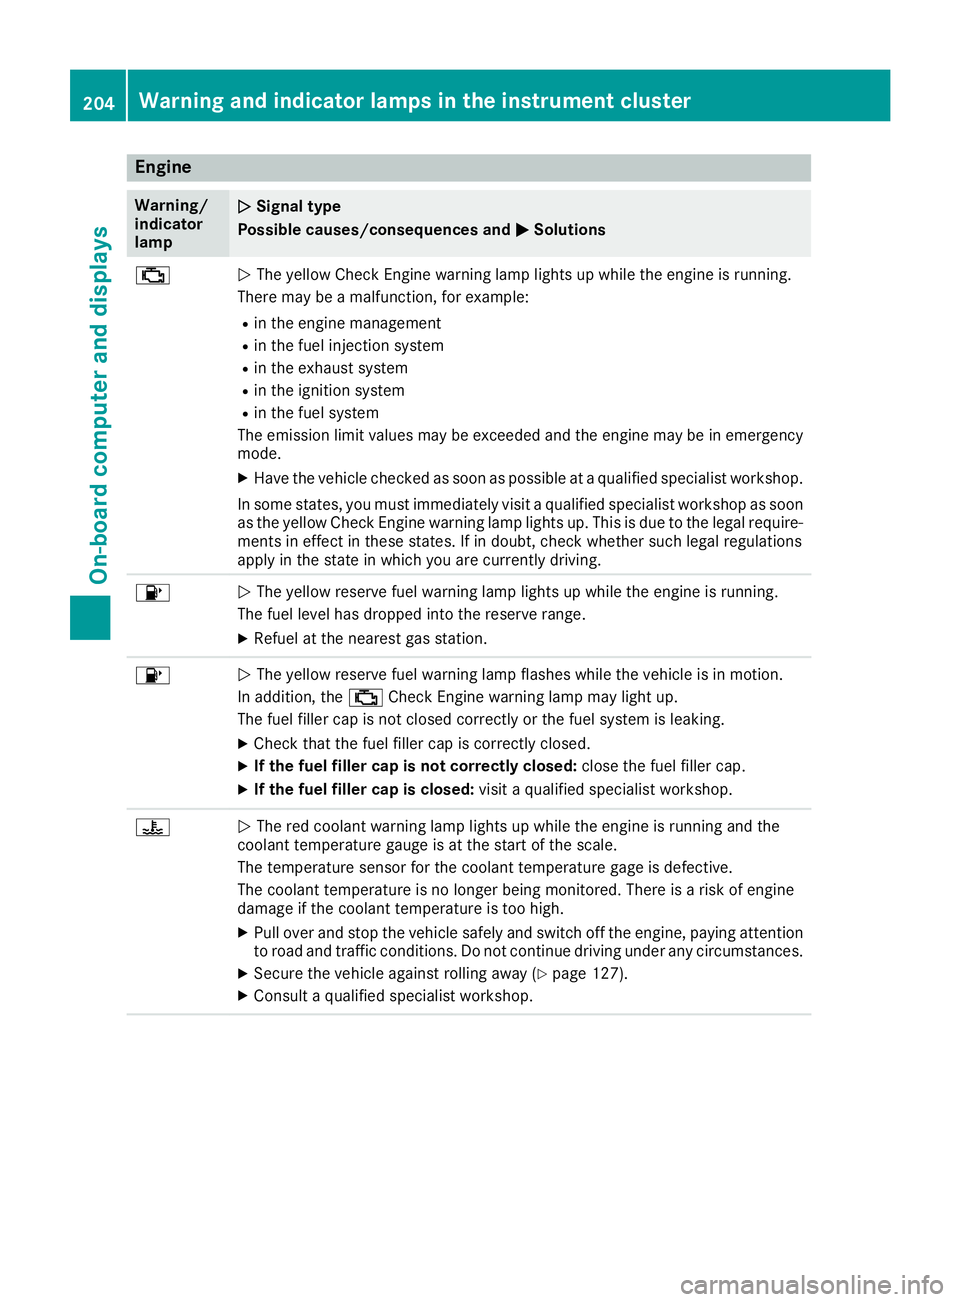
Engine
Warning/
indicator
lamp
0051 0051
Signal type
Possible causes/consequences and 0050
0050Solutions 00B9
0051
The yellow Check Engine warning lamp lights up while the engine is running.
There may be a malfunction, for example:
R in the engine management
R in the fuel injection system
R in the exhaust system
R in the ignition system
R in the fuel system
The emission limit values may be exceeded and the engine may be in emergency
mode.
X Have the vehicle checked as soon as possible at a qualified specialist workshop.
In some states, you must immediately visit a qualified specialist workshop as soon as the yellow Check Engine warning lamp lights up. This is due to the legal require-ments in effect in these states. If in doubt, check whether such legal regulations
apply in the state in which you are currently driving. 00B6
0051
The yellow reserve fuel warning lamp lights up while the engine is running.
The fuel level has dropped into the reserve range.
X Refuel at the nearest gas station. 00B6
0051
The yellow reserve fuel warning lamp flashes while the vehicle is in motion.
In addition, the 00B9Check Engine warning lamp may light up.
The fuel filler cap is not closed correctly or the fuel system is leaking.
X Check that the fuel filler cap is correctly closed.
X If the fuel filler cap is not correctly closed: close the fuel filler cap.
X If the fuel filler cap is closed: visit a qualified specialist workshop.00AC
0051
The red coolant warning lamp lights up while the engine is running and the
coolant temperature gauge is at the start of the scale.
The temperature sensor for the coolant temperature gage is defective.
The coolant temperature is no longer being monitored. There is a risk of engine
damage if the coolant temperature is too high.
X Pull over and stop the vehicle safely and switch off the engine, paying attention
to road and traffic conditions. Do not continue driving under any circumstances.
X Secure the vehicle against rolling away (Y page 127).
X Consult a qualified specialist workshop. 204
Warning and indicator lamps in the instrument clusterOn-board computer and displays
Page 255 of 298
Tire pressure not reached
If a pressure of 180 kPa (1.8 bar/26 psi) has not
been attained after five minutes:
X Switch off the tire inflation compressor.
X Unscrew the filler hose from the valve of the
faulty tire.
Tire sealant may escape when the filler hose is
unscrewed.
X Very slowly drive forwards or reverse approx-
imately 30 ft (10 m).
X Pump up the tire again.
After a maximum of ten minutes, the tire pres- sure must be at least 180 kPa (1.8 ba r/
26 psi). G
WA
RNING
If the required tire pressure is not reached
after the specified time, the tire is too badly
damaged. The tire sealant cannot repair the
tire in this instance. Damaged tires and a tire pressure that is too low can significantly
impair the vehicle's braking and driving char-
acteristics. There is a risk of accident.
Do not continue driving. Contact a qualified
specialist workshop.
Tire pressure reached G
WARNING
A tire temporarily sealed with tire sealant
impairs the driving characteristics and is not
suitable for higher speeds. There is a risk of
accident.
You should therefore adapt your driving style
accordingly and drive carefully. Do not exceed the specified maximum speed with a tire that
has been repaired using tire sealant.
The maximum permissible speed for a tire
sealed with tire sealant is 50 mph (80 km/h).
The upper part of the TIREFIT sticker must be
affixed to the instrument cluster in the driver's
field of vision.
! Residue from the tire sealant may come out
of the filler hose after use. This could cause
stains.
Therefore, place the filler hose in the plastic
bag which contained the TIREFIT kit. H
Environmental note
Have the used tire sealant bottle disposed of
professionally, e.g. at a qualified specialist
workshop.
If a tire pressure of 180 kPa (1.8 ba r/26 psi) has
been attained after five minutes:
X Switch off the tire inflation compressor.
X Unscrew the filler hose from the valve of the
faulty tire.
Tire sealant may escape when the filler hose is unscrewed.
X Stow the tire sealant bottle and the tire infla-
tion compressor.
X Pull away immediately.
X Stop after driving for approximately ten
minutes and check the tire pressure with the
tire inflation compressor.
The tire pressure must now be at least
130 kPa (1.3 bar/19 psi). G
WARNING
If the required tire pressure is not reached
after driving for a short period, the tire is too
badly damaged. The tire sealant cannot repair the tire in this instance. Damaged tires and a
tire pressure that is too low can significantly
impair the vehicle's braking and driving char-
acteristics. There is a risk of accident.
Do not continue driving. Contact a qualified
specialist workshop.
i In cases such as the one mentioned above,
contact an authorized Mercedes-Benz Cen-
ter. Or call 1-800-FOR-MERCedes (in the
USA) or 1-800-387-0100 (in Canada).
X Correct the tire pressure if it is still at least
130 kPa (1.3 bar/19 psi). See the Tire and
Loading Information placard on the driver's
side B-pillar or the tire pressure table in the
fuel filler flap for values.
X To increase the tire pressure: switch on the
tire inflation compressor. Flat tire
253Breakdown assistance Z