2019 MERCEDES-BENZ AMG GT ROADSTER oil level
[x] Cancel search: oil levelPage 12 of 298
Electronic Traction System
see ETS (Electronic Traction System)
Emergency
Automatic measures after an acci-
dent ................................................ .55
Emergency braking
see BAS (Brake Assist System)
Emergency release
Driver's door .................................... 73
Trunk .............................................. .76
Vehicle .............................................73
Emergency Tensioning Devices
Activation ........................................ .52
Emissions control
Service and warranty information .... 25
Engine
Check Engine warning lamp .......... .204
Display message ............................ 187
ECO start/stop function ................ 113
Engine number ............................... 288
Irregular running ............................ 115
Jump-starting ................................. 256
Starting problems .......................... 115
Starting the engine with the
SmartKey ....................................... 112
Starting with the Start/Stop but-
ton ................................................. 112
Switching off .................................. 128
Tow-starting (vehicle) ..................... 261
Engine electronics
Notes ............................................. 287
Problem (malfunction) ................... 115
Engine oil
Adding .......................................... .238
Additives ........................................ 291
Checking the oil level ..................... 236
Checking the oil level using the
dipstick .......................................... 236
Checking the oil level using the
on-board computer ........................ 237
Display message ............................ 188
Filling capacity ............................... 291
Notes about oil grades ................... 291
Notes on oil level/consumption .... 236
Temperature (on-board com-
puter) ............................................. 170
Engine oil additives
see Additives (engine oil) Entering an address
see also Digital Operator's Man-
ual ................................................. .209
ESC (Electronic Stability Control)
see ESP ®
(Electronic Stability Program)
ESP ®
(Electronic Stability Pro-
gram)
AMG menu (on-board computer) ... 171
Characteristics ................................. 62
Deactivating/activating ................... 62
Deactivating/activating (button
in AMG vehicles) .............................. 63
Display message ............................ 175
Function/notes ................................ 62
General notes .................................. 62
Important safety information ........... 62
Warning lamp ................................. 201
ETS (Electronic Traction System) ....... 62
Exhaust check ................................... 131
Exhaust pipe (cleaning instruc-
tions) ................................................. .247
Exterior lighting
Cleaning ......................................... 246
see Lights
Exterior mirror
Calling up a stored setting (mem-
ory function) ................................... .95
Exterior mirrors
Adjusting ........................................ .92
Dipping (automatic) ........................ .93
Folding in/out (automatically )......... 92
Folding in/out (electrically) ............. 92
Out of position (troubleshooting) ..... 93
Setting ............................................. 92
Storing settings (memory func-
tion) ................................................. 94
Storing the parking position ............. 93 F
Favorites Overview ........................................ 212
Features ............................................. 220
Filler cap
see Refueling
Flat tire
Changing a wheel/mounting the
spare wheel ................................... 281 10
Index
Page 16 of 298
Raising the vehicl
e .........................282
Removing a wheel .......................... 284
Securing the vehicle against roll-
ing away ........................................ 282
MP3
Operation ....................................... 165
see also Digital Operator's Man-
ual ................................................. .209
Multifunction display
Function/notes ............................ .161
Multifunction steering wheel
Operating the on-board computer .. 160
Overview .......................................... 35
Multimedia system
Switching on and off ..................... .210
Music files
see also Digital Operator's Man-
ual ................................................. .209 N
Navigation Displaying (on-board computer) ..... 163
Menu (on-board computer) ............ 163
see also Digital Operator's Man-
ual ................................................. .209
Neck-level heating/head-level
heating
see AIRSCARF
Notes on breaking-in a new vehi-
cle ....................................................... 109 O
Occupant Classification System
(OCS) Conditions ....................................... 48
Faults ............................................... 51
Operation ......................................... 48
System self-test ............................... 50
Occupant safety
Air bags .......................................... .45
Automatic measures after an acci-
dent ................................................. 55
Belt warning .................................... .44
Children in the vehicle .................... .55
Important safety notes .................... 40
Introduction to the restraint sys-
tem .................................................. 40 Occupant Classification System
(OCS) ............................................... 48
PASSENGER AIR BAG indicator
lamps ............................................... 41
Pets in the vehicle ........................... 58
PRE-SAFE ®
(anticipatory occu-
pant protection) ............................... 54
Restraint system warning lamp ........ 41
Seat belt .......................................... 41
Odometer ........................................... 161
Oil
see Engine oil
On-board computer
Active Distance Assist
DISTRONIC .................................... 142
AMG menu .....................................1 70
Assistance graphic menu .............. .167
Assistance menu ........................... 168
Display messages .......................... 173
Displaying a service message ....... .241
Factory settings ............................ .170
G-Mete r......................................... 171
Important safety notes .................. 159
Instrument cluster menu ............... 169
Lights menu ................................... 169
Media menu ................................... 165
Menu overview .............................. 161
Message memory .......................... 174
Navigation menu ............................ 163
Operation ....................................... 160
RACETIMER ................................... 172
Radio menu ................................... 164
Service menu ................................. 168
Settings menu ............................... 168
Standard display ............................ 161
Telephone menu ............................ 166
Trip menu ...................................... 161
Video DVD operation ..................... 166
On-board diagnostic interface
see Diagnostics connection
Operating safety
Declaration of conformity ................ 27
Important safety notes .................... 26
Operating system
see On-board computer
Operation
Digital Operator's Manual ................ 23 14
Index
Page 170 of 298
R
Active Distance Assist DISTRONIC
(Y page 136)
R Distance warning function of Active Brake
Assist (Y page 59)
R Blind Spot Assist (Y page 155)
R ATTENTION ASSIST (Y page 154)
R Lane Keeping Assist (Y page 157)
X Press 0064to display the ATTENTION ASSIST
assessment. Service menu
Depending on the equipment installed in the
vehicle, you have the following options in the
Service
Service menu:
R calling up display messages in message mem-
ory (Y page 174)
R checking the tire pressure electronically
(Y page 270).
R calling up the service due date (Y page 241).
R checking the engine oil level using the on-
board computer (Y page 237).Settings menu
Introduction Depending on the equipment installed in the
vehicle, you have the following options in the
Settings Settings menu:
R changing assistance settings (Y page 168).
R changing the light settings (Y page 169).
R changing the instrument cluster settings
(Y page 169).
R restoring the factory settings (Y page 170).
Assistance submenu Activating/deactivating Active Brake
Assist
X Press 00E2on the steering wheel to open the
menu list.
X Press 0064or0063 on the steering wheel to
select the Settings
Settings menu.
X Confirm by pressing 0076on the steering
wheel.
X Press 0064or0063 to select the DriveAs‐ DriveAs‐
sist
sist submenu. X
Press 0076to confirm.
X Press 0063or0064 to select Brake BrakeAssist Assist.
X Press 0076to confirm.
The current selection appears.
X To activate/deactivate: press the0076but-
ton again.
When Active Brake Assist is deactivated, the
00D4 symbol appears in the Assistance Assistance
Graphic
Graphic menu of the multifunction display.
Further information on Active Brake Assist
(Y page 59).
Activating/deactivating Blind Spot Assist
X Press 00E2on the steering wheel to open the
menu list.
X Press 0064or0063 on the steering wheel to
select the Settings
Settings menu.
X Confirm by pressing 0076on the steering
wheel.
X Press 0064or0063 to select the DriveAs‐
DriveAs‐
sist
sist submenu.
X Press 0076to confirm.
X Press 0064or0063 to select Blind Spot
Blind Spot
Assist
Assist .
X Press 0076to confirm.
The current selection appears.
X To activate/deactivate: press the0076but-
ton again.
When Blind Spot Assist is activated, gray
radar waves propagating backwards appear
next to the vehicle in the Assistance
Assistance
Graphic Graphic menu in the multifunction display.
For further information about Blind Spot Assist,
see (Y page 155).
Setting ATTENTION ASSIST X Press 00E2on the steering wheel to open the
menu list.
X Press 0064or0063 on the steering wheel to
select the Settings
Settings menu.
X Confirm by pressing 0076on the steering
wheel.
X Press 0064or0063 to select the DriveAs‐
DriveAs‐
sist
sist submenu.
X Press 0076to confirm.
X Select Attention Assist
Attention Assist with0064 or
0063.
X Press 0076to confirm. 168
Menus and submenusOn-board computer and displays
Page 190 of 298
Display messages
Possible causes/consequences and
0050
0050Solutions 003D
See Operator's Man‐ See Operator's Man‐
ual ual The battery is not being charged.
A warning tone also sounds.
Possible causes are:
R a defective alternator
R a torn poly-V-belt
R a malfunction in the electronics
! Do not drive any further. Otherwise the engine may overheat.
X Pull over and stop the vehicle safely and switch off the engine, pay-
ing attention to road and traffic conditions.
X Secure the vehicle against rolling away (Y page 127).
X Consult a qualified specialist workshop. 003D
Stop Vehicle See Stop Vehicle See
Operator's Manual Operator's Manual The battery is no longer being charged and the condition of charge is
too low.
A warning tone also sounds.
X Pull over and stop the vehicle safely and switch off the engine, pay-
ing attention to road and traffic conditions.
X Secure the vehicle against rolling away (Y page 127).
X Observe the instructions in the 003DSee Operator's Manual
See Operator's Manual
display message.
X Consult a qualified specialist workshop. 003D
Start Engine See Start Engine See
Operator's Manual Operator's Manual The engine is off and the battery condition of charge is too low.
X
Switch off electrical consumers that you do not need, such as the
rear window defroster and interior lighting.
X Leave the engine running for a few minutes or drive a long distance.
The battery is being charged. 00B2
Check Engine Oil Check Engine Oil
Level (Add 1 quart) Level (Add 1 quart) The engine oil level has dropped to the minimum level.
! Avoid longer journeys when there is insufficient engine oil. You
could otherwise damage the engine.
X Check the oil level when next refueling, at the latest (Y page 236).
X If necessary, add engine oil (Y page 238).
X Have the engine checked at a qualified specialist workshop if engine
oil needs to be added more often than usual.
Information on approved engine oils can be obtained from a qualified
specialist workshop or on the Internet at http://bevo.mercedes-
benz.co m. 00B2
Engine Oil Level Engine Oil Level
Low Stop Vehicle Low Stop Vehicle
Turn Engine Off Turn Engine Off The engine oil level is too low. There is a risk of engine damage.
X Pull over and stop the vehicle safely and switch off the engine, pay-
ing attention to road and traffic conditions.
X Secure the vehicle against rolling away (Y page 127).
X Check the engine oil level (Y page 236).
X If necessary, add engine oil (Y page 238).188
Display messagesOn-board computer and displays
Page 191 of 298
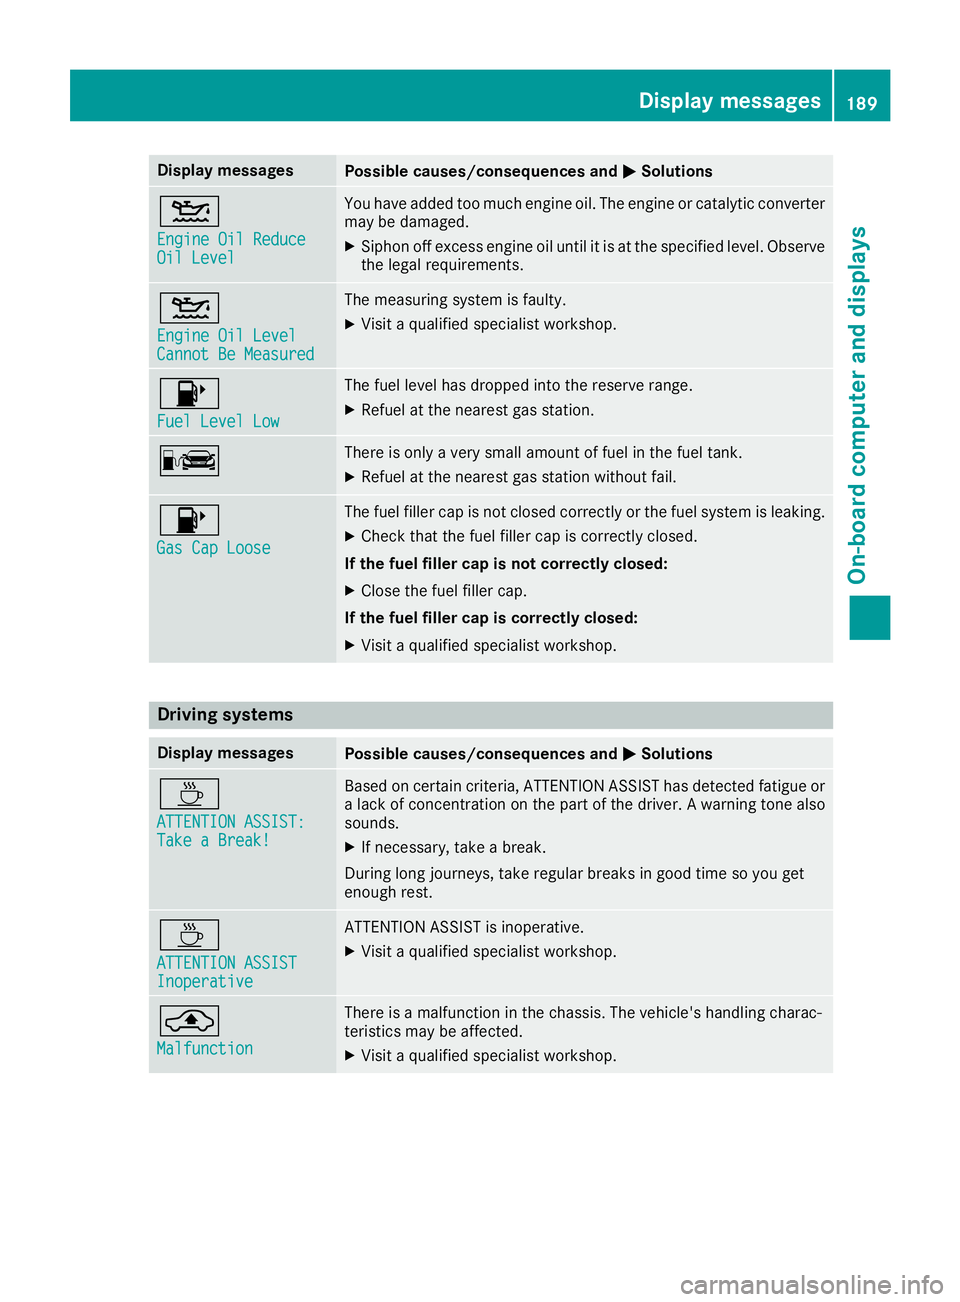
Display messages
Possible causes/consequences and
0050
0050Solutions 00B2
Engine Oil Reduce Engine Oil Reduce
Oil Level Oil Level You have added too much engine oil. The engine or catalytic converter
may be damaged.
X Siphon off excess engine oil until it is at the specified level. Observe
the legal requirements. 00B2
Engine Oil Level Engine Oil Level
Cannot Be Measured Cannot Be Measured The measuring system is faulty.
X
Visit a qualified specialist workshop. 00B6
Fuel Level Low Fuel Level Low The fuel level has dropped into the reserve range.
X Refuel at the nearest gas station. 00A8 There is only a very small amount of fuel in the fuel tank.
X Refuel at the nearest gas station without fail. 00B6
Gas Cap Loose Gas Cap Loose The fuel filler cap is not closed correctly or the fuel system is leaking.
X Check that the fuel filler cap is correctly closed.
If the fuel filler cap is not correctly closed:
X Close the fuel filler cap.
If the fuel filler cap is correctly closed:
X Visit a qualified specialist workshop. Driving systems
Display messages
Possible causes/consequences and
0050 0050Solutions 00AD
ATTENTION ASSIST: ATTENTION ASSIST:
Take a Break! Take a Break! Based on certain criteria, ATTENTION ASSIST has detected fatigue or
a lack of concentration on the part of the driver. A warning tone also
sounds.
X If necessary, take a break.
During long journeys, take regular breaks in good time so you get
enough rest. 00AD
ATTENTION ASSIST ATTENTION ASSIST
Inoperative Inoperative ATTENTION ASSIST is inoperative.
X Visit a qualified specialist workshop. 00AB
Malfunction Malfunction There is a malfunction in the chassis. The vehicle's handling charac-
teristics may be affected.
X Visit a qualified specialist workshop. Display
messages
189On-board computer and displays Z
Page 199 of 298
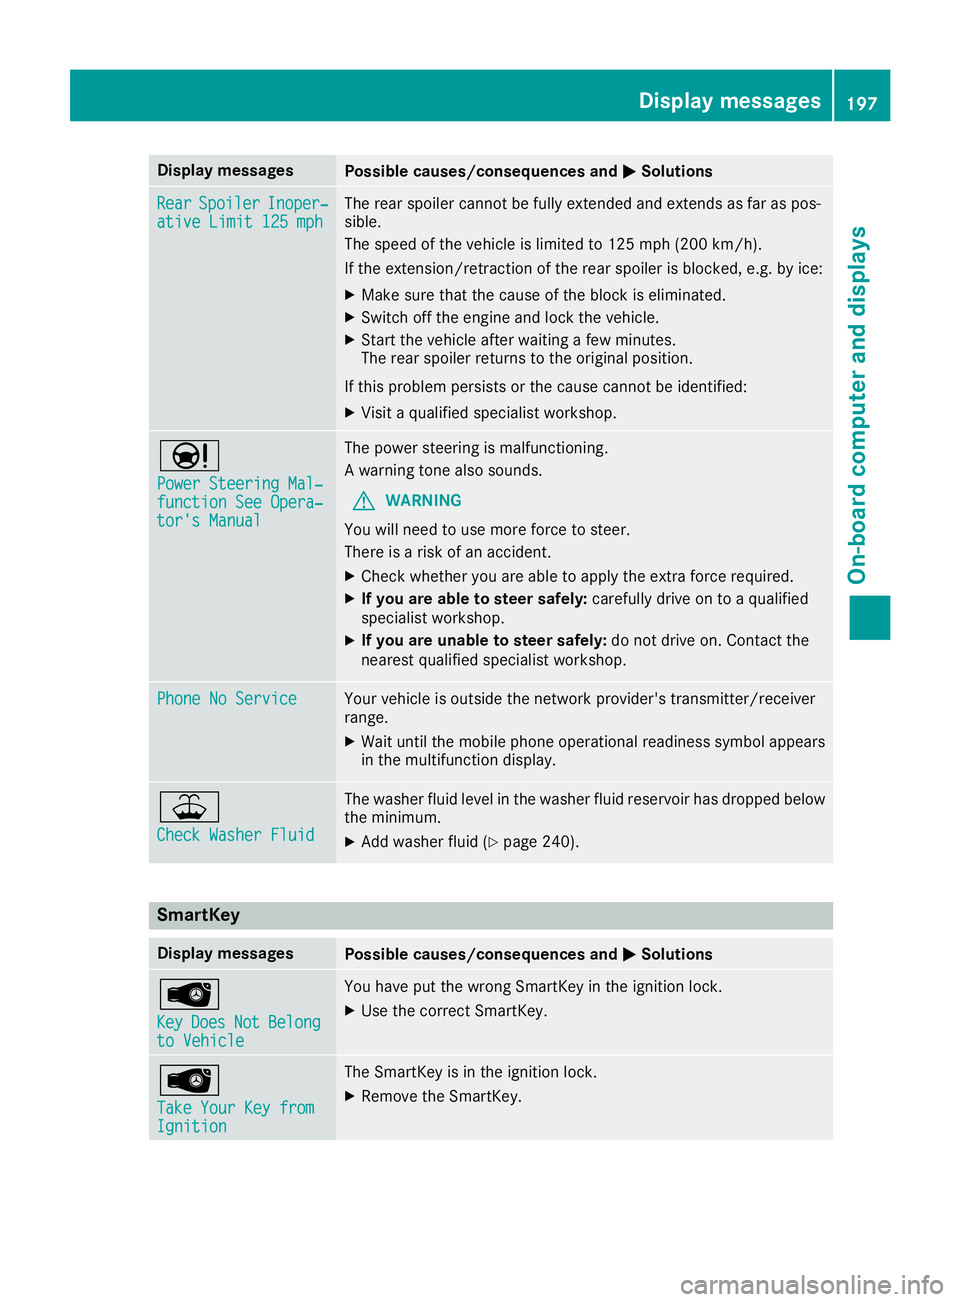
Display messages
Possible causes/consequences and
0050
0050Solutions Rear
Rear
Spoiler
Spoiler Inoper‐
Inoper‐
ative Limit 125 mph
ative Limit 125 mph The rear spoiler cannot be fully extended and extends as far as pos-
sible.
The speed of the vehicle is limited to 125 mph (200 km/h ).
If the extension/retraction of the rear spoiler is blocked, e.g. by ice:
X Make sure that the cause of the block is eliminated.
X Switch off the engine and lock the vehicle.
X Start the vehicle after waiting a few minutes.
The rear spoiler returns to the original position.
If this problem persists or the cause cannot be identified: X Visit a qualified specialist workshop. 00CC
Power Steering Mal‐ Power Steering Mal‐
function See Opera‐ function See Opera‐
tor's Manual tor's Manual The power steering is malfunctioning.
A warning tone also sounds.
G WARNING
You will need to use more force to steer.
There is a risk of an accident.
X Check whether you are able to apply the extra force required.
X If you are able to steer safely: carefully drive on to a qualified
specialist workshop.
X If you are unable to steer safely: do not drive on. Contact the
nearest qualified specialist workshop. Phone No Service Phone No Service Your vehicle is outside the network provider's transmitter/receiver
range.
X Wait until the mobile phone operational readiness symbol appears
in the multifunction display. 00B2
Check Washer Fluid Check Washer Fluid The washer fluid level in the washer fluid reservoir has dropped below
the minimum.
X Add washer fluid (Y page 240). SmartKey
Display messages
Possible causes/consequences and
0050
0050Solutions 00AF
Key Key
Does
Does Not
NotBelong
Belong
to Vehicle
to Vehicle You have put the wrong SmartKey in the ignition lock.
X Use the correct SmartKey. 00AF
Take Your Key from Take Your Key from
Ignition Ignition The SmartKey is in the ignition lock.
X Remove the SmartKey. Display messages
197On-board computer and displays Z
Page 238 of 298
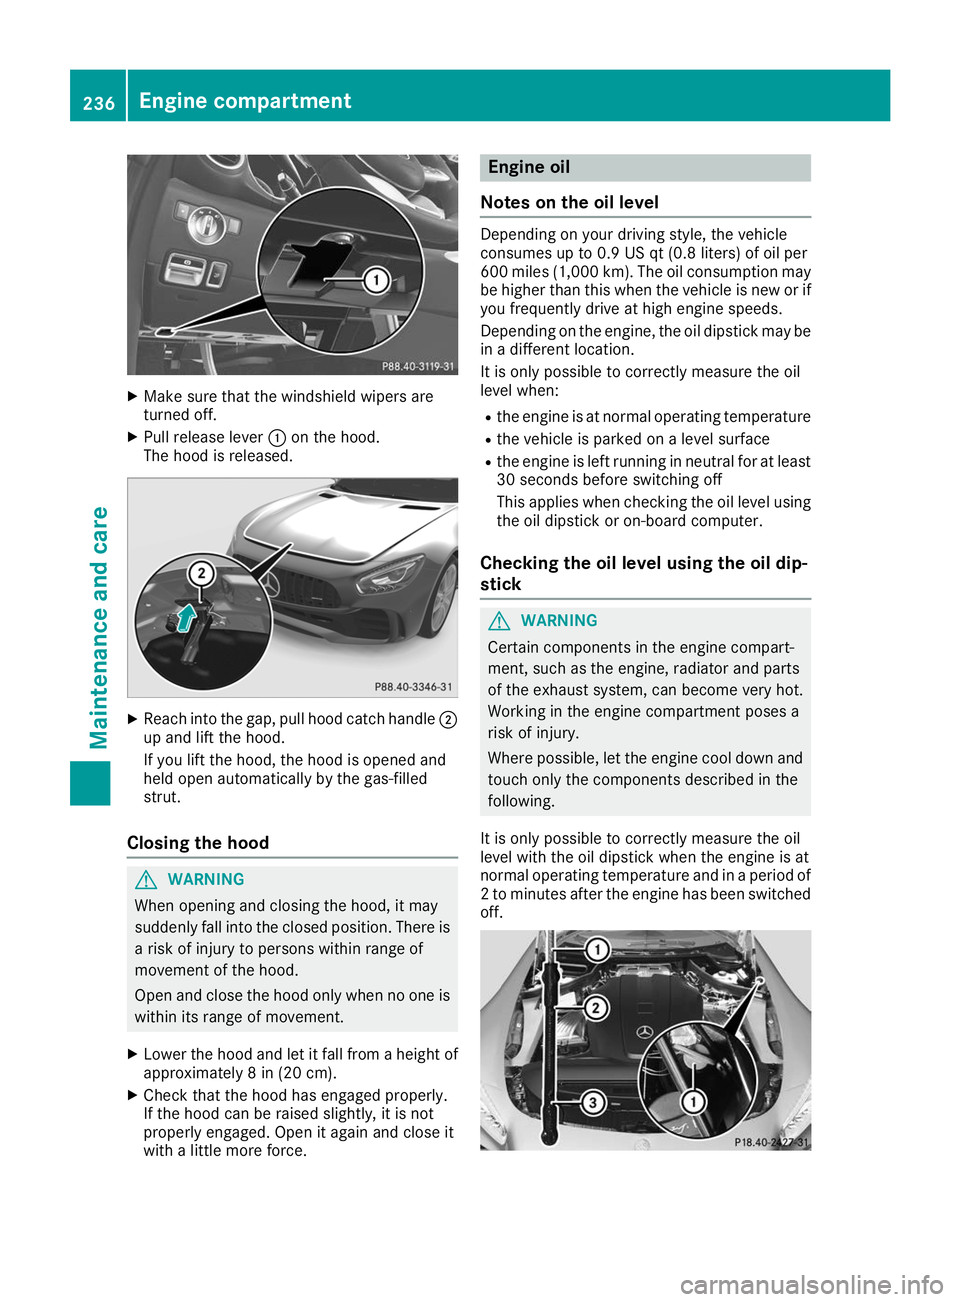
X
Make sure that the windshield wipers are
turned off.
X Pull release lever 0043on the hood.
The hood is released. X
Reach into the gap, pull hood catch handle 0044
up and lift the hood.
If you lift the hood, the hood is opened and
held open automatically by the gas-filled
strut.
Closing the hood G
WARNING
When opening and closing the hood, it may
suddenly fall into the closed position. There is a risk of injury to persons within range of
movement of the hood.
Open and close the hood only when no one is
within its range of movement.
X Lower the hood and let it fall from a height of
approximately 8 in (20 cm).
X Check that the hood has engaged properly.
If the hood can be raised slightly, it is not
properly engaged. Open it again and close it
with a little more force. Engine oil
Notes on the oil level Depending on your driving style, the vehicle
consumes up to 0.9 US qt (0.8 liters) of oil per
600 miles (1,000 km). The oil consumption may
be higher than this when the vehicle is new or if
you frequently drive at high engine speeds.
Depending on the engine, the oil dipstick may be in a different location.
It is only possible to correctly measure the oil
level when:
R the engine is at normal operating temperature
R the vehicle is parked on a level surface
R the engine is left running in neutral for at least
30 seconds before switching off
This applies when checking the oil level using
the oil dipstick or on-board computer.
Checking the oil level using the oil dip-
stick G
WARNING
Certain components in the engine compart-
ment, such as the engine, radiator and parts
of the exhaust system, can become very hot.
Working in the engine compartment poses a
risk of injury.
Where possible, let the engine cool down and touch only the components described in the
following.
It is only possible to correctly measure the oil
level with the oil dipstick when the engine is at
normal operating temperature and in a period of 2 to minutes after the engine has been switchedoff. 236
Engine compartmentMaintenance and care
Page 239 of 298
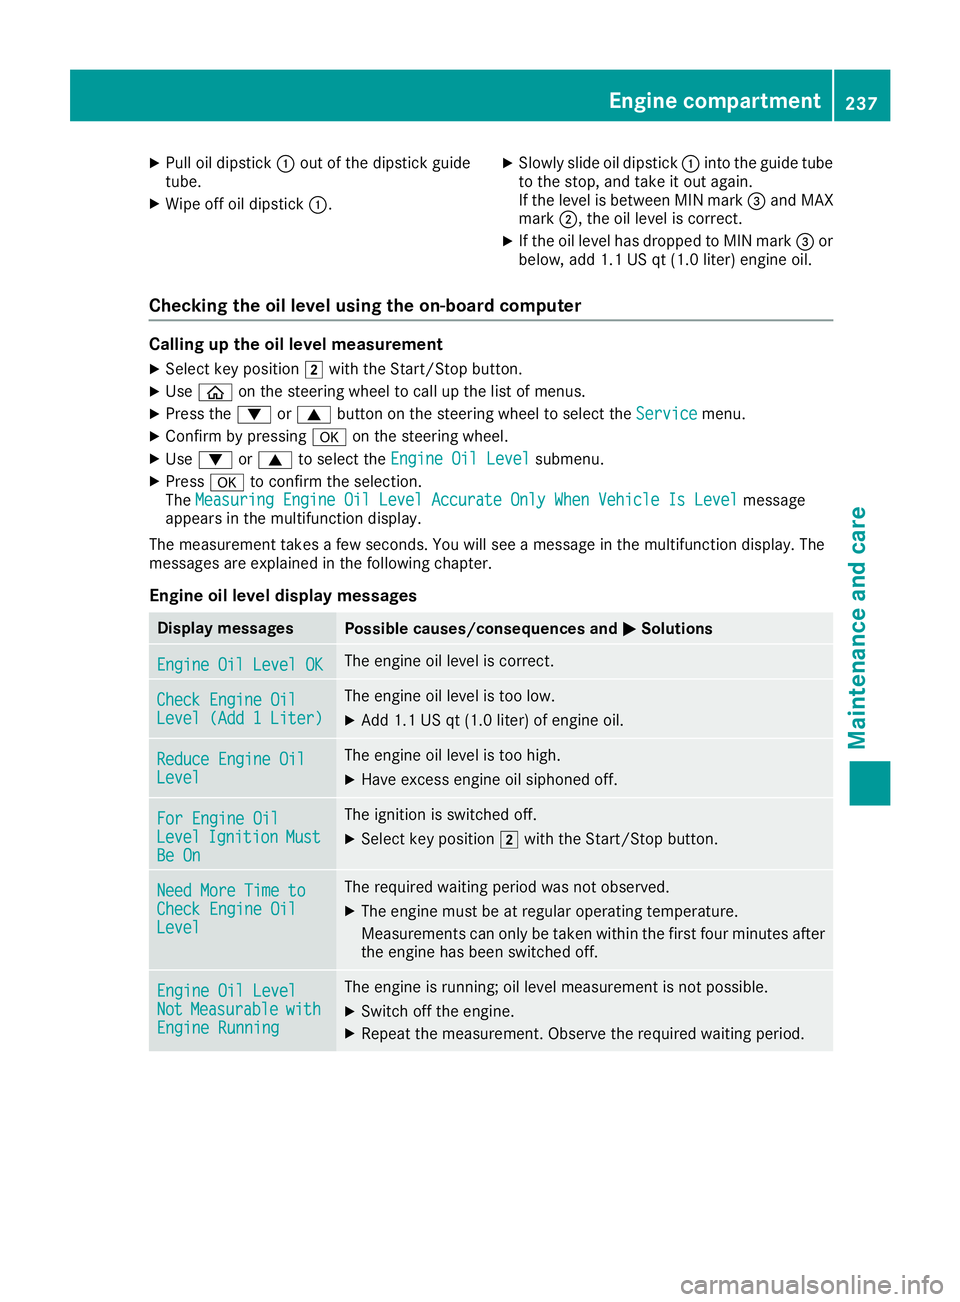
X
Pull oil dipstick 0043out of the dipstick guide
tube.
X Wipe off oil dipstick 0043. X
Slowly slide oil dipstick 0043into the guide tube
to the stop, and take it out again.
If the level is between MIN mark 0087and MAX
mark 0044, the oil level is correct.
X If the oil level has dropped to MIN mark 0087or
below, add 1.1 US qt (1.0 liter) engine oil.
Checking the oil level using the on-board computer Calling up the oil level measurement
X Select key position 0048with the Start/Stop button.
X Use 00E2 on the steering wheel to call up the list of menus.
X Press the 0064or0063 button on the steering wheel to select the Service
Service menu.
X Confirm by pressing 0076on the steering wheel.
X Use 0064 or0063 to select the Engine Oil Level
Engine Oil Level submenu.
X Press 0076to confirm the selection.
The Measuring Engine Oil Level Accurate Only When Vehicle Is Level
Measuring Engine Oil Level Accurate Only When Vehicle Is Level message
appears in the multifunction display.
The measurement takes a few seconds. You will see a message in the multifunction display. The
messages are explained in the following chapter.
Engine oil level display messages Display messages
Possible causes/consequences and
0050 0050Solutions Engine Oil Level OK
Engine Oil Level OK The engine oil level is correct.
Check Engine Oil
Check Engine Oil
Level (Add 1 Liter) Level (Add 1 Liter) The engine oil level is too low.
X Add 1.1 US qt (1.0 liter) of engine oil. Reduce Engine Oil
Reduce Engine Oil
Level Level The engine oil level is too high.
X Have excess engine oil siphoned off. For Engine Oil
For Engine Oil
Level Level
Ignition
Ignition Must
Must
Be On
Be On The ignition is switched off.
X Select key position 0048with the Start/Stop button. Need More Time to
Need More Time to
Check Engine Oil Check Engine Oil
Level Level The required waiting period was not observed.
X The engine must be at regular operating temperature.
Measurements can only be taken within the first four minutes after
the engine has been switched off. Engine Oil Level
Engine Oil Level
Not Not
Measurable
Measurable with
with
Engine Running
Engine Running The engine is running; oil level measurement is not possible.
X Switch off the engine.
X Repeat the measurement. Observe the required waiting period. Engine compartment
237Maintenance and care Z