2019 MERCEDES-BENZ AMG GT ROADSTER wiper blades
[x] Cancel search: wiper bladesPage 9 of 298
Seat belt ........................................ 248
Seat cove
r..................................... 248
Sensors ......................................... 246
Soft top .......................................... 245
Steering wheel ............................... 247
Trim pieces .................................... 247
Washing by hand ........................... 243
Wheels ........................................... 245
Windows ........................................ 245
Wiper blades .................................. 246
CD
see also Digital Operator's Man-
ual .................................................. 209
CD player (on-board computer) ........ 165
Center console
Overview .......................................... 36
Central control panel
Overview .......................................... 38
Central locking
Locking/unlocking (SmartKey )........ 66
Changing the media source ............. 165
Charge retention
Socket ........................................... 130
Charge-air pressure (on-board
computer) .......................................... 170
Child
Restraint system .............................. 56
Child seat
Forward-facing restraint system ...... 57
On the front-passenger sea t............ 57
Rearward-facing restraint system .... 57
Children
Special seat belt retractor ............... 56
Children in the vehicle
Important safety notes .................... 55
Cigarette lighter ................................ 222
Cleaning
Mirror turn signal ........................... 246
Climate control
Air-recirculation mode ................... 107
Automatic climate control (dual-
zone) .............................................. 103
Controlling automaticall y............... 105
Cooling with air dehumidification .. 104
Cooling with air dehumidification
(multimedia system) ...................... 213
Defrosting the windows ................. 106
Defrosting the windshield .............. 106 ECO start/stop function (3-zone
automatic climate control) ............. 104
General notes ................................ 103
Indicator lamp ................................ 105
Information about using auto-
matic climate control ..................... 104
Overview ........................................ 213
Overview of systems ...................... 103
Problem with the rear window
defroster ........................................ 107
Problems with cooling with air
dehumidification ............................ 105
Refrigerant ..................................... 293
Refrigerant filling capacity ............. 293
Setting the air distribution ............. 105
Setting the air vents ...................... 107
Setting the airflow ......................... 106
Setting the climate mode (multi-
media system) ............................... 213
Setting the temperature ................ 105
Switching air-recirculation mode
on/of f............................................ 107
Switching on/of f........................... 104
Switching the rear window
defroster on/of f............................ 106
Switching the synchronization
function on and off ........................ 106
Synchronization function (multi-
media system) ............................... 214
Climate control settings
Multimedia system ........................ 213
Climate control system
Climate control (3-zone automatic
climate control )............................. 104
Cockpit
Overview .......................................... 33
Code for Apps
see QR code
COMAND display
Cleaning ......................................... 247
Combination switch ............................ 97
Connecting a USB device
see also Digital Operator's Man-
ual .................................................. 209
Consumption statistics (on-board
computer) .......................................... 162
Controller ........................................... 210
Convenience closing feature .............. 78 Index
7
Page 24 of 298
Wheel chock
...................................... 282
Wheels
Changing a wheel .......................... 281
Checking ........................................ 264
Cleaning ......................................... 245
Important safety notes .................. 263
Information on driving .................... 263
Interchanging/changing ................ 281
Mounting a new wheel .................. .284
Mounting a wheel .......................... 282
Notes on sport tires ....................... 263
Removing a wheel .......................... 284
Storing .......................................... .282
Tightening torque ........................... 285
Wheel size/tire size ....................... 285
Wind screen ......................................... 82
Window curtain air bag
Display message ............................ 183
Windows
see Side windows
Windshield
Defrosting ...................................... 106
Windshield washer fluid
see Windshield washer system
Windshield washer system
Adding washer fluid ....................... 240
Important safety notes .................. 292
Windshield wipers
Problem (malfunction) ................... 102
Replacing the wiper blades ............ 101
Switching on/off ........................... 100
Winter driving
Slippery road surfaces ................... 134
Snow chains .................................. 265
Winter operation
General notes ................................ 265
Summer tires ................................. 265
Winter tires
M+S tires ....................................... 265
Wiper blades
Cleaning ......................................... 246
Important safety notes .................. 101
Replacing ....................................... 101
Replacing (windshield )................... 101
Workshop
see Qualified specialist workshop 22
Index
Page 102 of 298
Automatic interior lighting control
X
To switch on or off: press the0033button.
When the automatic interior lighting control is
activated, the button is flush with the over-
head control panel.
The interior lighting automatically switches on if you:
R unlock the vehicle
R open a door
R switch off the engine with the Start/Stop but-
ton
The interior lighting is activated for a short time
when the engine is switched off with the Start/ Stop button. This delayed switch-off can be
adjusted via the multimedia system (see Digital
Operator's Manual). Replacing bulbs
The front and rear light clusters of your vehicle
are equipped with LED light bulbs. Do not
replace the bulbs yourself. Contact a qualified
specialist workshop which has the necessary
specialist knowledge and tools to carry out the
work required.
Lamps are an important aspect of vehicle safety.
You must therefore make sure that these func-
tion correctly at all times. Have the headlamp
setting checked regularly. Windshield wipers
Switching the windshield wipers
on/off
! Do not operate the windshield wipers when
the windshield is dry, as this could damage
the wiper blades. Moreover, dust that has col- lected on the windshield can scratch the glass
if wiping takes place when the windshield is
dry.
If it is necessary to switch on the windshield
wipers in dry weather conditions, always use
washer fluid when operating the windshield
wipers.
! If the windshield wipers leave smears on the
windshield after the vehicle has been washed
in an automatic car wash, wax or other resi-
dues may be the reason for this. Clean the windshield using washer fluid after washing
the vehicle in an automatic car wash.
! Intermittent wiping with rain sensor: due to
optical influences and the windshield becom- ing dirty in dry weather conditions, the wind-
shield wipers may be activated inadvertently.
This could then damage the windshield wiper blades or scratch the windshield.
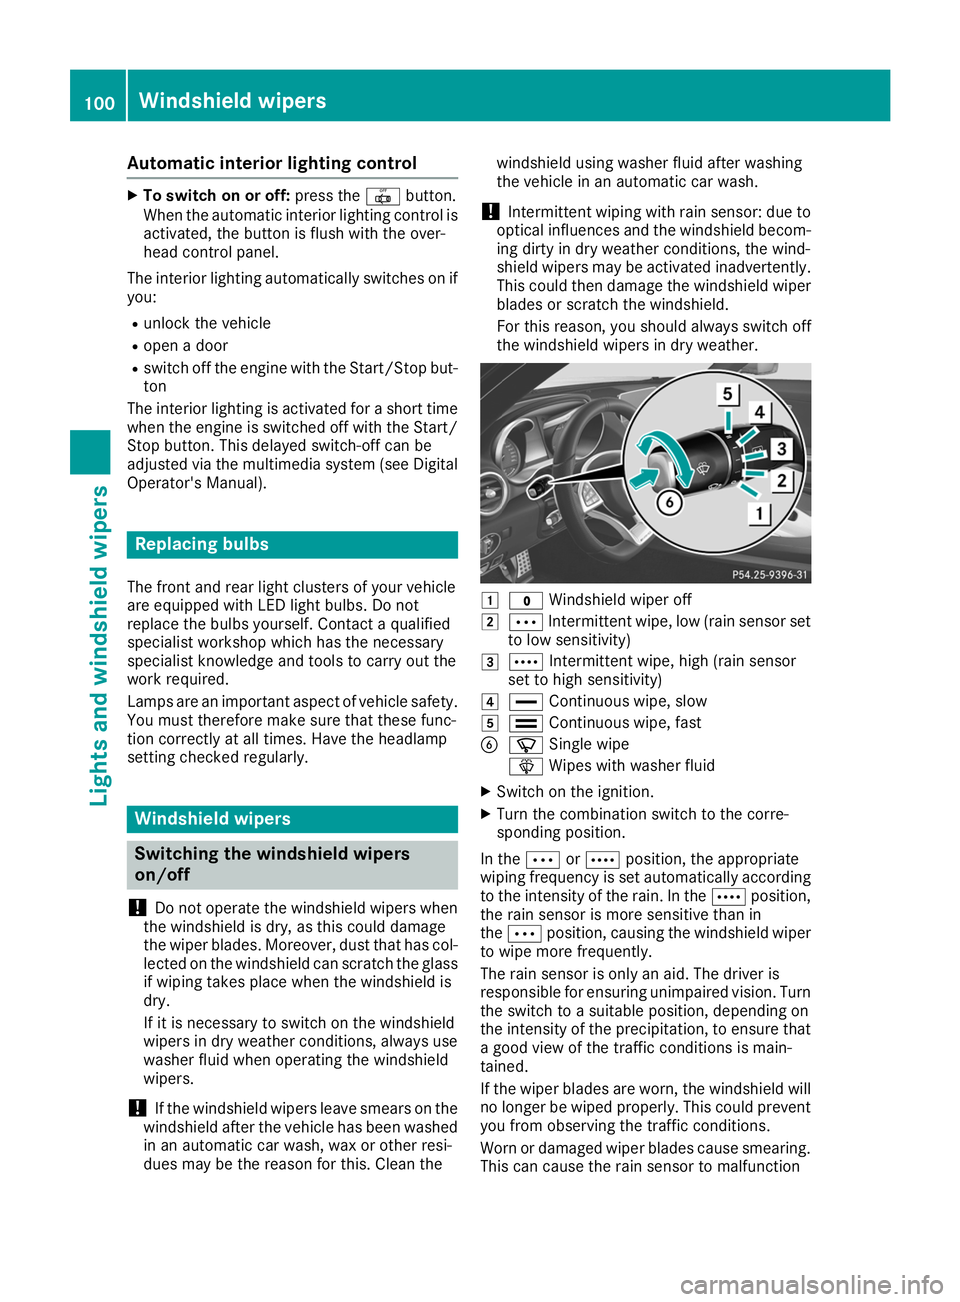
For this reason, you should always switch offthe windshield wipers in dry weather. 0047
003F Windshield wiper off
0048 0062 Intermittent wipe, low (rain sensor set
to low sensitivity)
0049 0063 Intermittent wipe, high (rain sensor
set to high sensitivity)
004A 00AA Continuous wipe, slow
004B 00A9 Continuous wipe, fast
0084 00D3 Single wipe
00D4 Wipes with washer fluid
X Switch on the ignition.
X Turn the combination switch to the corre-
sponding position.
In the 0062or0063 position, the appropriate
wiping frequency is set automatically according
to the intensity of the rain. In the 0063position,
the rain sensor is more sensitive than in
the 0062 position, causing the windshield wiper
to wipe more frequently.
The rain sensor is only an aid. The driver is
responsible for ensuring unimpaired vision. Turn
the switch to a suitable position, depending on
the intensity of the precipitation, to ensure that a good view of the traffic conditions is main-
tained.
If the wiper blades are worn, the windshield willno longer be wiped properly. This could preventyou from observing the traffic conditions.
Worn or damaged wiper blades cause smearing. This can cause the rain sensor to malfunction 100
Windshield wipersLights and windshield wipers
Page 103 of 298
Replacing the wiper blades
Important safety notes G
WARNING
If the windshield wipers begin to move while
you are changing the wiper blades, you could be trapped by the wiper arm. There is a risk of
injury.
Always switch off the windshield wipers and
ignition before changing the wiper blades.
! Never open the hood if a windshield wiper
arm has been folded away from the wind-
shield.
Never fold a windshield wiper arm without a
wiper blade back onto the windshield.
Hold the windshield wiper arm firmly when
you change the wiper blade. If you release the
windshield wiper arm without a wiper blade
and it falls onto the windshield, the windshield may be damaged by the force of the impact.
Mercedes-Benz recommends that you have
the wiper blades changed at a qualified spe-
cialist workshop.
! To avoid damaging the wiper blades, make
sure that you touch only the wiper arm of the
wiper.
Replacing the wiper blades Adjusting the wiper blades so that they
are vertical
X Switch off the engine.
X Remove your foot from the brake pedal. X
Set the windshield wiper to the 00AAposition.
X Press the Start/Stop button repeatedly until
the windshield wiper starts.
X When the wiper arms are in a vertical position
to the hood, press the Start/Stop button.
X Fold the wiper arm away from the windshield.
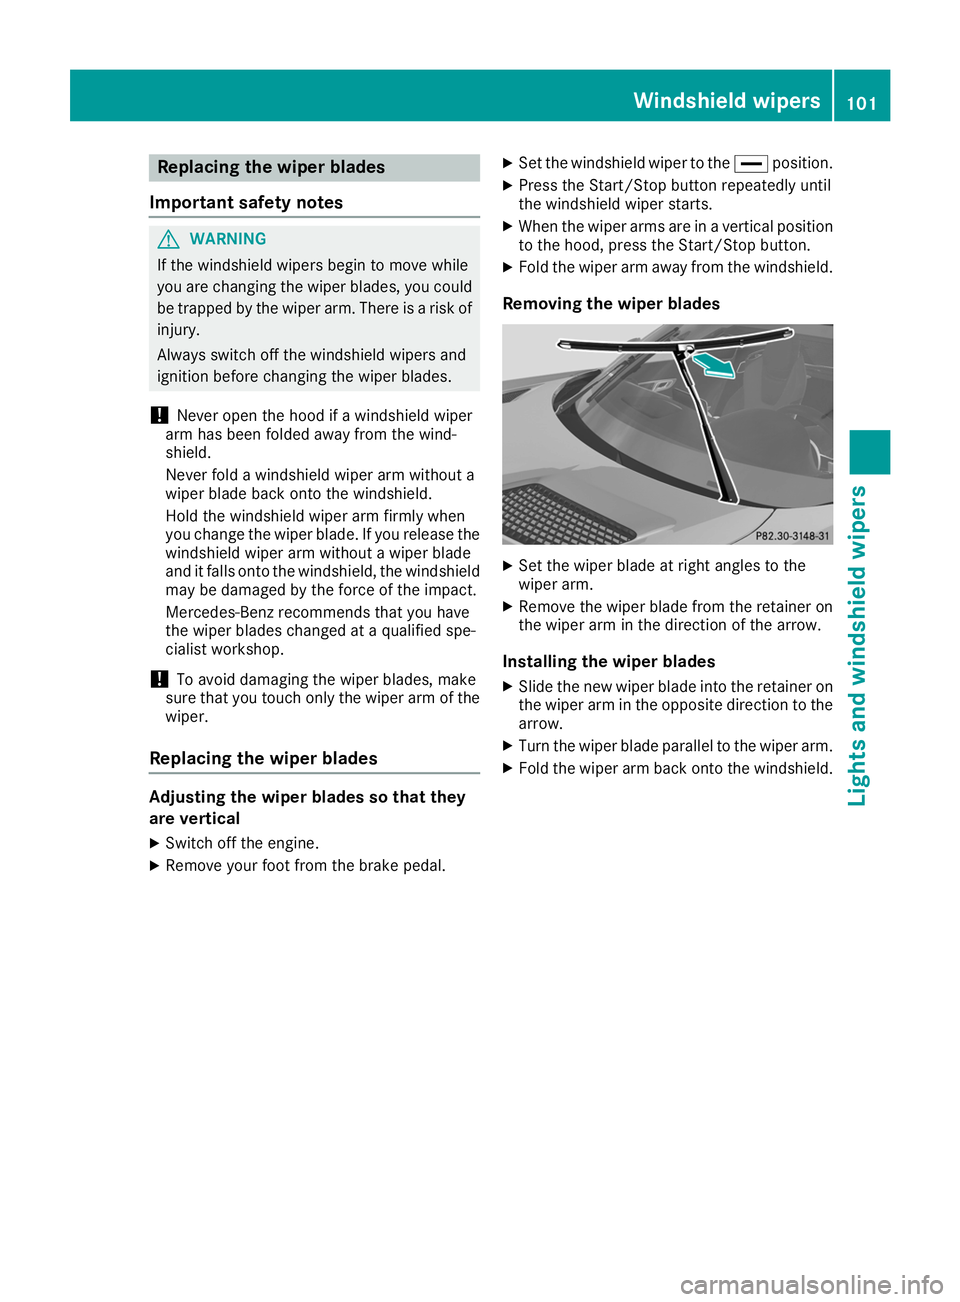
Removing the wiper blades X
Set the wiper blade at right angles to the
wiper arm.
X Remove the wiper blade from the retainer on
the wiper arm in the direction of the arrow.
Installing the wiper blades
X Slide the new wiper blade into the retainer on
the wiper arm in the opposite direction to the arrow.
X Turn the wiper blade parallel to the wiper arm.
X Fold the wiper arm back onto the windshield. Windshield wipers
101Lights and windshield wipers Z
Page 244 of 298

drive for a few minutes after cleaning. By
heating up the brakes, the brake discs and
pads dry. The vehicle can then be parked for a
long period of time.
Regular care of your vehicle is a condition for
retaining the quality in the long term.
Use care products and cleaning agents recom-
mended and approved by Mercedes-Benz. Washing the vehicle and cleaning the
paintwork
Automatic car wash G
WARNING
Braking efficiency is reduced after washing
the vehicle. There is a risk of an accident.
After the vehicle has been washed, brake
carefully while paying attention to the traffic
conditions until full braking power is restored.
! When Active Brake Assist, Active Distance
Assist DISTRONIC or the HOLD function is
activated, the vehicle brakes automatically in
certain situations.
To avoid damage to the vehicle, deactivate
these systems in the following or similar sit-
uations:
R when towing the vehicle
R in the car wash
! Preferably use automatic car washes with
adjustable high-pressure pre-cleaning. This
corresponds with the specification for the
Cabriolet program. In car washes that use
high water pressures, there is a risk that a
small amount of water may leak into the vehi- cle.
! Make sure that the vehicle is not subse-
quently treated with hot wax.
! Never clean your vehicle in a Touchless
Automatic Car Wash as these use special
cleaning agents. These cleaning agents can
damage the paintwork or plastic parts.
If you have your vehicle cleaned in a high-
pressure automatic car wash, small amounts of water may enter the vehicle. !
If the SmartKey is within the rear detection
range of KEYLESS-GO, the following situa-
tions, for example, could lead to the uninten-
tional opening of the trunk lid:
R when using an automatic car wash
R when using a power washer
Make sure that the SmartKey is at least 10 ft
(3 m) away from the vehicle.
! Make sure that:
R the side windows are fully closed
R the blower of the ventilation/heating sys-
tem is switched off
R the windshield wiper switch is at position
003F
R the rear-view camera is deactivated
The vehicle may otherwise be damaged.
! When washing your vehicle in a tow-through
car wash, use the SmartKey instead of the
Start/Stop button.
Start the engine using the SmartKey. Set the
transmission to 005Cwith the E-SELECT selec-
tor lever. Switch the engine off again with the SmartKey by turning the SmartKey to position
0048. Make sure that you then leave the Smart-
Key in position 0048. You may otherwise dam-
age the vehicle, the transmission or the car
wash.
Check the transmission position in the instru-
ment cluster.
! Before switching off the engine, use the
E‑SELECT lever to shift the transmission to
005C. If you open the driver's or front-passenger
door, the transmission remains in this posi-
tion for up to 30 minutes if the key is in the
ignition, even if the engine is switched off. If
you do not shift the transmission to 005Cusing
the E‑SELECT lever beforehand, it shifts auto-
matically to parking position 005Dand locks the
wheels if the driver's or front-passenger door
is opened when the engine is switched off.
This may damage the vehicle, the transmis-
sion or the car wash.
You can wash the vehicle in an automatic car
wash from the very start.
If the vehicle is very dirty, pre-wash it before
cleaning it in an automatic car wash.
After using an automatic car wash, wipe off wax from the windshield and the wiper blades. This
will prevent smears and reduce wiping noises
caused by residue on the windshield. 242
CareMaintenance and care
Page 247 of 298
i
Have work or repairs on decorative film car-
ried out at a qualified specialist workshop.
Mercedes-Benz recommends that you use an authorized Mercedes-Benz Center for this
purpose. Cleaning the vehicle parts
Cleaning the wheels G
WARNING
The water jet from a circular jet nozzle (dirt
blasters) can cause invisible exterior damage to the tires or chassis components. Compo-
nents damaged in this way may fail unexpect-edly. There is a risk of an accident.
Do not use power washers with circular jet
nozzles to clean the vehicle. Have damaged
tires or chassis components replaced imme-
diately.
! Do not use acidic wheel cleaning products
to remove brake dust. This could damage
wheel bolts and brake components.
! Do not park your vehicle for a long period of
time directly after cleaning, particularly after
cleaning the wheel rim with wheel cleaner.
Wheel cleaner can lead to the increased cor-
rosion of the brake discs and pads. Therefore,
drive for a few minutes after cleaning. By
heating up the brakes, the brake discs and
pads dry. The vehicle can then be parked for a long period of time.
Cleaning the windows G
WARNING
You could become trapped by the windshield wipers if they start moving while cleaning the
windshield or wiper blades. There is a risk of
injury.
Always switch off the windshield wipers and
the ignition before cleaning the windshield or
wiper blades.
! Do not use dry cloths, abrasive products,
solvents or cleaning agents containing sol-
vents to clean the inside of the windows. Do
not touch the insides of the windows with hard objects, e.g. an ice scraper or ring. There
is otherwise a risk of damaging the windows.
! Clean the water drainage channels of the
windshield and the rear window at regular
intervals. Deposits such as leaves, petals and pollen may under certain circumstances pre-
vent water from draining away. This can lead
to corrosion damage and damage to elec-
tronic components.
X Clean the inside and outside of the windows
with a damp cloth and a cleaning product that
is recommended and approved by Mercedes-
Benz.
Cleaning the soft top !
Never use any of the following to clean the
soft top:
R gasoline
R thinner
R tar or stain remover
R other organic solvents
! Remove bird droppings immediately, as
they are corrosive and can therefore cause
the soft-top fabric to leak. Do not wash the
vehicle with a power washer or in a car wash
that uses power washers. Do not use sharp-
edged equipment to remove ice and snow.
X Light soiling: you can clean the soft top while
it is dry or rinse it with clear water.
X Normal to heavy soiling: clean the soft top
with a brush and clear water. Clean stains and other dirt with a brush and soft top cleaning
agents that have been recommended and
approved by Mercedes-Benz. Always brush
from front to back, following the grain of the
fabric.
Frequent cleaning reduces the soft top's resist- ance to dirt.
To restore this resistance to dirt, clean the soft
top using soft top cleaning agents that have
been recommended and approved by
Mercedes-Benz.
Incorrect cleaning and care, as well as aging,
can cause the soft-top seams to leak. In the
event of this happening, have the soft-top seams
sealed at a qualified specialist workshop.
i Cover the soft top appropriately if you plan
to leave the vehicle outside for a long period
of time. Care
245Maintenance and care Z
Page 248 of 298
Cleaning wiper blades
G
WARNING
You could become trapped by the windshield wipers if they start moving while cleaning the
windshield or wiper blades. There is a risk of
injury.
Always switch off the windshield wipers and
the ignition before cleaning the windshield or
wiper blades.
! Do not pull the wiper blade. Otherwise, the
wiper blade could be damaged.
! Do not clean wiper blades too often and do
not rub them too hard. Otherwise, the graph-
ite coating could be damaged. This could
cause wiper noise.
! Hold the wiper arm securely when folding
back. The windshield could be damaged if the wiper arm smacks against it suddenly.
X Fold the windshield wiper arms away from the
windshield.
X Carefully clean the wiper blades with a damp
cloth.
X Fold the windshield wiper arms back again
before switching on the ignition.
Cleaning the exterior lighting !
Only use cleaning agents or cleaning cloths
which are suitable for plastic light lenses.
Unsuitable cleaning agents or cleaning cloths
could scratch or damage the plastic light len- ses.
X Clean the plastic lenses of the exterior light-
ing using a wet sponge and a mild cleaning
agent, e.g. Mercedes-Benz car shampoo or
cleaning cloths.
Cleaning the mirror turn signals !
Only use cleaning agents or cleaning cloths
that are suitable for plastic lenses. Unsuitable
cleaning agents or cleaning cloths could
scratch or damage the plastic lenses of the
mirror turn signals.
X Clean the plastic lenses of the mirror turn sig-
nals in the exterior mirror housing using a wet sponge and mild cleaning agent, e.g. Mercedes-Benz car shampoo or cleaning
cloths.
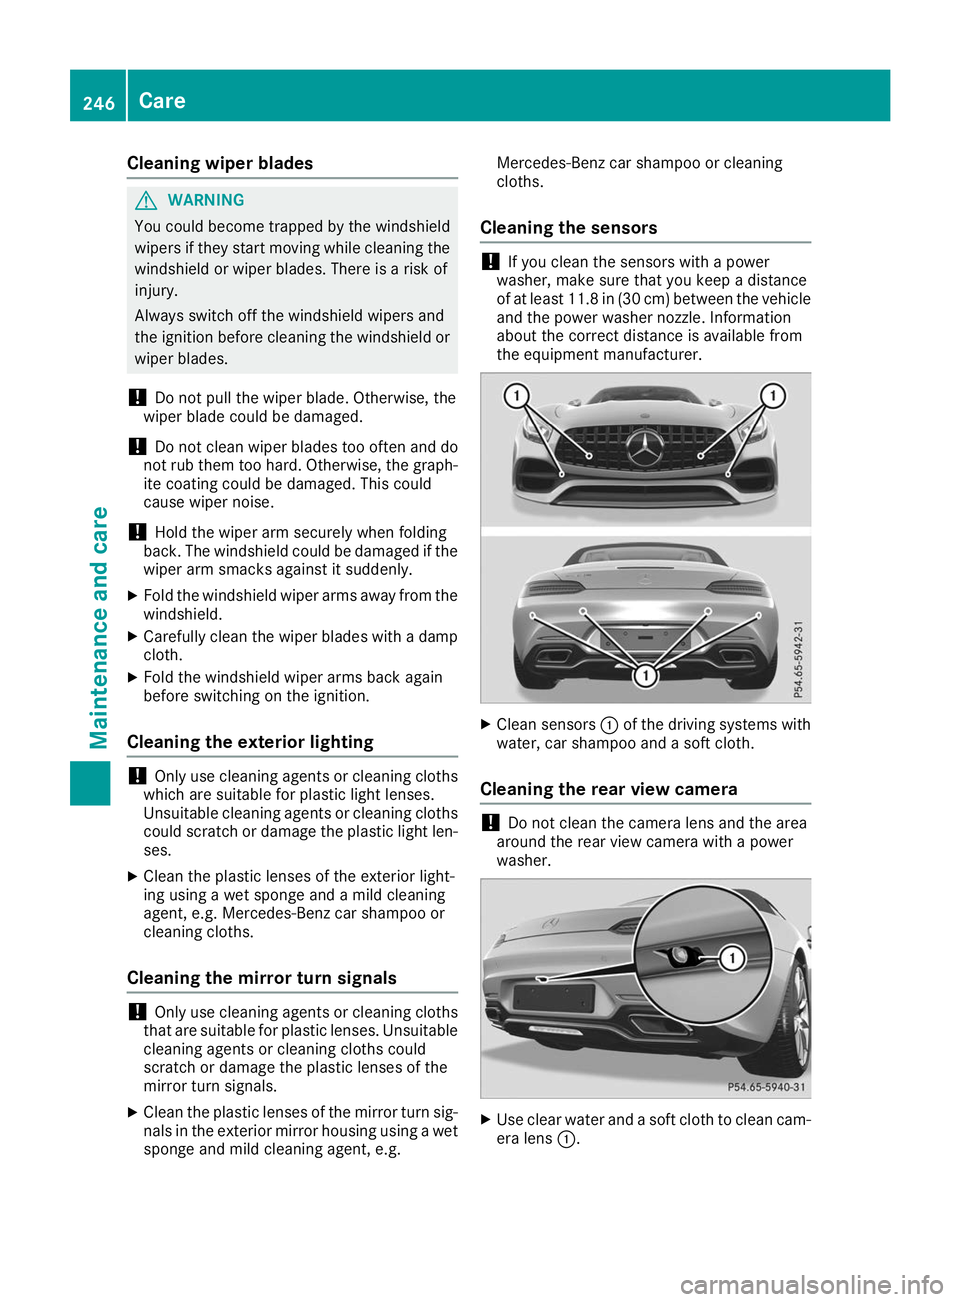
Cleaning the sensors !
If you clean the sensors with a power
washer, make sure that you keep a distance
of at least 11.8 in (30 cm) between the vehicle
and the power washer nozzle. Information
about the correct distance is available from
the equipment manufacturer. X
Clean sensors 0043of the driving systems with
water, car shampoo and a soft cloth.
Cleaning the rear view camera !
Do not clean the camera lens and the area
around the rear view camera with a power
washer. X
Use clear water and a soft cloth to clean cam-
era lens 0043. 246
CareMaintenance and care