Page 25 of 348

The essentials
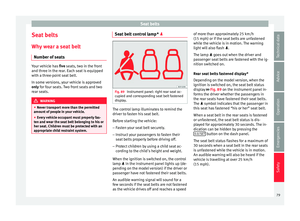
Knee airbag* Fig. 24
On the driver side: location of the
knee airb ag Fig. 25
On the driver side: radius of action of
the knee airb ag.The knee airbag is located on the driver side
belo
w the d
a
sh panel ››› Fig. 24. Airbags are
identified by the word “AIRBAG”.
The area framed in red (deployment area)
››› Fig. 25 is covered by the knee airbag when it is deployed. Objects should never be
plac
ed or mounted in this area.
››› page 86 Side airbags*
Fig. 26
Side airbag in driver's seat. Fig. 27
Illustration of completely inflated side
airb ag
s
on the left side of the vehicle. The side airbags are located in the driver's
se
at
and fr
ont passenger seat backrests
››› Fig. 26. The locations are identified by the
text “AIRBAG” in the upper region of the
backrests.
In conjunction with the seat belts, the side
airbag system provides additional protection
for the upper body in the event of a severe
side collision ››› in Side airbags* on
p ag
e 86
.
In a side collision, the side airbags reduce
the risk of injury to passengers to the areas
of the body facing the impact. In addition to
their normal protection, the seat belts also
hold the passengers in the event of a side
collision; this is how these airbags provide
maximum protection.
››› page 86 23
Page 26 of 348

The essentials
Head-protection airbags* Fig. 28
Location of head-protection airbags. The head-protection airbags are located on
both s
ide
s
in the interior above the doors
››› Fig. 28 and are identified with the text
“AIRBAG”.
In conjunction with the seat belts, the head-
protection airbag system gives the vehicle
occupants additional protection for the head
and upper body in the event of a severe side
collision ››› in Curtain airbags* on
p ag
e 87
.
››› in Curtain airbags* on page 87 Child seats
Impor t
ant
information regarding the
front passenger's airbag Fig. 29
Airbag stickers - version 1: on the
p a
s
senger-side sun blind and on the rear
frame of the front passenger's door . Fig. 30
Airbag stickers - version 2: on the
p a
s
senger-side sun blind and on the rear
frame of the front passenger's door . A sticker with important information about
the p
a
s
senger airbag is located on the pas-
senger's sun visor and/or on the passenger
side door frame.
››› in Important information regarding
the front passenger's airbag on page 91
››› page 90 24
Page 27 of 348

The essentials
Securing child seats Fig. 31
On the rear seats: Possible installations
for the c hi
ld seat. Figure
›››
Fig. 31
A shows the basic child re-
s tr
aint
system mounting using lower retain-
ing rings and the upper retaining strap. Fig-
ure ››› Fig. 31 B shows the child restraint
sy s
t
em mounting using the vehicle seat belt.
The seat belt may be used to secure univer-
sal type child seats to the vehicle seats
marked with a U in the table below.
● In a front passenger seat without height ad-
justment
: It is necessary to place the front
passenger seat in its rearmost position 1)
.
● In a front passenger seat with height ad-
justment
: it is necessary to place the front passenger seat in its rearmost and highest
position
1)
.
T
o correctly use a child seat in the back, the
front backrest must be adjusted so that there
is no contact with the child seat in the back
in the case that it goes opposite to the direc-
tion of the car. In the case of front facing re-
straint systems, the front backrest must be
adjusted so that there is no contact with the
child's feet.
To adjust the passenger seat to accommo-
date a child's seat and get the seat belt in a perfect position, adjust the passenger back-
res
t as far forward as possible 1)
.
If a semi-universal type chair is to be instal-
led, in which the method of attachment to
the car is through the seat belt and support
bracket, it should never be installed in the
central rear seat as the ground clearance is
lower than in other places and the support
bracket will not allow the seat to remain suffi-
ciently stable.
The systems include the child restraint sys-
tem mounting with an upper retaining strap
(Top Tether) and lower anchoring points on
the seat. »1)
Compliance with current national legislation and
the manuf act
urer's instructions is required when us-
ing or installing child seats. 25
Page 28 of 348

The essentialsWeight group
Seating position
Front passenger seat
a)Rear side seatRear central seatb)
airbag onairbag off
Group 0 to 10 kgXU
c)UU
Group 0+ to 13 kgXUc)UU
Group I 9 to 18 kgXUc)UU
Group II 15 to 25 kgXUF c)UFUF
Group III 22 to 36 kgXUFc)UFUF
X: It is not compatible to install chairs in this configuration.
U: Suitable for universal restraint systems for use in this weight group.
UF: Acceptable for front-facing universal-category child restraint systems approved for this mass group.
a)
Compliance with current national legislation and the manufacturer's instructions is required when using or installing child seats.
b) For semi-universal chairs where the securing system is the car safety belt and the support bracket, do not use them in the centre rear seat.
c) Seats without height adjustment should be placed in their rearmost position. Seats with height adjustment should be placed in their rearmost and highest position.
››› in Safety instructions on page 91Securing child seats with “ISOFIX” and Top Tether*
Child seats can be secured quickly, easily
and s
af
ely
on the rear outer seats with the
“ISOFIX” and Top Tether* system.
Two “ISOFIX” retaining rings are fitted on
each rear seat. In some vehicles, the rings
are secured to the seat frame and, in others,
they are secured to the rear floor. The “ISO- FIX” rings are located between the rear seat
back
rest and the seat cushioning ››› Fig. 32.
The Top Tether* rings are located on the rear
part of the backrests of the rear seats (be-
hind the seat backrest or in the boot)
››› Fig. 33. To understand the compatibility of the "ISO-
FIX" syst
ems in the vehicle, consult the table
below.
The body weight permitted and information
regarding sizes A to F is indicated on the la-
bel on child seats with “ universal” or “semi-
universal” certification. 26
Page 29 of 348
The essentialsWeight groupSize classElectrical equip-
ment
Vehicle Isofix positions
Front passenger seatRear side seatRear central seatairbag onairbag off
Baby carrierFISO/L1XXXX
GISO/L2XXXX
Group 0 to 10 kgEISO/R1XXILX
Group 0+ to 13 kg
EISO/R1XXILX
DISO/R2XXILX
CISO/R3XXILX
Group I 9 to 18 kg
DISO/R2XXILX
CISO/R3XXILX
BISO/F2XXIUF/ILX
B1ISO/F2XXXIUF/ILX
AISO/F3XXIUF/ILX
Group II 15 to 25 kg------ ------
Group III 22 to 36 kg------ ------
IUF: Suitable for forward-facing ISOFIX universal child restraint systems approved for use in this mass group.
IL: Suitable for certain ISOFIX child restraint systems (CRSs) listed in the attached list. This relates to ISOFIX CRSs that can be for the specific vehicle, restricted or semi-universal
categories.
: ISOFIX position not suitable for ISOFIX child restraint systems for this weight group or size class.
››› in Safety instructions on page 91
27
Page 30 of 348
The essentials
Securing child seats with the “ISOFIX/i-Size” ISOFIX System Fig. 32
ISOFIX/iSize securing rings. You are obliged to follow the seat manufac-
tur
er's
instructions.
● Press the child seat onto the “ISOFIX” re-
taining rin
gs ››› Fig. 32 until the child seat is
heard to engage securely. If the child seat is
equipped with Top Tether* anchor points, se-
cure it to the correspondent ring ››› Fig. 33.
Observe the manufacturer's instructions.
● Pull on both sides of the child seat to en-
sure th
at it is properly anchored. Child seats with the “ISOFIX” and Top Tether*
attachment
system are available from Techni-
cal Services.
Vehicle i-Size positions
Front passenger seatRear side seatRear central seatairbag onairbag off
Child restraint system approved under ECE R129XXi-UX
i-U Valid position for front-facing and rear-facing child restraint systems approved under ECE R129.
X: Invalid position for child restraint systems approved under ECE R129. 28
Page 31 of 348

The essentials
Securing child seats with the Top
T ether* r
et
aining strapsFig. 33
Position of the Top Tether rings on the
b ac
k
of the rear seat. Child seats with the Top Tether system come
w
ith a s
tr
ap for securing the seat to the vehi-
cle anchor point, located at the back of the
rear seat backrest and provide greater re-
straint.
The objective of this strap is to reduce for-
ward movements of the child seat in a crash,
to reduce the risk of injuries to the head from
hitting the inside of the vehicle.
Using the Top Tether in rear-facing mounted
seats
Currently, there are very few rear-facing child
safety seats that have Top Tether. Please
carefully read and follow the seat manufac-
turer instructions to learn the proper way to
install the Top Tether strap. Securing the Top Tether* to the an-
chorag
e point Fig. 34
Retainer strap: adjustment and as-
semb ly
ac
cording to the Top Tether belt. Securing the retainer strap
●
Follow the manufacturer's instructions to
dep lo
y
the child seat Top Tether retainer
strap.
● Place the belt under the head restraint of
the back
seat ››› Fig. 34 (depending on the in- structions of the chair itself, lift or remove the
head r
estraint if necessary).
● Slide the strap and secure it properly with
the anchorag
e of the backrest ››› Fig. 33.
● Firmly tighten the strap following the manu-
factur
er's instructions.
Releasing the retaining strap
● Loosen the strap following the manufactur-
er's ins
tructions.
● Push the lock and release it from the an-
choring s
upport.
››› in Safety instructions on page 91 29
Page 32 of 348

The essentials
Starting the vehicle Ignition loc kFig. 35
Ignition key positions. Switch ignition on: Place the key in the igni-
tion and s
t
ar
t the engine.
Locking and unlocking the steering wheel
● Engaging the steering wheel lock: Remove
the key fr
om the ignition and turn the wheel
until it locks. Depending on the country, in
vehicles with an automatic gearbox, to re-
move the key the gear lever must be in the P
position. If necessary, press the locking key
on the selector lever and release it again.
● Unlocking the steering wheel: Put the key
into the ignition and turn it
at the same time
as the steering wheel in the direction indica-
ted by the arrow. If it is not possible to turn
the steering wheel, it may be because it is
locked. Turning on/switching off the ignition, glow
plugs
reheating
● Switch ignition on: Turn the key to the 2 position.
●
Switch ignition off. Turn the key to the 1 position.
●
Diesel vehicles : The glo
w p
lugs reheat
when the ignition is switched on.
Starting the engine
● Manual gearbox: press the clutch pedal all
the way
down and move the gearbox lever in-
to neutral.
● Automatic gearbox: Press the brake pedal
and move the sel
ector lever to the P position
or into N.
● Turn the key to the 3 position. The key au-
t om
atic
ally returns to the 2 position. Do not
pr e
s
s the accelerator.
Start-Stop System*
When you stop and release the clutch pedal,
the Start-Stop system* turns off the engine.
The ignition remains switched on.
››› in Switching the ignition on and
starting the engine with the key on
page 182
››› page 181 Lights and visibility
Light sw
it
ch Fig. 36
Dash panel: light control. ●
Turn the switch to the required position
› ›
›
Fig. 36.
Sym-
bolIgnition switched
offIgnition is
switched on
Fog lights, dipped
beam and side lights
off.Daylight running
lights switched on.
The “Coming home”,
“Leaving home” and
Welcome lights may
be switched on.Automatic control of
dipped beam and
daytime running
light.
Side light on.Daylight running
lights switched on.
Dipped beam head-
light offDipped beam
switched on.
30