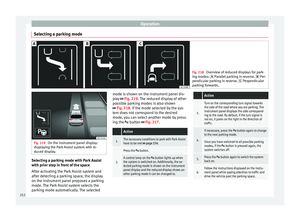
Page 129 of 348

Opening and closing
The vehicle keys or new spare keys can be
o bt
ained fr
om a SEAT Official Service, a spe-
cialised workshop or an approved key service
qualified to create this kind of key.
New keys or spare keys must be synchron-
ised before use ››› page 134. CAUTION
All of the vehicle keys contain electronic com-
ponents. Pr ot
ect them from damage, impacts
and humidity. Note
● Only u
se the key button when you require
the corresponding function. Pushing the but-
ton unnecessarily could accidentally unlock
the vehicle or trigger the alarm. It is also pos-
sible even when you are outside the radius of
action.
● Key operation can be greatly influenced by
overl
apping radio signals close to the vehicle
working in the same range of frequencies, for
example, radio transmitters or mobile tele-
phones.
● Obstacles between the remote control and
the vehic
le, bad weather conditions and dis-
charged batteries can considerably reduce
the range of the remote control.
● If the buttons of the vehicle key are press-
ed ›››
Fig. 128 or ››› Fig. 129 or one of the cen-
tral locking buttons ››› page 128 is pressed
repeatedly in short succession, the central
locking briefly disconnects as protection against overloading. The vehicle is then un-
lock
ed. L
ock it if necessary. Unlocking/Locking by remote control
Read the additional information carefully
›› ›
page 15
The vehicle will be locked again automatical-
ly if you do not open one of the doors or the
rear lid within 30 seconds after unlocking the
car. This function prevents the vehicle from
remaining unlocked if the unlocking button is
pressed by mistake. This does not apply if
you press the button for at least one sec-
ond.
In vehicles with a security central locking
feature (selective unlocking of side doors)
››› page 127, when the button is pressed
once, only the driver door and the fuel tank
flap are unlocked. When the button is press-
ed a second time, all the vehicle doors are unlocked. WARNING
Observe the safety warnings ›››
in Descrip-
tion on pag e 125
. Note
● Do not u se the r
emote control key until the
vehicle is visible. ●
Other fu nction
s of the remote control key
››› page 140, Convenience opening and clos-
ing. Selective unlocking system
The selective unlocking system allows you to
only
u
nlock the driver door and the fuel tank
flap. All other doors and the rear lid remain
locked.
Unlocking the driver door and tank flap
– Press ( once) the b utt
on on the remote
control key or turn the key once in the
opening direction.
Unlocking all the doors, the rear lid and the
tank flap simultaneously. – Within 5 seconds, press ( twice) the
but-
ton on the remote control key, or turn the
key twice within 5 seconds in the opening
direction.
The anti-theft security system* and the anti-
theft alarm* are immediately disabled if you
unlock only the driver door, without unlock-
ing the other doors.
In vehicles with Easy Connect*, you can pro-
gramme the security central locking system
directly ››› page 128.
127
Technical data
Advice
Operation
Emergencies
Safety
Page 130 of 348

Operation
Adjusting the central locking You can use Easy Connect* to select which
doors
ar
e unlocked with the central locking
system. Using the radio or the Easy Connect*
system, you can select whether the vehicle
automatically closes with the “Auto Lock”
programme at speeds of more than 15 km/h
(9 mph).
Programming the unlocking of the doors (ve-
hicles with Easy Connect)
– Select: button > SETTINGS
fu
nction
b
utton > Opening and closing > Cen-
tral locking > Unlocking doors .
Programming the Auto Lock (vehicles with
radio)
– Select: SETUP button > control button
Central locking > Locking while
driving .
Pr ogr
ammin
g the Auto Lock (vehicles with
Easy Connect)
– Select: button > SETTINGS
fu
nction
b
utton > Opening and closing > Cen-
tral locking > Locking while
driving .
Unlocking doors
You can choose to unlock all the doors or
only the driver door when you unlock the vehicle. In all
the options, the fuel
tank flap
is also unlocked.
With the Driver setting, when you press the
button on the remote control key once, on-
ly the driver door is unlocked. If that button is
pressed twice, the rest of the doors and the
rear lid will be unlocked.
In vehicles with a conventional key, turn the
key in the door lock, in the direction of open-
ing, twice within 2 seconds.
If the button is pressed, all the vehicle
doors are locked. At the same time, a confir-
mation signal* is heard.
Auto Lock while driving
If you select on, all the vehicle doors are
locked at speeds above 15 km/h (9 mph).
Central locking switch Read the additional information carefully
› ›
›
page 15
Please note the following when using the
central locking switch to lock your vehicle:
● It is not possible to open the doors or the
rear lid fr
om the outside (for safety reasons,
e.g. when stopped at traffic lights).
● The LED in the central locking switch lights
up when all the door
s are closed and locked. ●
You can open the door
s individually from
the inside by pulling the inside door handle.
● In the event of an accident in which the air-
bags
inflate, doors locked from the inside will
be automatically unlocked to facilitate access
and assistance. WARNING
● The centr a
l locking switch also operates
when the ignition is switched off and auto-
matically locks all the vehicle doors when the
button is pressed.
● The central locking switch does not operate
if the v
ehicle is locked from the outside and
the anti-theft security system is switched on.
● Locked doors could delay assistance in an
emergency
, potentially putting lives at risk.
Do not leave anyone, especially children, in
the vehicle. Note
Your vehicle will lock automatically when it
re ac
hes a speed of about 15 km/h (9 mph)
(Auto Lock) ››› page 125. You can unlock the
vehicle again using the button on the cen-
tral locking switch. 128
Page 131 of 348

Opening and closing
Related video Keyless Access Fig. 130
Handsfree Unlocking and locking the vehicle
w
ith K
eyl
ess Access* Fig. 131
Keyless Access locking and ignition
sy s
t
em: In the proximity of the car.
Opening the rear lid with sensor-controlled
opening (Easy Open) Fig. 132
Keyless Access locking and ignition
sys t
em: sensor surface A for unlocking in-
side the door h andl
e and sensor surface B for locking on the exterior of the handle.
Depending on the equipment, the vehicle
m
a
y
have the Keyless Access system.
Keyless Access is a key-free locking and igni-
tion system to unlock and lock the vehicle
without actively using its key. To do this, all
that is required is to have a valid vehicle key
in the detection area where you are attempt-
ing to access the vehicle ››› Fig. 131 and to
touch one of the sensor surfaces on the door
handles ››› Fig. 132 or operate the soft-
touch/handle on the rear lid
››› page 137 ››› .
The v
ehic
le can be unlocked and locked via
the front doors only. When doing so, the re-
mote control key must be no further than ap-
prox. 1.5 m from the door handle. »
129
Technical data
Advice
Operation
Emergencies
Safety
Page 132 of 348

Operation
It does not matter where you carry the key, for
in s
t
ance whether it is in your jacket pocket or
in a briefcase.
Once the doors have been locked, they can-
not be opened again immediately. This will
enable you to check that the doors are prop-
erly closed.
If you wish, when unlocking, you can unlock
only the corresponding door or the entire ve-
hicle. The necessary adjustments can be per-
formed in vehicles with a driver information
system ›››
page 33.
General information
If a valid key is in the proximity of the car,
››› Fig. 131 the Keyless Access locking and
starting system gives the key entry as soon
as one of the sensor surfaces on the door
handles is touched or the softtouch/handle
on the rear lid is operated. The following fea-
tures are then available without having to
use the vehicle key actively:
● Keyless-Entry: unloc
king the vehicle using
the handles of the front doors or the soft-
touch/handle on the rear lid.
● Keyless-Exit: lockin
g the vehicle using the
sensor of the driver or passenger door han-
dle.
● Easy Open: opening the re
ar lid moving one
foot below the rear bumper. ●
Pres
s & Drive: keyless starting of the en-
gine with the starter button ››› page 181.
The central locking and locking systems oper-
ate in the same way as a normal locking and
unlocking system. Only the controls change.
Unlocking the vehicle is confirmed with a
double flash of the indicator lights; locking
by a single flash.
If the vehicle is locked and then all doors and
the rear lid are closed leaving the last key
used inside the vehicle and none outside,
the vehicle will not lock immediately. All the
vehicle's indicator lights will flash four times.
The vehicle will lock after a few seconds if
you do not open any door or the rear lid.
The vehicle will lock again after a few sec-
onds if you unlock the vehicle but fail to open
any door or boot hatch.
Unlocking and opening the doors (Keyless-
Entry)
● Grip one of the front door handles. In doing
this, the sensor s
urface ››› Fig. 132 A (arrow)
on the h andl
e i
s touched and the vehicle un-
locks.
● Open the door.
On vehic
les with selective opening or info-
tainment system configuration, pulling the
door handle twice will unlock all doors. On vehicles without a “Safe” security sys-
tem: shutting and loc
king doors (Keyless-Ex-
it)
● Switch the ignition off.
● Close the driver's door.
● Touch (once) the locking sensor surface B (arrow) on one of the front door handles. The
door th
at
i
s used must be closed.
On vehicles with a “Safe” security system:
shutting and locking doors (Keyless-Exit)
● Switch the ignition off.
● Close the driver's door.
● Touch (once) the sensor surface B (arrow)
on one of the fr
ont
door handles. The vehicle
locks with the “Safe” ››› page 133 system.
The door that is used must be closed.
● Touch (twice) the sensor surface B (arrow)
of one of
the fr
ont door handles to lock the
vehicle without activating the “Safe” security
system ››› page 133.
Unlocking and locking the boot hatch
When the vehicle is locked, the rear lid auto-
matically unlocks on opening if there is a val-
id vehicle key in the proximity ››› Fig. 131 .
Open or close the rear lid normally.
After closing, the hatch locks automatically. If
the complete vehicle is unlocked, the rear lid
will not lock automatically after closing it.
130
Page 133 of 348

Opening and closing
Rear lid with sensor-controlled open-
in g/c
lo
sing (Easy Open)
If there is a valid vehicle key in the proximity
››› Fig. 131 of the rear lid, it is possible to
unlock and open or close it moving one foot
in the area of the sensors ››› Fig. 131 loca-
ted under the rear bumper.
● Switch the ignition off.
● Stand in front of the rear bumper, in the
middle.
● W
ith a brisk movement, bring your foot and
lower l
eg as close as you can to the bumper.
The lower part of the leg needs to be close to
the upper sensor area and your foot to the
lower sensor area ››› Fig. 131 1 .
● Quickly remove your foot and lower leg
fr om the sen
sor ar
eas ››› Fig. 131 2 . The
r e
ar lid w
ill be automatically opened.
● If the rear lid fails to open, repeat the pro-
cedure af
ter a few seconds.
The third brake light flashes once to show the
boot has opened with the Easy Open func-
tion.
The rear lid can be closed with another foot
movement similar to the opening one (provi-
ded a valid vehicle key is in the proximity of
the rear lid).
When closed, the rear lid automatically locks
if the vehicle has been locked beforehand
and there is no valid key inside. While the rear lid is in motion (either opening
or clos
ing), it can be stopped with another
foot movement similar to the opening one
(provided a valid vehicle key is in the proxim-
ity of the rear lid).
The Easy Open feature is not available or only
has limited availability in the following situa-
tions (examples):
● If the rear bumper is very dirty.
● If the rear bumper is wet with salt water,
e.g. aft
er having driven on gritted roads.
● If the electrical unlocking tow hitch is not
cov
ered.
● If the vehicle has been equipped at a later
time with a to
w bracket.
In the event of heavy rain, the Easy Open fea-
ture may take a little longer to open the boot
or may deactivate automatically, to avoid the
boot opening by accident, e.g. because of
the running water.
The Easy Open function can be connected
and disconnected permanently in the info-
tainment system by pressing the button
and the S
ET
TINGS and the
Openin
g and c
lo
sing function buttons
››
›
page 33.
What happens when locking the vehicle with
a second key
If there is a vehicle key inside the vehicle and
it is locked from the outside with a second
vehicle key, the key inside the vehicle is blocked for engine ignition
›››
page 181. In
order to enable engine ignition, the button
on the key inside the vehicle needs to be
pressed.
Automatically disabling sensors
If the vehicle is not locked or unlocked for a
long period of time, the proximity sensors on
the passenger doors are automatically disa-
bled.
If one of the sensor surfaces on the door han-
dles is often activated in an unusual manner
with the vehicle locked (e.g. by the branches
of a bush rubbing against it), all proximity
sensors are disabled for a certain period of
time.
Sensors will again be enabled:
● After a time.
● OR: if the vehicle is unlocked with the
butt
on on the key.
● OR: if the boot is opened.
● OR: if
the vehicle is unlocked manually with
the key
.
Keyless Access temporary disconnection
function*
You can deactivate the vehicle's Keyless Ac-
cess unlocking for a locking and unlocking
cycle. »
131
Technical data
Advice
Operation
Emergencies
Safety
Page 134 of 348

Operation
● Mo v
e the g
ear lever to position P (if the ve-
hicle has automatic gearbox), since other-
wise the vehicle cannot be locked.
● Close the door.
● Push the central locking button on the
remote c
ontrol and touch the locking sensor
surface ››› Fig. 132 B on the driver door han-
dl e onc
e w
ithin the following 5 seconds. Do
not grip the door handle, otherwise the vehi-
cle will not lock. Deactivation is also possible
if the vehicle is locked through the driver’s
door lock.
● To check that the function has been deacti-
vated, w
ait at least 10 seconds, grip and pull
on the door handle. The door should not
open.
The next time the door can only be unlocked
via the remote control or the lock cylinder.
The next time the door is locked/unlocked,
Keyless Access will be active again.
Convenience functions
To close all the electric windows using the
convenience function, keep a finger on the
locking sensor surface B (arrow) of the door
h andl
e f
or a few seconds until the windows
have closed.
The doors opened by touching the sensor
surface of the door handle depend on the
settings that have been activated in the info-
tainment system with the button and theSETTINGS and
Openin
g and c
lo
sing function but-
t on
s. WARNING
If there is a valid key in the proximity of the
re ar lid, in some c
ases the Easy Open func-
tion may be accidentally activated and the
rear lid will open, for example, when sweep-
ing under the rear bumper, when directing a
water jet or high pressure steam to the area
or when carrying out maintenance work or re-
pairs in that area. If accidentally opened, the
rear lid could injure somebody situated in its
area of operation or cause material damage.
● Therefore, always make sure that there is
no uns
upervised valid key in the area near
the rear lid.
● Before carrying out any maintenance or re-
pair work
on the vehicle, always disable the
Easy Open feature via the infotainment sys-
tem.
● Before washing the vehicle, always disable
the Easy
Open feature via the infotainment
system.
● Before attaching a bicycle rack or a trailer,
›››
page 273, always disable the Easy Open
feature via the infotainment system. CAUTION
The sensor surfaces on the door handles
cou l
d engage if hit with a water jet or high
pressure steam if there is a valid vehicle key
in the proximity. If at least one of the electric windows is open and the sensor surface
B (arrow) on one of the handles is activated
continuou
s
ly, all windows will close. Note
● If the v
ehicle battery has little or no charge,
or the vehicle key battery is almost or entire-
ly out of charge, you will probably not be able
to lock or unlock the vehicle with the Keyless
Access system. The vehicle can be unlocked
or locked manually ››› page 97.
● To control the proper locking of the vehicle,
the rele
ase function is disabled for approx. 2
seconds.
● If the message Keyless access system
faulty is di
splayed on the screen of the
dash panel, abnormalities may occur in the
operation of the Keyless Access system. Con-
tact a specialised workshop. SEAT recom-
mends visiting a SEAT dealership for this.
● Depending on the function set on the info-
tainment sy
stem for the mirrors, the exterior
mirrors will unfold and the surround lighting
will come on when unlocking the vehicle us-
ing the sensor surface on the driver and pas-
senger door handles ››› page 155.
● If there is no valid key inside the vehicle or
the syst
em fails to detect one, a warning will
display on the dash panel screen. This could
happen if any other radio frequency signal in-
terferes with the key signal (e.g. from a mo-
bile device accessory) or if the key is covered
by another object (e.g. an aluminium case). 132
Page 135 of 348

Opening and closing
●
If the sen sor
s are very dirty, e.g. have a lay-
er of salt, the correct functioning of the sen-
sors on the door handles may be affected. In
this case, clean the vehicle.
● If the vehicle is equipped with an automatic
gearbo
x, it may only be locked in the gear
stick is in position P. Anti-theft security system (Safelock)*
The following message is displayed on the in-
strument
p
anel to remind the driver that
when the vehicle is closed from the outside,
the anti-theft security system is switched on. Do not forget the Safelock.
Please see Instruction Manual . The
vehicle cannot be opened from inside. This
makes it more difficult for unauthorised per-
sons to break into the vehicle ››› in De-
s c
ription on p
age 125.
The anti-theft security system can be switch-
ed off each time the vehicle is locked:
● Turn the key a second time to the lock posi-
tion, in the door lock, w
ithin two seconds. If
necessary, remove the protective cover on
the driver door handle ›››
page 15 or
● Press the button on the r
emote control
key for a second time within 2 seconds.
The flashing frequency of the diode in the
door sill immediately confirms the process. Initially, the diode flashes in a fast sequence
for a brief period, then it
stops for approxi-
mately 30 seconds and, lastly continues
flashing slowly.
Replacing the battery Fig. 133
Vehicle key: opening the battery
c omp
ar
tment. Fig. 134
Vehicle key: removing the battery. SEAT recommends you ask a specialised
w
ork
shop t
o replace the battery.
The battery is located to the rear of the vehi-
cle key, under a cover.
Changing the battery ● Unfold the vehicle key blade ›››
page 126.
● Remove the cover from the back of the ve-
hicle k
ey ››› Fig. 133 in the direction of the ar-
row ››› .
● Extract the battery from the compartment
u s
in
g a suitable thin object ››› Fig. 134.
● Place the new battery in the compartment
as sho
wn ››› Fig. 134, pressing in the oppo-
site direction to that shown by the arrow
››› .
● Fit the cover as shown ››
›
Fig. 133 , pressing
it onto the vehicle key casing in the opposite
direction to that shown by the arrow until it
clicks into place. CAUTION
● If the b att
ery is not changed correctly, the
vehicle key may be damaged.
● Use of unsuitable batteries may damage
the vehic
le key. For this reason, always re-
place the dead battery with another of the
same voltage, size and specifications.
● When fitting the battery, check that the po-
larity i
s correct. » 133
Technical data
Advice
Operation
Emergencies
Safety
Page 136 of 348

Operation
For the sake of the environment
Please dispose of your used batteries correct-
ly and w ith r
espect for the environment.Synchronising the vehicle key
If the
button is pressed frequently outside
of the
vehicle range, it is possible that the ve-
hicle can no longer be locked or unlocked us-
ing the key. In this case, the key must be re-
synchronised as described below:
● Unfold the vehicle key blade ››
›
page 126.
● If necessary, remove the cover from the
driver door lev
er ›››
page 15.
● Press the button on the
vehicle key. For
this, it must remain with the vehicle.
● Open the vehicle within one minute using
the key b
lade. The key has been synchron-
ised.
● If necessary, fit the cap. Childproof lock Fig. 135
Childproof lock on the left hand side
door . The childproof lock prevents the rear doors
fr
om bein
g opened fr
om the inside. This sys-
tem prevents minors from opening a door ac-
cidentally while the vehicle is running.
This function is independent of the vehicle
electronic opening and locking systems. It
only affects rear doors. It can only be activa-
ted and deactivated manually, as described
below:
Activating the childproof lock
– Unlock the vehicle and open the door in
which y
ou wish to activate the childproof
lock.
– With the door open, rotate the groove in
the door usin
g the ignition key, clockwise
for the left hand side doors ››› Fig. 135 and anti-clockwise for the right hand side
doors.
De
activating the childproof lock
– Unlock the vehicle and open the door
whose chi
ldproof lock you want to deacti-
vate.
– With the door open, rotate the groove in
the door usin
g the ignition key, anti-clock-
wise for the left hand side doors ››› Fig. 135
and clockwise for the right hand side
doors.
Once the childproof lock is activated, the
door can only be opened from the outside.
The childproof lock can be activated or deac-
tivated by inserting the key in the groove
when the door is open, as described above.
Anti-theft alarm system* Des
cription The anti-theft alarm makes it more difficult to
br
e
ak
into the vehicle or steal it.
The anti-theft alarm is automatically turned
on when the vehicle is locked with the key.
● The turn signal light will flash twice on
opening and deactiv
ating the alarm.
134