Page 257 of 348

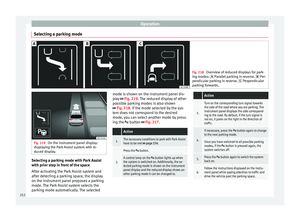
Driver assistance systemsFor parallel parking
spacesFor perpendicularparking spaces
Do not exceed approxi-
mately 40 km/h (25 mph)
when driving past the parking space.Do not exceed approxi-
mately 20 km/h (12 mph)
when driving past the parking space.
Keep a distance between 0.5 and 2.0 metres when driv- ing past the parking space.
Length of the space:
length of the vehicle + 0.8 metresWidth of the space: width
of the vehicle + 0.8 me- tres
Do not exceed approximately 7 km/h (4 mph) when
parking. Parking
Do the following:
1.The necessary conditions have to be met to park
with Park Assist
››› page 254 and the parking
mode must be selected ››› page 252.
2.
Look at the display on the instrument panel to
see if the space has been detected as “appropri-
ate” and if the correct position for parking has
been reached ››› Fig. 220
or ››› Fig. 221 .
The space is considered “appropriate” if the dis-
play on the instrument panel shows the message
to park 5
.
3.Stop the vehicle and, after a brief pause, engage
the reverse gear.
4.Release the steering wheel
››› in Introduction
on page 249.
Do the following:
5.
Please note the following message: Active au-
tomatic steering. Watch out around
you.
While you keep watch around you, carefully start
accelerating up to no more than 7 km/h (4 mph).
During the parking manoeuvre, the system only
takes charge of the steering. You, as the driver,
have to accelerate, engage the clutch if necessa-
ry, change gears and brake.
6.
Reverse until the ParkPilot continuous signal is
heard.
OR: reverse until the instrument panel displays
the message to go forwards ››› Fig. 220 or ››› Fig. 221 .
OR: reverse until the instrument panel displays
the message Park Assist finished .
The progress bar 7 indicates the distance to
cover ››› page 254.
7.
Press down the brake pedal until the Park Assist
system has finished turning the steering wheel.
OR: until the symbol on the instrument panel
display switches off.
8.Select first gear.
Do the following:
9.
Go forward until the ParkPilot continuous signal
is heard.
OR: go forward until the instrument panel display
shows the message to reverse.
The Park Assist system steers the vehicle forward
and back until it centres it in the space ››› Fig. 220
or ››› Fig. 221 .
10.
For best results, wait at the end of each manoeu-
vre until the Park Assist system has finished turn-
ing the steering wheel.
The parking manoeuvre ends when a correspond-
ing message is displayed on the instrument panel
and, in some cases, an acoustic signal sounds. Note
If the manoeuvre is terminated prematurely
during p ark
ing, the result may not be the
best. 255
Technical data
Advice
Operation
Emergencies
Safety
Page 258 of 348

Operation
Exiting a parking space with Park As-
s i
s
t (only for parallel spaces) Fig. 222
On the instrument panel display: ex-
itin g a p
ar
allel parking space. Key to the
Fig. 222:
P ark
ed
vehicle
Your vehicle in reverse gear
Progress bar to indicate the distance left
to cover
Message giving the proposed manoeuvre
to exit the parking space
Necessary conditions to exit a parking space
with Park Assist
● Only for parallel parking spaces
● The traction control system (ASR) must be
turned on ››
› page 191.
● Length of the space: leng
th of the vehicle
+ 0.5 metres 1 2
3
4 ●
Do not e
x
ceed approximately 7 km/h
(4 mph) when exiting the parking space.
Exiting a parking space
Do the following:
For parallel parking spaces
1.The necessary conditions to exit a parking space
with Park Assist have to be met ››› page 256.
2.Switch on the engine ››› page 181.
3.
Press the button ››› Fig. 217.
A control lamp on the button lights up when
the system is switched on.
4.Turn on the corresponding turn signal towards
the road you will enter when exiting the parking
space.
5.Engage reverse gear or turn the selector lever to
position R.
6.
Release the steering wheel ››› in Introduction
on page 249.
Please note the following message: Active
automatic steering. Watch out around
you.
While you keep watch around you, carefully start
accelerating up to no more than 7 km/h (4 mph).
When exiting the parking space, the system only
takes charge of the steering. You, as the driver,
have to accelerate, engage the clutch if necessa-
ry, change gears and brake.
For parallel parking spaces
7.
Reverse until the ParkPilot continuous signal is
heard.
OR: reverse until the instrument panel display
shows the message to go forward.
The progress bar ››› Fig. 222 3 indicates the dis-
tance to cover ››› page 254.
8.
Press down the brake pedal until the Park Assist
system has finished turning the steering wheel.
OR: press down the brake pedal until the sym-
bol on the instrument panel display switches off.
9.
Go forward until the ParkPilot continuous signal
is heard.
OR: go forward until the instrument panel display
shows the message to reverse.
The Park Assist system steers the vehicle forward
and back until it can exit the space.
10.
The vehicle can exit the space when a corre-
sponding message is displayed on the instru-
ment panel and, in some cases, an acoustic sig-
nal sounds.
Take charge of the steering with the turning an-
gle set by the Park Assist system.
11.Paying attention to the traffic, exit the parking
space. 256
Page 259 of 348

Driver assistance systems
Automatic braking intervention by
P ark
As
sist Park Assist helps the driver by automatically
brak
in
g in certain situations.
The driver is always responsible for braking
in time ››› .
Autom atic
braking intervention to avoid ex-
ceeding the speed limit
To avoid exceeding the speed limit of approx-
imately 7 km/h (4 mph) when entering or
leaving a parking space, the brakes may acti-
vate automatically. After automatically acti-
vating the brakes, the manoeuvres to enter or
exit a parking space may continue.
The brakes are only automatically activated
once for each attempt to enter or exit a park-
ing space. If the speed of approximately
7 km/h (4 mph) is exceeded again, the corre-
sponding operation is halted.
Automatic braking to reduce damages
Depending on certain conditions, the Park
Assist system can automatically brake the ve-
hicle when faced with an obstacle, briefly ac-
tioning and holding down the brake ped-
al ››› . Following this the driver must press
the br ak
e ped
al.
Automatic braking intervention to reduce
damage leads to the parking manoeuvre fin-
ishing. WARNING
The automatic braking intervention by Park
Ass i
st should never tempt you to take any
risk that may compromise safety. The system
is not a replacement for driver awareness.
● The Park Assist system is subject to certain
limitations
inherent to the system. In certain
situations, the automatic braking interven-
tion may only work in a limited way or not
work at all.
● Always be ready to use the brakes yourself!
● The automatic braking intervention will end
after ap
proximately 1.5 seconds. Following
this, brake the vehicle yourself. Parking System Plus (ParkPi-
lot)*
D e
s
cription Fig. 223
Represented area. During parking, P
ark
in
g System Plus assists
the driver by visually and audibly warning
them about obstacles detected in front of
and behind the vehicle.
There are ultrasound sensors integrated in
the front and rear bumpers. When they detect
an obstacle, you are alerted by audible warn-
ings and visually on the Easy Connect sys-
tem.
In the event of danger of a frontal collision,
the audible warnings come from the front of
the vehicle, and in the event of the danger of
a rear-end collision they come from the rear.
Make particularly sure that the sensors are
not covered by adhesives, residues and the
like, as this could affect the system's opera-
tion. Cleaning instructions ››› page 287.
The approximate measurement range of the
sensors is:
1.20 m
1.60 m
0.90 m
As you approach the obstacle, the time inter-
val between the audible warnings will be re-
duced. When you reach around 0.30 m the
warning will be constant: do not continue to
move forward (or backward)!
If you maintain separation from the obstacle,
the volume of the warning begins to reduce »
A B
C
257
Technical data
Advice
Operation
Emergencies
Safety
Page 260 of 348

Operation
after four seconds (does not affect the tone
of the c
on
stant warning).
In order to view the entire periphery of the ve-
hicle, the vehicle must be moved a few me-
tres forwards and backwards. Thus, the miss-
ing areas are screened and obstacles at the
sides of the vehicle are displayed
››› Fig. 223 C .
S pec
i
al features of ParkPilot with Area View
In the following situations the screened area
on the side of the vehicle is automatically
hidden:
● When a vehicle door is opened.
● When the ASR is switched off.
● When there is ASR or ESC regulation.
● If the vehicle remains stationary for more
than appr
oximately 3 minutes. WARNING
● Alw a
ys pay attention, also when looking
straight ahead, to traffic and the vehicle sur-
roundings. The assistance systems are not a
replacement for driver awareness. When in-
serting or removing the vehicle from a park-
ing space, or when performing similar ma-
noeuvres the driver always assumes the re-
sponsibility.
● Adapt your speed and driving style at all
times t
o suit visibility, weather, road and traf-
fic conditions. ●
The ultr a
sound sensors have blind spots in
which obstacles and people are not regis-
tered. Pay special attention to children and
animals.
● Always keep visual control of the vehicle
surrou
ndings: use the mirrors for additional
help. CAUTION
Parking Aid functions may be negatively af-
f ect ed b
y different factors that may lead to
damage to the vehicle or its immediate sur-
rounds:
● Under certain circumstances, the system
does not
detect or display certain objects:
– Objects such as chains, trailer draw bars,
fences, posts and thin trees.
– Objects that are located above the sen-
sors, such as protrusions in a wall.
– Objects with certain surfaces or struc-
tures, such as wire mesh fences or pow-
der snow.
● Certain surfaces of objects and garments
do not refl
ect the ultrasound sensors' sig-
nals. The system cannot detect these objects
or people wearing such clothes correctly.
● Ultrasound sensor signals may be affected
by e
xternal sound sources. In certain circum-
stances this may prevent them from detect-
ing people or objects.
● Please note that low obstacles detected by
the syst
em may no longer be registered by the sensors as the car moves closer, so the
sys
t
em will not give any further warning. In
certain circumstances, objects such as high
kerbs that could damage the bottom of the
vehicle are not detected either.
● If the first warning from the ParkPilot is ig-
nored, the v
ehicle could suffer considerable
damage.
● The knocks or damage on the radiator
grill
e, bumper, wheel arch and vehicle under-
body can adjust the orientation of the sen-
sors. This can affect the parking aid function.
In this case, have the function checked by a
specialised workshop.
● A registration plate or plate holder on the
front w
ith larger than the space for the regis-
tration plate, or a registration plate that is
curved or warped can cause:
– false detections,
– loss of sensor visibility. Note
● In cer t
ain situations, the system can give a
warning even though there is no obstacle in
the detected area, e.g:
–with rough or cobbled floors or ground
with long grass;
– with external ultrasound sources, such as
cleaning vehicles or other vehicles equip-
ped with ultrasound systems;
– in downpours, intense snow, hail or
dense exhaust gases, 258
Page 261 of 348

Driver assistance systems
–
if the number p l
ate is not perfectly se-
cured to the bumper surface,
– or in locations such as the brow of a hill.
● In order to guarantee good system opera-
tion, keep the ultr
asound sensors clean, free
of snow or ice, and do not cover them with
adhesives or other objects.
● If you use high-pressure or vapour equip-
ment to c
lean the ultrasound sensors, apply
it directly only very briefly and always from a
distance of more than 10 cm.
● Retrofitting of accessories to the vehicle,
such a
s a bicycle rack, may interfere with the
operation of the Parking Aid.
● Fitting certain accessories to the front of
the vehic
le, such as a plate holder with ad-
vertising, may interfere with the operation of
the Park Assist.
● In order to familiarise yourself with the sys-
tem, it i
s advised that you practice parking in
an area or car park that is free from traffic.
There must be good weather and light condi-
tions.
● The volume and tone of the warnings can
be modified, in addition t
o the indications
››› page 265.
● In vehicles without an inf
otainment system,
these parameters can be modified in a SEAT
Official Service or in a specialised workshop.
● Please observe information on towing a
trail
er ››› page 265.
● The display on the Easy Connect screen
shows
a slight time delay. Parking Aid operation
Fig. 224
Centre console: Park Assist button
(dependin g on the
v
ersion). Manual connection of Parking Aid
● Press the butt
on
once.
Manual disconnection of Parking Aid
● Press the button
again.
Manual disconnection of Parking Aid display
(the audible sounds remain active)
● Press a button on the main menu of the fac-
tory
-assembled infotainment system.
● OR: press the BA
CK function button.
Aut om
atic
connection of Parking Aid
● Engage reverse gear or turn the selector
lever t
o position R.
● OR: If the vehicle approaches an obstacle
that
is in its forwards path at a speed below 10 km/h (6 mph)
›››
page 260. The obstacle
is detected as of a distance of approx. 95 cm
if the automatic connection is activated in
the infotainment system. A reduced display is
shown.
● OR: If the vehicle moves backwards.
Autom
atic disconnection of Parking Aid
● Move the selector lever to position P.
● OR: accelerate to more than approx.
10 km/h (6 mph) for
ward.
Temporary suppression of sound in Parking
Aid
● Press the function b
utton.
Change from reduced view to full view
● Engage reverse gear or turn the selector
lever t
o position R.
● OR: press the car icon in reduced view.
If nec
essary, switch to the rear-assist image
(Rear View Camera “RVC”)
● Engage reverse gear or turn the selector
lever t
o position R.
● OR: Press the RVC fu
nction button.
A short confirmation signal will be heard and
the button symbol will light up yellow when
the system is switched on.
259
Technical data
Advice
Operation
Emergencies
Safety
Page 262 of 348

Operation
Automatic activation Fig. 225
Miniature indication of automatic ac-
tiv ation. When the Parking System Plus is switched on
aut
om
atic
ally, a miniature of the vehicle will
be displayed and the segments will be
shown on the left side of the screen
››› Fig. 225.
Automatic activation occurs when slowly ap-
proaching an obstacle located in front of the
vehicle. It only operates every time the speed
is reduced below approximately 10 km/h (6
mph) for the first time.
If the parking aid is switched off using the
button, the following actions must be carried
out in order for it to automatically switch on:
● Switch off the ignition and switch it on
again. ●
OR: ac
cel
erate above 10 km/h (6 mph) be-
fore reducing speed below this number
again.
● OR: place the selector lever in position P
and then mov
e it from this position.
● OR: switch on and off the automatic activa-
tion in the Ea
sy Connect system menu.
The automatic activation with parking aid
miniature indication can be switched on and
off from the Easy Connect system menu
››› page 33:
● Switch the ignition on.
● Select: button > Settings
> Parking
and manoeuvring .
● Select the Automatic activation op-
tion. When the f
u
nction button check box is
activated , the function is on.
If the system has been activated automatical-
ly, an audible sound warning will only be giv-
en when obstacles in front are at a distance
of less than 50 cm. CAUTION
The automatic connection of the Parking Aid
only w
orks when you are driving slowly. If
driving style is not adapted to the circum-
stances, an accident and serious injury or
damage may be caused. Segments of the visual indication
Fig. 226
Parking Aid display on the Easy Con-
nect sy
s
tem screen. The distance of separation from the obstacle
c
an be e
s
timated using the segments around
the vehicle.
The optical indication of the segments works
as follows:
they are displayed when
the obstacle is not within the vehicle's
trajectory or the direction of travel is in
the opposite direction to its location,
and also when the electronic parking
brake is activated.
obstacles located in the
vehicle's trajectory and which are more
than 30 cm away from the vehicle are
displayed in yellow.
White segments:
Yellow segments:
260
Page 263 of 348

Driver assistance systems
obstacles that are less than
30 c m a
w
ay from the vehicle are dis-
played in red.
Moreover, with the SEAT Media System
Plus/Navi System/Navi System Plus radios, a
yellow trail indicates the vehicle's expected
trajectory based on the steering angle.
Whenever the obstacle is located in the vehi-
cle’s direction of travel, the corresponding
audible warning will sound.
As the vehicle approaches an obstacle, the
segments are displayed closer to the vehicle.
When the penultimate segment is displayed,
this means that the vehicle has reached the
collision zone. In the collision zone, the ob-
stacles are represented in red, including
those out of the path. Do not continue to
move forward (or backward) ››› in Descrip-
tion on p ag
e 258
, ››› in Description on
p ag
e 258
!
In the event the car is equipped with the Top
View Camera system, Park Assist visual guid-
ance will appear in accordance with the view
selected in the Top View Camera system.
Adjusting the display and audible
warning
s The settings for the display and audible
w
arnin g
s are controlled via the Easy Con-
nect*. Red segments: Automatic activation
on – activate
s the Automatic activa-
tion option ››› page 260.
off – deactivates the Automatic ac-
tivation option ››› page 260.
Front volume*
Volume in the front and rear area.
Front sound settings/sharpness*
Frequency (tone) of the sound in the front
area.
Rear volume*
Volume in the rear area.
Rear sound settings/sharpness*
Frequency (tone) of the sound in the rear
area.
Adjust volume
With the parking aid switched on, the active
audio/video source volume will be reduced
to the intensity of the selected setting.
Error messages When the Parking Aid is activated or when it
i
s
sw
itched on, if a message reporting a Park- ing aid error is displayed on the instrument
panel, there i
s a fault in the system.
If the fault does not disappear before discon-
necting the ignition, the next time that the
parking aid is engaged in reverse, no audible
signal of the existence of a fault will be is-
sued.
If there is a fault in the parking aid system a
message will appear on the instrument panel
indicating the error. In addition the key
LED will blink.
If there is a fault in a sensor, the symbol is
displayed on the Easy Connect display in
front of/behind the vehicle. If a rear sensor is
faulty, only the obstacles in area A are dis-
p l
a
yed ››› Fig. 223. If a front sensor is faulty,
only the obstacles in area B are displayed.
Hav e the f
au
lt corrected by a specialised
workshop without delay.
261
Technical data
Advice
Operation
Emergencies
Safety
Page 264 of 348

Operation
Driving with a trailer Fig. 227
ParkPilot display on the screen with
tr ai
l
er attached. In vehicles equipped with a towing bracket
dev
ic
e fr
om the factory, when the trailer is
connected electrically, the Parking Aid rear
sensors will not be activated when reverse
gear is engaged, when the selector lever is
turned to position R or when the button is
pressed.
The distance to possible obstacles at the rear
of the vehicle and at its sides will not be dis-
played on the screen and will not be indica-
ted by means of audible sound signals.
The Easy Connect system screen will only dis-
play objects detected at the front, and the ve-
hicle's trajectory will be hidden. Braking while manoeuvring function* 3 Only valid with Parking System Plus
As
soon a
s an obstacle is detected while re-
versing, the braking while manoeuvring func-
tion activates the emergency braking. De-
pending on the equipment, the braking while
manoeuvring function can also activate
emergency braking while moving forwards.
The emergency braking function is used to
minimise collisions. Vehicle speed must not
be higher than 10 km/h.
The braked manoeuvre function is active or
inactive when the parking light is lit or off, re-
spectively. If an emergency braking is activa-
ted, the function will remain inactive until the
gear is changed.
The Parking System’s limitations apply.
The braking while manoeuvring function is
controlled in the Easy Connect system with
the button and the
S
ET
TINGS and
P ark
and m
anoeuvre function buttons.
● on – permits the u
se of the braking
while manoeuvring function.
● off – does not
permit the use of the
braking while manoeuvring function.
Temporary suppression of emergency brak-
ing
● When the function is deactivated with the
Brak in
g while manoeuvring button that appearson the P
arking System
s
c
reen of the Easy
Connect system.
● Whenever any of the car doors, rear lid or
bonnet are opened.
P
arking aid (Park Pilot)*
Des
cription Assorted assistance systems – which vary
depending on the equipment
fitt
ed in the car
– will help you when parking or manoeu-
vring.
The rear parking aid is an audible assistant
that warns of obstacles located behind the
vehicle.
There are sensors integrated in the rear
bumper. When they detect an obstacle, you
are alerted by audible warnings and visually
on the Easy Connect system.
If the Top View Camera* is installed, the rear
parking aid will issue an audible warning
about objects near the rear of the vehicle,
and the Top View Camera* image will be
available on the Easy Connect screen, giving
a real image of the objects around the car.
Make particularly sure that the sensors are
not covered by adhesives, residues, dirt and
the like, as this could affect the system's op-
eration. Cleaning instructions ››› page 287.
262