Page 177 of 348

Air conditioning
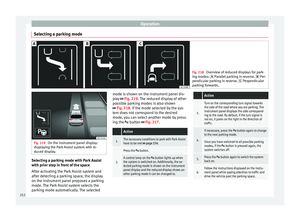
Functioning mode of automatic air recircula-
tion (air c onditionin
g menu)
W
ith the automatic air recirculation mode ac-
tivated, the entry of fresh air into the cabin
interior is enabled. If the system detects a
high concentration of hazardous substances
in the ambient air, air recirculation mode is
switched on automatically. When the level of
impurities drops to within a normal range, re-
circulation mode is switched off.
The system is unable to detect unpleasant
smells.
The air recirculation will not connect auto-
matically in versions without humidity sensor
and in the following external conditions:
● The outside temperature is lower than +3°C
(+38°F).
● The cooling system is switched off and the
outside temper
ature is below +10°C (+50°F).
● The cooling system is switched off, the out-
side temper
ature is below +15°C (+59°F) and
the windscreen wipers are switched on.
Activation/deactivation of automatic air recir-
culation is done in the air conditioner menu,
under Configuration. WARNING
Observe the safety warnings ›››
in Intro-
duction on pag e 171
. ●
If the c oo
ling system is switched off and air
recirculation mode switched on, the windows
can mist over very quickly, considerably limit-
ing visibility.
● Switch air recirculation mode off when it is
not requir
ed. CAUTION
Do not smoke when air recirculation is
sw itc
hed on in vehicles with an air condition-
er. The smoke taken in could lie on the cool-
ing system vaporiser and on the activated
charcoal cartridge of the dust and pollen fil-
ter, leading to a permanently unpleasant
smell. Note
Climatronic: air recirculation mode is activa-
ted t o pr
event exhaust gas or unpleasant
odours from entering the vehicle interior
when it is in reverse and while the automatic
windscreen wiper is working. Heated windscreen*
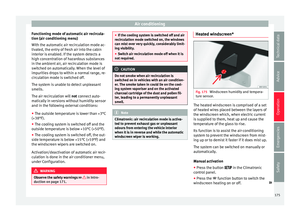
Fig. 175
Windscreen humidity and tempera-
t ur
e sen
sor. The heated windscreen is comprised of a set
of
he
at
ed wires placed between the layers of
the windscreen which, when electric current
is supplied to them, heat up and cause the
temperature of the glass to rise.
Its function is to assist the air-conditioning
system to prevent the windscreen from mist-
ing up or to demist it faster if it does mist up.
The system can be switched on manually or
automatically.
Manual activation
● Press the button in the Climatr
onic
control panel.
● Press the function b
utton to switch the
windscreen heating on or off. »
175
Technical data
Advice
Operation
Emergencies
Safety
Page 178 of 348
Operation
Automatic activation
T o f
ac
ilitate use of the heated windscreen it
can turn on automatically.
The Climatronic control panel can detect the
danger of the windscreen misting thanks to
its temperature and humidity sensors,
switching the system on or off accordingly
››› Fig. 175. Moreover, it will also be activated
automatically when the button is
pressed on the Climatronic control panel.
Adjust it as follows for it to switch on auto-
matically:
● Press the button in the Climatr
onic
control panel.
● Press the SETTINGS function b
utton on the
infotainment system.
● Switch the function on or off by pressing
the Automatic
windscreen heating function but-
t on. 176
Page 179 of 348

Air conditioning
Auxiliary heater (additional
he at
er)*
Intr
oduction The auxiliary heater runs on fuel from the ve-
hicl
e's
tank and can be used while you are
driving and when the vehicle is stationary.
The auxiliary heater can be switched on using
the fast heating button of the air condition-
ing controls, with the remote control or by
previously programming a departure time in
the auxiliary heater menu of the infotainment
system.
In winter, with the auxiliary heater switched
on, you can defog the windscreen and leave
it free of ice and snow (if it is a thin layer) be-
fore you start driving.
If the outside temperature is very high, the
vehicle interior can be ventilated with the en-
gine off using the auxiliary heater. WARNING
Swallowing a battery with a 20 mm diameter
or any other b
utton battery can cause serious
and even fatal injuries within a very short
time.
● Always keep the remote control, keyrings
with batt
eries, the spare batteries, button
batteries and all other batteries over 20 mm
out of reach of children. ●
If y
ou suspect that someone may have
swallowed a battery, seek immediate medical
attention. WARNING
The auxiliary heater exhaust fumes contain
c arbon mono x
ide, an odourless and colour-
less toxic gas. Carbon monoxide can cause
people to lose consciousness. It can also
cause death.
● Never switch on the auxiliary heater or
leav
e it running in enclosed spaces or areas
with no ventilation.
● Never programme the auxiliary heater so
that it
switches itself on and is running in an
enclosed space or an area with no ventila-
tion. WARNING
The components of the auxiliary heater are
extr emely
hot and could cause a fire.
● Always park your vehicle so that no part of
the exhau
st system can come in contact with
easily flammable materials that might be be-
low the vehicle, such as dried grass. CAUTION
Never place food, medicines or other temper-
atur e-
sensitive objects close to the air vents.
Food, medicines and other objects sensitive
to heat or cold may be damaged or made un- suitable for use by the air coming from the
vent
s. Note
After switching the engine on with a 12-volt
b att er
y that is heavily discharged or newly
changed or after a jump start some system
settings (such as the time, the date, the per-
sonalised comfort settings and the program-
ming) might be altered or deleted. Check and
correct these settings once the battery is suf-
ficiently charged. Switching on and off the auxiliary
he
at
er
Switching the auxiliary heater on:
Manually with the fast heating button of the air
conditioner controls. The control lamp of the
button will light up
››› page 170.
Manually with the remote control
››› page 178.
Automatically by programming and activating a
departure time ››› page 179.
Switching the auxiliary heater off:
Manually with the fast heating button of the air
conditioner controls. The control lamp of the
button goes off
››› page 170.
Manually with the remote control
››› page 178.» 177
Technical data
Advice
Operation
Emergencies
Safety
Page 180 of 348

OperationSwitching the auxiliary heater off:
Automatically once the programmed departure
time has arrived or after the programmed oper-
ating time has elapsed
››› page 179.
Automatically when the control lamp (fuel
level indicator) ››› page 292 lights up.
Automatically when the 12-volt battery charge
is too low ››› page 305. Special feature
Once sw
it
ched off, the auxiliary heater will
continue to operate for a short period of time
in order to burn the fuel remaining in the sys-
tem and also to expel the exhaust fumes.
Remote control Fig. 176
Auxiliary heater: remote control.
Fig. 176Meaning
Switch the auxiliary heater on
Switch the auxiliary heater off
1Control lamp
If the buttons of the remote control are press-
ed unnec
e
ssarily, it could switch on the auxil-
iary heater involuntarily, even when it is out
of range or when the control lamp is flashing.
Control lamp on the remote control
When the buttons are pressed, the control
lamp on the remote control provides the user
with different information:
Control lamp 1Meaning
It will light for about 2 sec-
onds in green.The auxiliary heater has
been switched on using
the
button.
It will light for about 2 sec-
onds in red.The auxiliary heater has
been switched off using
the
button.
It flashes green slowly for
approximately 2 seconds
(approximately 4 times per
second).No on a)
signal has been
received.
Control lamp 1Meaning
It flashes green quickly for
approximately 2 seconds
(approximately 10 times
per second).The auxiliary heater is
locked.
Possible causes: The fuel
tank is almost empty, the
12-volt battery charge is
too low or there is a fault.
It flashes orange for ap-
proximately 2 seconds
(approximately 4 times per
second).No off a)
signal has been
received.
It will light for about 2 sec-
onds in orange, then
green or red.The remote control battery
is almost flat. However,
the on or off signal has
been received.
It will light for about 2 sec-
onds in orange, then it
flashes green or red.The remote control battery
is almost flat. No on or off
signal has been received.
It flashes orange for ap-
proximately 5 seconds.The remote control battery
is flat. No on or off signal
has been received.
a) The remote control is out of range. In this case it will be nec-
essary to get closer to the vehicle and press the corresponding
button again.
Replacing the remote control battery
If, when pressing the buttons of the remote
control, control lamp 1 flashes orange for
ap pr
o
ximately 5 seconds or it does not
switch on, the remote control battery will
need replacing.
178
Page 181 of 348

Air conditioning
The battery is located beneath a cover on the
b ac
k
of the remote control.
● To open the cover, lift it slightly at the bot-
tom and slide it
down.
● Remove the old battery.
● Insert the new battery. When doing so, take
into acc
ount the polarity and use batteries of
the same type ››› .
● Replace the battery cover by inserting the
t ab
s
at the top and pressing the bottom.
Range
The receiver is inside the vehicle. The remote
control, when fitted with new batteries, has a
range of several hundred metres. Obstacles
between the remote control and the vehicle,
bad weather conditions and discharged bat-
teries can considerably reduce the range of
the remote control. CAUTION
● The ra dio fr
equency remote control con-
tains electronic components. Therefore, avoid
getting it wet and exposing it to knocks or di-
rect sunlight.
● The use of inappropriate batteries may
damag
e the radio frequency remote control.
For this reason, always replace the used bat-
tery with another of the same voltage, size
and specifications. For the sake of the environment
● Ple a
se dispose of your used batteries cor-
rectly and with respect for the environment.
● The remote control battery may contain
perch
lorate. Observe the legal provisions re-
garding disposal.
● Care should be taken so as not to operate
the remote c
ontrol unintentionally so as to
prevent the auxiliary heater being switched
on accidentally. Programming the auxiliary heater
Before pr
ogramming it, check that the vehi-
c l
e's date and time are set correctly ››› .
The aux i
li
ary heater is programmed in the
Auxiliary heater menu of the infotain-
ment system.
Open the Auxiliary heater menu.
● Press the button in the Clim
atronic
control panel.
● Press the function b
utton.
Function button: function
Switch off: The auxiliary heater is immediately switched
off.
Function button: function
Heat, Ventilate: Set to heat or ventilate the vehicle interi-
or when the auxiliary heater is switched on. By pressing
the function button
, you can select the desired
mode.
Set: Opens the Auxiliary heater menu.
Departure time 1, Departure time 2, Departure time 3:
Three different departure times (hh.mm) may be
programmed. If the auxiliary heater should only
be switched on a certain day of the week, this can
also be selected.
Duration: The duration determines the operating
time of the auxiliary heater when switched on us-
ing the fast heating button
on the air condi-
tioning controls. The duration is also used to cal-
culate the departure time for the manual air con-
ditioner. It can be set between 10 and 60 mi-
nutes at 10-minute intervals.
This returns to the main menu.
The programmed departure time determines
the ap
pr
o
ximate time it should take to reach
the temperature set in the vehicle. The start
of the heating operation is determined auto-
matically depending on the outside tempera-
ture.
Checking the programming
When a departure time is activated and the
ignition is switched off the control lamp of
the fast heating button lights up for ap-
proximately 10 seconds. »
179
Technical data
Advice
Operation
Emergencies
Safety
Page 182 of 348

Operation
WARNING
Never programme the auxiliary heater so that
it sw it
ches itself on and is running in an en-
closed space or an area with no ventilation.
The auxiliary heater exhaust fumes contain
carbon monoxide, an odourless and colour-
less toxic gas. Carbon monoxide can cause
people to lose consciousness. It can also
cause death. Operating instructions
The auxiliary heater exhaust system located
belo
w the
v
ehicle must be kept clear of snow,
mud and other objects. The exhaust fumes
must be able to exit freely. The emissions
generated by the auxiliary heater are re-
moved via an exhaust pipe fitted underneath
the vehicle.
On heating the vehicle interior, depending on
the outside temperature, the warm air is first
directed at the windscreen and then to the
rest of the vehicle interior through the air
vents. Directing the diffusers – towards the
windows for example – can affect air distribu-
tion.
When will the auxiliary heater not be activa-
ted?
● The auxiliary heater requires about as
much po w
er as the dipped beam headlights.
If the 12-volt battery charge is too low, the auxiliary heater switches off automatically
and cannot
be sw
itched on. This avoids prob-
lems when starting the engine.
● The heating must be activated every time
you want
to set off. Similarly, the departure
time must reactivate each time.
● The control lamp (fuel l
evel indicator)
lights up. Note
● Noise s
will be heard while the auxiliary
heater is running.
● When the air humidity is high and the in-
side temper
ature low, condensation from the
heating and ventilating system may evapo-
rate when the auxiliary heater is switched on.
In this case, steam may be released from un-
derneath the vehicle. This does not mean
that there is a vehicle malfunction.
● If the vehicle is tilted, e.g. if parked on a
slope, the operation of
the auxiliary heater
may be restricted if the fuel tank level is low
(just above the reserve level).
● If the auxiliary heater is used a number of
times f
or a long period of time, the 12-volt
battery will lose its charge. To recharge the
battery, the vehicle must be driven for a num-
ber of kilometres from time to time. As a
guideline: The journey should last approxi-
mately as long as the heater was connected.
● At temperatures below +5°C (+41°F), the
auxili
ary heater may switch itself on automat-
ically when the engine is switched on. The auxiliary heater is switched off again after a
cer
t
ain time.180
Page 183 of 348

Driving
Driving St ar
tin
g and stopping the en-
gine
Switching the ignition on and starting
the engine with the key Fig. 177
Ignition key positions. Read the additional information carefully
› ›
›
page 30
Diesel engines can take a few seconds longer
than usual to start on cold days. Therefore
the clutch pedal (manual gearbox) or the
brake pedal (automatic gearbox) must re-
main pressed until the engine starts up. Dur-
ing preheating, the warning lamp remains
lit.
The preheating time depends on the coolant
and exterior temperatures. With the engine at operating temperature, or at outside temper-
ature
s above +8°C, the warning lamp will
light up for about one second. This means
that the engine starts immediately.
If the engine does not immediately start up,
interrupt the starting process and try again
after 30 seconds. To start the engine again,
return the key to position 1 .
St ar
t
-Stop System*
If the vehicle is stopped and the Start-Stop
system* switches off the engine, the ignition
remains switched on.
Automatic gearbox: before leaving the vehi-
cle, make sure that the ignition is switched
off and the selector lever is in position P.
Driver messages on the instrument panel
display
Press the clutch
This message appears on vehicles with a
manual gearbox if the driver tries to start the
engine without having the clutch pedal
pressed. The engine will only start if you
press the clutch pedal.
Press the brake This message appears on vehicles with an
automatic gearbox if the driver tries to start
the engine without having the brake pedal
pressed. Select N or P
This me
ssage appears if you try to start or
stop the engine when the selector lever of
the automatic gearbox is not in position P or
N. The engine can only start or stop in certain
positions.
Engage position P; the vehicle
can move; doors can only close in
position P.For safety reasons, this driver message ap-
pears and an audible warning sounds if the
selector lever of the automatic gearbox is not
in position P after you switch off the ignition.
Put the selector lever in position P, otherwise
the vehicle could roll away.
Gear change: selector lever in
the drive position! This driver message is displayed when the
selector lever is not in the position P when
the driver door is opened. Additionally, a
buzzer will sound. Put the selector lever in
position P, otherwise the vehicle could roll
away.
Ignition is switched on
This driver message is displayed and a buz-
zer is sounded when the driver door is
opened with the ignition switched on. »
181
Technical data
Advice
Operation
Emergencies
Safety
Page 184 of 348

Operation
WARNING
● Never ru n the en
gine in confined spaces, as
the exhaust gases are poisonous. CAUTION
Avoid high engine speeds, full throttle and
extr eme lo
ad conditions until the engine has
reached its normal operating temperature,
otherwise this can damage the engine. For the sake of the environment
Do not warm up the engine by idling it. You
shoul d driv
e off as soon as you start the en-
gine. This will help avoid unnecessary ex-
haust emissions. Note
● If it i
s difficult to turn the ignition key to
the position 2 , turn the steering wheel to
both side s
to release the steering lock.
● When starting from cold, the engine may be
a little noisy
for the first few seconds until oil
pressure has built up in the hydraulic valve
lifters. This is quite normal, and no cause for
concern.
● If the vehicle battery is disconnected and
reconnect
ed, the key must remain in the posi-
tion 1 for around 5 seconds before starting
up.
● Vehic
les with automatic gearbox: depend-
ing on the cou
ntry, after switching off the ig-
nition, you can only remove the ignition key if the selector lever is in position “P” (parking
lock). Ne
xt, the sel
ector lever is locked. Switching off the engine with the key
Switching off the engine
– Stop the vehicle.
– Turn the ignition key to position 1 ›››
Fig. 177.
Eng agin
g the steering wheel lock
In vehicles with automatic gearbox, the igni-
tion key can only be removed when the selec-
tor lever is in position P.
– Remove the key from the ignition in posi-
tion 1
› ›
› Fig. 177
››› .
– Turn the steering wheel until you hear it en-
gag
e.
P
ossible vehicle theft is prevented with the
steering lock engaged. WARNING
● Never sw it
ch the engine off until the vehi-
cle is stationary. The brake servo and power
steering functions will not be completely cov-
ered under warranty. More force may also be
needed to turn the steering wheel or to brake.
As you cannot steer and brake in the normal
manner, there is a greater risk of accidents
and serious injury. ●
Never r emo
ve the key from the ignition if
the vehicle is in motion. Otherwise, the steer-
ing could suddenly lock, making it impossible
to steer the vehicle: risk of accident!
● Always take the key with you when you
leav
e the vehicle. This is particularly impor-
tant if there are children in the vehicle, as
they might otherwise be able to start the en-
gine or use power-operated equipment (e.g.
the electric windows), which could cause in-
juries. CAUTION
If the engine has been running under high
loa d f
or a long time, there is a risk of heat
building up in the engine compartment after
it has been switched off; this could cause en-
gine damage. For this reason, you should idle
the engine for approximately 2 minutes be-
fore you switch it off. Note
After the engine is switched off the radiator
fan m a
y run on for up to 10 minutes, even if
the ignition is switched off. It is also possible
that the fan turns itself on once more if the
coolant temperature increases due to the
heat accumulated in the engine compartment
or due to its prolonged exposure to solar ra-
diation. 182