Page 201 of 416

199
In this case, this warning lamp
flashes for a few seconds then goes
of f.
Going into engine
START mode
With a manual gearbox, the Stop & Start
warning lamp goes off on the instrument panel
and the engine restarts automatically when you
press the clutch pedal fully down to the floor.
With an automatic gearbox , the Stop & Start
warning lamp on the instrument panel goes off
and the engine restarts automatically when:
-
y
ou release the brake pedal with the gear
selector in position D or M ,
-
y
ou are in position N with the brake pedal
released and you move the gear selector to
position D or M,
-
y
ou engage reverse.
This operation is perfectly normal.
With an electronic gearbox
, the Stop & Start
warning lamp on the instrument panel goes off
and the engine restarts automatically when:
-
y
ou release the brake pedal with the gear
selector in position A or M ,
-
y
ou are in position N with the brake pedal
released and you move the gear selector to
position A or M,
-
y
ou engage reverse.
Special cases: START mode
activated automatically
START mode is invoked automatically in
certain temporary conditions (examples:
battery charge, engine temperature, braking
assistance, air conditioning setting) to assure
correct operation of the system and mainly
when:
-
y
ou open the driver's door,
-
y
ou open a sliding side door,
-
y
ou unfasten the driver's seat belt,
-
t
he speed of the vehicle exceeds 16 mph
(25
km/h) or 2 mph (3 km/h) (depending on
the engine) with a manual gearbox,
-
t
he speed of the vehicle exceeds 2 mph
(3
km/h) with an automatic gearbox.In this case, this warning lamp
flashes for a few seconds then goes
of f.
Deactivation/Activation
With/Without audio system
This operation is perfectly normal.
With touch screen
In the " Driving/Vehicle " menu,
activate/deactivate " Stop & Star t
system".
If the system has been deactivated
in STOP mode, the engine restarts
immediately.
To deactivate the system:
F
P
ress the button, its indicator
lamp comes on, the system is
deactivated.
To activate the system:
F
P
ress this button, the indicator
lamp goes off, the system is
activated.
6
Driving
Page 202 of 416

200
The system reactivates automatically
every time the engine is started by the
driver.
Opening the bonnet
Driving on flooded roadsOperating fault
Depending on your vehicle's equipment:In the event of a fault with the
system, this warning lamp flashes in
the instrument panel.
The indicator lamp in this button
flashes and a message appears,
accompanied by an audible signal.
Have it checked by a PEUGEOT dealer or a
qualified workshop.
If a fault occurs in STOP mode, the vehicle may
stall.
All of the instrument panel warning lamps come
on.
Depending on version, an alert message may
also be displayed, asking you to place the gear
lever in position N and put your foot on the
brake pedal.
With the vehicle stationary, you must switch off
the ignition and then start the engine again.
Head-up display
System which projects various information onto
a blade in the driver's field of vision so that they
do not have to take their eyes off the road.
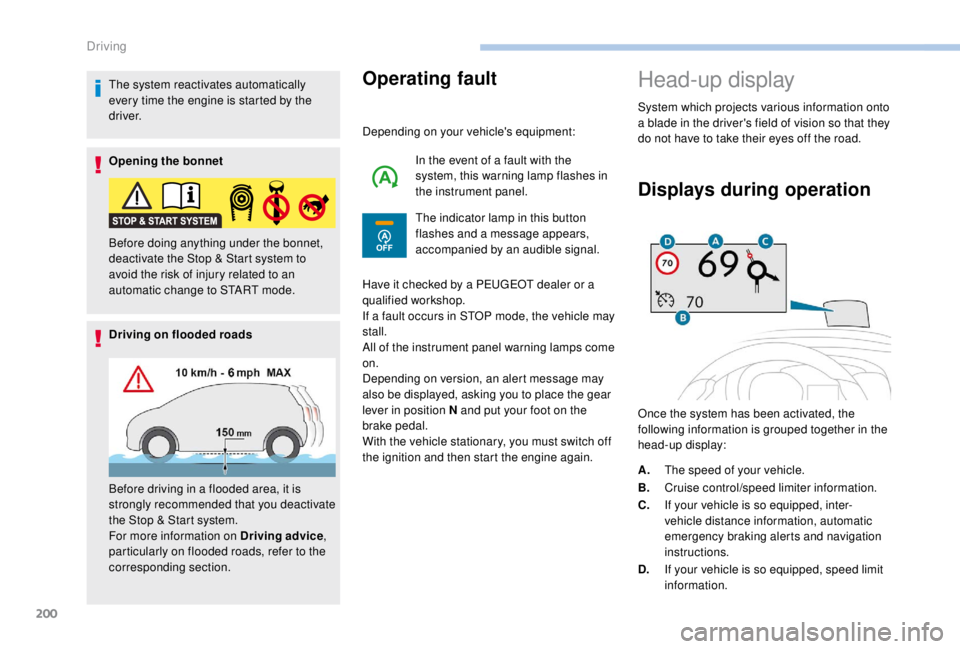
Displays during operation
Once the system has been activated, the
following information is grouped together in the
head-up display:
Before doing anything under the bonnet,
deactivate the Stop & Start system to
avoid the risk of injury related to an
automatic change to START mode.
Before driving in a flooded area, it is
strongly recommended that you deactivate
the Stop & Start system.
For more information on Driving advice
,
particularly on flooded roads, refer to the
corresponding section. A.
The speed of your vehicle.
B. Cruise control/speed limiter information.
C. If your vehicle is so equipped, inter-
vehicle distance information, automatic
emergency braking alerts and navigation
instructions.
D. If your vehicle is so equipped, speed limit
information.
Driving
Page 203 of 416

201
For more information on Navigation, refer
to the Audio equipment and telematics
section.
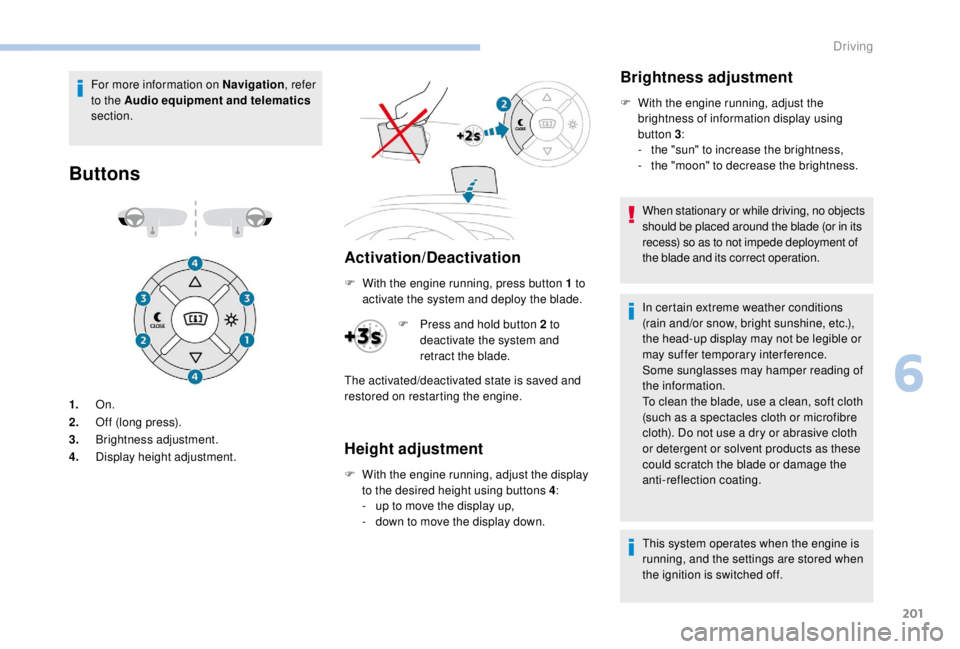
Buttons
Activation/Deactivation
1. On.
2. Off (long press).
3. Brightness adjustment.
4. Display height adjustment. F
W
ith the engine running, press button 1 to
activate the system and deploy the blade.
Height adjustment
F With the engine running, adjust the display to the desired height using buttons 4 :
-
u
p to move the display up,
-
d
own to move the display down.
Brightness adjustment
F With the engine running, adjust the brightness of information display using
button 3 :
-
t
he "sun" to increase the brightness,
-
t
he "moon" to decrease the brightness.
When stationary or while driving, no objects
should be placed around the blade (or in its
recess) so as to not impede deployment of
the blade and its correct operation.
In certain extreme weather conditions
(rain and/or snow, bright sunshine, etc.),
the head-up display may not be legible or
may suffer temporary interference.
Some sunglasses may hamper reading of
the information.
To clean the blade, use a clean, soft cloth
(such as a spectacles cloth or microfibre
cloth). Do not use a dry or abrasive cloth
or detergent or solvent products as these
could scratch the blade or damage the
anti-reflection coating.
This system operates when the engine is
running, and the settings are stored when
the ignition is switched off.
F
P
ress and hold button 2
to
deactivate the system and
retract the blade.
The activated/deactivated state is saved and
restored on restarting the engine.
6
Driving
Page 204 of 416

202
Memorising speeds
This function allows speed settings to
be stored that will then be offered for
configuration of two systems: speed limiter
or cruise control.
You can memorise up to six speed settings for
each system.
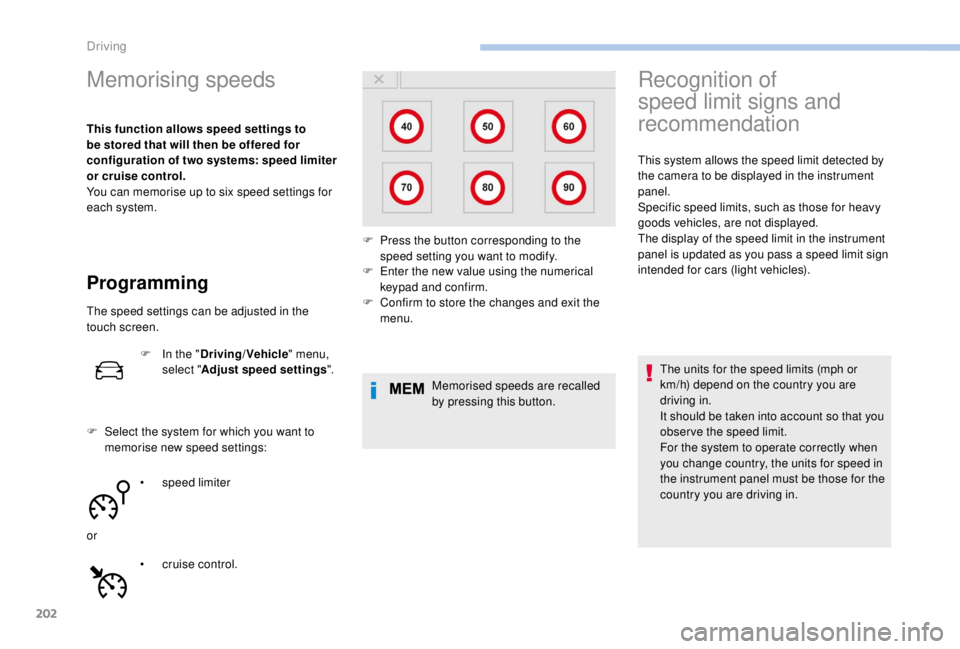
Programming
The speed settings can be adjusted in the
touch screen.F
I
n the "Driving/Vehicle " menu,
select " Adjust speed settings ".
F
S
elect the system for which you want to
memorise new speed settings:
•
sp
eed limiter
or •
c
ruise control. F
E
nter the new value using the numerical
keypad and confirm.
F C onfirm to store the changes and exit the
menu.
Memorised speeds are recalled
by pressing this button.
Recognition of
speed limit signs and
recommendation
This system allows the speed limit detected by
the camera to be displayed in the instrument
panel.
Specific speed limits, such as those for heavy
goods vehicles, are not displayed.
The display of the speed limit in the instrument
panel is updated as you pass a speed limit sign
intended for cars (light vehicles).
The units for the speed limits (mph or
km/h) depend on the country you are
driving in.
It should be taken into account so that you
obser ve the speed limit.
For the system to operate correctly when
you change country, the units for speed in
the instrument panel must be those for the
country you are driving in.
F
P
ress the button corresponding to the
speed setting you want to modify.
Driving
Page 205 of 416

203
The automatic reading of road signs is a
driving assistance system and does not
always display speed limits correctly.
The speed limit signs present on the road
always take priority over the display by the
system.
The system cannot in any circumstances
replace the need for vigilance on the part
of the driver.
The driver must observe the driving
regulations and must adapt the speed of
the vehicle to suit the weather and traffic.
It is possible for the system to not display
the speed limit if it does not detect a
speed limit sign within a preset period.
The system is designed to detect signs
that conform to the Vienna Convention on
road signs.
To maintain correct operation of the
system: regularly clean the area in front of
the camera.Principles
Depending on equipment, the
system takes account of speed limit
information from the navigation
system mapping.
Depending on equipment, using a camera at
the top of the windscreen, this system detects
and reads speed limit and end of speed limit
signs.
Depending on equipment, the system takes
account of the camera and information from the
navigation system mapping. For the speed limit information given
by the navigation system to be correct,
your mapping software must be regularly
updated.
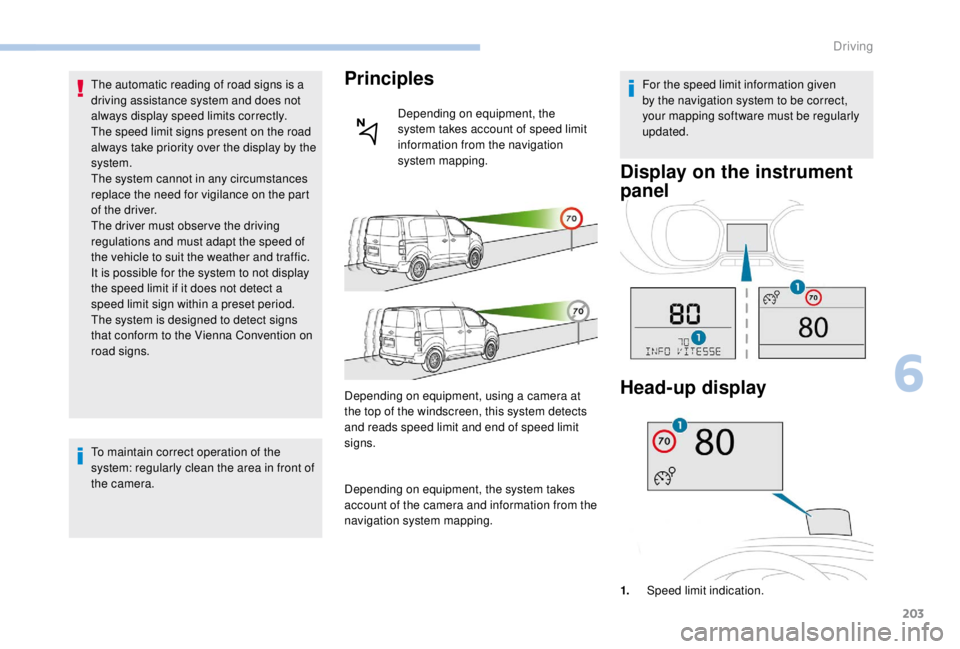
Display on the instrument
panel
Head-up display
1.
Speed limit indication.
6
Driving
Page 206 of 416

204
Speed displayActivation/Deactivation
The system is activated or deactivated via the
vehicle configuration menu.
With audio system
In the "Personalisation-
configuration " menu,
activate/deactivate " Speed
recommendation ".
With the touch screen
In the "Driving/Vehicle " menu,
activate/deactivate " Displaying of
the recommended speed. ".
Operating limits
The legislation on speed limits is specific to
each country.
The system does not take account of reduced
speed limits in the following cases:
-
p
oor weather (rain, snow),
-
a
tmospheric pollution,
-
t
railer, caravan,
-
d
riving with snow chains fitted,
-
p
uncture repair using the temporary repair
kit,
-
y
oung drivers. The following situations may inter fere with the
operation of the system or prevent it working:
-
p
oor visibility (inadequate street lighting,
falling snow, rain, fog),
-
h
idden road signs (other vehicles,
vegetation, snow),
-
s
peed limit signs that do not conform to the
standard, are damaged or distorted.
Clean the area of the windscreen in front
of the camera regularly.
Memorising the speed
setting
This function is additional to the display of
Speed limit recognition .
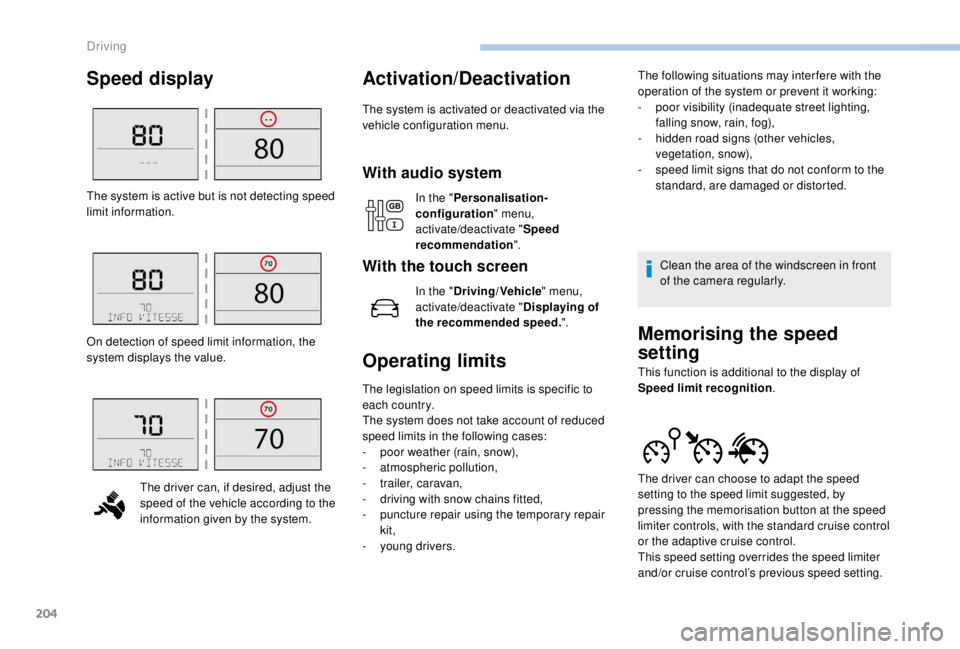
The system is active but is not detecting speed
limit information.
On detection of speed limit information, the
system displays the value.
The driver can, if desired, adjust the
speed of the vehicle according to the
information given by the system. The driver can choose to adapt the speed
setting to the speed limit suggested, by
pressing the memorisation button at the speed
limiter controls, with the standard cruise control
or the adaptive cruise control.
This speed setting overrides the speed limiter
and/or cruise control’s previous speed setting.
Driving
Page 207 of 416
205
Display on the instrument panelHead-up display
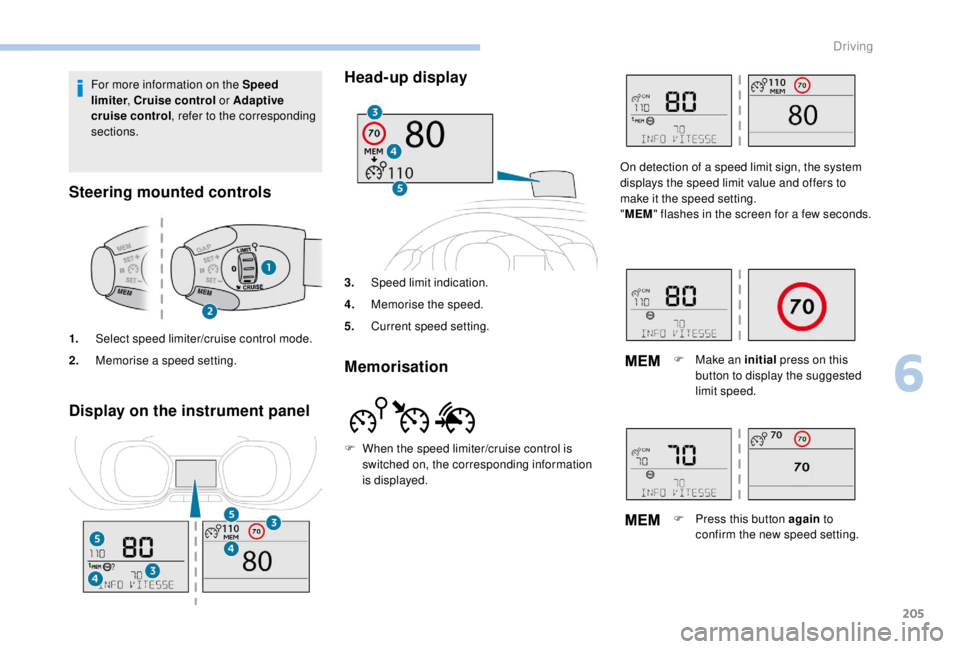
3.
Speed limit indication.
4. Memorise the speed.
5. Current speed setting.
Memorisation
For more information on the Speed
limiter , Cruise control or Adaptive
cruise control , refer to the corresponding
sections.
Steering mounted controls
1. Select speed limiter/cruise control mode.
2. Memorise a speed setting.
F
W
hen the speed limiter/cruise control is
switched on, the corresponding information
is displayed. On detection of a speed limit sign, the system
displays the speed limit value and offers to
make it the speed setting.
"
MEM " flashes in the screen for a few seconds.
F
M
ake an initial press on this
button to display the suggested
limit speed.
F
P
ress this button again to
confirm the new speed setting.
6
Driving
Page 208 of 416

206
Speed limiter ("LIMIT")
System which prevents the
vehicle from exceeding the speed
programmed by the driver.
Once the programmed speed limit is reached,
additional pressure on the accelerator pedal
has no effect.
The speed setting value is stored when
the ignition is switched off.
For more information on this
button and the Dynamic
cruise control , refer to the
corresponding section.
For more information on
Memorising speeds , refer to the
corresponding section.
For more information on Speed limit
recognition and memorising them in
particular, refer to the corresponding
section.
Steering mounted controls Display on the instrument panel
Head-up display
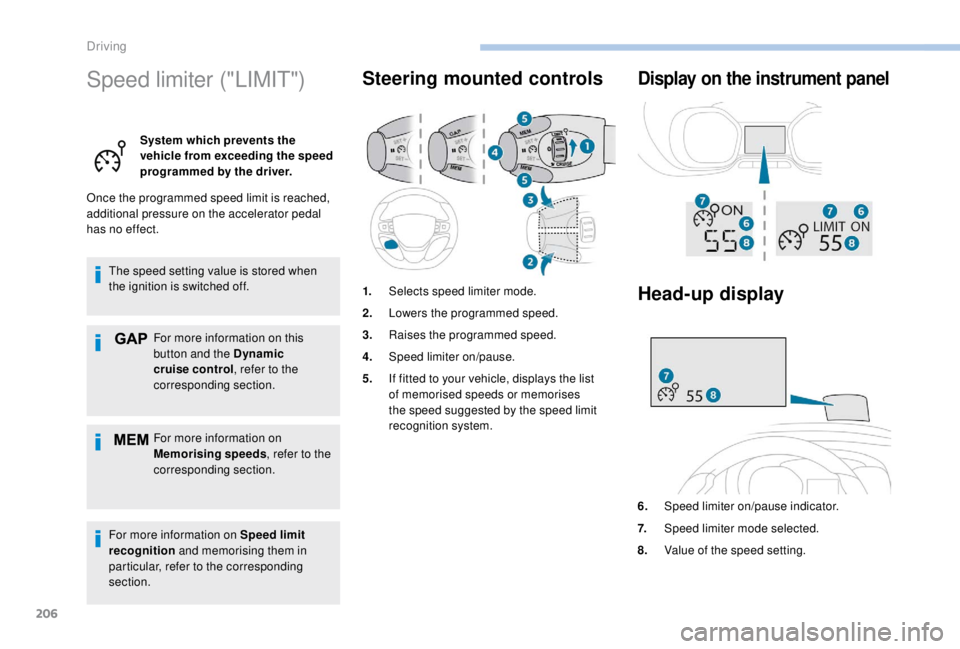
6. Speed limiter on/pause indicator.
7. Speed limiter mode selected.
8. Value of the speed setting.
1.
Selects speed limiter mode.
2. Lowers the programmed speed.
3. Raises the programmed speed.
4. Speed limiter on/pause.
5. If fitted to your vehicle, displays the list
of memorised speeds or memorises
the speed suggested by the speed limit
recognition system.
Driving