2018 MERCEDES-BENZ G-CLASS tow
[x] Cancel search: towPage 22 of 294
Transmissionsee Automatic transmission
Transmission positions .................... 114
Transporting the vehicle .................. 253
Traveling uphill
Brow of hill ..................................... 132
Trim pieces (cleaning instruc-
tions) .................................................. 241
Trip computer (on-board com-
puter) .................................................. 163
Trip odometer
Calling up ....................................... 163
Resetting (on-board computer) ...... 163
Turn signals
Display message ............................ 180
Replacing bulbs (front) ..................... 91
Switching on/off .............................. 88
TV
Operating (on-board computer) ..... 166
see Separate operating instructions
Two-way radio
Frequencies ................................... 281
Installation ..................................... 281
Transmission output (maximum) .... 281
TWR (Tongue Weight Rating) (defi-
nition) ................................................. 275
Type identification plate
see Vehicle identification plate
U
UnlockingEmergency unlocking ....................... 68
From inside the vehicle (central
unlocking button) ............................. 67
USB devices
Connecting to the Media Inter-
face ...............................................2 08
V
Vanity mirror
Sun visor ........................................ 216
Vehicle
Correct use ...................................... 27
Data acquisition ............................... 28
Display message ............................ 190
Equipment ....................................... 24 Individual settings .......................... 168
Limited Warranty .............................2
8
Loading .......................................... 266
Locking (in an emergency) ............... 68
Locking (SmartKey) .......................... 63
Lowering ........................................ 278
Maintenance .................................... 25
Operation outside the USA/
Canada ............................................ 25
Parking .......................................... 122
Parking for a long period ................ 124
Pulling away ................................... 106
Raising ........................................... 276
Securing from rolling away ............ 276
Tow-starting ................................... 254
Towing ........................................... 251
Transporting .................................. 253
Unlocking (in an emergency) ........... 68
Unlocking (SmartKey) ...................... 63
Vehicle data ................................... 288
Vehicle data ....................................... 288
Vehicle data (off-road driving)
Approach/departure angle ............ 290
Fording depth ................................ 290
Maximum gradient climbing abil-
ity .................................................. 290
Vehicle dimensions ........................... 288
Vehicle emergency locking ................ 68
Vehicle identification number
see VIN
Vehicle identification plate .............. 282
Vehicle tool kit .................................. 244
Ventilation
Setting the airflow ........................... 99
Video
Operating the DVD ......................... 166
see also Digital Operator's Man-
ual .................................................. 203
VIN
Type plate ...................................... 282
W
Warning and indicator lampsABS ................................................ 194
Brakes ........................................... 193
Check Engine ................................. 199
Coolant .......................................... 199
20Index
Page 29 of 294

subject to the two following two conditions: 1)
These devices may not cause harmful interfer-
ence, and 2) These devices must accept any
interference received, including interference
that may cause undesired operation. Changes
or modifications not expressly approved by the
party responsible for compliance could void the
user’s authority to operate the equipment."
Canada:"The wireless devices of this vehicle
comply with Industry Canada license-exempt
RSS standard(s). Operation is subject to the fol-
lowing two conditions: (1) These devices may
not cause interference, and (2) These devices
must accept any interference, including inter-
ference that may cause undesired operation of
the device."
Diagnostics connection
The diagnostics connection is only intended for
the connection of diagnostic equipment at a
qualified specialist workshop.
GWARNING
If you connect equipment to a diagnostics
connection in the vehicle, it may affect the
operation of vehicle systems. As a result, the
operating safety of the vehicle could be affec-
ted. There is a risk of an accident.
Only connect equipment to a diagnostics con-
nection in the vehicle, which is approved for
your vehicle by Mercedes-Benz.
GWARNING
Objects in the driver's footwell may restrict
the clearance around the pedals or block a
depressed pedal. This jeopardizes the oper-
ating and road safety of the vehicle. There is a risk of an accident.
Stow all objects securely in the vehicle so that
they do not get into the driver's footwell.
When using floormats or carpets, make sure
that they are properly secured so that they do not slip or obstruct the pedals. Do not place
several floormats or carpets on top of one
another.
!If the engine is switched off and equipment
on the diagnostics connection is used, the
starter battery may discharge. Connecting equipment to the diagnostics con-
nection can lead to emissions monitoring infor-
mation being reset, for example. This may lead
to the vehicle failing to meet the requirements of
the next emissions test during the main inspec-
tion.
Qualified specialist workshop
An authorized Mercedes-Benz Center is a quali-
fied specialist workshop. It has the necessary
specialist knowledge, tools and qualifications to
correctly carry out the work required on your
vehicle. This is especially the case for work rel-
evant to safety.
Observe the notes in the Maintenance Booklet.
Always have the following work carried out at an
authorized Mercedes-Benz Center:
Rwork relevant to safety
Rservice and maintenance work
Rrepair work
Ralterations, installation work and modifica-
tions
Rwork on electronic components
Correct use
If you remove any warning stickers, you or oth-
ers could fail to recognize certain dangers.
Leave warning stickers in position.
Observe the following information when driving
your vehicle:
Rthe safety notes in this manual
Rtechnical data for the vehicle
Rtraffic rules and regulations
Rlaws and safety standards pertaining to motor
vehicles
Reporting safety defects
USA only:
The following text is reproduced as required of
all manufacturers under Title 49, Code of U.S.
Federal Regulations, Part 575 pursuant to the
National Traffic and Motor Vehicle Safety Act of
1966.
If you believe that your vehicle has a defect
which could cause a crash or could cause injury
or death, you should immediately inform the
Operating safety27
Introduction
Z
Page 37 of 294
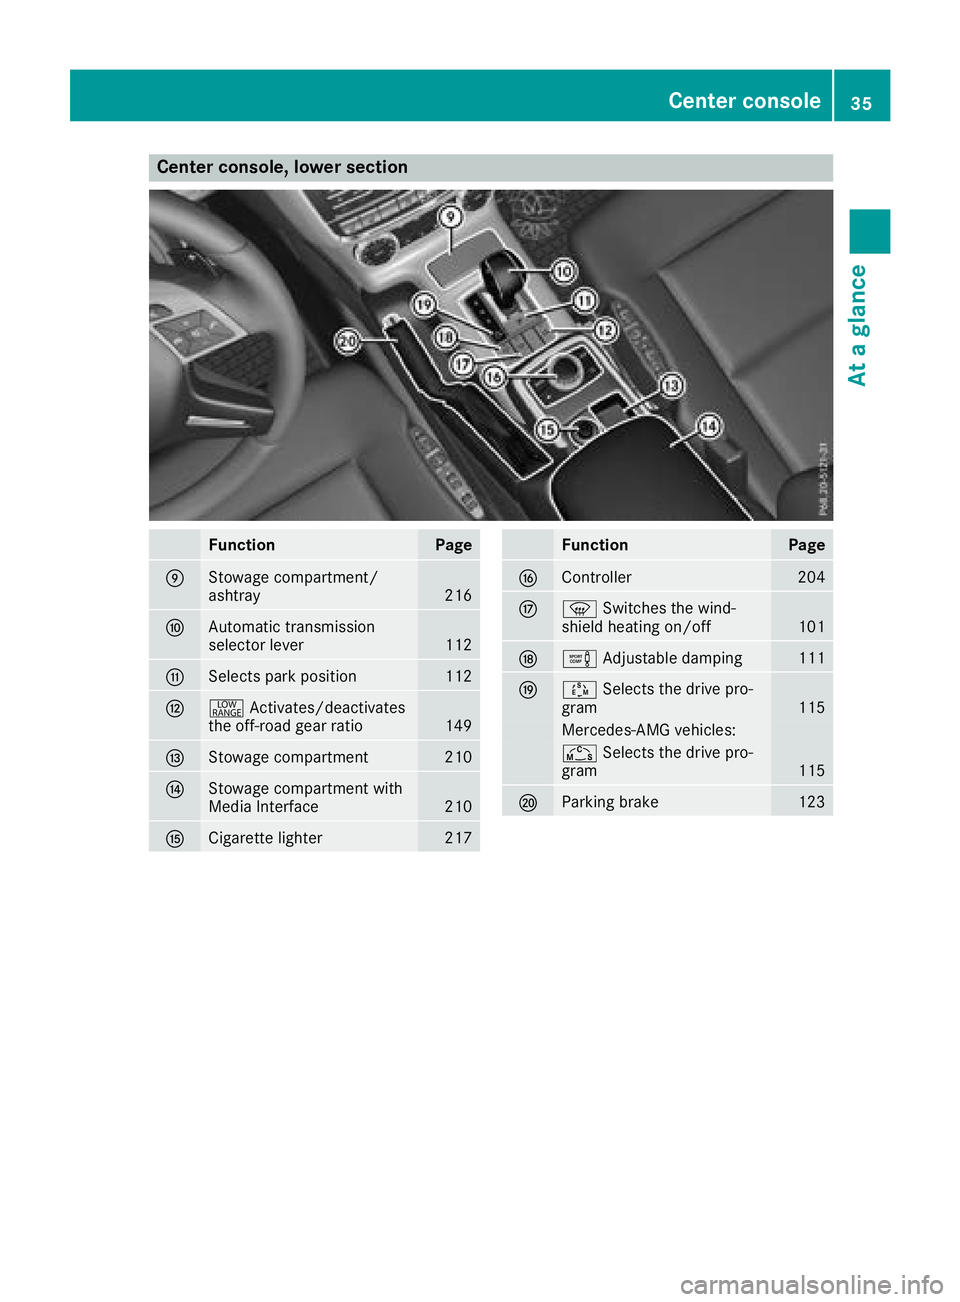
Center console, lower section
FunctionPage
EStowage compartment/
ashtray216
FAutomatic transmission
selector lever112
GSelects park position112
H+Activates/deactivates
the off-road gear ratio149
IStowage compartment210
JStowage compartment with
Media Interface210
KCigarette lighter217
FunctionPage
LController204
Mz Switches the wind-
shield heating on/off101
Ne Adjustable damping111
OÚSelects the drive pro-
gram115
Mercedes-AMG vehicles:
Ñ Selects the drive pro-
gram115
PParking brake123
Center console35
At a glance
Page 49 of 294

Deployment of Emergency Tensioning
Devicesan dair bags
Important safet ynotes
GWARNING
The air bag parts are hot after an air bag has
bee ndeployed .There is aris kof injury.
Do no ttouch th eair bag parts .Hav e a
deployed air bag replaced at aqualified spe -
cialis tworkshop as soo nas possible.
GWARNING
A deployed air bag no longer offers any pro -
tection and canno tprovid eth eintended pro -
tection in an accident. There is an increase d
ris kof injury.
Hav eth evehicle towed to aqualified special-
ist workshop in order to hav e adeployed air
bag replaced.
It is important fo ryour safet yand that of your
passenger to hav edeployed air bags replaced
and to hav eany malfunctionin gair bags
repaired. Thi swill hel pto mak esur eth eair bags
continue to perform their protective function fo r
th evehicle occupant sin th eevent of acrash .
GWARNING
Emergency Tensioning Devices that hav e
deployed pyrotechnically are no longer opera-
tional and are unable to perform their inten-
ded protective function .Thi sposes an
increase dris kof injury or eve nfatal injury.
Hav epyrotechnically triggere dEmergency
Tensioning Devices replaced immediately at a
qualified specialis tworkshop .
If Emergency Tensioning Devices are triggere d
or air bags are deployed ,you will hear abang,
and som epowder may also be released. The
6 restrain tsyste mwarnin glamp lights up.
Only in rar ecases will th eban gaffec tyour hear -
ing. The powder that is release dgenerally doe s
no tconstitute ahealth hazard ,but it may cause
short-term breathin gdifficulties in people wit h
asthm aor other respirator yproblems. Provided
it is saf eto do so, you should leav eth evehicle
immediately or ope nth ewindow in order to pre -
ven tbreathin gdifficulties . Ai
rbags and pyrotechni cEmergency Tensioning
Devices (ETDs) contain perchlorat ematerial,
whic hmay require special handlin gand regard
fo rth eenvironment. National guidelines mus t
be observed durin gdisposal. In California, see
www.dtsc.ca.gov/Hazard ousWas
te/
Perchlorate/index.cfm .
Method of operation
Duringth efirst stage of acollision ,th erestrain t
syste mcontro luni tevaluates important physi-
cal dat arelatin gto vehicle deceleration or accel-
eration ,suc has:
Rduration
Rdirection
Rintensit y
Based on th eevaluation of this data, th e
restrain tsyste mcontro luni ttriggers th eEmer-
gency Tensioning Devices durin g afronta lor
rea rcollision .
An Emergency Tensioning Devic ecan only be
triggered, if:
Rth eignition is switched on
Rth ecomponent sof th erestrain tsyste mare
operational. You can fin dfurther information
under "Restrain tsyste mwarnin glamp "
(
Ypage 38 )
Rtheseat belt buckl etongue has engage din
th ebelt buckl eof th erespective fron tseat
The Emergency Tensioning Devices in th erea r
compartmen tare triggere dindependentl yof th e
loc kstatus of th eseat belts.
If th erestrain tsystem contro luni tdetects a
more severe accident, further component sof
th erestrain tsystem are activated independ -
entl yof eac hother in certain fronta lcollision
situations:
RDriver' sair bag
RFront-passenger fron tair bag
The front- passe
nger fron tair bag is activated or
deactivated dependin gon th eperson on th e
front-passenger seat .The front-passenger fron t
air bag can only deploy in an acciden tif th e
PASSENGE RAI RBA GOF Findicator lamp is off.
Observ eth einformation on th ePASSENGE RAI R
BA GOF Findicator lamp (
Ypage 39).
Your vehicle has atwo-stage driver's air bag. In
th efirst deploymen tstage, th efron tair bag is
filled wit hpropellant gas .The fron tair bag is full y
deployed wit hth emaximum amount of propel-
Occupant safety47
Safety
Z
Page 53 of 294
be immediately refastened. There is an
increased risk of injury, possibly even fatal.
Stop the vehicle immediately, paying atten-
tion to road and traffic conditions. Reactivate
the special seat belt retractor and secure the
child restraint system properly.
All seat belts in the vehicle, except the driver's
seat belt, are equipped with a special seat belt
retractor. When activated, the special seat belt
retractor ensures that the seat belt cannot
slacken once the child seat is secured.
Installing a child restraint system:
XMake sure you observe the child restraint
system manufacturer's installation instruc-
tions.
XPull the seat belt smoothly out of the belt sash
guide.
XEngage seat belt tongue in belt buckle.
Activating the special seat belt retractor:
XPull the seat belt out fully and let the inertia
reel retract it again.
While the seat belt is retracting, you should
hear a ratcheting sound. The special seat belt
retractor is enabled.
XPush the child restraint system down so that
the seat belt is tight and does not loosen.
Removing the child restraint system and deac-
tivating the special seat belt retractor:
XMake sure you observe the child restraint
system manufacturer's installation instruc-
tions.
XPress the release button of the seat belt
buckle and route the seat belt tongue back
towards the belt sash guide.
The special seat belt retractor is deactivated.
Child restraint system
The use of seat belts and child restraint systems
is required by law in:
Rall 50 states
Rthe U.S. territories
Rthe District of Columbia
Rall Canadian provinces
You can obtain further information about the
correct child restraint system from any author-
ized Mercedes-Benz Center.
GWARNING
If the child restraint system is installed incor-
rectly on a suitable seat, it cannot protect as
intended. The child cannot then be restrained
in the event of an accident, heavy braking or
sudden changes of direction. There is an
increased risk of injury, possibly even fatal.
Make sure that you observe the child restraint
system manufacturer's installation instruc-
tions and the notes on use. Please ensure,
that the base of the child restraint system is
always resting completely on the seat cush-
ion. Never place objects, e.g. cushions, under or behind the child restraint system. Only use
child restraint systems with the original cover
designed for them. Only replace damaged
covers with genuine covers.
GWARNING
If the child restraint system is installed incor-
rectly or is not secured, it can come loose in
the event of an accident, heavy braking or a
sudden change in direction. The child
restraint system could be thrown about, strik-
ing vehicle occupants. There is an increased
risk of injury, possibly even fatal.
Always install child restraint systems prop-
erly, even if they are not being used. Make
sure that you observe the child restraint sys-
tem manufacturer's installation instructions.
You will find further information on stowing
objects, luggage or loads under "Loading guide-
lines" (
Ypage 209).
GWARNING
Child restraint systems or their securing sys-
tems which have been damaged or subjected
to a load in an accident can no longer protect
as intended. The child cannot then be
restrained in the event of an accident, heavy
braking or sudden changes of direction. There is an increased risk of injury, possibly even
fatal.
Replace child restraint systems which have
been damaged or subjected to a load in an
accident as soon as possible. Have the secur-
Children in the vehicle51
Safety
Z
Page 70 of 294
XTo deactivate:press and hold button :for
approximately five seconds until a tone
sounds.
XTo activate: press and hold button ;for
approximately five seconds until a tone
sounds.
If you press one of the two buttons and do not
hear a tone, the relevant setting has already
been selected.
The vehicle is locked automatically when the
ignition is switched on and the wheels are turn-
ing.
You could therefore be locked out if:
Rthe vehicle is being pushed.
Rthe vehicle is being towed.
Rthe vehicle is being tested on a dynamometer.
You can also switch the automatic locking func-
tion on and off using the on-board computer
(
Ypage 170).
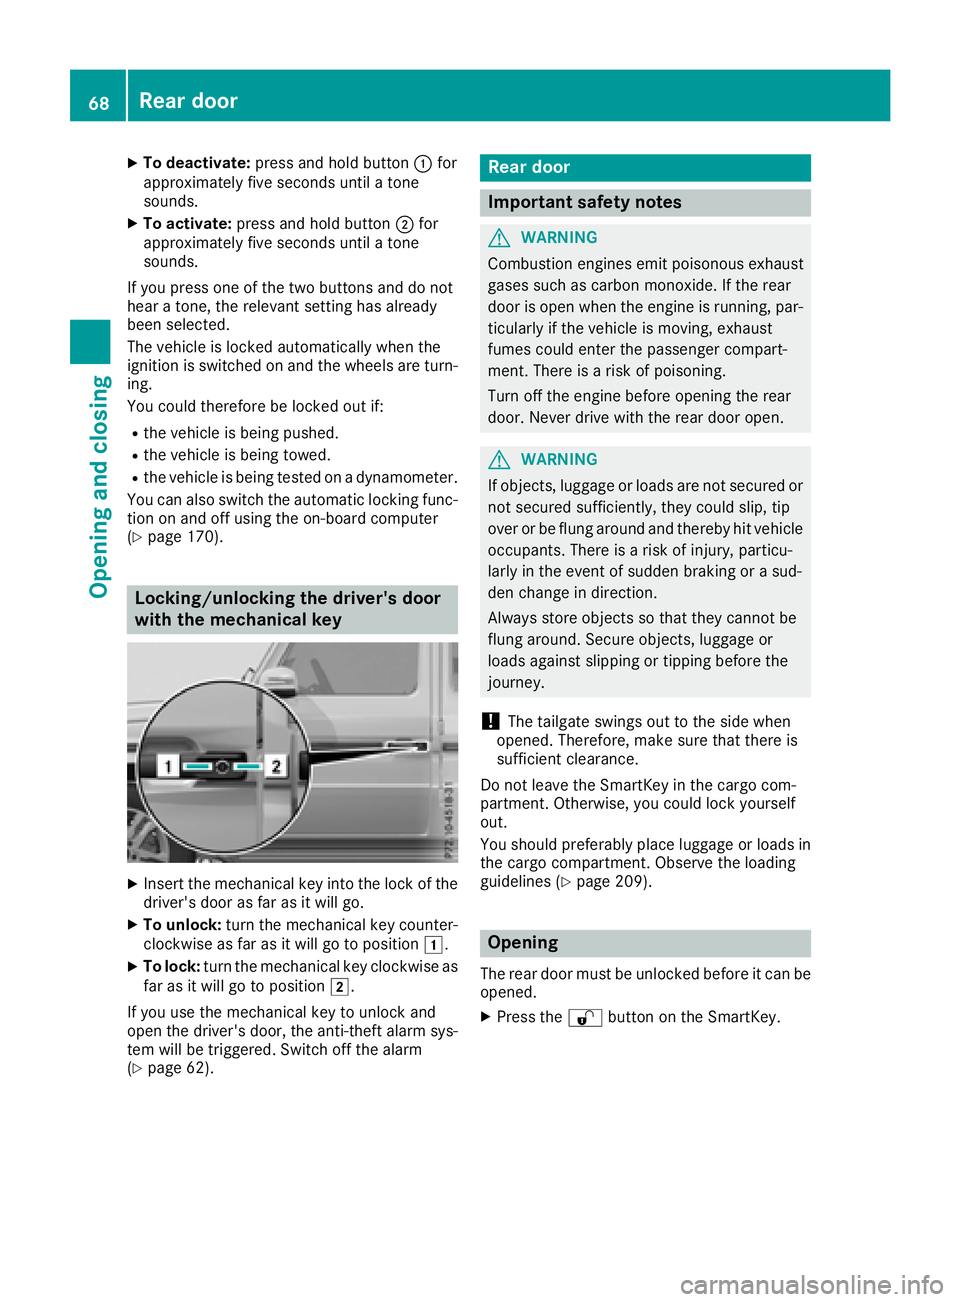
Locking/unlocking the driver's door
with the mechanical key
XInsert the mechanical key into the lock of the driver's door as far as it will go.
XTo unlock: turn the mechanical key counter-
clockwise as far as it will go to position 1.
XTo lock:turn the mechanical key clockwise as
far as it will go to position 2.
If you use the mechanical key to unlock and
open the driver's door, the anti-theft alarm sys-
tem will be triggered. Switch off the alarm
(
Ypage 62).
Rear door
Important safety notes
GWARNING
Combustion engines emit poisonous exhaust
gases such as carbon monoxide. If the rear
door is open when the engine is running, par-
ticularly if the vehicle is moving, exhaust
fumes could enter the passenger compart-
ment. There is a risk of poisoning.
Turn off the engine before opening the rear
door. Never drive with the rear door open.
GWARNING
If objects, luggage or loads are not secured or
not secured sufficiently, they could slip, tip
over or be flung around and thereby hit vehicle
occupants. There is a risk of injury, particu-
larly in the event of sudden braking or a sud-
den change in direction.
Always store objects so that they cannot be
flung around. Secure objects, luggage or
loads against slipping or tipping before the
journey.
!The tailgate swings out to the side when
opened. Therefore, make sure that there is
sufficient clearance.
Do not leave the SmartKey in the cargo com-
partment. Otherwise, you could lock yourself
out.
You should preferably place luggage or loads in
the cargo compartment. Observe the loading
guidelines (
Ypage 209).
Opening
The rear door must be unlocked before it can be opened.
XPress the %button on the SmartKey.
68Rear door
Opening and closing
Page 83 of 294

Problems with the steering wheel heat-
ing
If steering wheel heating indicator lamp=is
flashing, the steering wheel heating has
switched off automatically. The vehicle's elec-
trical system voltage is too low because too
many electrical consumers are switched on.
XSwitch off electrical consumers that you do
not need, such as the rear window defroster
or interior lighting.
Once the battery is sufficiently charged, the
steering wheel heating will switch back on
automatically.
Steering wheel EASY-ENTRY/EXIT fea-
ture
Important safety notes
GWARNING
When the EASY-ENTRY/EXIT feature adjusts
the steering wheel and the driver's seat, you
and other vehicle occupants – particularly
children – could become trapped. There is a
risk of injury.
While the EASY-ENTRY/EXIT feature is mak-
ing adjustments, make sure that no one has
any body parts in the sweep of the seat and
the steering wheel.
If somebody becomes trapped:
Rpress one of the memory function position
buttons, or
Rpress one of the memory function memory
buttons, or
Rmove the switch for steering wheel adjust-
ment in the opposite direction to that in
which the steering wheel is moving
The adjustment process is stopped.
GWARNING
If you drive off while the EASY-ENTRY/EXIT
feature is making adjustments, you could lose
control of the vehicle. There is a risk of an
accident.
Always wait until the adjustment process is
complete before driving off.
!Do not activate the EASY-ENTRY/EXIT fea-
ture, if the seat backrest is reclined too far
backwards. This can damage the front or rear
seats. You must first move the backrest to a
vertical position.
The EASY-ENTRY/EXIT feature makes getting in
and out of your vehicle easier.
You can activate and deactivate the EASY-
ENTRY/EXIT feature in the on-board computer
(
Ypage 170).
Position of the steering wheel when the
EASY-ENTRY/EXIT feature is active
The steering wheel moves upwards and towards
the dashboard if:
Ryou remove the SmartKey from the ignition
lock or
Ryou open the driver's door and the SmartKey
is in position 0or 1in the ignition lock
iThe steering wheel only moves upwards and
towards the dashboard if it has not already
reached the upper steering limiter.
Position of the steering wheel for driv-
ing
The steering wheel is moved to the last selected position when:
Rthe driver's door is closed
Ryou insert the SmartKey into the ignition lock
The last position of the steering column is stored
when you switch off the ignition or when you
store the setting with the memory function
(
Ypage 84).
Mirrors
Rear-view mirror
XAdjust the rear-view mirror in such a way that
you have a good view of road and traffic con- ditions behind you.
Mirrors81
Seats, steering wheel and mirrors
Z
Page 106 of 294
Notes on breaking-in a new vehicle
Important safety notes
The sensor system of some driving and driving
safety systems adjusts automatically while a
certain distance is being driven after the vehiclehas been delivered or after repairs. Full system
effectiveness is not reached until the end of this
teach-in procedure.
New and replaced brake pads and discs only
reach their optimum braking effect after several hundred kilometers of driving. Compensate for
this by applying greater force to the brake pedal.
The first 1000 miles (1500 km)
The more you look after the engine when it is
new, the more satisfied you will be with its per-
formance in the future.
RYou should therefore drive at varying vehicle
and engine speeds for the first 1,000 miles
(1,500 km).
RAvoid heavy loads, e.g. driving at full throttle,
during this period.
RWhen shifting gears manually, shift up in good
time, before the tachometer needle reaches
Ô of the way to the red area of the tachom-
eter display.
RDo not manually shift to a lower gear to brake
the vehicle.
RTry to avoid depressing the accelerator pedal
beyond the pressure point (kickdown).
Additional breaking-in notes for Mercedes-AMG
vehicles:
RDo not drive faster than 85 mph (140 km/h)
for the first 1,000 miles (1,500 km).
ROnly briefly allow the engine to reach a max-
imum engine speed of 4,500 rpm.
RAvoid driving off-road before the first differ-
ential oil change at 2,000 miles (3,000 km).
RIdeally, for the first 1,000 miles (1,500 km),
drive in program C.
After 1,000 mile s(1,500 km), you can increase
the engine speed gradually and bring the vehicle
to full speed.
You shoul
d also observe these notes on break-
ing in if the engine or parts of the drive train on
your vehicle have been replaced.
Always observe the maximum permissible
speed.
Axle differential transmission
(Mercedes-AMG vehicles)
Change the oil after a breaking-in period of
2,000 miles (3,000 km) to improve protection of
the axle differential transmission.
This oil change prolongs the service life of the
axle differential transmission. Have the oil
change carried out at a qualified specialist work- shop.
Axle differential transmission and
portal transmission (G 500 4x42)
Change the oil after a breaking-in period of
2,000 miles (3,000 km) to improve protection of
the axle differential transmission and portal
transmission.
This oil change prolongs the service life of the
axle differential and portal transmission. Have
the oil change carried out at a qualified special-ist workshop.
Driving
Important safety notes
GWARNING
Objects in the driver's footwell may restrict
the clearance around the pedals or block a
depressed pedal. This jeopardizes the oper-
ating and road safety of the vehicle. There is a risk of an accident.
Stow all objects securely in the vehicle so that
they do not get into the driver's footwell.
When using floormats or carpets, make sure
that they are properly secured so that they do not slip or obstruct the pedals. Do not place
several floormats or carpets on top of one
another.
GWARNING
Unsuitable footwear can hinder correct usage of the pedals, e.g.:
Rshoes with thick soles
Rshoes with high heels
Rslippers
104Driving
Driving and parking