2018 MERCEDES-BENZ G-CLASS wheel size
[x] Cancel search: wheel sizePage 21 of 294

Maximum tire load .........................272
Maximum tire load (definition) ....... 274
Optional equipment weight (defi-
nition) ............................................ 275
PSI (pounds per square inch) (def-
inition) ...........................................2 75
Replacing ....................................... 275
Service life ..................................... 258
Sidewall (definition) ....................... 275
Snow chains .................................. 259
Speed rating (definition) ................ 274
Storing ...........................................2 76
Structure and characteristics
(definition) ..................................... 273
Summer tires in winter .................. 259
Temperature .................................. 269
TIN (Tire Identification Number)
(definition) ..................................... 275
Tire bead (definition) ......................2 75
Tire pressure (definition) ................ 275
Tire pressures (recommended) ...... 274
Tire size (data) ............................... 279
Tire size designation, load-bearing
capacity, speed rating .................... 270
Tire tread ....................................... 258
Tire tread (definition) ..................... 275
Total load limit (definition) ............. 275
Traction ......................................... 269
Traction (definition) ....................... 275
Tread wear ..................................... 269
TWR (permissible trailer drawbar
noseweight) (definition) ................. 275
Uniform Tire Quality Grading
Standards ...................................... 269
Uniform Tire Quality Grading
Standards (definition) .................... 273
Wear indicator (definition) ............. 275
Wheel and tire combination ........... 279
Wheel rim (definition) .................... 274
see Flat tire
Top Tether ............................................ 52
Tow-starting
Emergency engine starting ............ 254
Important safety notes .................. 251
Towing a trailer
Axle load, permi
ssible .................... 291
Cleaning the trailer tow hitch ......... 240
Coupling up a trailer ...................... 157 Decoupling a trailer ....................... 158
Driving tips .................................... 154
ESP
®(Electronic Stability Pro-
gram) ............................................... 61
Important safety notes .................. 153
Installing the ball coupling ............. 156
Lights display message .................. 180
Pulling away with a trailer .............. 107
Shift range ..................................... 115
Trailer loads ................................... 291
Trailer tow hitch ............................. 291
Towing away
Important safety guidelines ........... 251
In the event of malfunctions .......... 253
With both axles on the ground ....... 252
Towing eye
Front .............................................. 252
Rear ............................................... 252
Traffic reports
see also Digital Operator's Man-
ual .................................................. 203
Trailer
7-pin connector ............................. 159
Power supply ................................. 159
Trailer coupling
see Towing a trailer
Trailer loads
Technical data ............................... 291
Trailer loads and drawbar nose-
weights ............................................... 159
Trailer tow hitch
Ball position ................................... 291
Trailer towing
PARKTRONIC ................................. 145
Permissible trailer loads and
drawbar noseweights ..................... 159
Transfer case
General notes ................................ 149
Shift range ..................................... 149
Shifting .......................................... 149
Shifting (general notes) .................. 149
Shifting (important safety notes) ... 149
Shifting to neutral .......................... 150
Switching off the off-road gear
ratio ............................................... 150
Switching on the off-road gear
ratio ............................................... 149
Index19
Page 23 of 294
Distance warning ........................... 201
DISTRONIC PLUS ........................... 201
ESP
®.............................................. 196
ESP®OFF ....................................... 197
Fuel tank ........................................ 199
General notes ................................ 191
Overview .......................................... 32
Parking brake ................................ 194
PASSENGER AIR BAG OFF ............... 39
Reserve fuel ................................... 199
Restraint system ............................ 198
Seat belt ........................................ 192
Tire pressure monitor .................... 202
Warning triangle ................................ 243
Warranty .............................................. 24
Washer fluid
Display message ............................ 191
Weather display (COMAND)
see also Digital Operator's Man-
ual .................................................. 203
Wheel and tire combinations
Tires ............................................... 279
Wheel bolt tightening torque ........... 278
Wheels
Changing a wheel .......................... 275
Checking ........................................ 257
Cleaning ......................................... 238
Important safety notes .................. 257
Information on driving .................... 257
Interchanging/changing ................ 275
Mounting a new wheel ................... 278
Mounting a wheel .......................... 276
Removing a wheel .......................... 278
Snow chains .................................. 259
Storing ........................................... 276
Tightening torque ........................... 278
Wheel size/tire size ....................... 279
Window curtain air bag
Display message ............................ 178
Operation ......................................... 46
Windows
see Side windows
Windshield
Defrosting ...................................... 100
Windshield heating ........................... 101
Windshield washer fluid
see Windshield washer system Windshield washer system
Adding washer fluid ....................... 234
Notes ............................................. 287
Windshield wipers
Problem (malfunction) ..................... 95
Rear window wiper .......................... 94
Replaci ng the w
iper blades .............. 94
Switching on/off .............................. 93
Winter driving
Important safety notes .................. 258
Slippery road surfaces ................... 128
Snow chains .................................. 259
Winter operation
Overview ........................................ 258
Radiator cover ............................... 231
Summer tires ................................. 259
Winter tires
M+S tires ....................................... 259
Wiper blades
Cleaning ......................................... 239
Important safety notes .................... 94
Replacing ......................................... 94
Wooden trim (cleaning instruc-
tions) .................................................. 241
Index21
Page 62 of 294

!Only operate the vehicle for a maximum of
ten seconds on a brake test dynamometer.
Switch off the ignition.
Application of the brakes by ESP
®may oth-
erwise destroy the brake system.
!A function or performance test should only
be carried out on a two-axle dynamometer.
Before you operate the vehicle on such a
dynamometer, please consult a qualified
workshop. You could otherwise damage the
drive train or the brake system.
If the å ESP
®OFF warning lamp lights up
continuously, ESP®is deactivated.
If the ÷ ESP®warning lamp lights up contin-
uously, ESP®is not available due to a malfunc-
tion.
Observe the information on warning lamps
(
Ypage 196) and display messages which may
be displayed in the instrument cluster
(
Ypage 175).
Only use wheels with the recommended tire
sizes. Only then will ESP
®function properly.
If differential locks are switched on, ABS, BAS
and ESP
®switch off automatically.
Characteristics of ESP®
General information
If the ÷ ESP®warning lamp goes out before
beginning the journey, ESP®is automatically
active.
If ESP
®intervenes, the ÷ESP®warning lamp
flashes in the instrument cluster.
If ESP
®intervenes:
XDo not deactivate ESP®under any circum-
stances.
XOnly depress the accelerator pedal as far as
necessary when pulling away.
XAdapt your driving style to suit the prevailing
road and weather conditions.
ECO start/stop function
The ECO start/stop function switches the
engine off automatically when the vehicle stops
moving. The engine starts automatically when
the driver wants to pull away again. ESP
®
remains in its previously selected status, e.g. if
ESP®was deactivated before the engine was
automatically switched off.
Deactivating/activating ESP®
Important safety notes
iObserve the "Important safety notes" sec-
tion (Ypage 58).
You can select between the following states of
ESP
®:
RESP®is activated.
RESP®is deactivated.
GWARNING
If you deactivate ESP
®, ESP®no longer sta-
bilizes the vehicle. There is an increased risk
of skidding and an accident.
Only deactivate ESP
®in the situations descri-
bed in the following.
It may be best to deactivate ESP
®in the follow-
ing situations:
Rwhen using snow chains
Rin deep snow
Ron sand or gravel
Roff-road
Spinning the wheels results in a cutting action
which provides better grip.
Activate ESP
®as soon as the situations descri-
bed above no longer apply. ESP®will otherwise
not be able to stabilize the vehicle if the vehicle
starts to skid or a wheel starts to spin.
!Avoid spinning the driven wheels for an
extended period with ESP®deactivated. You
could otherwise damage the drivetrain.
Deactivating/activating ESP®
60Driving safety systems
Safety
Page 84 of 294
Exterior mirrors
Adjusting the exterior mirrors
GWARNING
The exterior mirror on the front-passenger
side reduces the size of the image. Visible
objects are actually closer than they appear.
This means that you could misjudge the dis-
tance from road users traveling behind, e.g.
when changing lane. There is a risk of an acci-
dent.
For this reason, always make sure of the
actual distance from the road users traveling
behind by glancing over your shoulder.
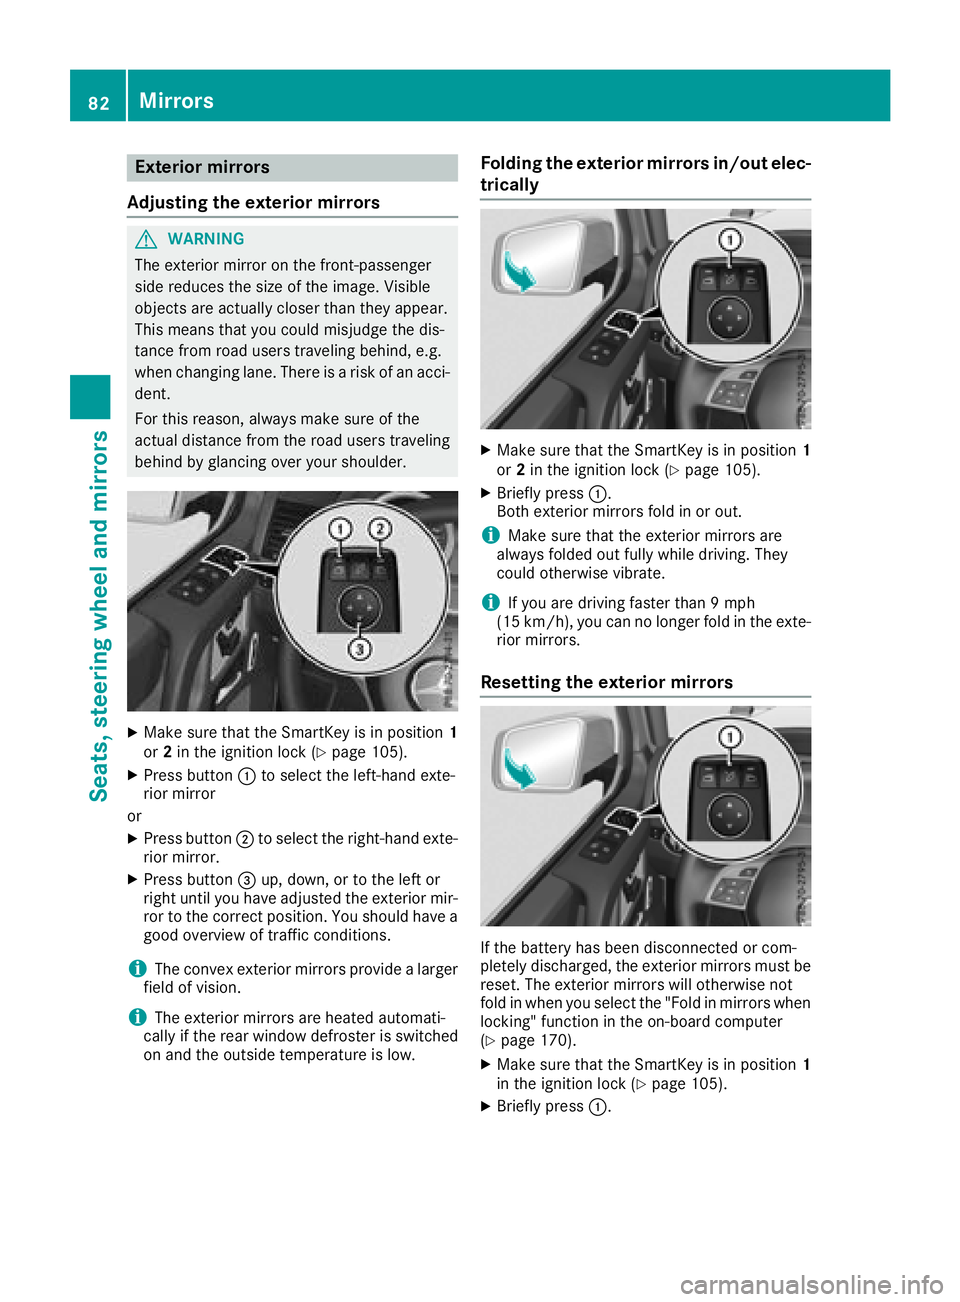
XMake sure that the SmartKey is in position 1
or 2in the ignition lock (Ypage 105).
XPress button :to select the left-hand exte-
rior mirror
or
XPress button ;to select the right-hand exte-
rior mirror.
XPress button =up, down, or to the left or
right until you have adjusted the exterior mir- ror to the correct position. You should have a
good overview of traffic conditions.
iThe convex exterior mirrors provide a larger
field of vision.
iThe exterior mirrors are heated automati-
cally if the rear window defroster is switched
on and the outside temperature is low.
Folding the exterior mirrors in/out elec-
trically
XMake sure that the SmartKey is in position 1
or 2in the ignition lock (Ypage 105).
XBriefly press :.
Both exterior mirrors fold in or out.
iMake sure that the exterior mirrors are
always folded out fully while driving. They
could otherwise vibrate.
iIf you are driving faster than 9 mph
(15 km/h), you can no longer fold in the exte-
rior mirrors.
Resetting the exterior mirrors
If the battery has been disconnected or com-
pletely discharged, the exterior mirrors must be
reset. The exterior mirrors will otherwise not
fold in when you select the "Fold in mirrors when
locking" function in the on-board computer
(
Ypage 170).
XMake sure that the SmartKey is in position 1
in the ignition lock (Ypage 105).
XBriefly press :.
82Mirrors
Seats, steering wheel and mirrors
Page 239 of 294
cleaning agents. These cleaning agents can
damage the paintwork or plastic parts.
!Make sure that the automatic car wash is
suitable for the size of the vehicle. Fold in the
exterior mirrors before the vehicle is washed.
The exterior mirrors could otherwise be dam-
aged.
!Make sure that the automatic transmission
is in transmission position iwhen washing
your vehicle in a tow-through car wash. The
vehicle may be damaged in another transmis-
sion position.
!Make sure that:
Rthe side windows and the sliding sunroof
are fully closed.
Rthe blower is switched off.
Rthe windshield wiper switch is at position
$.
The vehicle may otherwise be damaged.
You can wash the vehicle in an automatic car
wash from the very start.
If the vehicle is very dirty, pre-wash it before
cleaning it in an automatic car wash.
After using an automatic car wash, wipe off wax
from the windshield and the wiper blades. This
will prevent smears and reduce wiping noises
caused by residue on the windshield.
Washing by hand
In some countries, washing by hand is only
allowed at specially equipped washing bays.
Observe the legal requirements in each country.
When using the vehicle in winter, remove all
traces of road salt deposits carefully and as
soon as possible.
When washing the underside of the vehicle, also
clean the insides of the wheels.
XDo not use hot water and do not wash the
vehicle in direct sunlight.
XUse a soft sponge to clean.
XUse a mild cleaning agent, such as a car
shampoo approved by Mercedes-Benz.
XThoroughly hose down the vehicle with a gen-
tle jet of water.
XDo not point the water jet directly towards the
air inlet.
XUse plenty of water and rinse out the sponge
frequently.
XRinse the vehicle with clean water and dry
thoroughly with a chamois.
XDo not let the cleaning agent dry on the paint-
work.
Power washers
GWARNING
The water jet from a circular jet nozzle (dirt
blasters) can cause invisible exterior damage
to the tires or chassis components. Compo-
nents damaged in this way may fail unexpect-
edly. There is a risk of an accident.
Do not use power washers with circular jet
nozzles to clean the vehicle. Have damaged
tires or chassis components replaced imme-
diately.
!Always maintain a distance of at least
11.8 in (30 cm) between the vehicle and the
power washer nozzle. Information about the
correct distance is available from the equip-
ment manufacturer.
Move the power washer nozzle around when
cleaning your vehicle.
Do not aim directly at any of the following:
RTires
RDoor gaps, roof gaps, joints, etc.
RElectrical components
RBattery
RConnectors
RLamps
RSeals
RTrim
RVentilation slots
Damaged seals or electrical components can
lead to leaks or failures.
!Vehicles with decorative film: parts of your
vehicle are covered with a decorative film.
Maintain a distance of at least 27.5 in (70 cm)
between the parts of the vehicle covered with
the film and the nozzle of the high pressure
cleaner.
Information about the correct distance is
available from the equipment manufacturer.
Move the power washer nozzle around when
cleaning your vehicle.
Care237
Maintenance and care
Z
Page 247 of 294
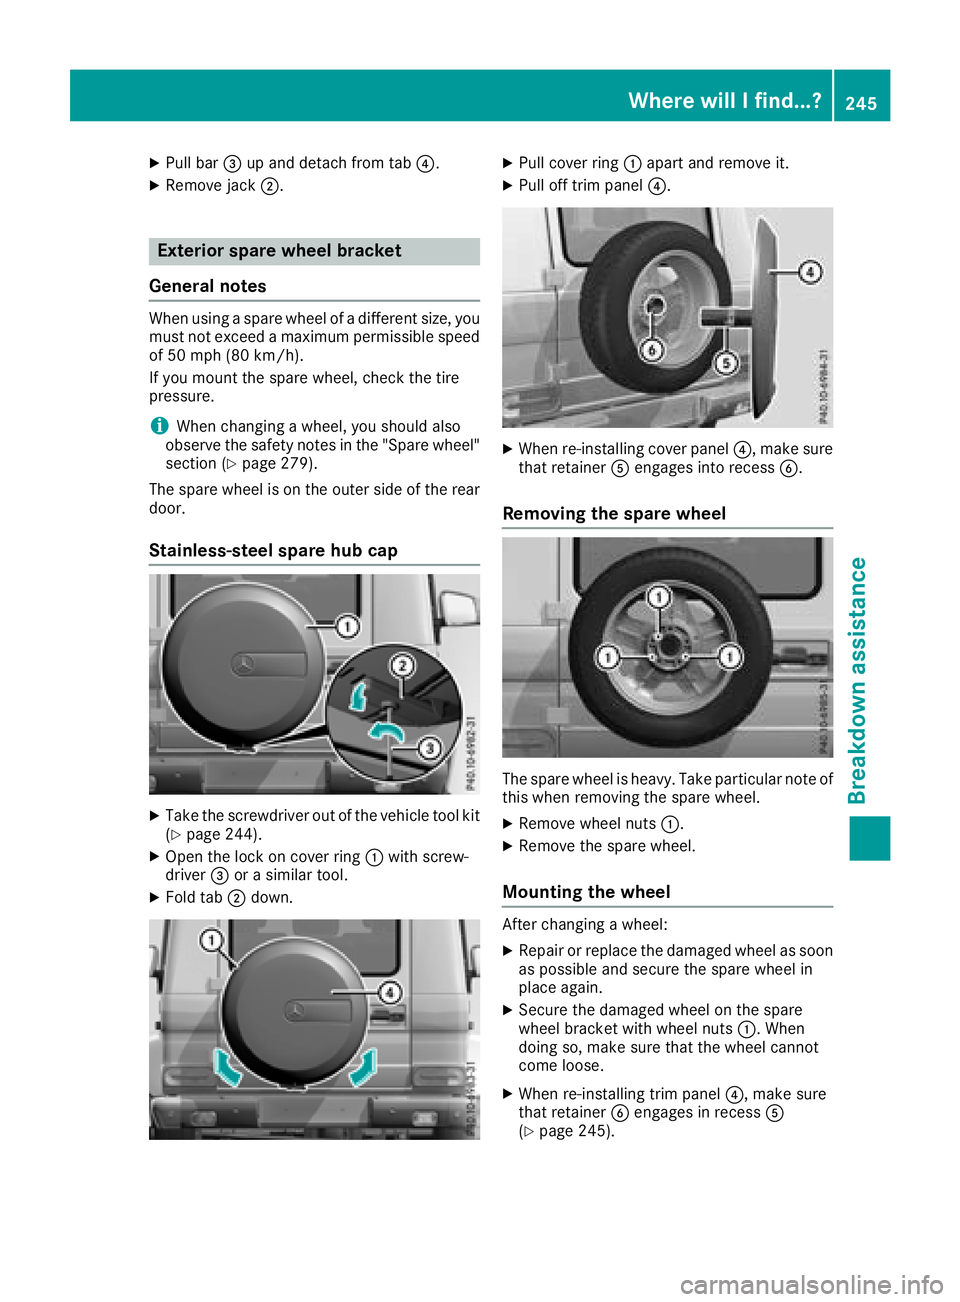
XPull bar=up and detach from tab ?.
XRemove jack;.
Exterior spare wheel bracket
General notes
When using a spare wheel of a different size, you
must not exceed a maximum permissible speed
of 50 mph (80 km/ h).
If you mount the spare wheel, check the tire
pressure.
iWhen changing a wheel, you should also
observe the safety notes in the "Spare wheel"
section (
Ypage 279).
The spare wheel is on the outer side of the rear
door.
Stainless-steel spare hub cap
XTake the screwdriver out of the vehicle tool kit
(Ypage 244).
XOpen the lock on cover ring :with screw-
driver =or a similar tool.
XFold tab ;down.
XPull cover ring :apart and remove it.
XPull off trim panel ?.
XWhen re-installing cover panel ?, make sure
that retainer Aengages into recess B.
Removing the spare wheel
The spare wheel is heavy. Take particular note of
this when removing the spare wheel.
XRemove wheel nuts:.
XRemove the spare wheel.
Mounting the wheel
After changing a wheel:
XRepair or replace the damaged wheel as soon
as possible and secure the spare wheel in
place again.
XSecure the damaged wheel on the spare
wheel bracket with wheel nuts :. When
doing so, make sure that the wheel cannot
come loose.
XWhen re-installing trim panel ?, make sure
that retainer Bengages in recess A
(
Ypage 245).
Where will I find...?245
Breakdown assistance
Page 260 of 294
Rbulges on tires
Rdeformation or severe corrosion on wheels
Regularly check the tire tread depth and the
condition of the tread across the whole width of
the tire (
Ypage 258). In order to inspect the
inner side of the tire surface, turn the steering
wheel to full lock.
All wheels must have a valve cap to protect the valve against dirt and moisture. Do not install
anything onto the valve other than the standard
valve cap or a valve cap approved by Mercedes-
Benz for your vehicle. Do not use any other valve
caps or systems, e.g. tire pressure monitoring
systems.
You should regularly check the pressure of all
your tires including the spare wheel, particularly
prior to long trips. Adjust the tire pressure as
necessary (
Ypage 260).
The service life of tires depends, among other
things, on the following factors:
RDriving style
RTire pressure
RDistance covered
Notes on tire tread
GWARNING
Insufficient tire tread will reduce tire traction.
The tire is no longer able to dissipate water.
This means that on wet road surfaces, the risk
of hydroplaning increases, in particular where speed is not adapted to suit the driving con-
ditions. There is a risk of accident.
If the tire pressure is too high or too low, tires
may exhibit different levels of wear at differ-
ent locations on the tire tread. Thus, you
should regularly check the tread depth and
the condition of the tread across the entire
width of all tires.
Minimum tire tread depth for:
RSummer tires: âin (3 mm)
RM+S tires: ãin (4 mm)
For safety reasons, replace the tires before
the legally prescribed limit for the minimum
tire tread depth is reached.
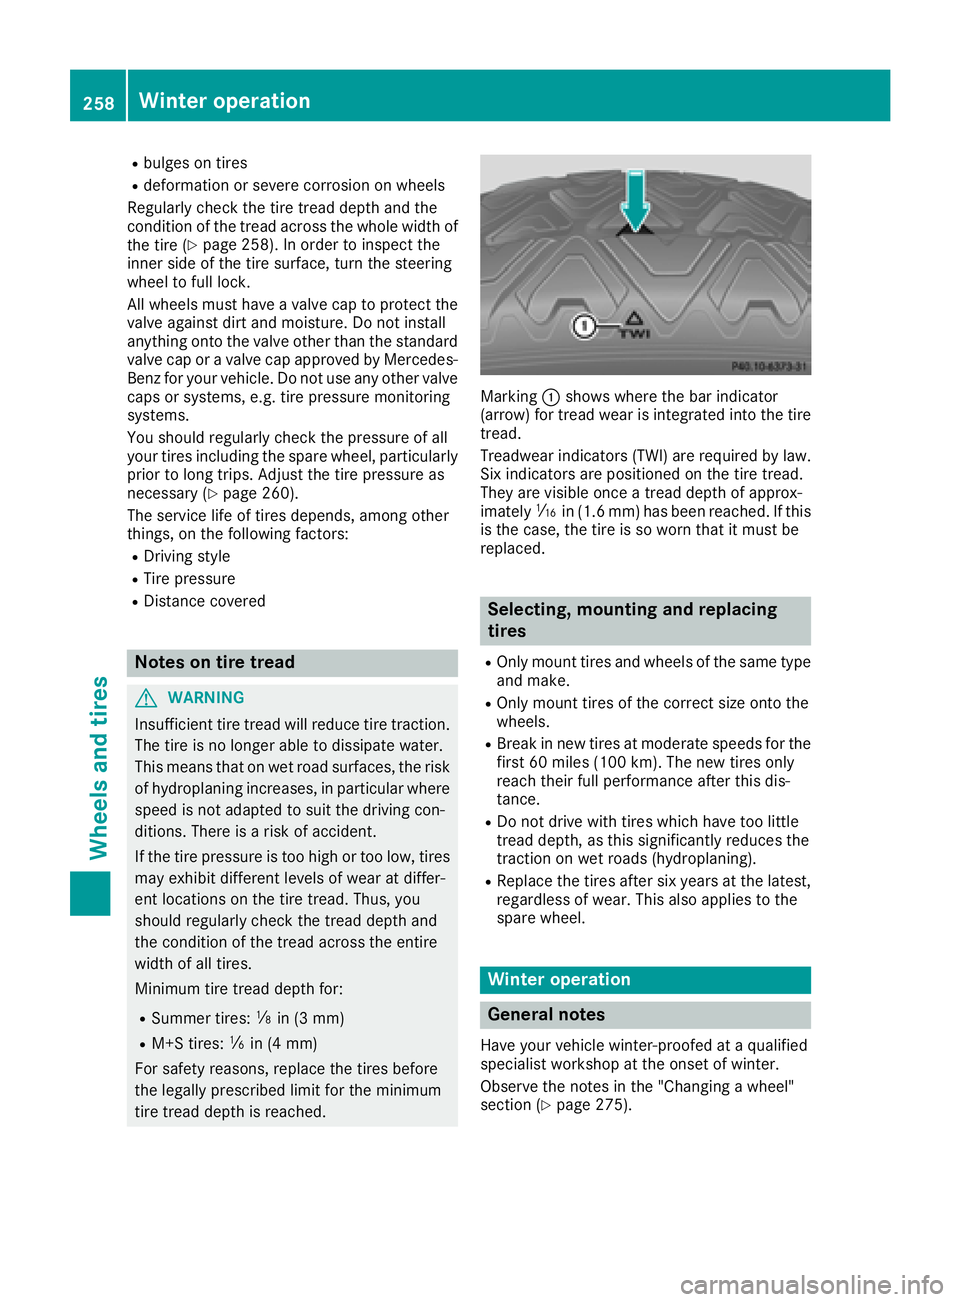
Marking :shows where the bar indicator
(arrow) for tread wear is integrated into the tire
tread.
Treadwear indicators (TWI) are required by law. Six indicators are positioned on the tire tread.
They are visible once a tread depth of approx-
imately áin (1.6 mm) has been reached. If this
is the case, the tire is so worn that it must be
replaced.
Selecting, mounting and replacing
tires
ROnly mount tires and wheels of the same type
and make.
ROnly mount tires of the correct size onto the
wheels.
RBreak in new tires at moderate speeds for the
first 60 miles (100 km). The new tires only
reach their full performance after this dis-
tance.
RDo not drive with tires which have too little
tread depth, as this significantly reduces the
traction on wet roads (hydroplaning).
RReplace the tires after six years at the latest,
regardless of wear. This also applies to the
spare wheel.
Winter operation
General notes
Have your vehicle winter-proofed at a qualified
specialist workshop at the onset of winter.
Observe the notes in the "Changing a wheel"
section (
Ypage 275).
258Winter operation
Wheels and tires
Page 261 of 294
Drivingwit hsummer tire s
At temperature sbelo w45 ‡(+7 †), elasticity in
summer tires is significantly lower and thus also
traction and braking power. Change the tires on
your vehicle to M+S tires. Using summer tires at
very cold temperatures could cause cracks to
form, thereby damaging the tires permanently.
Mercedes-Benz cannot accept responsibility for
this type of damage.
GWARNING
Damaged tires can cause tire inflation pres-
sure loss. As a result, you could lose control of
your vehicle. There is a risk of accident.
Check the tires regularly for signs of damage
and replace any damaged tires immediately.
M+S tires
GWARNING
M+S tires with a tire tread depth of less than
ã in (4 mm) are not suitable for use in winter
and do not provide sufficient traction. There is
a risk of an accident.
M+S tires with a tread depth of less than ãin
(4 mm) must be replaced immediately.
GWARNING
Wheel and tire dimensions as well as the type of tire can vary between the spare wheel and
the wheel to be replaced. When the spare
wheel is mounted, driving characteristics may be severely affected. There is a risk of an acci-
dent.
In order to reduce risks:
Ryou should therefore adapt your driving
style and drive carefully.
Rnever mount more than one spare wheel
that differs from the wheel to be replaced.
Ronly use a spare wheel that differs from the
wheel to be replaced for a short time.
Rdo not deactivate ESP®.
Rhave a spare wheel that differs from the
wheel that has been changed replaced at
the nearest qualified specialist workshop.
You must observe the correct wheel and
tire dimensions as well as the wheel type.
Do not exceed a maximum speed of 50 mph
(80 km/h) if a spare wheel of a different size is
installed.
At temperatures below 45 ‡(+7 †), use winter
tires or all-season tires. Both types of tire are
identified by the M+S marking.
Only winter tires bearing the isnowflake
symbol in addition to the M+S marking provide
the best possible grip in wintry road conditions.
Only these tires will allow driving safety systems
such as ABS and ESP
®to function optimally in
winter. These tires have been developed specif-
ically for driving in snow.
Use M+S tires of the same make and tread on all
wheels to maintain safe handling characteris-
tics.
Always observe the maximum permissible
speed specified for the M+S tires you have
mounted.
When you have mounted the M+S tires:
XCheck the tire pressures (Ypage 263).
XRestart the tire pressure monitor
(Ypage 265).
Snow chains
GWARNING
If you drive too fast with snow chains moun-
ted, they may snap. As a result, you could
injure others and damage the vehicle. There is
a risk of an accident.
Observe the maximum permissible speed for
operation with snow chains.
!Information about the use of snow chain
compatible AMG winter tires is applicable for
AMG tires. Use of snow chains is only per-
missible with these tires.
!On some tire sizes there is not enough space
for snow chains. To avoid damage to the vehi- cle or tires, observe the "Wheel and tire com-
binations" section under "Tires and wheels".
Winter operation259
Wheels and tires
Z