2018 MERCEDES-BENZ G-CLASS interior lights
[x] Cancel search: interior lightsPage 4 of 294

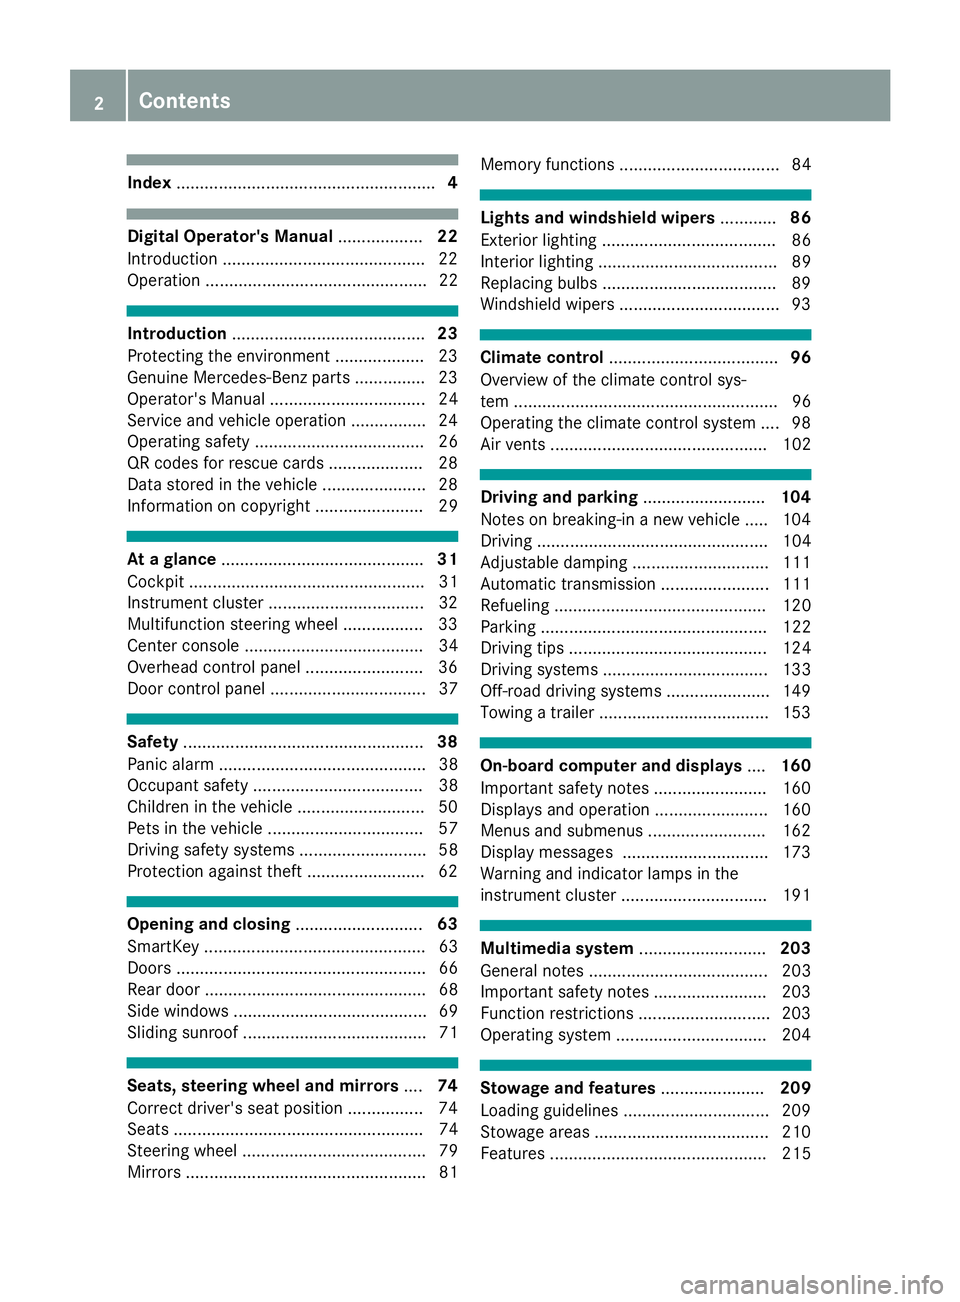
Index....................................................... 4
Digital Operator's Manual..................22
Introduction .......................................... .22
Operation ............................................... 22
Introduction ......................................... 23
Protecting the environment ...................2 3
Genuine Mercedes-Benz parts .............. .23
Operator's Manual ................................. 24
Service and vehicle operation ................2 4
Operating safety .................................... 26
QR codes for rescue cards .................... 28
Data stored in the vehicle ......................2 8
Information on copyright ....................... 29
At a glance ........................................... 31
Cockpit .................................................. 31
Instrument cluster .................................3 2
Multifunction steering wheel ................. 33
Center console ...................................... 34
Overhead control panel .........................3 6
Door control panel ................................. 37
Safety ................................................... 38
Panic alarm ............................................ 38
Occupant safety .................................... 38
Children in the vehicle ........................... 50
Pets in the vehicle ................................. 57
Driving safety systems ........................... 58
Protection against theft .........................6 2
Opening and closing...........................63
SmartKey ............................................... 63
Doors ..................................................... 66
Rear door ............................................... 68
Side windows ......................................... 69
Sliding sunroof ....................................... 71
Seats, steering wheel and mirrors ....74
Correct driver's seat position ............... .74
Seats ..................................................... 74
Steering wheel ....................................... 79
Mirrors ................................................... 81 Memory functions .................................. 84
Lights and windshield wipers
............86
Exterior lighting ..................................... 86
Interior lighting ...................................... 89
Replacing bulbs ..................................... 89
Windshield wipers .................................. 93
Climate control .................................... 96
Overview of the climate control sys-
tem ........................................................ 96
Operating the climate control system .... 98
Air vents .............................................. 102
Driving and parking ..........................104
Notes on breaking-in a new vehicle ..... 104
Driving ................................................. 104
Adjustable damping ............................. 111
Automatic transmission ....................... 111
Refueling ............................................. 120
Parking ................................................ 122
Driving tips .......................................... 124
Driving systems ................................... 133
Off-road driving systems ...................... 149
Towing a trailer .................................... 153
On-board computer and displays ....160
Important safety notes ........................ 160
Displays and operation ........................ 160
Menus and submenus ......................... 162
Display messages ............................... 173
Warning and indicator lamps in the
instrument cluster ............................... 191
Multimedia system ...........................203
General notes ...................................... 203
Important safety notes ........................ 203
Function restrictions ............................ 203
Operating system ................................ 204
Stowage and features ......................209
Loading guidelines ............................... 209
Stowage areas ..................................... 210
Features .............................................. 215
2Contents
Page 8 of 294

Camerasee Rear view camera
Care
Car wash ........................................ 236
Carpets .......................................... 24 2
Chrome parts ................................ .240
Display ...........................................2 41
Exhaust pipe .................................. 240
Exterior lights ................................ 239
General notes ................................ 236
Interior ...........................................2 41
Matte finish ................................... 238
Paint .............................................. 238
Plastic trim ....................................2 41
Power washer ................................ 237
Rear view camera .......................... 240
Roof lining ...................................... 242
Seat belt ........................................ 242
Seat cover ..................................... 241
Selector lever ................................ 241
Sensors ......................................... 239
Steering wheel ............................... 241
Trim pieces ....................................2 41
Washing by hand ........................... 237
Wheels ...........................................2 38
Windows ........................................ 239
Wiper blades .................................. 239
Wooden trim .................................. 241
Cargo compartment cover
Important safety notes .................. 214
Installing/removing ....................... 214
Notes/how to use ......................... 214
Opening and closing ......................2 14
Cargo compartment enlargement
Important safety notes .................. 211
Cargo tie down rings ......................... 214
CD
see also Digital Operator's Man-
ual ..................................................2 03
CD player/CD changer (on-board
computer) .......................................... 165
Center console
Lower section .................................. 35
Overview .......................................... 34
Upper secti
on .................................. 34
Central locking
Automatic locking (on-board com-
puter) ............................................. 170 Locking/unlocking (SmartKey) ........6
3
Change of address .............................. 25
Change of ownership .......................... 25
Changing bulbs
Standing lamp (rear) ........................ 92
Changing gears .................................. 114
Child
Restraint system .............................. 51
Child seat
BabySmart™ air bag deactivation
system ............................................ .53
Forward-facing restraint system ...... 55
LATCH-type (ISOFIX) child seat
anchors ............................................ 52
On the front-passenger seat ............ 55
Problem (malfunction) ..................... 56
Rearward-facing restraint system .... 55
Top Tether ....................................... 52
Child-proof locks
Important safety notes .................... 56
Rear door ......................................... 57
Rear doors ....................................... 57
Children
Special seat belt retractor ............... 50
Children in the vehicle
Important safety notes .................... 50
Chrome parts (cleaning instruc-
tions) .................................................. 240
Cigarette lighter ................................ 217
Cleaning
Mirror turn signal ........................... 239
Trailer tow hitch ............................. 240
Climate control
Controlling automatically ................. 99
Cooling with air dehumidification ..... 98
Defrosting the windows ................. 100
Defrosting the windshield .............. 100
Dual-zone automa tic cl
imate con-
trol ................................................... 96
ECO start/stop function .................. 98
Important safety notes .................... 96
Indicator lamp .................................. 98
Maximum cooling .......................... 100
Notes on using dual-zone auto-
matic climate control ....................... 97
Overview of systems ........................ 96
6Index
Page 13 of 294

Genuine parts...................................... 23
Glove box ........................................... 210
Google™ Local Search
see also Digital Operator's Man-
ual .................................................. 203
GTW (Gross Trailer Weight) (defini-
tion) .................................................... 274
H
Hazard warning lamps ........................ 88
Head restraints
Adjusting .........................................7 6
Adjusting (rear) ................................ 77
Installing/removing (rear) ................ 77
Luxury .............................................. 76
Resetting (front) ............................... 76
see NECK-PRO head restraints
see NECK-PRO luxury head restraints
Headlamps
Cleaning system (function) .............. 87
Cleaning system (notes) ................ 287
Fogging up ....................................... 88
Protective grille ................................ 91
see Automatic headlamp mode
Heating
see Climate control
High beam flasher ............................... 88
High-beam headlamps
Display message ............................ 180
Switching on/off .............................. 88
Hill start assist .................................. 107
HOLD function
Activating ....................................... 143
Activation conditions ..................... 143
Deactivating ................................... 143
Function/notes ............................. 142
General notes ................................ 142
Home address
see also Digital Operator's Man-
ual .................................................. 203
Hood
Closing ........................................... 231
Display message ............................ 190
Important safety notes .................. 230
Opening ......................................... 230
Horn ...................................................... 31
Hydroplaning ..................................... 127
I
Ignition lock
see Key positions
Immobilizer .......................................... 62
Indicator lamp
Replacing bulbs (rear) ...................... 92
Insect protection on the radiator .... 231
Instrument cluster
Overview .......................................... 32
Warning and indicator lamps ........... 32
Instrument cluster lighting .............. 160
Interior lighting
Automatic control ............................ 89
Delayed switch-off (on-board
computer) ...................................... 169
Overview .......................................... 89
iPod
®
see also Digital Operator's Man-
ual .................................................. 203
J
Jack Pump lever ..................................... 276
Storage location ............................ 244
Using ............................................. 276
Jump starting (engine) ...................... 249
K
Key positions
SmartKey ....................................... 105
L
Language (on-board computer) ........ 168
Lap time (RACETIMER) ...................... 172
LATCH-type (ISOFIX) child seat
anchors ................................................ 52
License plate lamp (display mes-
sage) ................................................... 180
Light sensor (display message) ....... 180
Lights
Activating/deactivating the inte-
rior lighting delayed switch-off ....... 169
Automatic headlamp mode .............. 87
Combination switch ......................... 88
Fogged up headlamps ...................... 88
Index11
Page 41 of 294

regular intervals while the engine is running.
Therefore, malfunctions can be detected in
good time.
The6 restraint system warning lamp on the
instrument cluster lights up when the ignition is
switched on. It goes out no later than a few sec-
onds after the vehicle is started. The compo-
nents of the restraint system are in operational
readiness.
A malfunction has occurred if the 6restraint
system warning lamp:
Rdoes not light up after the ignition is switched
on
Rdoes not go out after a few seconds with the
engine running
Rlights up again while the engine is running
GWARNING
If the restraint system is malfunctioning,
restraint system components may be trig-
gered unintentionally or may not deploy as
intended during an accident. This can affect
for example the Emergency Tensioning
Device or the air bag. This poses an increased
risk of injury or even fatal injury.
Have the restraint system checked and
repaired in a qualified specialist workshop as
soon as possible.
PASSENGER AIR BAG OFF indicator
lamp
PASSENGER AIR BAG OFF indicator lamp :is
part of the BabySmart™ air bag deactivation
system.
A permanently lit PASSENGER AIR BAG OFF
indicator lamp informs you that the front-
passenger front air bag is deactivated. Depending on the person in the front-passenger
seat, the front-passenger front air bag must
either be deactivated or enabled; see the fol-
lowing points. You must make sure of this both
before and during a journey.
RChildren in a child restraint system:
whether the front-passenger front air bag is
enabled or deactivated depends on the instal-
led child restraint system, and the age and
size of the child. Therefore, always observe
the information on "Children in the vehicle"
(
Ypage 50). There you will also find instruc-
tions on rearward and forward-facing child
restraint systems on the front-passenger
seat.
RAll other persons: the PASSENGER AIR BAG
OFF indicator lamp must be off. Be sure to
observe the notes on "Seat
belts“ (
Ypage 39) and "Air bags"
(Ypage 44). There you can also find infor-
mation on the correct seat position.
Observe the information on the BabySmart™ air
bag deactivation system in the front-passenger
seat (
Ypage 53).
Seat belts
Introduction
Seat belts are the most effective means of
restricting the movement of vehicle occupants
in the event of an accident or the vehicle rolling
over. This reduces the risk of vehicle occupants
coming into contact with parts of the vehicle
interior or being ejected from the vehicle. Fur-
thermore, the seat belt helps to keep the vehicle
occupant in the best position in relation to the
air bag.
The seat belt system comprises:
RSeat belts
REmergency Tensioning Devices for the front
seat belts and the outer seat belts in the rear
RSeat belt force limiters for the front seat belts
and the outer seat belts in the rear
If the seat belt is pulled out at the belt sash guide
quickly or with a jerky movement, the belt
retractor locks. The belt strap cannot be extrac-
ted any further.
The Emergency Tensioning Device tightens the
seat belt in an accident, pulling the belt close
against the body. However it does not pull the
Occupant safety39
Safety
Z
Page 56 of 294

accident. This poses an increased risk of
injury or even fatal injury.
Do not place any of the devices mentioned
above or similar devices on the front-
passenger seat. Be aware of the status of the
front-passenger front air bag both before and
during the journey.
The BabySmart™ air bag deactivation system's
sensor system in the front-passenger seat
detects whether a special Mercedes-Benz child
restraint system with a transponder for the
BabySmart™ air bag deactivation system has
been installed. In this case, the PASSENGER AIR
BAG OFF indicator lamp lights up and remains
lit. The front-passenger front air bag is deacti-
vated.
When the SmartKey is removed from the ignition
lock or is in position g, the PASSENGER AIR
BAG OFF indicator lamp is not lit.
iIf the front-passenger front air bag is deac-
tivated by the BabySmart™ air bag deactiva-
tion system, the following remain enabled on
the front-passenger side:
Rthe side impact air bag
Rthe pelvis air bag
Rthe window curtain air bag
Rthe Emergency Tensioning Device
GWARNING
If you secure a child in a child restraint system on the front-passenger seat and the
PASSENGER AIR BAG OFF indicator lamp is
off, the front-passenger front air bag can
deploy in the event of an accident. The child
could be struck by the air bag. This poses an
increased risk of injury or even fatal injury.
Make sure that the front-passenger front air
bag has been deactivated. The PASSENGER
AIR BAG OFF indicator lamp must be lit.
NEVER use a rearward-facing child restraint
on a seat protected by an ACTIVE FRONT AIR
BAG in front of it; DEATH or SERIOUS INJURY
to the child can occur.
GWARNING
If the PASSENGER AIR BAG OFF indicator
lamp is lit, the front-passenger front air bag is
deactivated. It will not be deployed in the
event of an accident and cannot perform its
intended protective function. A person in the
front-passenger seat could then, for example, come into contact with the vehicle's interior,
especially if the person is sitting too close to
the dashboard. This poses an increased risk of
injury or even fatal injury.
In this case the front-passenger seat may not
be used. You may only transport a child on the
front-passenger seat if they are seated in a
suitable rearward or forward-facing child
restraint system. Always observe the child
restraint system manufacturer's installation
instructions.
GWARNING
If you secure a child in a forward-facing child
restraint system on the front-passenger seat
and you position the front-passenger seat too close to the dashboard, in the event of an
accident, the child could:
Rcome into contact with the vehicle's inte-
rior if the PASSENGER AIR BAG OFF indi-
cator lamp is lit, for example
Rbe struck by the air bag if the PASSENGER
AIR BAG OFF indicator lamp is off
This poses an increased risk of injury or even fatal injury.
Move the front-passenger seat as far back as
possible. Always make sure that the shoulder belt strap is correctly routed from the vehicle
belt sash guide to the shoulder belt guide on
the child restraint system. The shoulder belt
strap must be routed forwards and down-
wards from the belt sash guide. If necessary,
adjust the belt sash guide and the front-
passenger seat accordingly. Always observe
the information about suitable positioning of
the child restraint system in this Operator's
Manual as well as the child restraint system
manufacturer's installation instructions.
54Children in the vehicle
Safety
Page 82 of 294

When leaving the vehicle, always take the
SmartKey with you and lock the vehicle. Never
leave children unsupervised in the vehicle.
The electrically adjustable steering wheel can
still be adjusted when there is no SmartKey in
the ignition lock.
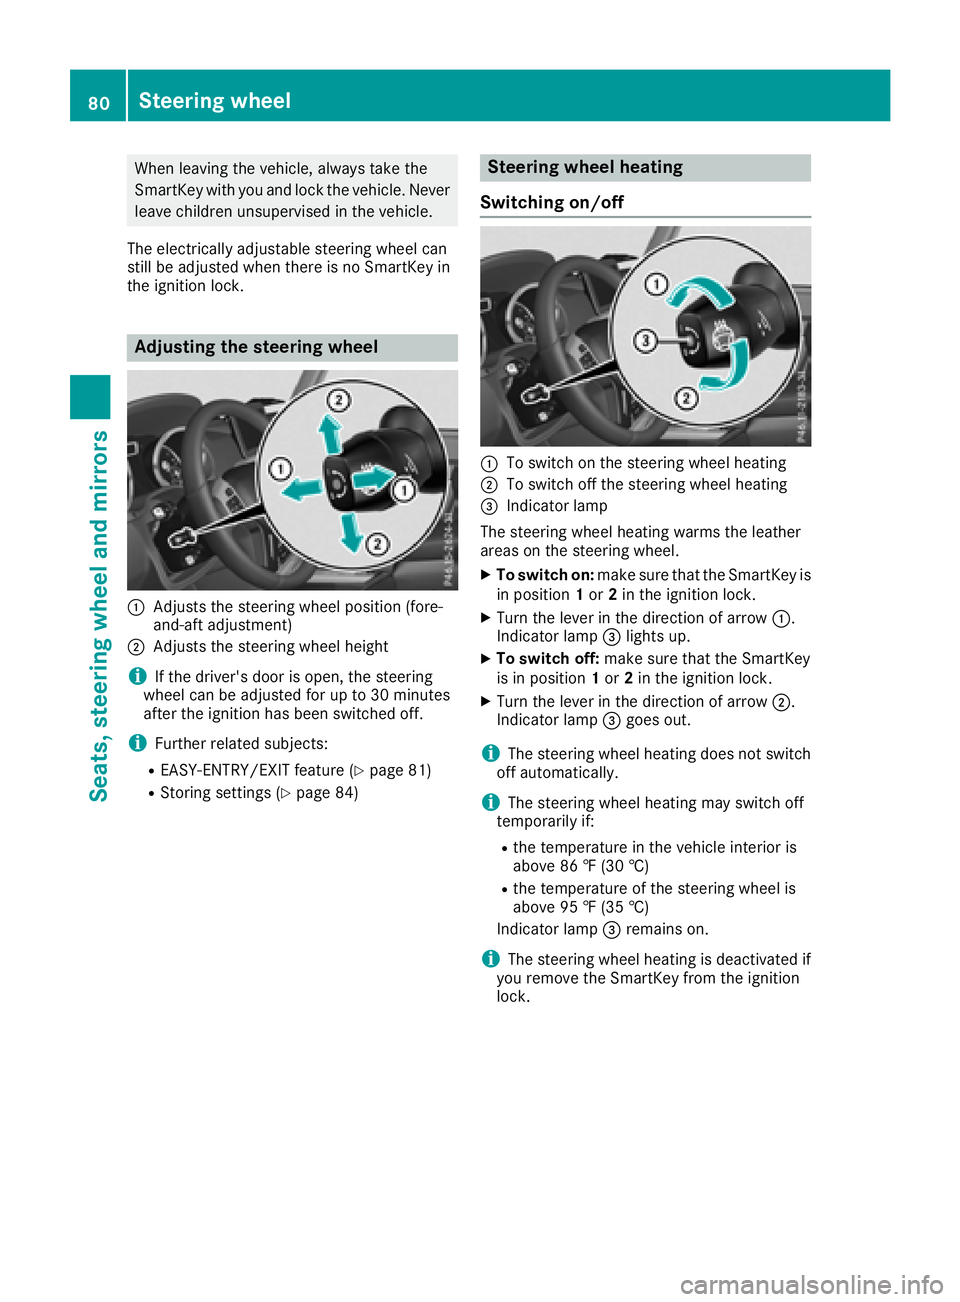
Adjusting the steering wheel
:Adjusts the steering wheel position (fore-
and-aft adjustment)
;Adjusts the steering wheel height
iIf the driver's door is open, the steering
wheel can be adjusted for up to 30 minutes
after the ignition has been switched off.
iFurther related subjects:
REASY-ENTRY/EXIT feature (Ypage 81)
RStoring settings (Ypage 84)
Steering wheel heating
Switching on/off
:To switch on the steering wheel heating
;To switch off the steering wheel heating
=Indicator lamp
The steering wheel heating warms the leather
areas on the steering wheel.
XTo switch on: make sure that the SmartKey is
in position 1or 2in the ignition lock.
XTurn the lever in the direction of arrow :.
Indicator lamp =lights up.
XTo switch off: make sure that the SmartKey
is in position 1or 2in the ignition lock.
XTurn the lever in the direction of arrow ;.
Indicator lamp =goes out.
iThe steering wheel heating does not switch
off automatically.
iThe steering wheel heating may switch off
temporarily if:
Rthe temperature in the vehicle interior is
above 86 ‡ (30 †)
Rthe temperature of the steering wheel is
above 95 ‡ (35 †)
Indicator lamp =remains on.
iThe steering wheel heating is deactivated if
you remove the SmartKey from the ignition
lock.
80Steering wheel
Seats, steering wheel and mirrors
Page 91 of 294

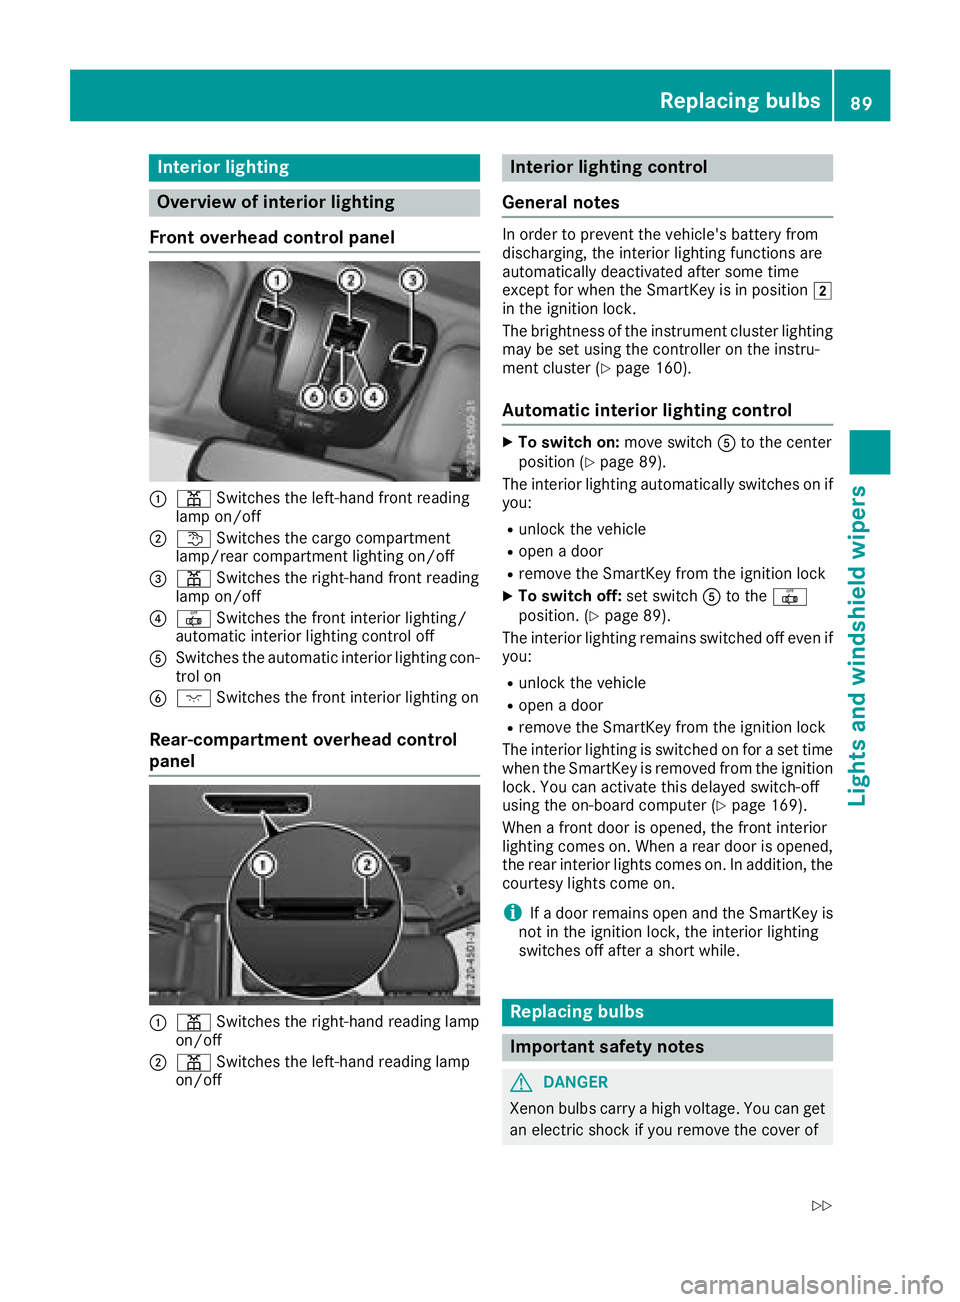
Interior lighting
Overview of interior lighting
Front overhead control panel
:p Switches th eleft-han dfron treading
lamp on/off
;t Switches th ecargo compartmen t
lamp/rear compartmen tlighting on/off
=p Switches th eright-hand fron treading
lamp on/off
?| Switches th efron tinterio rlighting /
automatic interio rlighting control off
ASwitches th eautomatic interio rlighting con-
trol on
Bc Switches th efron tinterio rlighting on
Rear-compartment overhead control
panel
:p Switches th eright-hand reading lamp
on/off
;p Switches th eleft-han dreading lamp
on/off
Interior lighting control
General notes
In order to preven tth evehicle's battery from
discharging, th einterior lighting function sare
automatically deactivated after som etime
except for when th eSmartKey is in position 2
in th eignition lock.
The brightness of th einstrumen tcluste rlighting
may be set usin gth econtroller on th einstru-
men tcluste r (
Ypage 160).
Automatic interior lighting control
XTo switch on: moveswitch Ato th ecenter
position (Ypage 89) .
The interior lighting automatically switches on if
you:
Runlock th evehicl e
Ropenadoor
Rremove th eSmartKey from th eignition loc k
XTo switch off :set switch Ato th e|
position . (Ypage 89).
The interior lighting remain sswitched off eve nif
you:
Runlock th evehicl e
Ropenadoor
Rremove th eSmartKey from th eignition loc k
The interior lighting is switched on for aset time
when th eSmartKey is remove dfrom th eignition
lock. You can activat ethis delaye dswitch-off
usin gth eon-board computer (
Ypage 169).
When afron tdoor is opened, th efron tinterior
lighting comes on .When arear door is opened,
th erear interior lights comes on .In addition ,th e
courtesy lights come on .
iIfadoor remain sopen and th eSmartKey is
no tin th eignition lock, th einterior lighting
switches off after ashort while .
Replacing bulbs
Important safety notes
GDANGER
Xenon bulbs carry ahigh voltage. You can get
an electric shock if you remove th ecover of
Replacing bulbs89
Lights and windshield wipers
Z
Page 103 of 294

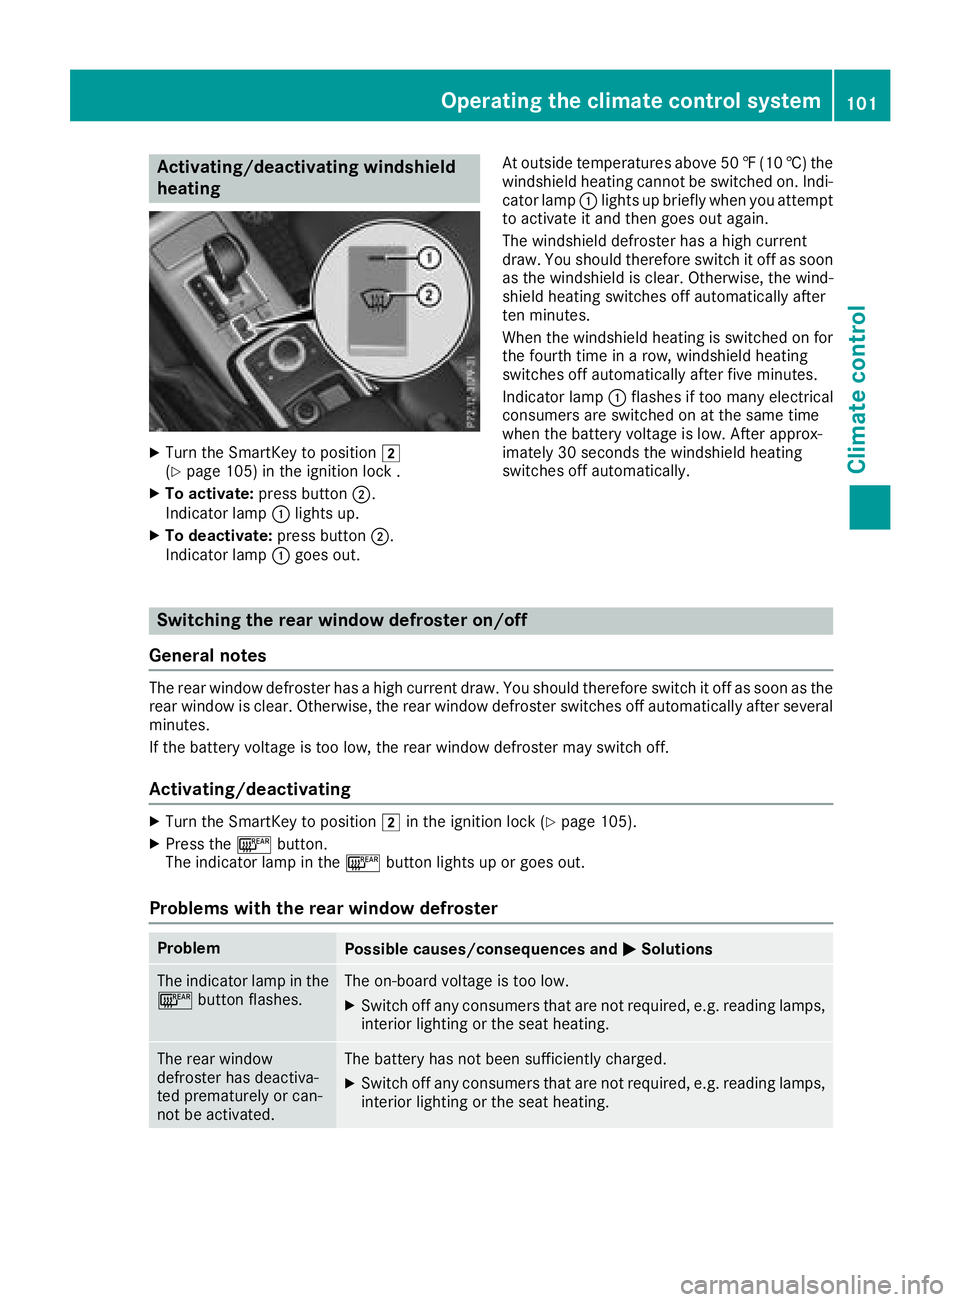
Activating/deactivating windshield
heating
XTurn theSmartKey to position 2
(Ypage 105) in th eignition loc k .
XTo activate: press button;.
Indicato rlamp :lights up.
XTo deactivate: press button;.
Indicato rlamp :goe sout . At outside temperatures abov
e50 ‡(10 †) the
windshield heating cannot be switched on. Indi-
cator lamp :lights up briefly when you attempt
to activate it and then goes out again.
The windshield defroster has a high current
draw. You should therefore switch it off as soon
as the windshield is clear. Otherwise, the wind-
shield heating switches off automatically after
ten minutes.
When the windshield heating is switched on for
the fourth time in a row, windshield heating
switches off automatically after five minutes.
Indicator lamp :flashes if too many electrical
consumers are switched on at the same time
when the battery voltage is low. After approx-
imately 30 seconds the windshield heating
switches off automatically.
Switching the rear window defroster on/off
General notes
The rear window defroster has a high current draw. You should therefore switch it off as soon as the
rear window is clear. Otherwise, the rear window defroster switches off automatically after several
minutes.
If the battery voltage is too low, the rear window defroster may switch off.
Activating/deactivating
XTurn the SmartKey to position 2in the ignition lock (Ypage 105).
XPress the ¤button.
The indicator lamp in the ¤button lights up or goes out.
Problems with the rear window defroster
ProblemPossible causes/consequences and MSolutions
The indicator lamp in the
¤button flashes.The on-board voltage is too low.
XSwitch off any consumers that are not required, e.g. reading lamps,
interior lighting or the seat heating.
The rear window
defroster has deactiva-
ted prematurely or can-
not be activated.The battery has not been sufficiently charged.
XSwitch off any consumers that are not required, e.g. reading lamps,
interior lighting or the seat heating.
Operating the climate control system101
Climate control