2018 MERCEDES-BENZ G-CLASS trunk
[x] Cancel search: trunkPage 171 of 294

Setting the time
XPress the=or; button on the steering
wheel to select the Settingsmenu.
XPress:or9 to select the Time/Datesubmenu.
XPressato confirm.
XPress :or9 to select the Time:func-
tion.
You will see the current setting.
XTo set the time: pressaagain.
XPress =or; to switch between hours
and minutes.
XPress :or9 to set the hours or
minutes.
XPress ato store the entry.
The display shows the selected time.
Lights
Setting the daytime running lamps
iThis function is not available in Canada.
XPress the =or; button on the steering
wheel to select the Sett.menu.
XPress the:or9 button to select the
Lightssubmenu.
XPress ato confirm.
XPress the :or9 button to select the
Daytime Running Lightsfunction.
If the DaytimeRunningLightsfunction has
been switched on, the cone of light and the
W symbol are shown in red in the multi-
function display.
XPress the abutton to save the setting.
Further information on daytime running lamps
(
Ypage 86).
Surround lighting and exterior lighting
delayed switch-off
XPress the =or; button on the steering
wheel to select the Sett.menu.
XPress the:or9 button to select the
Lightsubmenu.
XPress ato confirm.
XPress the :or9 button to select the
Surround Lightingfunction.
When the Surround Lightingfunction has
been activated, the cone of light is shown in
red in the multifunction display.
XPress the abutton to save the setting. To deactivate exterior lighting delayed switch-
off temporarily:
XBefore leaving the vehicle, turn the SmartKey
to position
gin the ignition lock
(
Ypage 105).
XTurn the SmartKey to position 2in the igni-
tion lock (Ypage 105).
Exterior lighting delayed switch-off is deacti-
vated.
Exterior lighting delayed switch-off is reactiva-
ted the next time you start the engine.
If you have activated the Surround Lighting
function and the light switch is set to Ã, the
following functions are switched on when it is
dark:
Rsurround lighting: the exterior lighting
remains lit for 40 seconds after unlocking
with the SmartKey. If you start the engine, the
surround lighting is switched off and auto-
matic headlamp mode is activated
(
Ypage 87).
Rexterior lighting delayed switch-off: the
exterior lighting remains lit for 60 seconds
after the engine is switched off. If you close all
the doors and the trunk lid, the exterior light-
ing goes off after five seconds.
iDepending on your vehicle's equipment,
when the surround lighting and exterior light-
ing delayed switch-off are on, the following
light up:
RParking lamps
RLow-beam headlamps
RDaytime running lamps
RSide marker lamps
RSurround lighting in the exterior mirrors
Switching the interior lighting delayed
switch-off on/off
If you activate the Interior Lighting Delayfunction, the interior lighting remains on for
20 seconds after you remove the SmartKey from
the ignition lock.
XPress the=or; button on the steering
wheel to select the Sett.menu.
XPress the:or9 button to select the
Lightssubmenu.
XPress ato confirm.
Menus and submenus169
On-board computer and displays
Z
Page 214 of 294

level of protection and could even cause
injuries.
RObjects or loads in the trunk/cargo com-
partment cannot be restrained by the seat
backrest.
There is an increased risk of injury.
Before every trip, make sure that the seat
backrests and the rear bench seat/rear seat
are engaged.
GWARNING
Combustion engines emit poisonous exhaust
gases such as carbon monoxide. If the rear
door is open when the engine is running, par-
ticularly if the vehicle is moving, exhaust
fumes could enter the passenger compart-
ment. There is a risk of poisoning.
Turn off the engine before opening the rear
door. Never drive with the rear door open.
!Ensure that you remove all containers from
the cup holder in the rear before folding the
seat backrest and the seat cushion of the rear
bench seat forwards.
Observe the loading guidelines (
Ypage 209).
The rear bench seat is split symmetrically.
The left-hand and right-hand rear bench seats
can be folded forward to increase the capacity
of the rear compartment. You can:
Rfold the seat backrests forward
Rfold the rear bench seat back fully
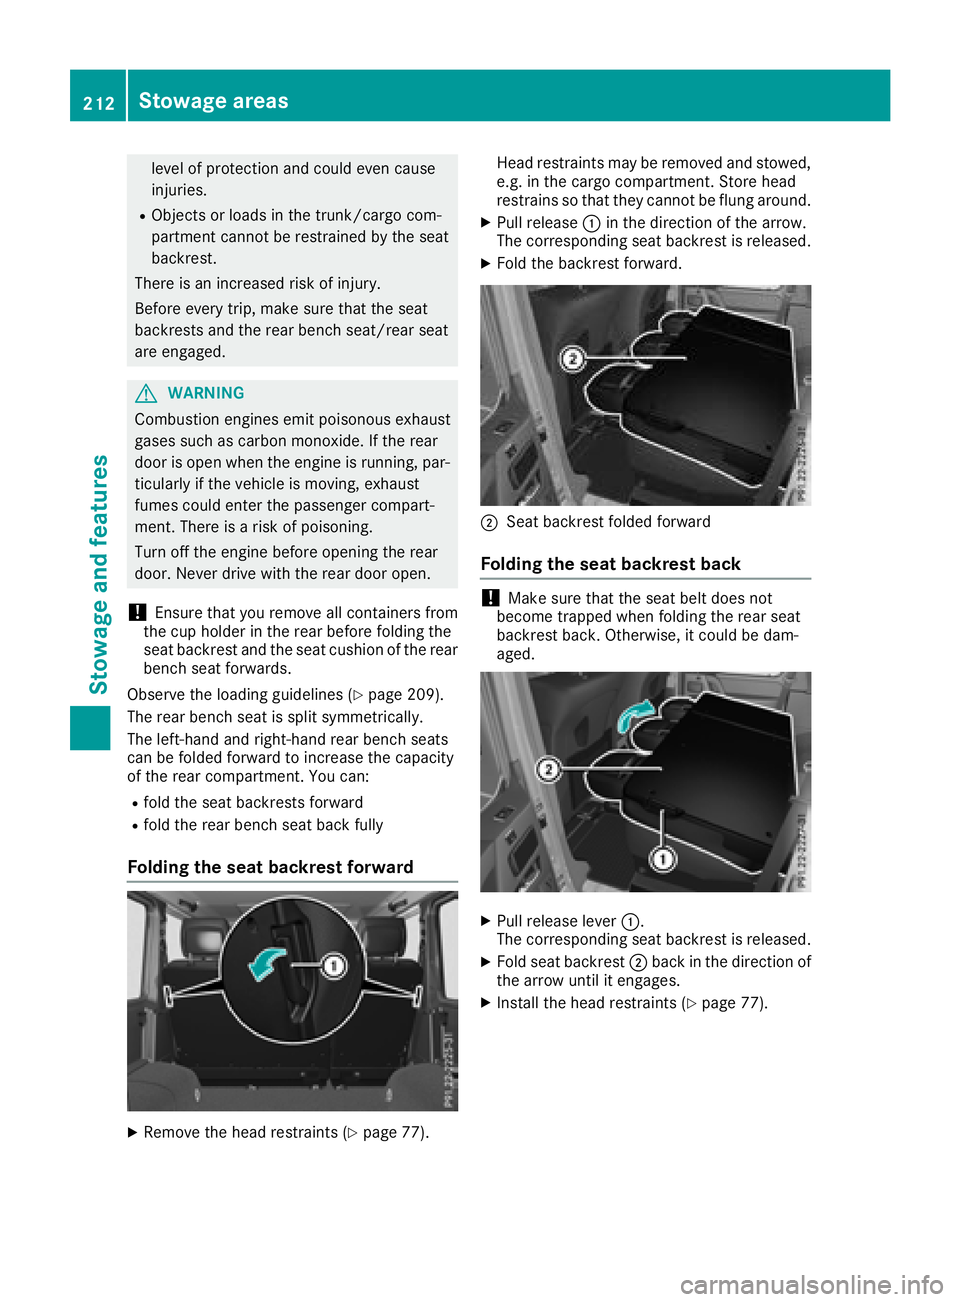
Folding the seat backrest forward
XRemove the head restraints (Ypage 77). Head restraints may be removed and stowed,
e.g. in the cargo compartment. Store head
restrains so that they cannot be flung around.
XPull release
:in the direction of the arrow.
The corresponding seat backrest is released.
XFold the backrest forward.
;Seat backrest folded forward
Folding the seat backrest back
!Make sure that the seat belt does not
become trapped when folding the rear seat
backrest back. Otherwise, it could be dam-
aged.
XPull release lever :.
The corresponding seat backrest is released.
XFold seat backrest ;back in the direction of
the arrow until it engages.
XInstall the head restraints (Ypage 77).
212Stowage areas
Stowage and features
Page 215 of 294

Rear bench seat
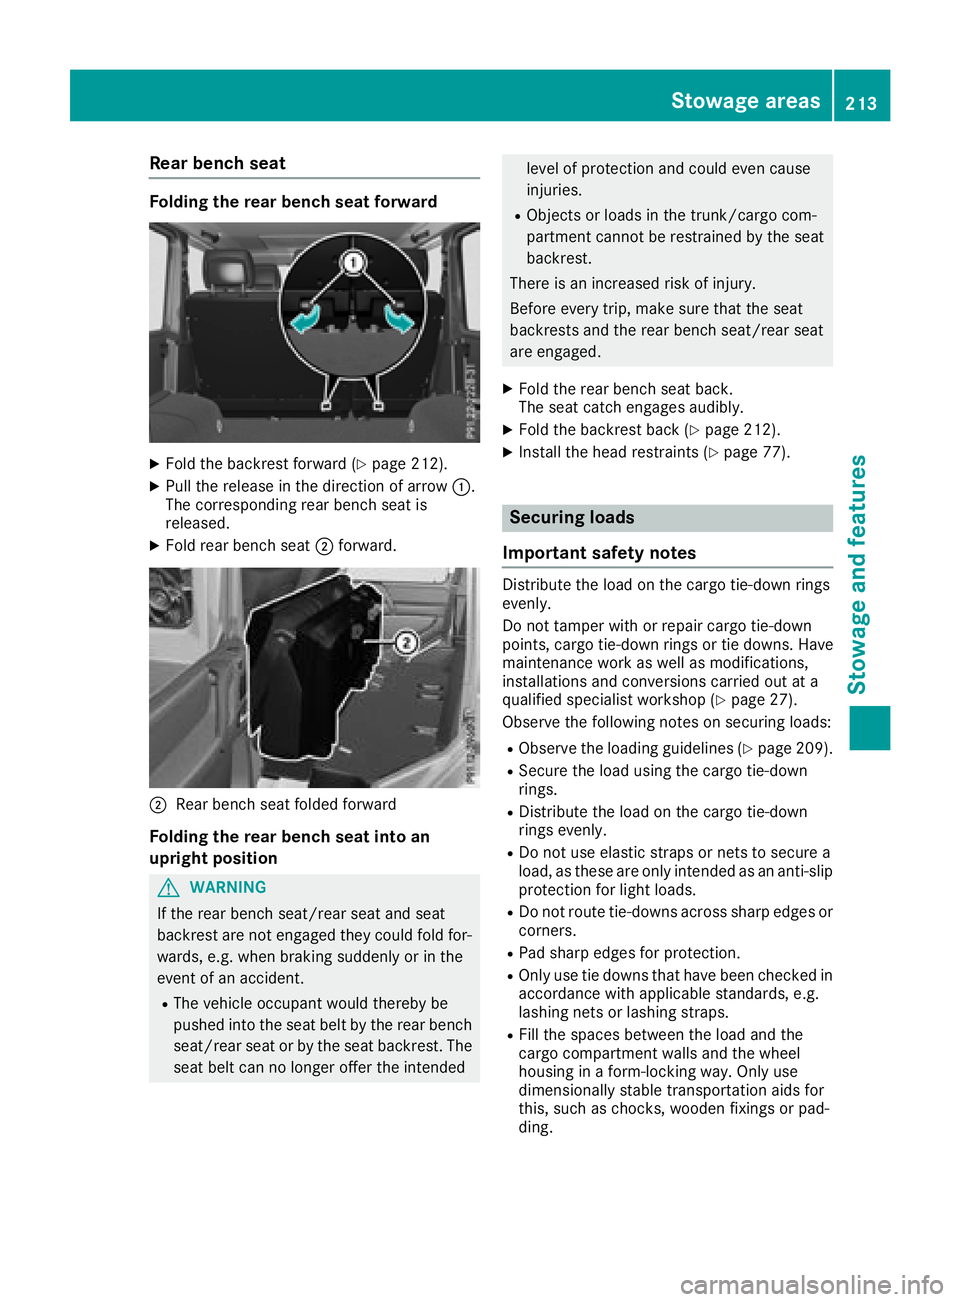
Folding the rear bench seat forward
XFold the backrest forward (Ypage 212).
XPull the release in the direction of arrow:.
The corresponding rear bench seat is
released.
XFold rear bench seat ;forward.
;Rear bench seat folded forward
Folding the rear bench seat into an
upright position
GWARNING
If the rear bench seat/rear seat and seat
backrest are not engaged they could fold for-
wards, e.g. when braking suddenly or in the
event of an accident.
RThe vehicle occupant would thereby be
pushed into the seat belt by the rear bench
seat/rear seat or by the seat backrest. The
seat belt can no longer offer the intended
level of protection and could even cause
injuries.
RObjects or loads in the trunk/cargo com-
partment cannot be restrained by the seat
backrest.
There is an increased risk of injury.
Before every trip, make sure that the seat
backrests and the rear bench seat/rear seat
are engaged.
XFold the rear bench seat back.
The seat catch engages audibly.
XFold the backrest back (Ypage 212).
XInstall the head restraints (Ypage 77).
Securing loads
Important safety notes
Distribute the load on the cargo tie-down rings
evenly.
Do not tamper with or repair cargo tie-down
points, cargo tie-down rings or tie downs. Have
maintenance work as well as modifications,
installations and conversions carried out at a
qualified specialist workshop (
Ypage 27).
Observe the following notes on securing loads:
RObserve the loading guidelines (Ypage 209).
RSecure the load using the cargo tie-down
rings.
RDistribute the load on the cargo tie-down
rings evenly.
RDo not use elastic straps or nets to secure a
load, as these are only intended as an anti-slip
protection for light loads.
RDo not route tie-downs across sharp edges or corners.
RPad sharp edges for protection.
ROnly use tie downs that have been checked in
accordance with applicable standards, e.g.
lashing nets or lashing straps.
RFill the spaces between the load and the
cargo compartment walls and the wheel
housing in a form-locking way. Only use
dimensionally stable transportation aids for
this, such as chocks, wooden fixings or pad-
ding.
Stowage areas213
Stowage and features
Z
Page 284 of 294

The maximum transmission output (PEAK) at the
base of the antenna must not exceed the fol-
lowing values:
Frequency bandMaximum
transmission output
Short wave
3 - 54 MHz100 W
4 m waveband
68 - 87.5 MHz30 W
2 m waveband
144 - 174 MHz50 W
Trunked radio system/
Tetra
380 - 460 MHz10 W
70 cm waveband
400 - 460 MHz35 W
Mobile communications
(2G/3G/4G)10 W
The following can be used in the vehicle without
restrictions:
RTwo-way radios with a maximum transmission
output of up to 100 mW
RWireless devices with transmitter frequencies
in the 380 - 410 MHz waveband and a maxi-
mum transmission output of up to 2 W
(trunked radio/Tetra)
RMobile phones (2G/3G/4G)
There is no restriction for antenna positions on
the outside of the vehicle for the following fre-
quency bands:
RTrunked radio system/Tetra
R70 cm waveband
R2G/3G/4G
Identification plates
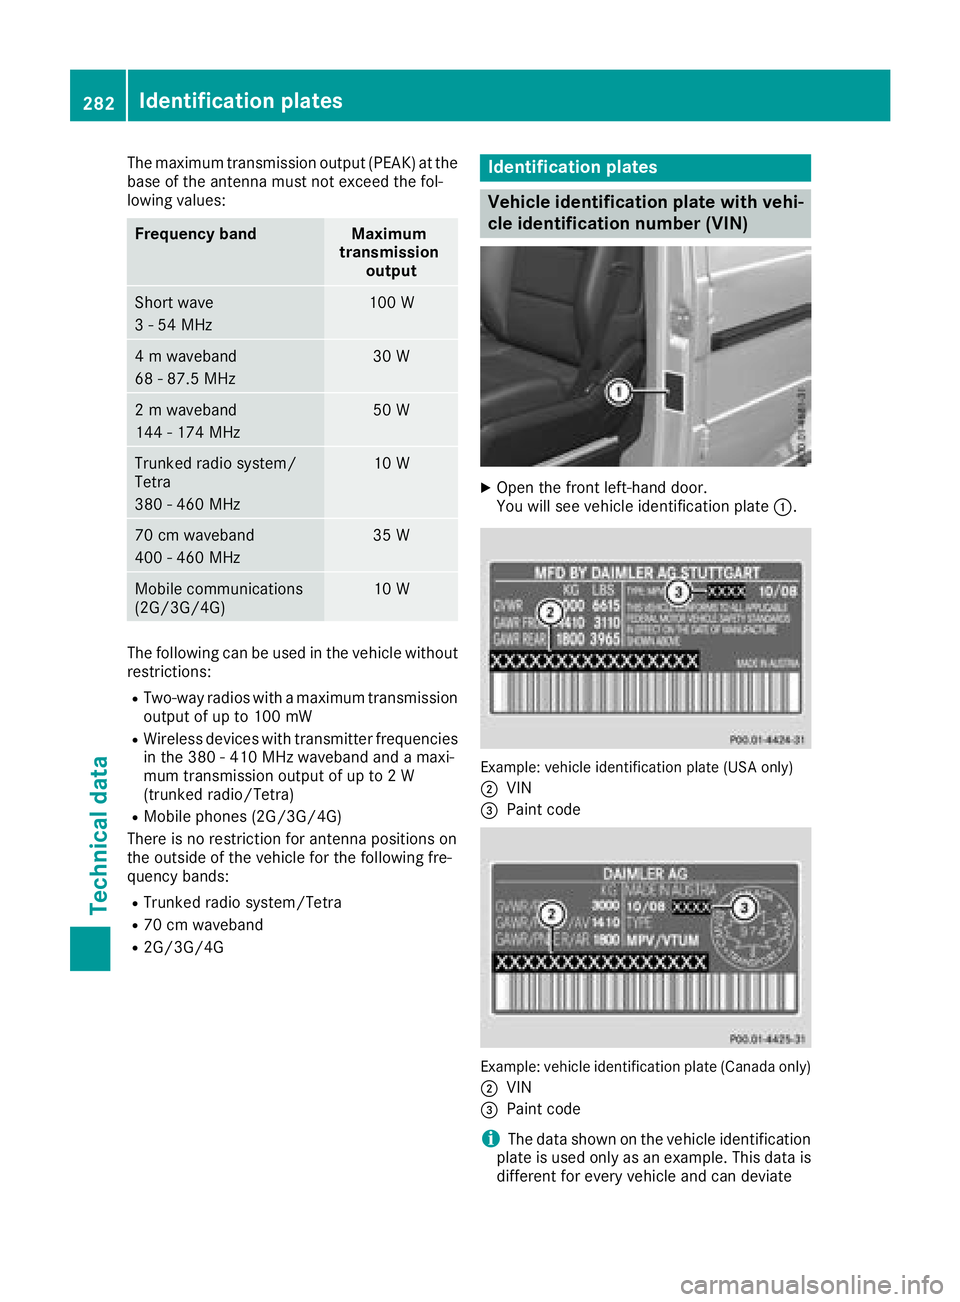
Vehicle identification plate with vehi-
cle identification number (VIN)
XOpen the front left-hand door.
You will see vehicle identification plate :.
Example: vehicle identification plate (USA only)
;
VIN
=Paint code
Example: vehicle identification plate (Canada only)
;
VIN
=Paint code
iThe data shown on the vehicle identification
plate is used only as an example. This data is
different for every vehicle and can deviate
282Identification plates
Technical data