2018 MERCEDES-BENZ G-CLASS reset
[x] Cancel search: resetPage 13 of 294

Genuine parts...................................... 23
Glove box ........................................... 210
Google™ Local Search
see also Digital Operator's Man-
ual .................................................. 203
GTW (Gross Trailer Weight) (defini-
tion) .................................................... 274
H
Hazard warning lamps ........................ 88
Head restraints
Adjusting .........................................7 6
Adjusting (rear) ................................ 77
Installing/removing (rear) ................ 77
Luxury .............................................. 76
Resetting (front) ............................... 76
see NECK-PRO head restraints
see NECK-PRO luxury head restraints
Headlamps
Cleaning system (function) .............. 87
Cleaning system (notes) ................ 287
Fogging up ....................................... 88
Protective grille ................................ 91
see Automatic headlamp mode
Heating
see Climate control
High beam flasher ............................... 88
High-beam headlamps
Display message ............................ 180
Switching on/off .............................. 88
Hill start assist .................................. 107
HOLD function
Activating ....................................... 143
Activation conditions ..................... 143
Deactivating ................................... 143
Function/notes ............................. 142
General notes ................................ 142
Home address
see also Digital Operator's Man-
ual .................................................. 203
Hood
Closing ........................................... 231
Display message ............................ 190
Important safety notes .................. 230
Opening ......................................... 230
Horn ...................................................... 31
Hydroplaning ..................................... 127
I
Ignition lock
see Key positions
Immobilizer .......................................... 62
Indicator lamp
Replacing bulbs (rear) ...................... 92
Insect protection on the radiator .... 231
Instrument cluster
Overview .......................................... 32
Warning and indicator lamps ........... 32
Instrument cluster lighting .............. 160
Interior lighting
Automatic control ............................ 89
Delayed switch-off (on-board
computer) ...................................... 169
Overview .......................................... 89
iPod
®
see also Digital Operator's Man-
ual .................................................. 203
J
Jack Pump lever ..................................... 276
Storage location ............................ 244
Using ............................................. 276
Jump starting (engine) ...................... 249
K
Key positions
SmartKey ....................................... 105
L
Language (on-board computer) ........ 168
Lap time (RACETIMER) ...................... 172
LATCH-type (ISOFIX) child seat
anchors ................................................ 52
License plate lamp (display mes-
sage) ................................................... 180
Light sensor (display message) ....... 180
Lights
Activating/deactivating the inte-
rior lighting delayed switch-off ....... 169
Automatic headlamp mode .............. 87
Combination switch ......................... 88
Fogged up headlamps ...................... 88
Index11
Page 15 of 294

Mobile phoneConnecting (Bluetooth®inter-
face) ..............................................2 06
Frequencies ................................... 281
Installation ..................................... 281
Menu (on-board computer) ............ 166
Transmission output (maximum) .... 281
Modifying the programming
(SmartKey) ...........................................6 4
Mounting wheels
Lowering the vehicle ...................... 278
Mounting a new wheel ................... 278
Preparing the vehicle .....................2 76
Raising the vehicle ......................... 276
Removing a wheel .......................... 278
Securing the vehicle against roll-
ing away ........................................ 276
MP3
Operation ....................................... 165
see also Digital Operator's Man-
ual ..................................................2 03
see separate operating instructions
Multifunction display
Function/notes .............................1 62
Permanent display ......................... 168
Multifunction steering wheel
Operating the on-board computer .. 161Overview .......................................... 33
Multimedia system
Switching on and off ......................2 04
Music files
see also Digital Operator's Man-
ual .................................................. 203
N
NavigationEntering a destination .................... 205
Menu (on-board computer) ............ 164
see also Digital Operator's Man-
ual .................................................. 203
see separate operating instructions
NECK-PRO head restraints
Operation ......................................... 48
Resetting triggered .......................... 49
NECK-PRO luxury head restraints
Important safety notes .................... 48
Operation ......................................... 48 Resetting when triggered ................. 49
Notes on breaking-in a new vehi-
cle ....................................................... 104
O
Occupant safety
Air bags ........................................... 44
Automatic measures after an acci-
dent ................................................. 50
BabySmart™ air bag deactivation
system ............................................. 53
Belt warning ..................................... 43
Children in the vehicle ..................... 50
Important safety notes .................... 38
Introduction to the restraint sys-
tem .................................................. 38
PASSENGER AIR BAG indicator
lamps ............................................... 39
Pets in the vehicle ........................... 57
Restraint system warning lamp ........ 38
Seat belt .......................................... 39
Odometer ........................................... 163
Off-road
Differential locks ............................ 151
Off-road ABS .................................... 59
Off-road driving
Checklist after driving off-road ...... 131
Checklist before driving off-road .... 130
Driving on sand .............................. 131
General information ....................... 130
Important safety notes .................. 129
Traveling uphill ............................... 132
Off-road fording ................................. 128
Off-road system
Permanent all-wheel drive ............. 143
Oil
see Engine oil
On-board computer
AMG menu ..................................... 171
Assistance menu ........................... 167
Audio menu ................................... 165
Convenience submenu .................. 170
Display messages .......................... 173
DISTRONIC PLUS ........................... 139
Factory settings submenu ............. 171
Important safety notes .................. 160
Instrument cluster submenu .......... 168
Index13
Page 17 of 294

R
RACE TIMER (on-board computer,
Mercedes-AMG vehicles).................. 172
RACETIMER
Deleting all laps .............................1 72
Displaying and starting .................. 172
Displaying the intermediate time ... 172
Resetting the current lap ...............1 72
Starting a new lap .......................... 172
Stopping ........................................ 172
Radiator cover ................................... 231
Radio
Selecting a station ......................... 165
Radio mode
see also Digital Operator's Man-
ual ..................................................2 03
Radio-wave reception/transmis-
sion in the vehicle
Declaration of conformity ................ 26
Rear bench seat
Folding forward .............................. 213
Rear compartment
Setting the air vents ......................1 03
Rear door
Display message ............................ 190
Important safety notes .................... 68
Rear fog lamp
Display message ............................ 180
Replacing bulbs ............................... 92
Switching on/off .............................. 87
Rear seat bench
Folding into an upright position ..... 213
Rear view camera
Cleaning instructions ..................... 240
Coupling up a trailer function ........1 48
Display in the multimedia system .. 147
Function/notes .............................1 46
General notes ................................ 146
Switching on/off ........................... 147
Rear window defroster
Problem (malfunction) ................... 101
Switching on/off ........................... 101
Rear window wiper
Replacing the wiper blade ................ 94
Switching on/off .............................. 94
Rear-view mirror
Dipping (automatic) ......................... 83 Reflective safety jacket
.................... 243
Refrigerant (air-conditioning sys-
tem)
Important safety notes .................. 287
Refueling
Fuel gauge ....................................... 32
Important safety notes .................. 120
R
efueling process .......................... 120
see Fuel
Remote control
Programming (garage door
opener) .......................................... 227
Replacing bulbs
Backup lamp .................................... 92
Brake lamp ...................................... 92
Important safety notes .................... 89
Overview of bulb types .................... 90
Rear fog lamp .................................. 92
Tail lamp .......................................... 92
Turn signal (rear) .............................. 92
Turn signals (front) ........................... 91
Reporting safety defects .................... 27
Rescue card ......................................... 28
Reserve (fuel tank)
see Fuel
Reserve fuel
Display message ............................ 183
Warning lamp ................................. 199
Residual heat
Switching on/off ........................... 102
Restraint system
Display message ............................ 177
Introduction ..................................... 38
Warning lamp ................................. 198
Warning lamp (function) ................... 38
Reversing lamps (display mes-
sage) ................................................... 180
Roadside Assistance (breakdown) .... 25
Roof lining and carpets (cleaning
guidelines) ......................................... 242
Route (navigation)
see Route guidance (navigation)
Route guidance
see also Digital Operator's Man-
ual .................................................. 203
Route guidance (navigation) ............ 164
Route guidance active ...................... 164
Index15
Page 22 of 294

Transmissionsee Automatic transmission
Transmission positions .................... 114
Transporting the vehicle .................. 253
Traveling uphill
Brow of hill ..................................... 132
Trim pieces (cleaning instruc-
tions) .................................................. 241
Trip computer (on-board com-
puter) .................................................. 163
Trip odometer
Calling up ....................................... 163
Resetting (on-board computer) ...... 163
Turn signals
Display message ............................ 180
Replacing bulbs (front) ..................... 91
Switching on/off .............................. 88
TV
Operating (on-board computer) ..... 166
see Separate operating instructions
Two-way radio
Frequencies ................................... 281
Installation ..................................... 281
Transmission output (maximum) .... 281
TWR (Tongue Weight Rating) (defi-
nition) ................................................. 275
Type identification plate
see Vehicle identification plate
U
UnlockingEmergency unlocking ....................... 68
From inside the vehicle (central
unlocking button) ............................. 67
USB devices
Connecting to the Media Inter-
face ...............................................2 08
V
Vanity mirror
Sun visor ........................................ 216
Vehicle
Correct use ...................................... 27
Data acquisition ............................... 28
Display message ............................ 190
Equipment ....................................... 24 Individual settings .......................... 168
Limited Warranty .............................2
8
Loading .......................................... 266
Locking (in an emergency) ............... 68
Locking (SmartKey) .......................... 63
Lowering ........................................ 278
Maintenance .................................... 25
Operation outside the USA/
Canada ............................................ 25
Parking .......................................... 122
Parking for a long period ................ 124
Pulling away ................................... 106
Raising ........................................... 276
Securing from rolling away ............ 276
Tow-starting ................................... 254
Towing ........................................... 251
Transporting .................................. 253
Unlocking (in an emergency) ........... 68
Unlocking (SmartKey) ...................... 63
Vehicle data ................................... 288
Vehicle data ....................................... 288
Vehicle data (off-road driving)
Approach/departure angle ............ 290
Fording depth ................................ 290
Maximum gradient climbing abil-
ity .................................................. 290
Vehicle dimensions ........................... 288
Vehicle emergency locking ................ 68
Vehicle identification number
see VIN
Vehicle identification plate .............. 282
Vehicle tool kit .................................. 244
Ventilation
Setting the airflow ........................... 99
Video
Operating the DVD ......................... 166
see also Digital Operator's Man-
ual .................................................. 203
VIN
Type plate ...................................... 282
W
Warning and indicator lampsABS ................................................ 194
Brakes ........................................... 193
Check Engine ................................. 199
Coolant .......................................... 199
20Index
Page 29 of 294

subject to the two following two conditions: 1)
These devices may not cause harmful interfer-
ence, and 2) These devices must accept any
interference received, including interference
that may cause undesired operation. Changes
or modifications not expressly approved by the
party responsible for compliance could void the
user’s authority to operate the equipment."
Canada:"The wireless devices of this vehicle
comply with Industry Canada license-exempt
RSS standard(s). Operation is subject to the fol-
lowing two conditions: (1) These devices may
not cause interference, and (2) These devices
must accept any interference, including inter-
ference that may cause undesired operation of
the device."
Diagnostics connection
The diagnostics connection is only intended for
the connection of diagnostic equipment at a
qualified specialist workshop.
GWARNING
If you connect equipment to a diagnostics
connection in the vehicle, it may affect the
operation of vehicle systems. As a result, the
operating safety of the vehicle could be affec-
ted. There is a risk of an accident.
Only connect equipment to a diagnostics con-
nection in the vehicle, which is approved for
your vehicle by Mercedes-Benz.
GWARNING
Objects in the driver's footwell may restrict
the clearance around the pedals or block a
depressed pedal. This jeopardizes the oper-
ating and road safety of the vehicle. There is a risk of an accident.
Stow all objects securely in the vehicle so that
they do not get into the driver's footwell.
When using floormats or carpets, make sure
that they are properly secured so that they do not slip or obstruct the pedals. Do not place
several floormats or carpets on top of one
another.
!If the engine is switched off and equipment
on the diagnostics connection is used, the
starter battery may discharge. Connecting equipment to the diagnostics con-
nection can lead to emissions monitoring infor-
mation being reset, for example. This may lead
to the vehicle failing to meet the requirements of
the next emissions test during the main inspec-
tion.
Qualified specialist workshop
An authorized Mercedes-Benz Center is a quali-
fied specialist workshop. It has the necessary
specialist knowledge, tools and qualifications to
correctly carry out the work required on your
vehicle. This is especially the case for work rel-
evant to safety.
Observe the notes in the Maintenance Booklet.
Always have the following work carried out at an
authorized Mercedes-Benz Center:
Rwork relevant to safety
Rservice and maintenance work
Rrepair work
Ralterations, installation work and modifica-
tions
Rwork on electronic components
Correct use
If you remove any warning stickers, you or oth-
ers could fail to recognize certain dangers.
Leave warning stickers in position.
Observe the following information when driving
your vehicle:
Rthe safety notes in this manual
Rtechnical data for the vehicle
Rtraffic rules and regulations
Rlaws and safety standards pertaining to motor
vehicles
Reporting safety defects
USA only:
The following text is reproduced as required of
all manufacturers under Title 49, Code of U.S.
Federal Regulations, Part 575 pursuant to the
National Traffic and Motor Vehicle Safety Act of
1966.
If you believe that your vehicle has a defect
which could cause a crash or could cause injury
or death, you should immediately inform the
Operating safety27
Introduction
Z
Page 51 of 294

restraints on the driver's and front-passenger
seats are moved forwards and upwards. This
provides better head support.
If the NECK-PRO head restraints/NECK-PRO
luxury head restraints have been triggered in an
accident, reset the NECK-PRO head restraints/
NECK-PRO luxury head restraints on the driver's
seat and the front-passenger seat
(
Ypage 49). Otherwise, the additional protec-
tion will not be available in the event of another
rear-end collision. You can see that a NECK-PRO
head restraint/NECK-PRO luxury head restraint
has been triggered if it is tilted forward and can
no longer be adjusted.
Mercedes-Benz recommends that you have the
functionality of the NECK-PRO head restraints/
NECK-PRO luxury head restraints checked at a
qualified specialist workshop after a rear-end
collision.
Resetting a triggered NECK-PRO head
restraint/NECK-PRO luxury head
restraint
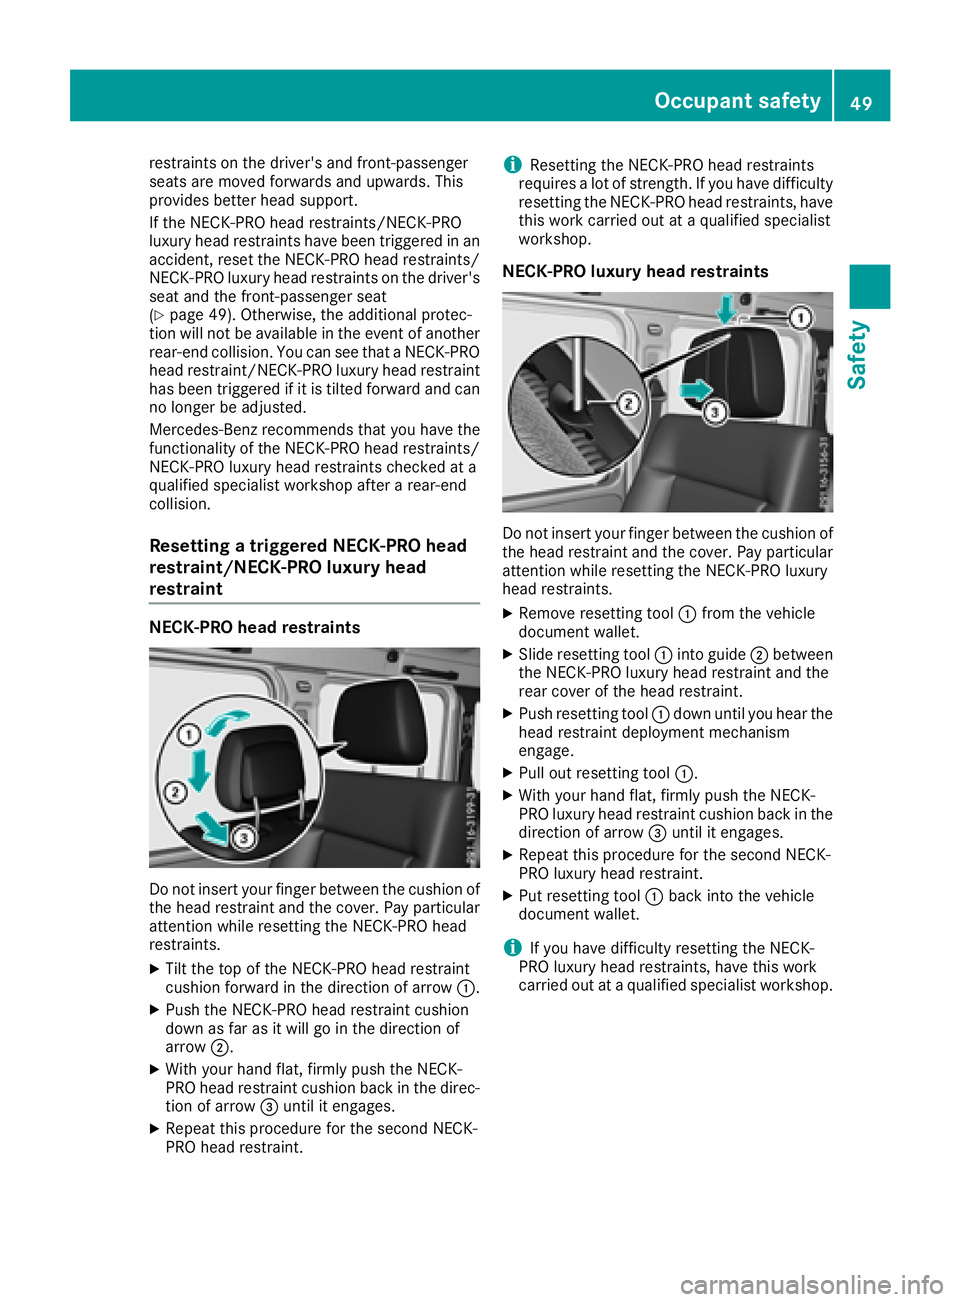
NECK-PRO head restraints
Do not insert your finger between the cushion of
the head restraint and the cover. Pay particular
attention while resetting the NECK-PRO head
restraints.
XTilt the top of the NECK-PRO head restraint
cushion forward in the direction of arrow :.
XPush the NECK-PRO head restraint cushion
down as far as it will go in the direction of
arrow;.
XWith your hand flat, firmly push the NECK-
PRO head restraint cushion back in the direc-
tion of arrow =until it engages.
XRepeat this procedure for the second NECK-
PRO head restraint.
iResetting the NECK-PRO head restraints
requires a lot of strength. If you have difficulty
resetting the NECK-PRO head restraints, have
this work carried out at a qualified specialist
workshop.
NECK-PRO luxury head restraints
Do not insert your finger between the cushion of
the head restraint and the cover. Pay particular
attention while resetting the NECK-PRO luxury
head restraints.
XRemove resetting tool :from the vehicle
document wallet.
XSlide resetting tool :into guide ;between
the NECK-PRO luxury head restraint and the
rear cover of the head restraint.
XPush resetting tool :down until you hear the
head restraint deployment mechanism
engage.
XPull out resetting tool :.
XWith your hand flat, firmly push the NECK-
PRO luxury head restraint cushion back in the
direction of arrow=until it engages.
XRepeat this procedure for the second NECK-
PRO luxury head restraint.
XPut resetting tool :back into the vehicle
document wallet.
iIf you have difficulty resetting the NECK-
PRO luxury head restraints, have this work
carried out at a qualified specialist workshop.
Occupant safety49
Safety
Z
Page 78 of 294

Adjusting the seats electrically
!
Mak esur ethat th ecup holder on th ecenter
console is folded down before you mov eth e
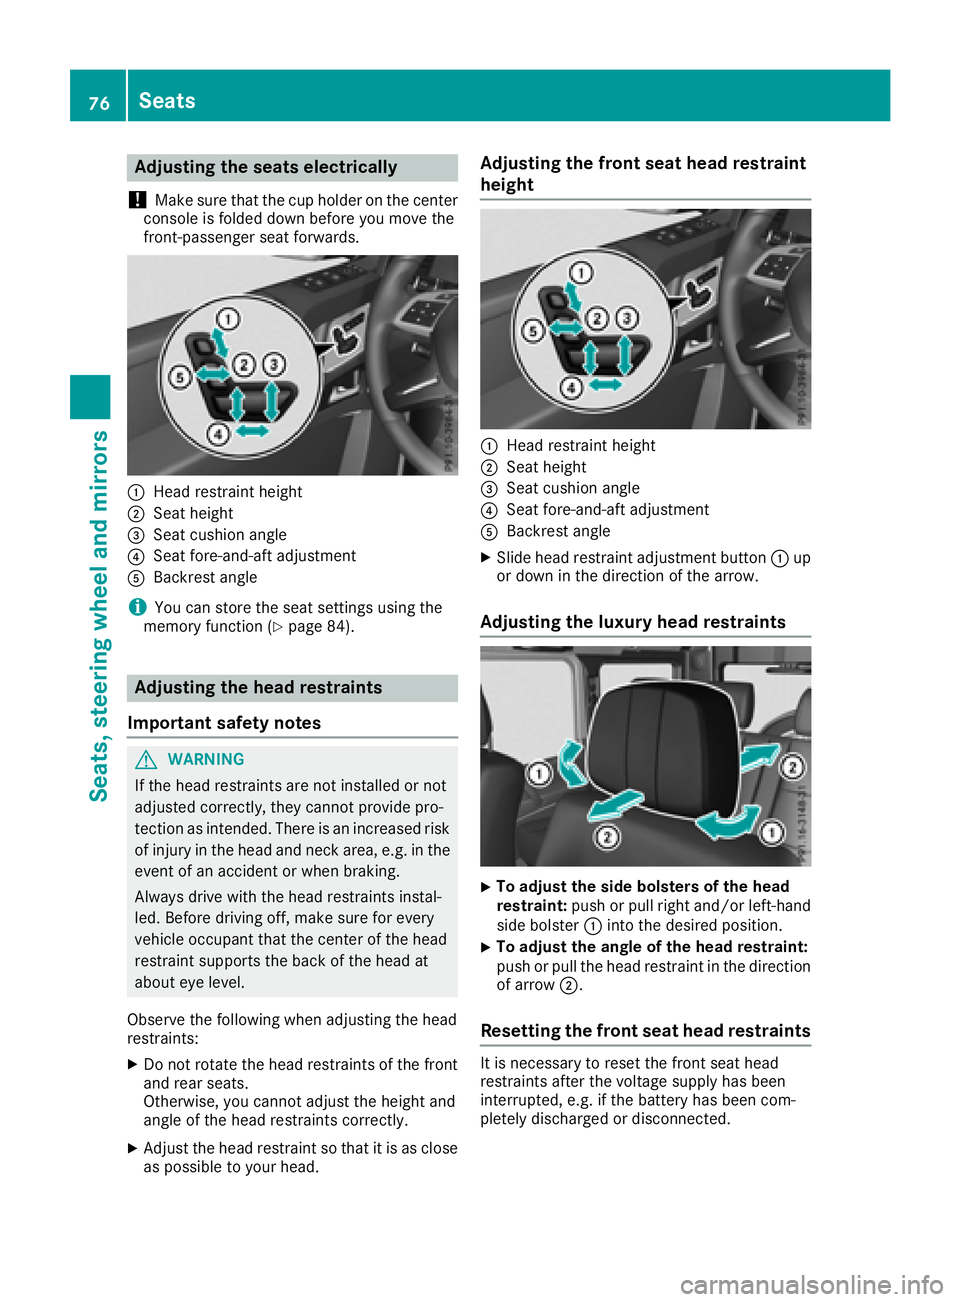
front-passenger seat forwards.
:Hea drestrain theight
;Seat height
=Seat cushion angle
?Seat fore-and-af tadjustmen t
ABackrest angle
iYou can store th eseat setting susin gth e
memory function (Ypage 84).
Adjusting the head restraints
Import ant safety notes
GWARNIN G
If th ehead restraints are no tinstalled or no t
adjusted correctly, they canno tprovid epro -
tection as intended. There is an increased ris k
of injury in th ehead and neck area, e.g. in th e
event of an acciden tor when braking .
Always drive wit hth ehead restraints instal -
led. Befor edrivin goff ,mak esur efor every
vehicl eoccupant that th ecenter of th ehead
restrain tsupport sth ebac kof th ehead at
about eye level.
Observ eth efollowin gwhen adjusting th ehead
restraints :
XDo notrotate th ehead restraints of th efron t
and rear seats.
Otherwise ,you canno tadjust th eheight and
angle of th ehead restraints correctly.
XAdjus tth ehead restrain tso that it is as close
as possibl eto your head .
Adjusting the front seat head restraint
height
:Headrestrain theight
;Seat height
=Seat cushion angle
?Seat fore-and-af tadjustmen t
ABackrest angle
XSlide head restrain tadjustmen tbutto n: up
or down in th edirection of th earrow.
Adjusting the luxury head restraints
XTo adjust th esid ebolsters of th ehea d
restraint: push or pull right and/o rleft-han d
side bolste r: intoth edesired position .
XTo adjust theangle of th ehea drestraint:
push or pull th ehead restrain tin th edirection
of arrow ;.
Resetting the front seat head restraints
It is necessar yto reset th efron tseat head
restraints after th evoltag esupply has been
interrupted, e.g. if th ebattery has been com-
pletely discharged or disconnected.
76Seats
Seats, steering wheel and mirrors
Page 84 of 294

Exterior mirrors
Adjusting the exterior mirrors
GWARNING
The exterior mirror on the front-passenger
side reduces the size of the image. Visible
objects are actually closer than they appear.
This means that you could misjudge the dis-
tance from road users traveling behind, e.g.
when changing lane. There is a risk of an acci-
dent.
For this reason, always make sure of the
actual distance from the road users traveling
behind by glancing over your shoulder.
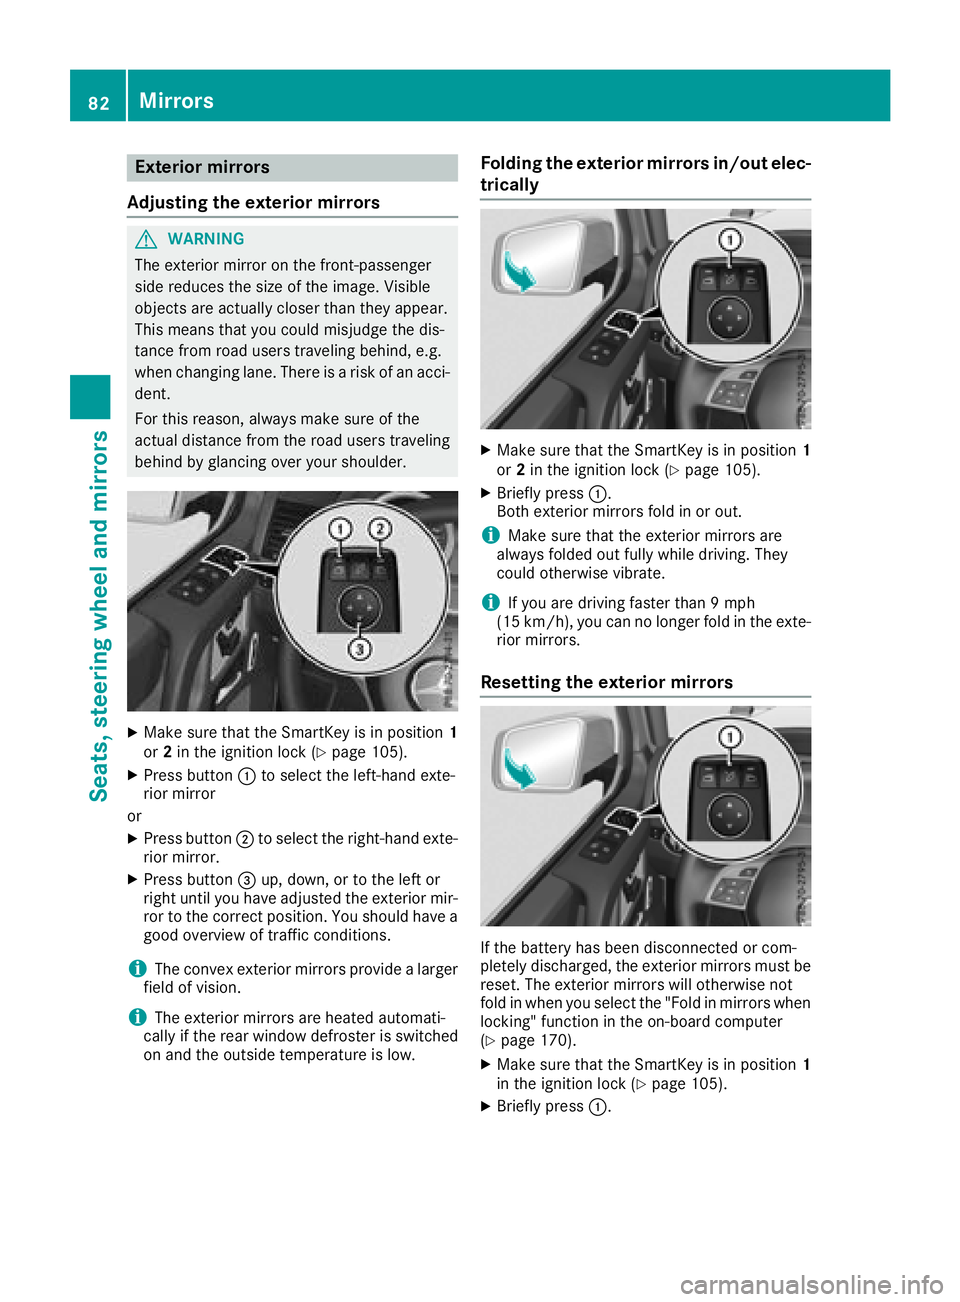
XMake sure that the SmartKey is in position 1
or 2in the ignition lock (Ypage 105).
XPress button :to select the left-hand exte-
rior mirror
or
XPress button ;to select the right-hand exte-
rior mirror.
XPress button =up, down, or to the left or
right until you have adjusted the exterior mir- ror to the correct position. You should have a
good overview of traffic conditions.
iThe convex exterior mirrors provide a larger
field of vision.
iThe exterior mirrors are heated automati-
cally if the rear window defroster is switched
on and the outside temperature is low.
Folding the exterior mirrors in/out elec-
trically
XMake sure that the SmartKey is in position 1
or 2in the ignition lock (Ypage 105).
XBriefly press :.
Both exterior mirrors fold in or out.
iMake sure that the exterior mirrors are
always folded out fully while driving. They
could otherwise vibrate.
iIf you are driving faster than 9 mph
(15 km/h), you can no longer fold in the exte-
rior mirrors.
Resetting the exterior mirrors
If the battery has been disconnected or com-
pletely discharged, the exterior mirrors must be
reset. The exterior mirrors will otherwise not
fold in when you select the "Fold in mirrors when
locking" function in the on-board computer
(
Ypage 170).
XMake sure that the SmartKey is in position 1
in the ignition lock (Ypage 105).
XBriefly press :.
82Mirrors
Seats, steering wheel and mirrors