2018 MERCEDES-BENZ G-CLASS transmission fluid
[x] Cancel search: transmission fluidPage 7 of 294

Neutral (ECO start/stop func-
tion) ............................................... 113
Overview ........................................ 111
Problem (malfunction) ................... 119
Program selector button ................ 115
Pulling away ................................... 106
Selector lever ................................ 112
Shift ranges ................................... 116
Steering wheel paddle shifters ...... 116
Trailer towing ................................. 115
Transmission position display ........ 112
Automatic transmission emer-
gency mode ....................................... 119
Axle load, permissible (trailer tow-
ing) ...................................................... 291
B
BabySmart™
Air bag deactivation system ............. 53
Back button ....................................... 204
Backup lamp
Replacing bulbs ............................... 92
Ball coupling
Installing ........................................ 156
BAS (Brake Assist System) ................. 59
Battery (SmartKey)
Checking .......................................... 65
Important safety notes .................... 64
Replacing ......................................... 65
Battery (vehicle)
Charging ........................................ 248
Display message ............................ 182
Important safety notes .................. 246
Jump starting ................................. 249
Overview ........................................ 246
Belt warning ......................................... 43
Blind Spot Assist
Activating/deactivating ................. 167
Activating/deactivating (on-
board computer) ............................ 167
Display message ............................ 185
Notes/function .............................. 140
Bluetooth
®
Searching for a mobile phone ........ 207
see also Digital Operator's Man-
ual .................................................. 203
Telephony ...................................... 206 Brake fluid
Display message ............................ 177
Notes ............................................. 286
Brake fluid level ................................ 235
Brake force distribution
see EBD (electronic brake force
distribution)
Brake lamp
Replacing bulbs ............................... 92
Brake lamps
Display message ............................ 180
Brakes
ABS .................................................. 58
BAS .................................................. 59
Brake fluid (notes) ......................... 286
Display message ............................ 175
EBD .................................................. 61
High-performance brake system .... 127
Hill start assist ............................... 107
HOLD function ............................... 142
Important safety notes .................. 125
Maintenance .................................. 126
Parking brake ................................ 123
Riding tips ...................................... 125
Warning lamp ................................. 193
Breakdown
see Flat tire
see Towing away
Brightness control (instrument
cluster lighting) ................................... 32
Brush guard ....................................... 226
Bulbs
Backup lamp .................................... 90
Brake lamp ...................................... 90
Rear fog lamp .................................. 90
Standing lamps (rear) ...................... 90
T
ail lamp .......................................... 90
Turn signal lamp (front) .................... 90
Turn signal lamp (rear) ..................... 90
see Replacing bulbs
C
California
Important notice for retail cus-
tomers and lessees .......................... 24
Calling up a malfunction
see Display messages
Index5
Page 95 of 294

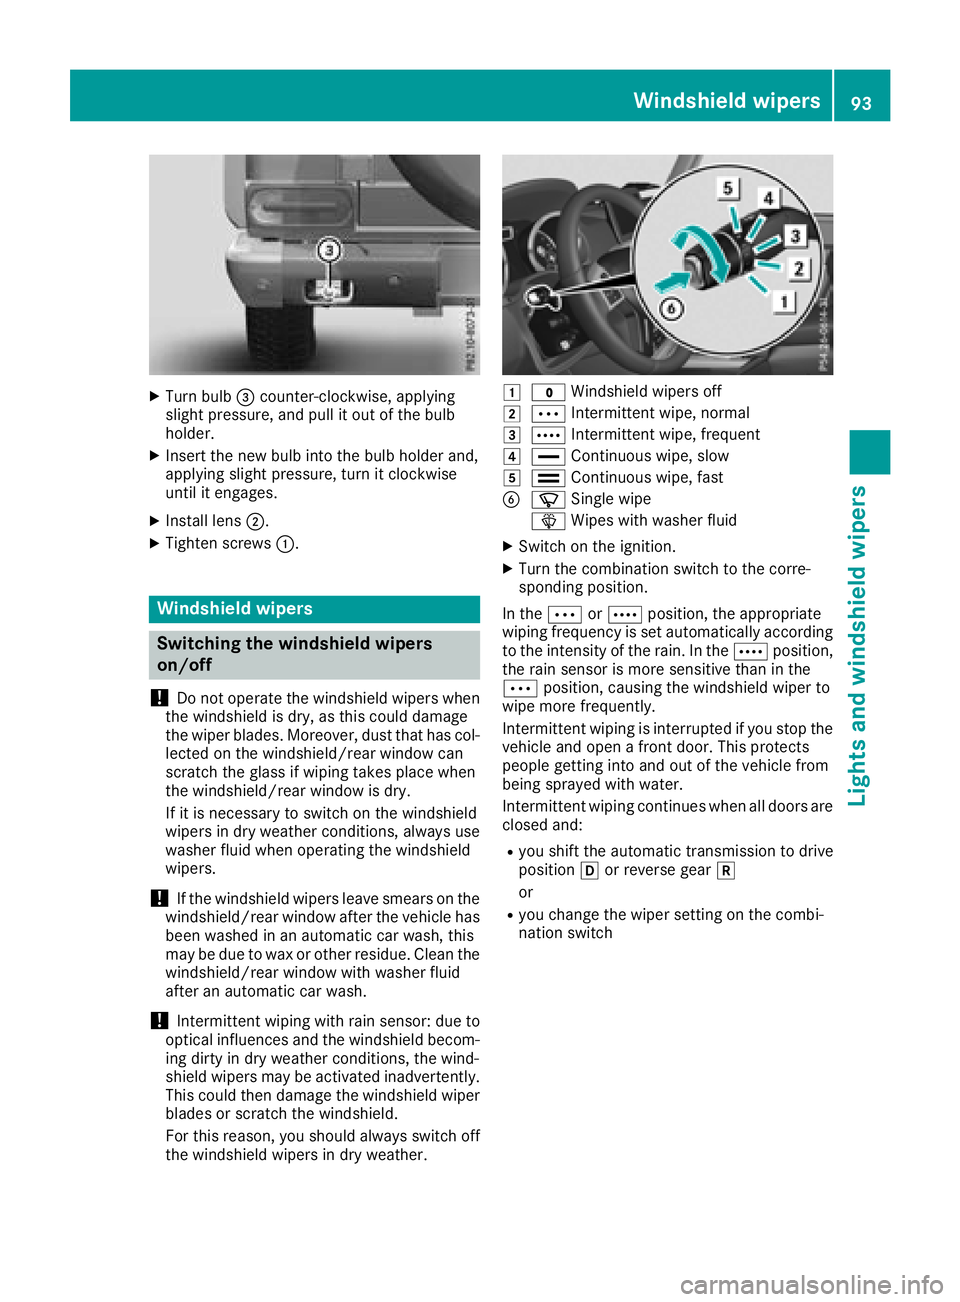
XTurn bulb=counter-clockwise, applying
slight pressure, and pull it out of the bulb
holder.
XInsert the new bulb into the bulb holder and,
applying slight pressure, turn it clockwise
until it engages.
XInstall lens ;.
XTighten screws :.
Windshield wipers
Switching the windshield wipers
on/off
!
Do not operate the windshield wipers when
the windshield is dry, as this could damage
the wiper blades. Moreover, dust that has col-
lected on the windshield/rear window can
scratch the glass if wiping takes place when
the windshield/rear window is dry.
If it is necessary to switch on the windshield
wipers in dry weather conditions, always use
washer fluid when operating the windshield
wipers.
!If the windshield wipers leave smears on the
windshield/rear window after the vehicle has
been washed in an automatic car wash, this
may be due to wax or other residue. Clean the
windshield/rear window with washer fluid
after an automatic car wash.
!Intermittent wiping with rain sensor: due to
optical influences and the windshield becom-
ing dirty in dry weather conditions, the wind-
shield wipers may be activated inadvertently.
This could then damage the windshield wiper
blades or scratch the windshield.
For this reason, you should always switch off
the windshield wipers in dry weather.
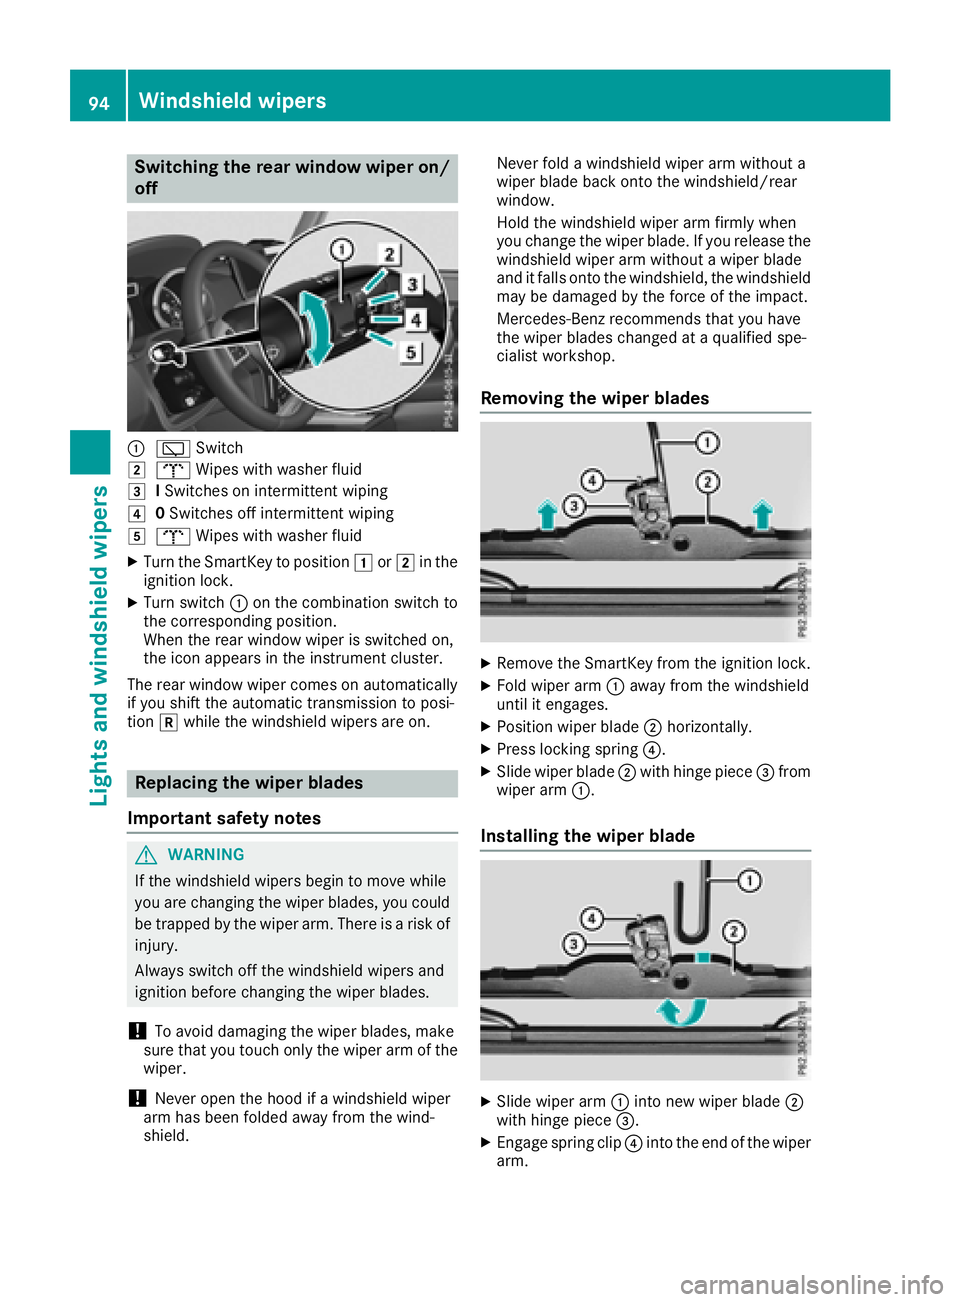
1$ Windshield wipers off
2ÄIntermittent wipe, normal
3ÅIntermittent wipe, frequent
4°Continuous wipe, slow
5¯Continuous wipe, fast
BíSingle wipe
î Wipes with washer fluid
XSwitch on the ignition.
XTurn the combination switch to the corre-
sponding position.
In the ÄorÅ position, the appropriate
wiping frequency is set automatically according
to the intensity of the rain. In the Åposition,
the rain sensor is more sensitive than in the
Ä position, causing the windshield wiper to
wipe more frequently.
Intermittent wiping is interrupted if you stop the vehicle and open a front door. This protects
people getting into and out of the vehicle from
being sprayed with water.
Intermittent wiping continues when all doors are
closed and:
Ryou shift the automatic transmission to drive
position hor reverse gear k
or
Ryou change the wiper setting on the combi-
nation switch
Windshield wipers93
Lights and windshield wipers
Z
Page 96 of 294

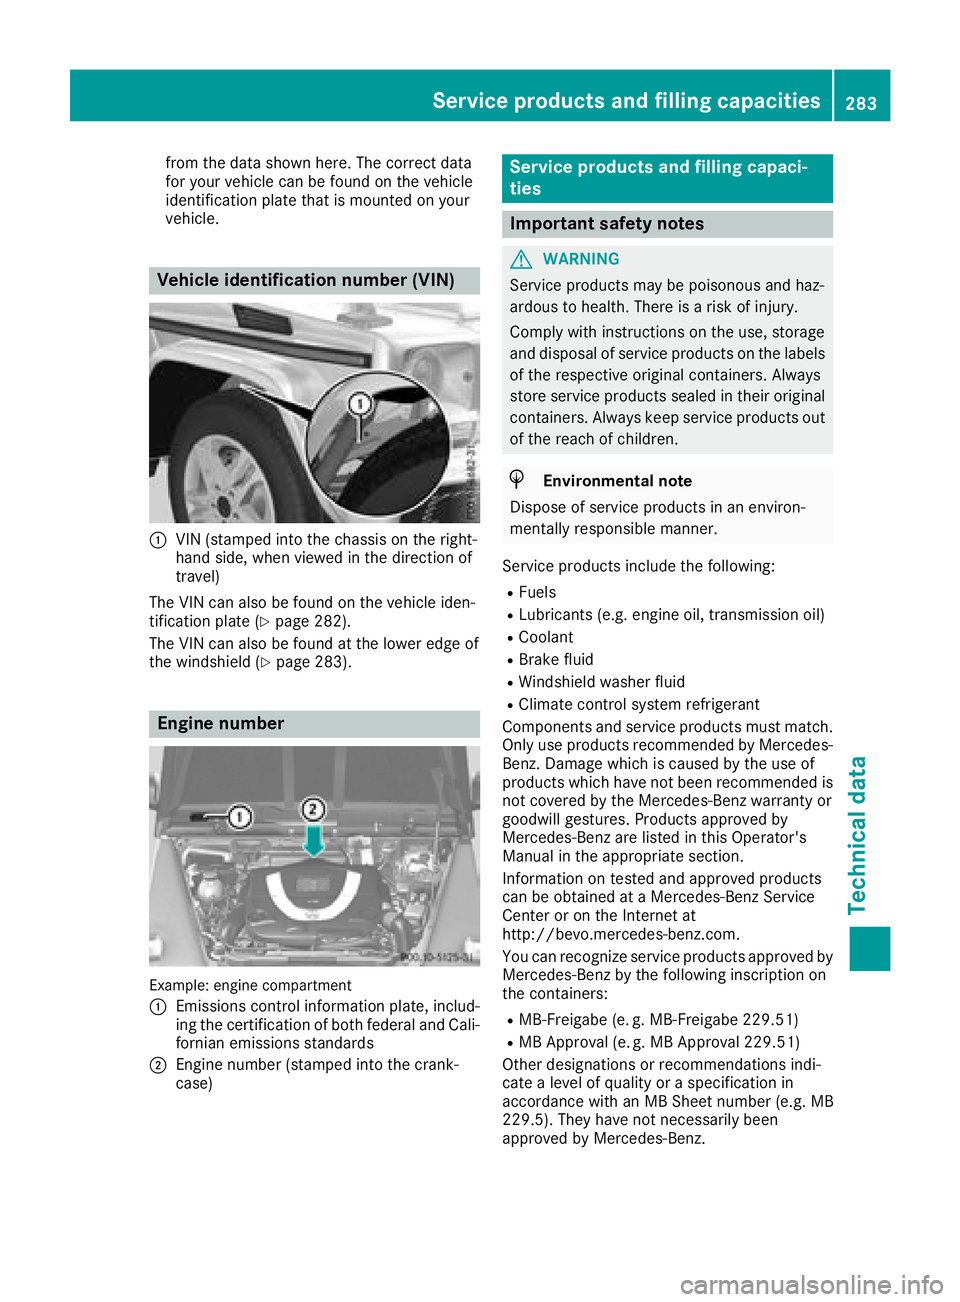
Switching the rear window wiper on/
off
:èSwitch
2bWipes with washer fluid
3ISwitches on intermittent wiping
40 Switches off intermittent wiping
5b Wipes with washer fluid
XTurn the SmartKey to position 1or2 in the
ignition lock.
XTurn switch :on the combination switch to
the corresponding position.
When the rear window wiper is switched on,
the icon appears in the instrument cluster.
The rear window wiper comes on automatically
if you shift the automatic transmission to posi-
tion kwhile the windshield wipers are on.
Replacing the wiper blades
Important safety notes
GWARNING
If the windshield wipers begin to move while
you are changing the wiper blades, you could be trapped by the wiper arm. There is a risk of
injury.
Always switch off the windshield wipers and
ignition before changing the wiper blades.
!To avoid damaging the wiper blades, make
sure that you touch only the wiper arm of the
wiper.
!Never open the hood if a windshield wiper
arm has been folded away from the wind-
shield. Never fold a windshield wiper arm without a
wiper blade back onto the windshield/rear
window.
Hold the windshield wiper arm firmly when
you change the wiper blade. If you release the
windshield wiper arm without a wiper blade
and it falls onto the windshield, the windshield
may be damaged by the force of the impact.
Mercedes-Benz recommends that you have
the wiper blades changed at a qualified spe-
cialist workshop.
Removing the wiper blades
XRemove the SmartKey from the ignition lock.
XFold wiper arm :away from the windshield
until it engages.
XPosition wiper blade ;horizontally.
XPress locking spring ?.
XSlide wiper blade;with hinge piece =from
wiper arm :.
Installing the wiper blade
XSlide wiper arm :into new wiper blade ;
with hinge piece =.
XEngage spring clip ?into the end of the wiper
arm.
94Windshield wipers
Lights and windshield wipers
Page 285 of 294

from the data shown here. The correct data
for your vehicle can be found on the vehicle
identification plate that is mounted on your
vehicle.
Vehicle identification number (VIN)
:VIN (stamped into the chassis on the right-
hand side, when viewed in the direction of
travel)
The VIN can also be found on the vehicle iden-
tification plate (
Ypage 282).
The VIN can also be found at the lower edge of
the windshield (
Ypage 283).
Engine number
Example: engine compartment
:
Emissions control information plate, includ-
ing the certification of both federal and Cali-
fornian emissions standards
;Engine number (stamped into the crank-
case)
Service products and filling capaci-
ties
Important safety notes
GWARNING
Service products may be poisonous and haz-
ardous to health. There is a risk of injury.
Comply with instructions on the use, storage
and disposal of service products on the labels
of the respective original containers. Always
store service products sealed in their original
containers. Always keep service products out
of the reach of children.
HEnvironmental note
Dispose of service products in an environ-
mentally responsible manner.
Service products include the following:
RFuels
RLubricants (e.g. engine oil, transmission oil)
RCoolant
RBrake fluid
RWindshield washer fluid
RClimate control system refrigerant
Components and service products must match.
Only use products recommended by Mercedes-
Benz. Damage which is caused by the use of
products which have not been recommended is
not covered by the Mercedes-Benz warranty or
goodwill gestures. Products approved by
Mercedes-Benz are listed in this Operator's
Manual in the appropriate section.
Information on tested and approved products
can be obtained at a Mercedes-Benz Service
Center or on the Internet at
http://bevo.mercedes-benz.com.
You can recognize service products approved by
Mercedes-Benz by the following inscription on
the containers:
RMB-Freigabe (e. g. MB-Freigabe 229.51)
RMB Approval (e. g. MB Approval 229.51)
Other designations or recommendations indi-
cate a level of quality or a specification in
accordance with an MB Sheet number (e.g. MB
229.5). They have not necessarily been
approved by Mercedes-Benz.
Service products and filling capacities283
Technical data
Z