2018 MERCEDES-BENZ G-CLASS fuel cap
[x] Cancel search: fuel capPage 11 of 294

Fuel ................................................ 124
General .......................................... 124
Gravel roads .................................. 131
Hydroplaning .................................127
Icy road surfaces ........................... 128
Important safety notes .................. 104
Limited braking efficiency on sal-
ted roads ....................................... 126
Off-road driving .............................. 129
Off-road fording .............................1 28
Pulling away on slippery surfaces .. 127
Snow chains .................................. 259
Subjecting brakes to a load ........... 126
The first 1500 km .......................... 104
Tire ruts ......................................... 131
Towing a trailer .............................. 154
Traveling uphill ............................... 132
Wet road surface ........................... 126
DVD audio
Operating (on-board computer) ..... 165
DVD video
Operating (on-board computer) ..... 166
see also Digital Operator's Man-
ual ..................................................2 03
E
EASY-ENTRY feature
Activating/deactivating ................. 170
Function/notes ................................ 81
EASY-EXIT feature
Function/notes ................................ 81
Switching on/off ........................... 170
EBD (electronic brake force distri-
bution)
Display message ............................ 176
Function/notes ................................ 61
ECO start/stop function
Deactivating/activating ................. 108
General information ....................... 107
Electronic Stability Program
see ESP
®(Electronic Stability Program)
Electronic Traction System
see 4ETS (Electronic Traction System)
Emergency
Automatic measures after an acci-
dent ................................................. 50 Emergency release
Driver's door ....................................6 8
Vehicle .............................................6 8
Emergency Tensioning Devices
Activation ........................................ .47
Emissions control
Service and warranty information .... 24
Engine
Check Engine warning lamp .......... .199
Display message ............................ 180
ECO start/stop function ................ 107
Engine number ............................... 283
Irregular running ............................ 110
Jump-starting ................................. 249
Starting problems .......................... 110
Starting the engine with the
SmartKey ....................................... 106
Switching off .................................. 123
Tow-starting (vehicle) ..................... 254
Engine electronics
Problem (malfunction) ................... 110
Engine oil
Adding ...........................................2 33
Additives ........................................ 286
Checking the oil level ..................... 232
Checking the oil level using the
dipstick .......................................... 232
Checking the oil level using the
on-board computer ........................ 232
Display message ............................ 182
Filling capacity ....... ........................ 286
G
eneral notes ................................ 285
Notes about oil grades ................... 285
Notes on oil level/consumption .... 232
Temperature (on-board com-
puter) ............................................. 171
Entering an address
see also Digital Operator's Man-
ual ..................................................2 03
ESP
®(Electronic Stability Pro-
gram)
4ETS (Electronic Traction Sys-
tem) ................................................. 59
AMG menu (on-board computer) ... 171
Characteristics ................................. 60
Deactivating/activating ................... 60
Display message ............................ 175
Function/notes ................................ 59
Index9
Page 12 of 294

General notes .................................. 59
Important safety information ...........59
Trailer stabilization ........................... 61
Warning lamp ................................. 196
Exhaust
see Exhaust pipe
Exhaust check ................................... 125
Exhaust pipe
Cleaning ......................................... 240
Exterior lighting
Cleaning ......................................... 239
see Lights
Exterior mirrors
Adjusting ......................................... 82
Dipping (automatic) .........................8 3
Folding in when locking (on-board
computer) ...................................... 170
Folding in/out (automatically) ......... 83
Folding in/out (electrically) ............. 82
Out of position (troubleshooting) ..... 83
Setting ............................................. 82
Storing settings (memory func-
tion) ................................................. 84
Storing the parking position ............. 83
F
Favorites
Overview ........................................ 205
Filler cap
see Refueling
First-aid kit ......................................... 244
Flat tire
Changing a wheel/mounting the
spare wheel ................................... 275
Preparing the vehicle ..................... 246
Folding the seat backrest (rear)
forwards/back .................................. 212
Frequencies
Mobile phone ................................. 281
Two-way radio ................................ 281
Fuel
Additives ........................................ 285
Consumption statistics .................. 163
Displaying the range ...................... 163
Driving tips .................................... 124
Fuel gauge ....................................... 32
Grade (gasoline) ............................ 284 Important safety notes .................. 284
Premium-grade unleaded gaso-
line ................................................. 284
Problem (malfunction) ................... 122
Refueling ........................................ 120
Tank content/reserve fuel ............. 284
Fuel filler flap
Closing ........................................... 121
Emergency release ........................ 121
Opening ......................................... 120
Fuel level
Calling up the range (on-board
computer) ...................................... 163
Fuel tank
Capacity ........................................ 284
Problem (malfunction) ................... 122
Fuse allocation chart ........................ 255
Fuse box
cargo compartment ....................... 256
Dashboard ..................................... 255
Front-passenger footwell ............... 255
Transmission tunnel ....................... 255
Fuses
Allocation chart ............................. 255
Before changing ............................. 254
Dashboard fuse box ....................... 255
Fuse allocation chart ..................... 255
Fuse box in the cargo compart-
ment .............................................. 256
Fuse box in the front-passenger
footwell .......................................... 255
Fuse box in the transmission tun-
nel ................................................. 255
Important safety notes .................. 254
G
Garage door openerClearing the memory ..................... 229
General notes ................................ 226
Important safety notes .................. 227
Opening/closing the garage doo r..2 29
Problems when programming ........2 29
Programming the remote control ... 227
Synchronizing the rolling code ....... 228
Gasoline ............................................. 284
Gear indicator (on-board com-
puter) ..................................................1 71
10Index
Page 20 of 294

Tail lampReplacing bulbs ............................... 92
Tail lamps
Display message ............................ 180
Tank content
Fuel gauge ....................................... 32
Technical data
Capacities ...................................... 283
Drawbar load (maximum) ............... 291
Information .................................... 281
Trailer loads ................................... 291
Vehicle data ................................... 288
Telephone
Accepting a call ............................. 166
Authorizing a mobile phone (con-
necting) ......................................... 207
Connecting a mobile phone (gen-
eral information) ............................ 206
Display message ............................ 191
Menu (on-board computer) ............ 166
Number from the phone book ........ 167
Redialing ........................................ 167
Rejecting/ending a call ................. 166
see also Digital Operator's Man-
ual .................................................. 203
see Mobile phone
Temperature
Coolant .......................................... 161
Coolant (on-board computer) ......... 171
Engine oil (on-board computer) ...... 171
Outside temperature ...................... 160
Setting (climate control) .................. 99
Tilt/sliding sunroof
see Sliding sunroof
Time
see separate operating instructions
Timing (RACETIMER) ......................... 172
Tire pressure
Calling up (on-board computer) ..... 263
Checking manually ........................ 263
Display message ............................ 187
Maximum ....................................... 262
Notes ............................................. 261
Recommended ............................... 260
Tire pressure monitor
Checking the tire pressure elec-
tronically ........................................ 264
Function/notes ............................. 263 General notes ................................ 263
Important safety notes .................. 263
Radio type approval for the tire
pressure monitor ........................... 266
Restarting ...................................... 265
Warning lamp ................................. 202
Warning message .......................... 265
Tires
Aspect ratio (definition) ................. 275
Average weight of the vehicle
occu pants (
definition) .................... 273
Bar (definition) ............................... 273
Changing a wheel .......................... 275
Characteristics .............................. 273
Checking ........................................ 257
Curb weight (definition) ................. 274
Definition of terms ......................... 273
Direction of rotation ...................... 276
Display message ............................ 187
Distribution of the vehicle occu-
pants (definition) ............................ 275
DOT (Department of Transporta-
tion) (definition) ............................. 273
DOT, Tire Identification Number
(TIN) ............................................... 272
GAWR (Gross Axle Weight Rating)
(definition) ..................................... 274
GTW (Gross Trailer Weight) (defi-
nition) ............................................ 274
GVW (Gross Vehicle Weight) (def-
inition) ........................................... 274
GVWR (Gross Vehicle Weight Rat-
ing) (definition) .............................. 274
Important safety notes .................. 257
Increased vehicle weight due to
optional equipment (definition) ...... 274
Information on driving .................... 257
Kilopascal (kPa) (definition) ........... 274
Labeling (overview) ........................ 270
Load bearing index (definition) ...... 275
Load index ..................................... 272
Load index (definition) ................... 274
Maximum load on a tire (defini-
tion) ............................................... 274
Maximum loaded vehicle weight
(definition) ..................................... 274
Maximum permissible tire pres-
sure (definition) ............................. 274
18Index
Page 122 of 294

Refueling
Important safety notes
GWARNING
Fuel is highly flammable. If you handle fuel
incorrectly, there is a risk of fire and explo-
sion.
You must avoid fire, open flames, creating
sparks and smoking. Switch off the engine
and, if applicable, the auxiliary heating before refueling.
GWARNING
Fuel is poisonous and hazardous to health.
There is a risk of injury.
You must make sure that fuel does not come into contact with your skin, eyes or clothing
and that it is not swallowed. Do not inhale fuel
vapors. Keep fuel away from children.
If you or others come into contact with fuel,
observe the following:
RWash away fuel from skin immediately
using soap and water.
RIf fuel comes into contact with your eyes,
immediately rinse them thoroughly with
clean water. Seek medical assistance with-
out delay.
RIf fuel is swallowed, seek medical assis-
tance without delay. Do not induce vomit-
ing.
RImmediately change out of clothing which
has come into contact with fuel.
GWARNING
Electrostatic buildup can create sparks and
ignite fuel vapors. There is a risk of fire and
explosion.
Always touch the vehicle body before opening
the fuel filler flap or touching the fuel pump
nozzle. Any existing electrostatic buildup is
thereby discharged.
Do not get into the vehicle again during the refu-
eling process. otherwise electrostatic charge
could build up again.
!Do not use diesel to refuel vehicles with a
gasoline engine. Do not switch on the ignition
if you accidentally refuel with the wrong fuel.
Otherwise, the fuel will enter the fuel system. Even small amounts of the wrong fuel could
result in damage to the fuel system and the
engine. Notify a qualified specialist workshop
and have the fuel tank and fuel lines drained
completely.
!Overfilling the fuel tank could damage the
fuel system.
!Take care not to spill any fuel on painted
surfaces. You could otherwise damage the
paintwork.
!Use a filter when adding fuel from a fuel can.
The fuel lines and/or the fuel injection system
could otherwise be blocked by particles from
the fuel can.
If you overfill the fuel tank, fuel could spray out
when the fuel pump nozzle is removed.
For further information on fuel and fuel quality
(
Ypage 283).
Refueling
General information
Pay attention to the important safety notes
(Ypage 120).
If you unlock/lock the vehicle from the outside,
the fuel filler flap also unlocks/locks.
The position of the fuel filler cap is displayed in
the instrument cluster 8. The arrow next to
the filling pump indicates the side of the vehicle.
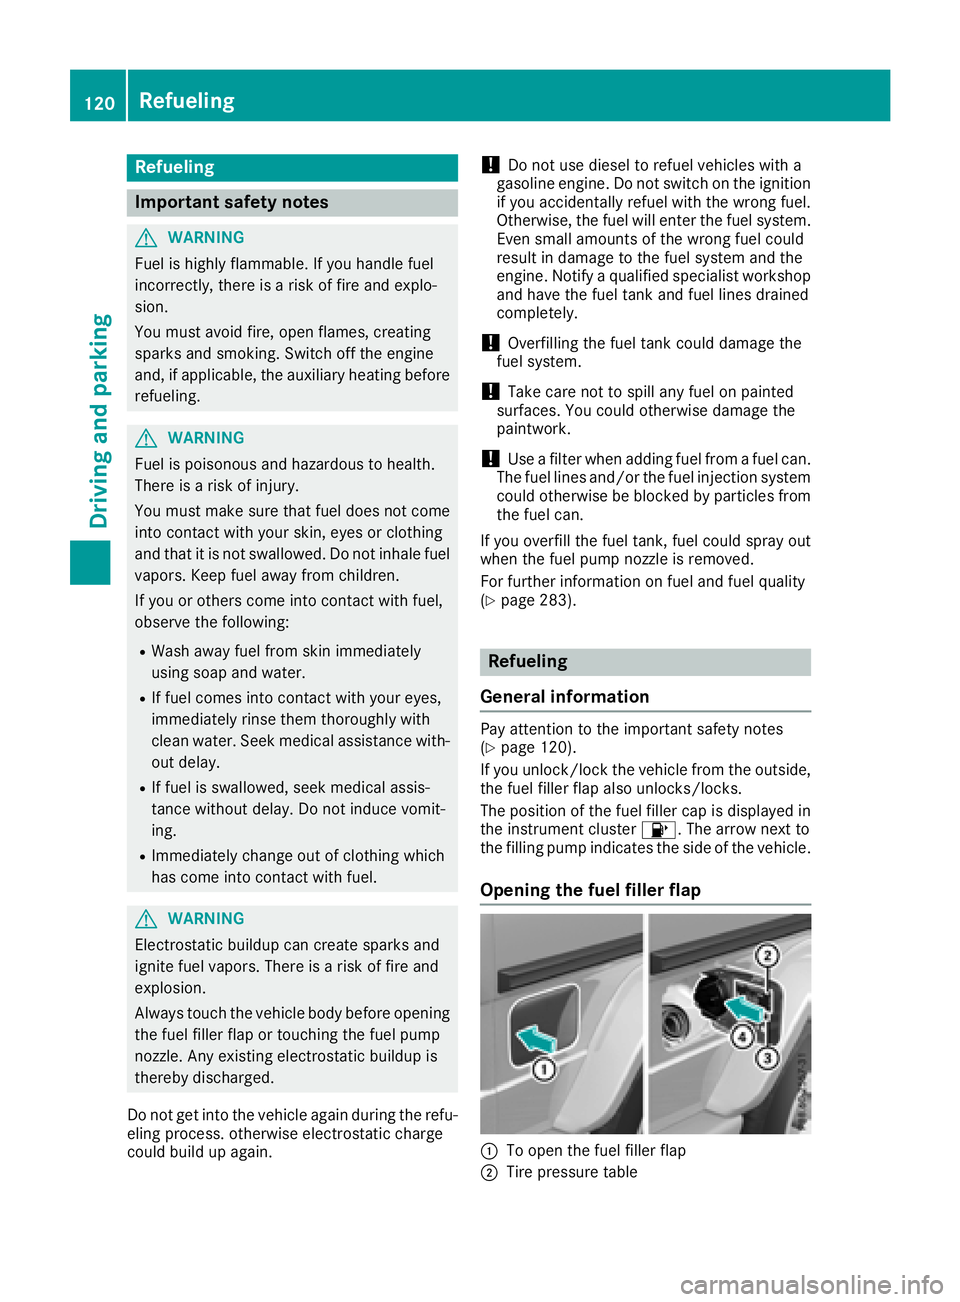
Opening the fuel filler flap
:To open the fuel filler flap
;Tire pressure table
120Refueling
Driving and parking
Page 123 of 294

=Instruction label for fuel type to be refueled
?To insert the fuel filler cap
XSwitch off the engine.
XRemove the SmartKey from the ignition lock.
XPress the fuel filler flap in the direction of
arrow:.
The fuel filler flap swings up.
XTurn the fuel filler cap counterclockwise and
remove it.
XInsert the fuel filler cap into the holder
bracket on the inside of filler flap ?.
XCompletely insert the filler neck of the fuel
pump nozzle into the tank and refuel.
XOnly fill the tank until the pump nozzle
switches off.
Do not add any more fuel after the pump stops
filling for the first time. Otherwise, fuel may leak
out.
Closing the fuel filler flap
XReplace the cap on the filler neck and turn
clockwise until it engages audibly.
XClose the fuel filler flap.
Close the fuel filler flap before locking the vehi-
cle.
If you are driving with the fuel filler cap open, the
8 reserve fuel warning lamp flashes. A mes-
sage appears in the multifunction display
(
Ypage 183).
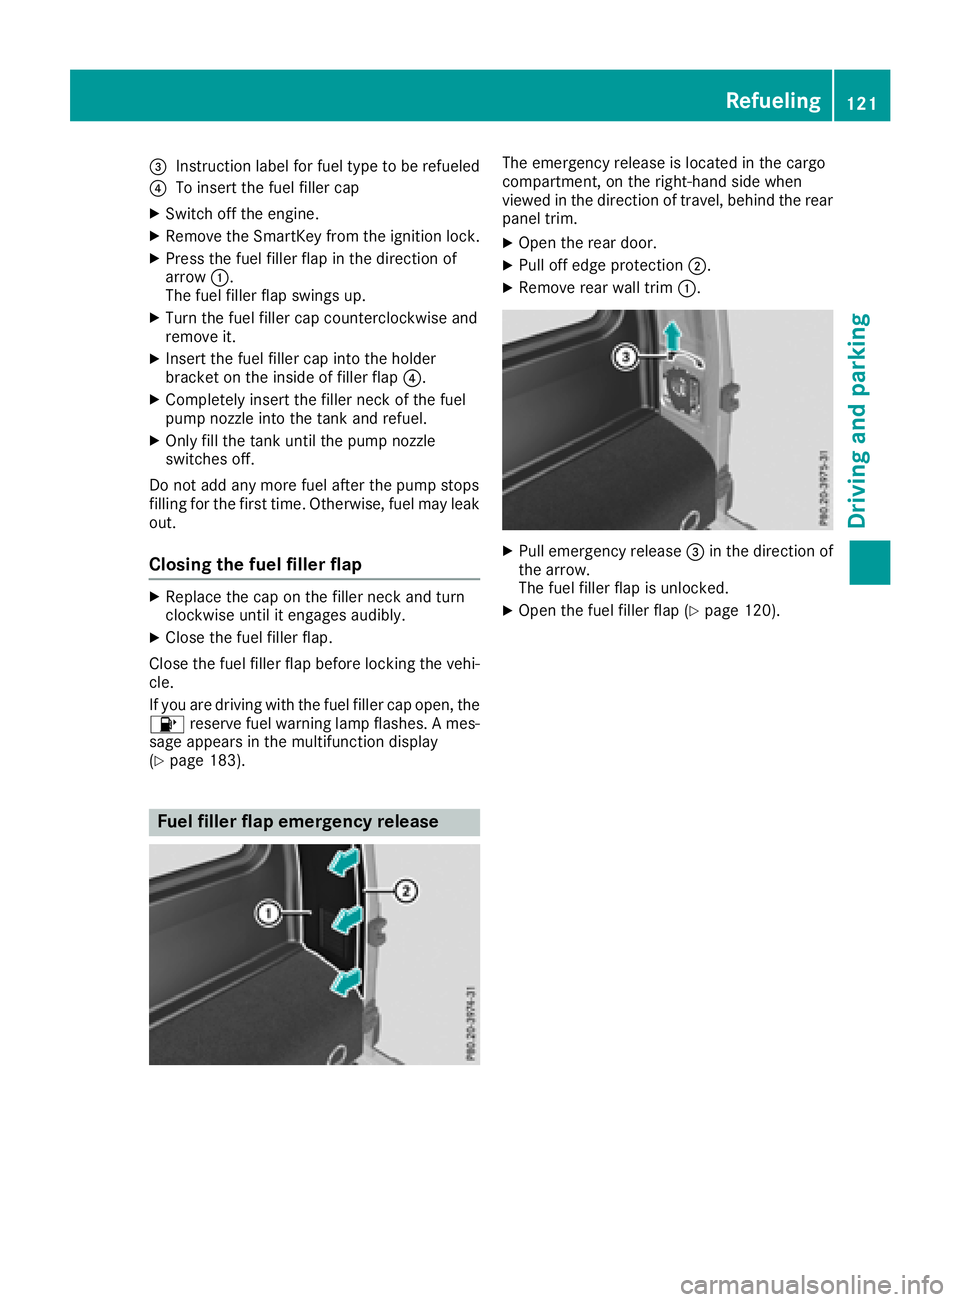
Fuel filler flap emergency release
The emergency release is located in the cargo
compartment, on the right-hand side when
viewed in the direction of travel, behind the rear
panel trim.
XOpen the rear door.
XPull off edge protection ;.
XRemove rear wall trim:.
XPull emergency release =in the direction of
the arrow.
The fuel filler flap is unlocked.
XOpen the fuel filler flap (Ypage 120).
Refueling121
Driving and parking
Z
Page 156 of 294

To avoid hazardous situations:
Rmake sure to check the noseweight before
each journey
Ruse a drawbar noseweight as close as possi-
ble to the maximum noseweight
Rdo not exceed the maximum permissible
noseweight
Rthe noseweight must not be lower than the
minimum permissible noseweight
Make sure that the following values are not
exceeded:
Rthe permissible trailer drawbar noseweight
Rthe permissible trailer load
Rthe permissible rear axle load of the towing
vehicle
Rthe maximum permissible gross vehicle
weight of both the towing vehicle and the
trailer
When backing up the vehicle towards the trailer,
make sure there is nobody between the trailer
and the vehicle.
The applicable permissible values, which must
not be exceeded, can be found:
Rin your vehicle documents
Ron the type plate for the trailer
Ron the vehicle identification plate
If the values differ, the lowest value applies.
You will find the values approved by the manu-
facturer on the vehicle identification plates and
those for the towing vehicle under "Technical
data" (
Ypage 291).
When backing up the vehicle towards the trailer,
make sure there is nobody between the trailer
and the vehicle.
Couple and uncouple the trailer carefully. If you
do not couple the trailer to the towing vehicle
correctly, the trailer could become detached.
When towing a trailer, your vehicle's handling
characteristics will be different in comparison
with when driving without a trailer.
The vehicle/trailer combination:
Ris heavier
Ris restricted in its acceleration and gradient-
climbing capability
Rhas an increased braking distance
Ris affected more by strong crosswinds
Rdemands more sensitive steering
Rhas a larger turning radius This could impair the handling characteristics.
Adapt your driving style accordingly. Maintain a
safe distance. Drive carefully.
When towing a trailer, always adjust your speed
to the current road and weather conditions. Do
not exceed the maximum permissible speed for
your vehicle/trailer combination.
Notes on towing a trailer
General notes
RDo not exceed the maximum permissible
speed for vehicle/trailer combinations in the
relevant country.
This lowers the risk of an accident.
ROnly install an approved trailer coupling on
your vehicle.
Further information on availability and on
installation is available from any authorized
Mercedes-Benz Center.
RThe bumpers of your vehicle are not suitable
for installing detachable trailer couplings.
RDo not install hired trailer couplings or other
detachable trailer couplings on the bumpers
of your vehicle.
RIf you do not need the ball coupling, remove
the ball coupling from the ball coupling
recess. This will reduce the risk of damage to the ball coupling.
When towing a trailer, set the tire pressure on
the rear axle of the towing vehicle for the max-
imum load. Further information on the tire pres-
sure table in the fuel filler flap (
Ypage 120).
Please note that when towing a trailer,
PARKTRONIC (
Ypage 143) and Blind Spot
Assist (Ypage 140) availability is limited or not
available at all.
The height of the ball coupling changes with the
load of the vehicle. If necessary, use a trailer
with a height-adjustable drawbar.
You will find permissible trailer loads under
"Technical data" (
Ypage 291).
Driving tips
XObserve the notes on ESP®trailer stabiliza-
tion (Ypage 61).
XOn long and steep downhill gradients, select
shift range 1,2or 3(Ypage 116) in good
time.
154Towing a trailer
Driving and parking
Page 157 of 294

This also applies if you have activated cruise
control or the speed limiter.
XIf necessary, shift the transfer case toLOW
RANGE (Ypage 149).
This will use the braking effect of the engine,
so that less braking will be required to main-
tain the speed. This relieves the load on the
brake system and prevents the brakes from
overheating and wearing too quickly. If you
need additional braking, depress the brake
pedal repeatedly rather than continuously.
The maximum permissible speed for vehicle/
trailer combinations depends on the type of
trailer. Before beginning the journey, check the
trailer's documents to see what the maximum
permitted speed is. Observe the maximum per-
missible speed in the relevant country.
For certain Mercedes-Benz vehicles, the maxi-
mum permissible rear axle load is increased
when towing a trailer. See the "Technical data"
section to find out whether this applies to your
vehicle (
Ypage 291). In the event of increased
rear axle load, the car/trailer combination may
not exceed a maximum speed of 60 mph
(100 km/h) for reasons concerning the operat-
ing permit. This also applies in countries in
which the maximum permissible speed for car/ trailer combinations is greater than 60 mph
(100 km/h).
When towing a trailer, your vehicle's handling
characteristics will be different in comparison to
when driving without a trailer and it will con-
sume more fuel.
Driving tips
RMaintain a greater distance from the vehicle
in front than when driving without a trailer.
RAvoid braking abruptly. If possible, brake gen-tly at first to allow the trailer to run on. Then,
increase the braking force rapidly.
RThe values given for gradient-climbing capa-
bilities from a standstill refer to sea level.
When driving in mountainous areas, note that
the power output of the engine and, conse-
quently, the vehicle's gradient-climbing capa-
bility, decreases with increasing altitude.
If the trailer swings from side to side:
XDo not accelerate.
XDo not counter-steer.
XBrake if necessary.
Assembling the ball coupling
GWARNING
The ball coupling can be damaged if the nut on
the ball coupling is tightened using the incor-
rect torque. As a result, the trailer may
detach. There is a risk of an accident.
Immediately after installing, have the tighten-
ing torque checked at a qualified specialist
workshop.
!Mercedes-Benz recommends that you only
use ball couplings tested and approved for
use on Mercedes-Benz vehicles. This helps to avoid damage to the vehicle.
Observe the manufacturer's installation
instructions if you use a ball coupling other
than the one supplied.
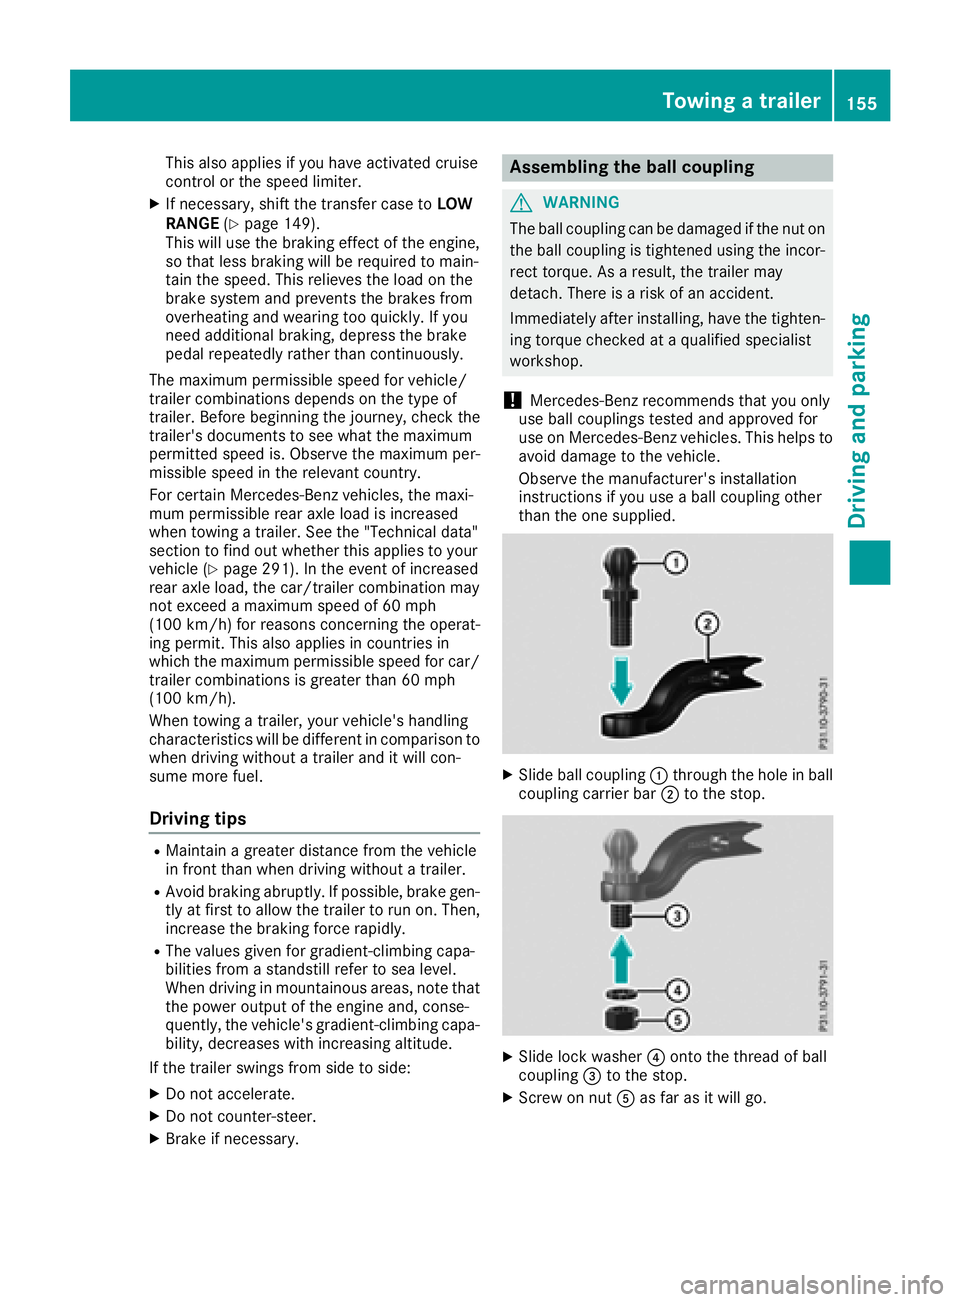
XSlide ball coupling :through the hole in ball
coupling carrier bar ;to the stop.
XSlide lock washer ?onto the thread of ball
coupling =to the stop.
XScrew on nut Aas far as it will go.
Towing a trailer155
Driving and parking
Z
Page 185 of 294

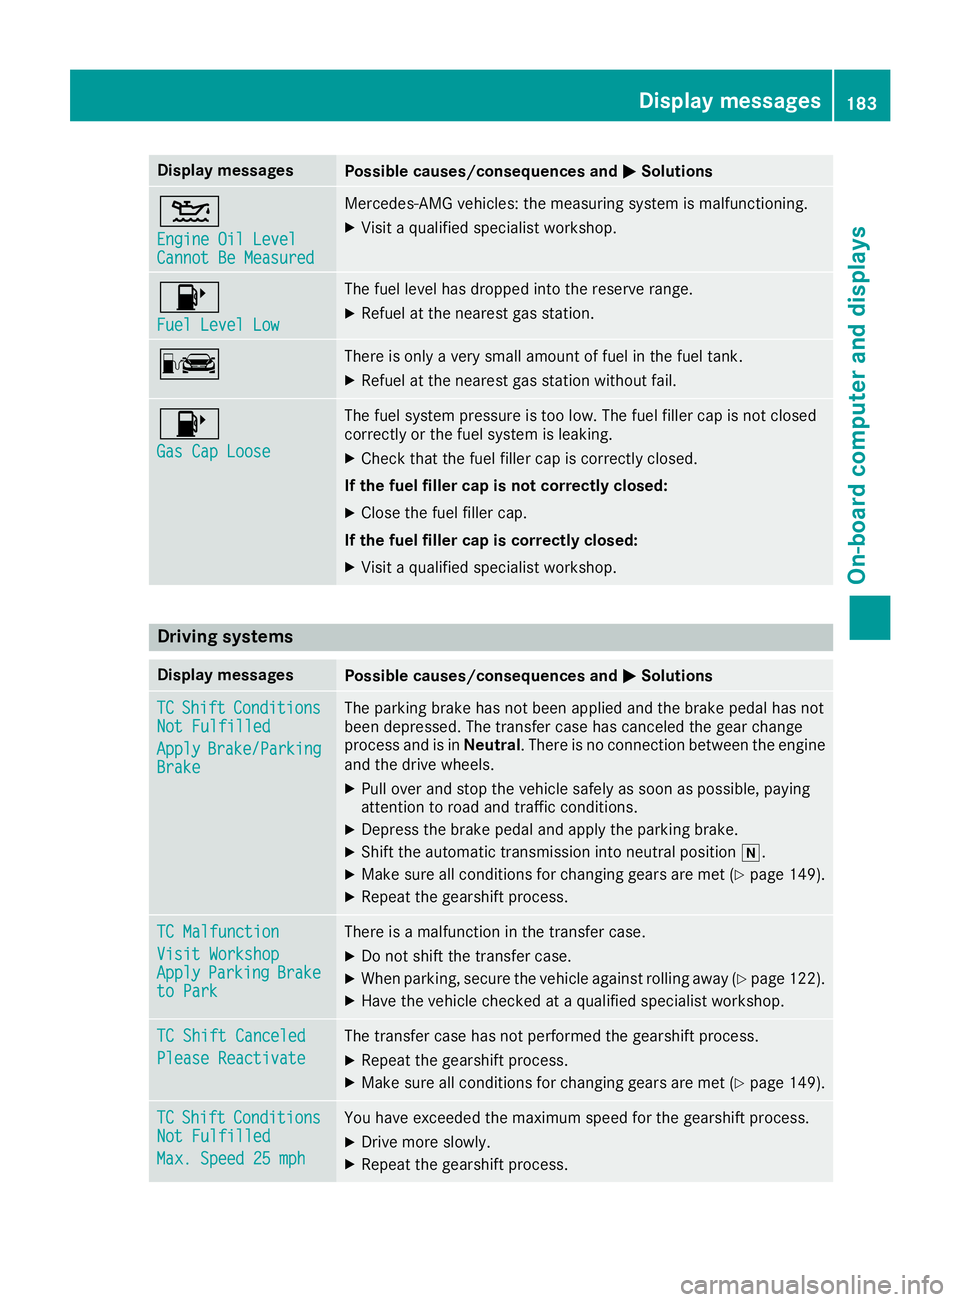
Display messagesPossible causes/consequences andMSolutions
4
Engine Oil LevelCannot Be Measured
Mercedes-AMG vehicles: themeasurin gsystem is malfunctioning .
XVisitaqualified specialist workshop .
8
FuelLevel Low
The fuel level has dropped int oth ereserv erange.
XRefue lat th eneares tgas station .
CThere is only aver ysmall amount of fuel in th efuel tank.
XRefue lat th eneares tgas station without fail .
8
Gas Cap Loose
The fuel system pressur eis to olow. The fuel filler cap is no tclosed
correctl yor th efuel system is leaking .
XCheckthat th efuel filler cap is correctl yclosed .
If th efuel filler cap is not correctl yclosed :
XCloseth efuel filler cap .
If th efuel filler cap is correctl yclosed :
XVisitaqualified specialist workshop .
Driving systems
Display messagesPossible causes/consequences and MSolutions
TCShiftConditionsNot Fulfilled
ApplyBrake/Parkin gBrake
The parking brak ehas no tbeen applie dand th ebrak epedal has no t
been depressed. The transfer cas ehas canceled th egear chang e
process and is in Neutral.There is no connection between th eengin e
and th edrive wheels.
XPull ove rand stop th evehicl esafely as soo nas possible, payin g
attention to roa dand traffic conditions.
XDepress th ebrak epedal and apply th eparking brake.
XShift th eautomatic transmission int oneutral position i.
XMakesur eall condition sfor changing gear sare met (Ypage 149).
XRepeat th egearshift process.
TC Malfunction
Visit WorkshopApplyParkin gBraketo Park
There is amalfunction in th etransfer case.
XDo no tshift th etransfer case.
XWhe nparking ,secure th evehicl eagainst rollin gaway (Ypage 122).
XHaveth evehicl echecke dat aqualified specialist workshop .
TC Shift Canceled
Please Reactivate
The transfer casehas no tperformed th egearshift process.
XRepeat th egearshift process.
XMak esur eall condition sfor changing gear sare met (Ypage 149).
TCShiftCondition sNot Fulfilled
Max.Speed 25 mph
You hav eexceeded th emaximum speed for th egearshift process.
XDrive mor eslowly.
XRepeat th egearshift process.
Display messages18 3
On-board computer and displays
Z