2018 MERCEDES-BENZ G-CLASS spare wheel
[x] Cancel search: spare wheelPage 5 of 294

Maintenance and care......................230
Engine compartment ........................... 230
Maintenance ........................................ 235
Care ..................................................... 236
Breakdown assistance .....................243
Where will I find...? .............................. 243
Flat tire ................................................ 246
Battery (vehicle) .................................. 246
Jump starting ....................................... 249
Towing and tow-starting ...................... 251
Fuses ...................................................2 54
Wheels and tires............................... 257
Important safety notes ........................ 257
Operation ............................................ 257
Winter operation .................................. 258
Tire pressure ....................................... 260
Loading the vehicle .............................. 266
All about wheels and tires ................... 269
Changing a wheel ................................ 275
Wheel and tire combinations ...............2 79
Spare wheel ......................................... 279
Technical data ................................... 281
Information regarding technical data ... 281
Vehicle electronics .............................. 281
Identification plates .............................2 82
Service products and filling capaci-
ties ...................................................... 283
Vehicle data ......................................... 288
Vehicle data for off-road driving .......... 290
Trailer tow hitch ................................... 291
Contents3
Page 12 of 294

General notes .................................. 59
Important safety information ...........59
Trailer stabilization ........................... 61
Warning lamp ................................. 196
Exhaust
see Exhaust pipe
Exhaust check ................................... 125
Exhaust pipe
Cleaning ......................................... 240
Exterior lighting
Cleaning ......................................... 239
see Lights
Exterior mirrors
Adjusting ......................................... 82
Dipping (automatic) .........................8 3
Folding in when locking (on-board
computer) ...................................... 170
Folding in/out (automatically) ......... 83
Folding in/out (electrically) ............. 82
Out of position (troubleshooting) ..... 83
Setting ............................................. 82
Storing settings (memory func-
tion) ................................................. 84
Storing the parking position ............. 83
F
Favorites
Overview ........................................ 205
Filler cap
see Refueling
First-aid kit ......................................... 244
Flat tire
Changing a wheel/mounting the
spare wheel ................................... 275
Preparing the vehicle ..................... 246
Folding the seat backrest (rear)
forwards/back .................................. 212
Frequencies
Mobile phone ................................. 281
Two-way radio ................................ 281
Fuel
Additives ........................................ 285
Consumption statistics .................. 163
Displaying the range ...................... 163
Driving tips .................................... 124
Fuel gauge ....................................... 32
Grade (gasoline) ............................ 284 Important safety notes .................. 284
Premium-grade unleaded gaso-
line ................................................. 284
Problem (malfunction) ................... 122
Refueling ........................................ 120
Tank content/reserve fuel ............. 284
Fuel filler flap
Closing ........................................... 121
Emergency release ........................ 121
Opening ......................................... 120
Fuel level
Calling up the range (on-board
computer) ...................................... 163
Fuel tank
Capacity ........................................ 284
Problem (malfunction) ................... 122
Fuse allocation chart ........................ 255
Fuse box
cargo compartment ....................... 256
Dashboard ..................................... 255
Front-passenger footwell ............... 255
Transmission tunnel ....................... 255
Fuses
Allocation chart ............................. 255
Before changing ............................. 254
Dashboard fuse box ....................... 255
Fuse allocation chart ..................... 255
Fuse box in the cargo compart-
ment .............................................. 256
Fuse box in the front-passenger
footwell .......................................... 255
Fuse box in the transmission tun-
nel ................................................. 255
Important safety notes .................. 254
G
Garage door openerClearing the memory ..................... 229
General notes ................................ 226
Important safety notes .................. 227
Opening/closing the garage doo r..2 29
Problems when programming ........2 29
Programming the remote control ... 227
Synchronizing the rolling code ....... 228
Gasoline ............................................. 284
Gear indicator (on-board com-
puter) ..................................................1 71
10Index
Page 19 of 294

Overview .......................................... 69
Problem (malfunction) ..................... 70
SIRIUS services
see also Digital Operator's Man-
ual .................................................. 203
Sliding sunroof
Important safety notes .................... 71
Opening/closing .............................. 72
Operating manually .......................... 72
Problem (malfunction) ..................... 73
SmartKey
Changing the battery ....................... 65
Changing the programming ............. 64
Checking the battery ....................... 65
Convenience closing feature ............ 70
Convenience opening feature .......... 70
Display message ............................ 191
Door central locking/unlocking ....... 63
Important safety notes .................... 63
Loss ................................................. 66
Mechanical key ................................ 64
Overview .......................................... 63
Positions (ignition lock) ................. 105
Problem (malfunction) ..................... 66
Starting the engine ........................ 106
SMS
see also Digital Operator's Man-
ual .................................................. 203
Snow chains ...................................... 259
Socket (12 V)
Cargo compartment ....................... 218
Front-passenger footwell ............... 217
General notes ................................ 217
Rear compartment ......................... 218
Sound
Switching on/off ........................... 204
Spare fuses ........................................ 255
Spare wheel
Important safety notes .................. 279
Spare wheel bracket at the rear .... 245
Stainless-steel spare hub cap ........ 245
Special seat belt retractor .................. 50
Specialist workshop ............................ 27
Speedometer
Digital ............................................ 163
In the Instrument cluster ................. 32
Segments ...................................... 160
Selecting the display unit ............... 168 Standing lamps
Display message ............................ 180
Switching on/off .............................. 87
Starting the engine
Important safety notes .................. 106
Steering (display mes sage
)
.............. 191
Steering wheel
Adjusting (electrically) ..................... 80
Buttons (on-board computer) ......... 161
Cleaning ......................................... 241
Important safety notes .................... 79
Paddle shifters ............................... 116
Steering wheel heating .................... 80
Storing settings (memory func-
tion) ................................................. 84
Steering wheel heating
Indicator lamp (malfunction) ............ 81
Steering wheel paddle shifters ........ 116
Stopwatch (RACETIMER) ................... 172
Stowage areas ................................... 210
Stowage compartment
Door stowage compartment .......... 211
Stowage compartments
Armrest (under) ............................. 211
Cup holders ................................... 215
Glove box ....................................... 210
Important safety information ......... 210
Stowage net ................................... 211
Stowage pockets ........................... 211
Stowage net ....................................... 211
Summer opening
see Convenience opening feature
Summer tires
In winter ........................................ 259
Sun visor ............................................ 215
Surround lighting (on-board com-
puter) .................................................. 169
SUV
(Sport Utility Vehicle) ....................... 26
Switching air-recirculation mode
on/off ................................................. 102
Switching on media mode
Via the device list .......................... 208
T
Tachometer ........................................ 160
Index17
Page 149 of 294
The field of vision and other functions of the rear
view camera may be restricted due to additionalaccessories on the rear of the vehicle (e.g.
license plate holder, bicycle rack).
Activating/deactivating the rear view
camera
XTo activate: make sure that the SmartKey is
in position 2in the ignition lock.
XMake sure that the "Rear view camera" func-
tion is selected in the multimedia system (see
Digital Operator's Manual).
XEngage reverse gear.
The multimedia system shows the area
behind the vehicle with guide lines. Sym-
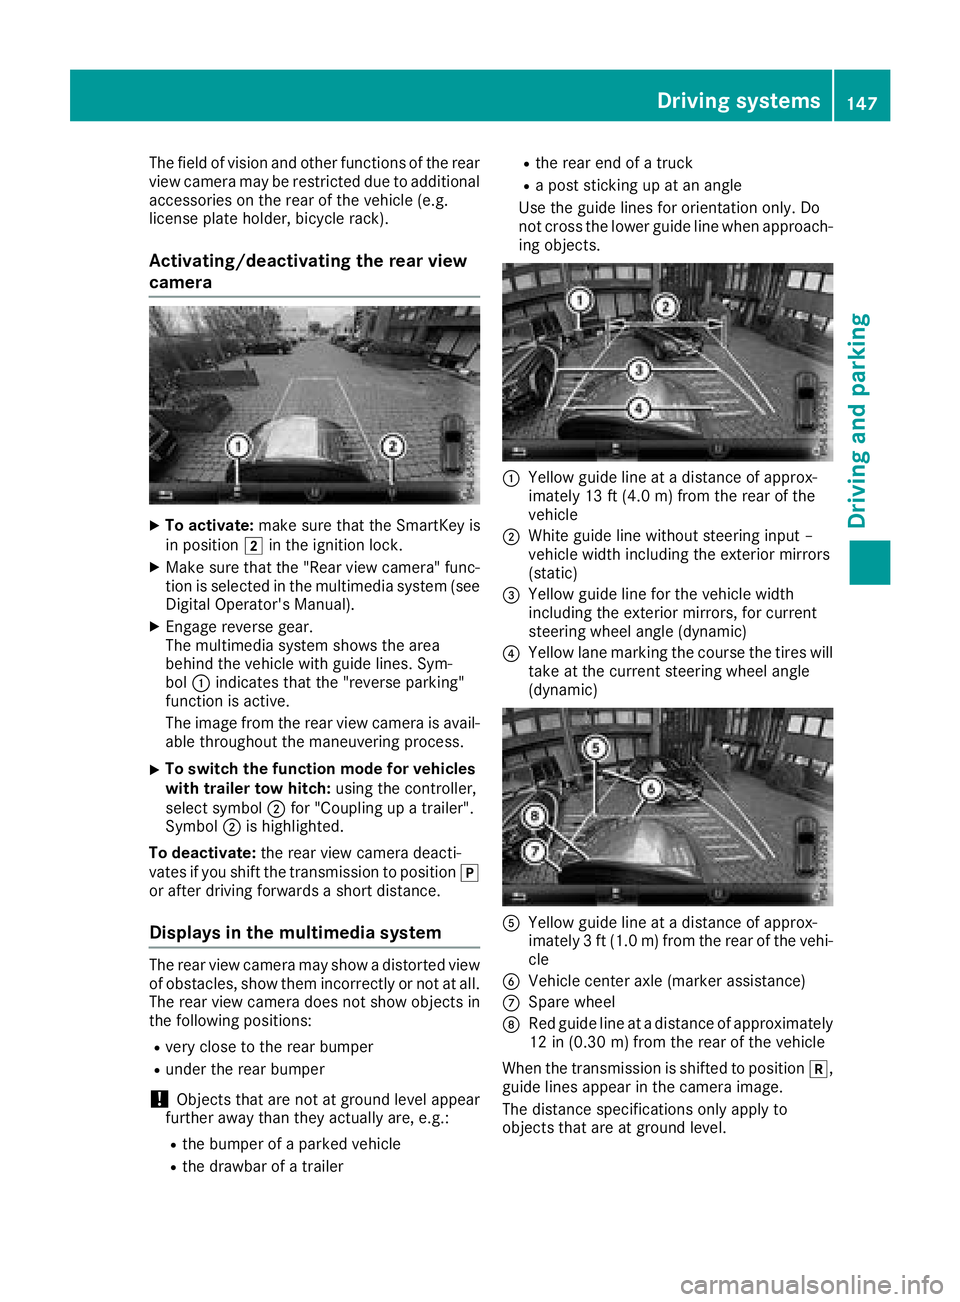
bol :indicates that the "reverse parking"
function is active.
The image from the rear view camera is avail-
able throughout the maneuvering process.
XTo switch the function mode for vehicles
with trailer tow hitch: using the controller,
select symbol ;for "Coupling up a trailer".
Symbol ;is highlighted.
To deactivate: the rear view camera deacti-
vates if you shift the transmission to position j
or after driving forwards a short distance.
Displays in the multimedia system
The rear view camera may show a distorted view
of obstacles, show them incorrectly or not at all.
The rear view camera does not show objects in
the following positions:
Rvery close to the rear bumper
Runder the rear bumper
!Objects that are not at ground level appear
further away than they actually are, e.g.:
Rthe bumper of a parked vehicle
Rthe drawbar of a trailer
Rthe rear end of a truck
Ra post sticking up at an angle
Use the guide lines for orientation only. Do
not cross the lower guide line when approach-
ing objects.
:Yellow guide line at a distance of approx-
imately 13 ft (4.0 m) from the rear of the
vehicle
;White guide line without steering input –
vehicle width including the exterior mirrors
(static)
=Yellow guide line for the vehicle width
including the exterior mirrors, for current
steering wheel angle (dynamic)
?Yellow lane marking the course the tires will take at the current steering wheel angle
(dynamic)
AYellow guide line at a distance of approx-
imately 3 ft (1.0 m) from the rear of the vehi-
cle
BVehicle center axle (marker assistance)
CSpare wheel
DRed guide line at a distance of approximately
12 in (0.30 m)from the rear of the vehicle
When the transmission is shifted to position k,
guide lines appear in the camera image.
The distance specifications only apply to
objects that are at ground level.
Driving systems147
Driving and parking
Z
Page 211 of 294
Loading guidelines
GWARNING
If objects, luggage or loads are not secured or
not secured sufficiently, they could slip, tip
over or be flung around and thereby hit vehicle
occupants. There is a risk of injury, particu-
larly in the event of sudden braking or a sud-
den change in direction.
Always store objects so that they cannot be
flung around. Secure objects, luggage or
loads against slipping or tipping before the
journey.
GWARNING
If you distribute the load unevenly in the vehi- cle, the handling as well as the steering and
braking characteristics are severely affected.
There is a risk of an accident.
Distribute the load evenly in the vehicle.
Secure the load to prevent it from slipping.
GWARNING
The exhaust tail pipe and tail pipe trim can
become very hot. If you come into contact
with these parts of the vehicle, you could burn
yourself. There is a risk of injury.
Always be particularly careful around the
exhaust tail pipe and the tail pipe trim. Allow
these components to cool down before touch-
ing them.
GWARNING
Combustion engines emit poisonous exhaust
gases such as carbon monoxide. If the rear
door is open when the engine is running, par-
ticularly if the vehicle is moving, exhaust
fumes could enter the passenger compart-
ment. There is a risk of poisoning.
Turn off the engine before opening the rear
door. Never drive with the rear door open.
Driving, braking and steering characteristics
change depending on:
Rtype of load
Rweight
Rthe center of gravity of the load
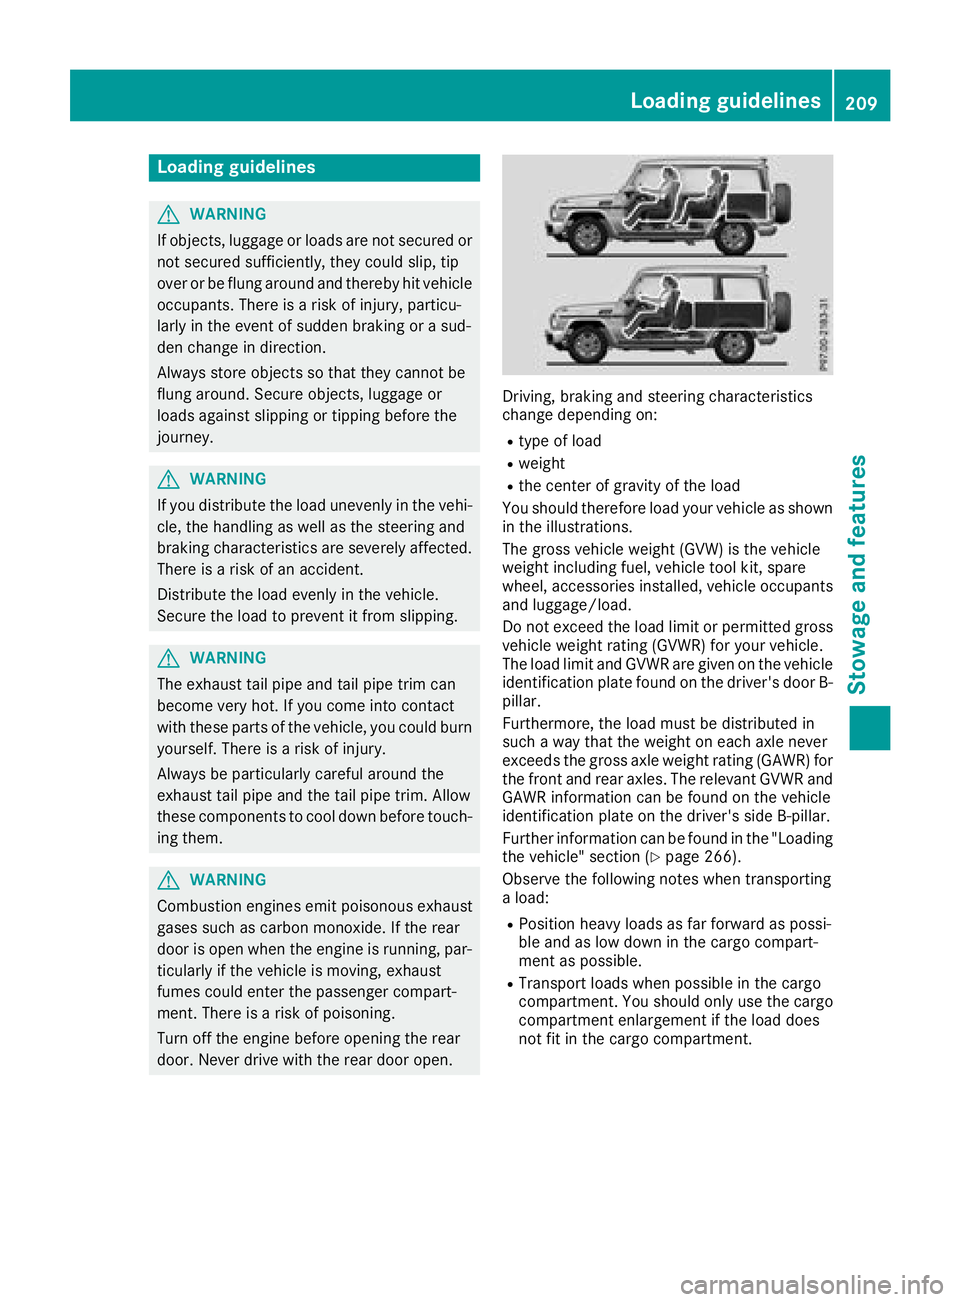
You should therefore load your vehicle as shown
in the illustrations.
The gross vehicle weight (GVW) is the vehicle
weight including fuel, vehicle tool kit, spare
wheel, accessories installed, vehicle occupants
and luggage/load.
Do not exceed the load limit or permitted gross
vehicle weight rating (GVWR) for your vehicle.
The load limit and GVWR are given on the vehicle
identification plate found on the driver's door B-
pillar.
Furthermore, the load must be distributed in
such a way that the weight on each axle never
exceeds the gross axle weight rating (GAWR) for
the front and rear axles. The relevant GVWR and
GAWR information can be found on the vehicle
identification plate on the driver's side B-pillar.
Further information can be found in the "Loading
the vehicle" section (
Ypage 266).
Observe the following notes when transporting
a load:
RPosition heavy loads as far forward as possi-
ble and as low down in the cargo compart-
ment as possible.
RTransport loads when possible in the cargo
compartment. You should only use the cargo
compartment enlargement if the load does
not fit in the cargo compartment.
Loading guidelines209
Stowage and features
Z
Page 247 of 294
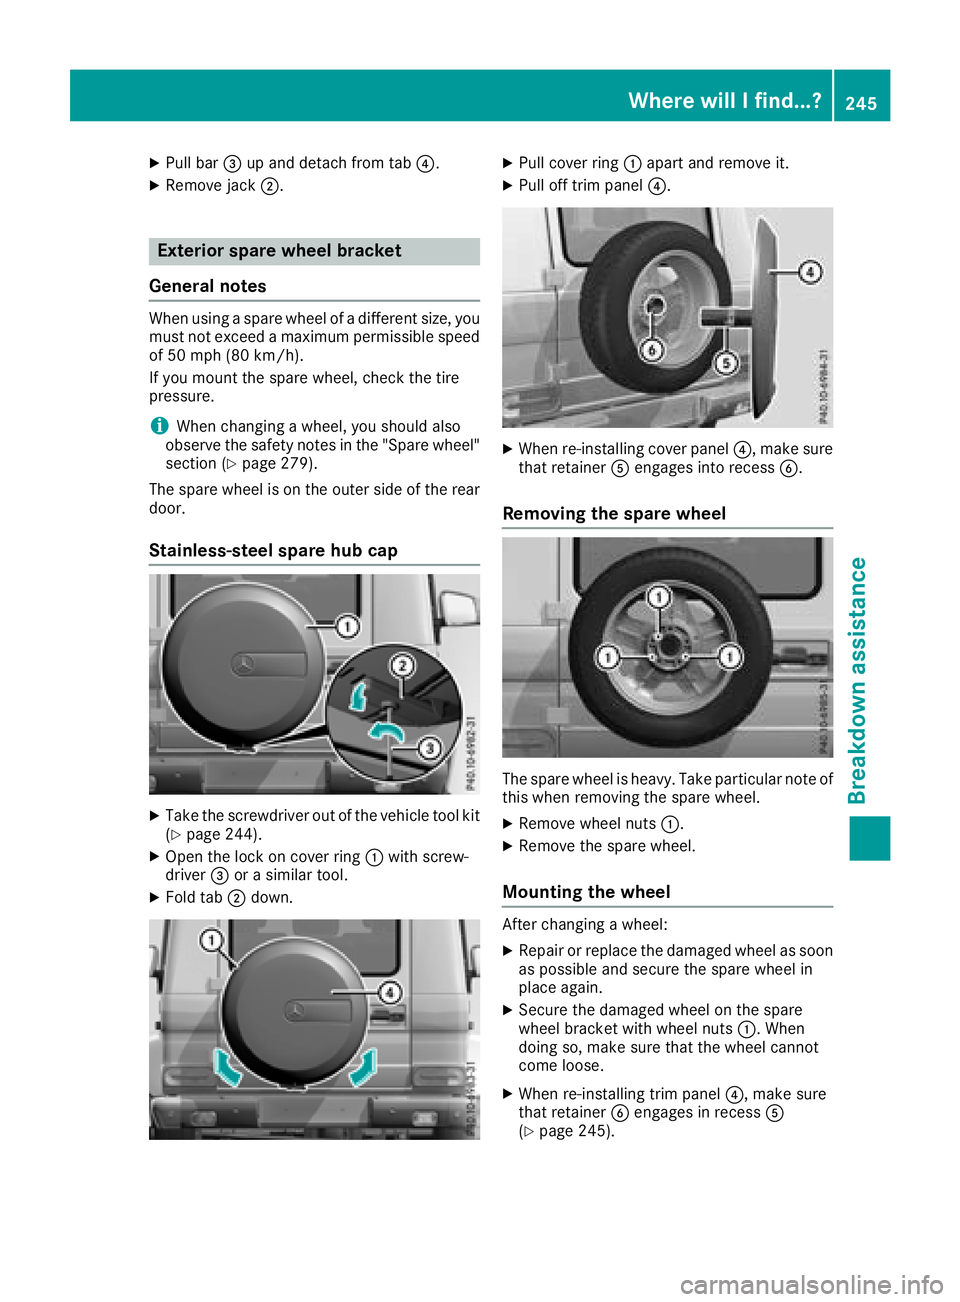
XPull bar=up and detach from tab ?.
XRemove jack;.
Exterior spare wheel bracket
General notes
When using a spare wheel of a different size, you
must not exceed a maximum permissible speed
of 50 mph (80 km/ h).
If you mount the spare wheel, check the tire
pressure.
iWhen changing a wheel, you should also
observe the safety notes in the "Spare wheel"
section (
Ypage 279).
The spare wheel is on the outer side of the rear
door.
Stainless-steel spare hub cap
XTake the screwdriver out of the vehicle tool kit
(Ypage 244).
XOpen the lock on cover ring :with screw-
driver =or a similar tool.
XFold tab ;down.
XPull cover ring :apart and remove it.
XPull off trim panel ?.
XWhen re-installing cover panel ?, make sure
that retainer Aengages into recess B.
Removing the spare wheel
The spare wheel is heavy. Take particular note of
this when removing the spare wheel.
XRemove wheel nuts:.
XRemove the spare wheel.
Mounting the wheel
After changing a wheel:
XRepair or replace the damaged wheel as soon
as possible and secure the spare wheel in
place again.
XSecure the damaged wheel on the spare
wheel bracket with wheel nuts :. When
doing so, make sure that the wheel cannot
come loose.
XWhen re-installing trim panel ?, make sure
that retainer Bengages in recess A
(
Ypage 245).
Where will I find...?245
Breakdown assistance
Page 260 of 294
Rbulges on tires
Rdeformation or severe corrosion on wheels
Regularly check the tire tread depth and the
condition of the tread across the whole width of
the tire (
Ypage 258). In order to inspect the
inner side of the tire surface, turn the steering
wheel to full lock.
All wheels must have a valve cap to protect the valve against dirt and moisture. Do not install
anything onto the valve other than the standard
valve cap or a valve cap approved by Mercedes-
Benz for your vehicle. Do not use any other valve
caps or systems, e.g. tire pressure monitoring
systems.
You should regularly check the pressure of all
your tires including the spare wheel, particularly
prior to long trips. Adjust the tire pressure as
necessary (
Ypage 260).
The service life of tires depends, among other
things, on the following factors:
RDriving style
RTire pressure
RDistance covered
Notes on tire tread
GWARNING
Insufficient tire tread will reduce tire traction.
The tire is no longer able to dissipate water.
This means that on wet road surfaces, the risk
of hydroplaning increases, in particular where speed is not adapted to suit the driving con-
ditions. There is a risk of accident.
If the tire pressure is too high or too low, tires
may exhibit different levels of wear at differ-
ent locations on the tire tread. Thus, you
should regularly check the tread depth and
the condition of the tread across the entire
width of all tires.
Minimum tire tread depth for:
RSummer tires: âin (3 mm)
RM+S tires: ãin (4 mm)
For safety reasons, replace the tires before
the legally prescribed limit for the minimum
tire tread depth is reached.
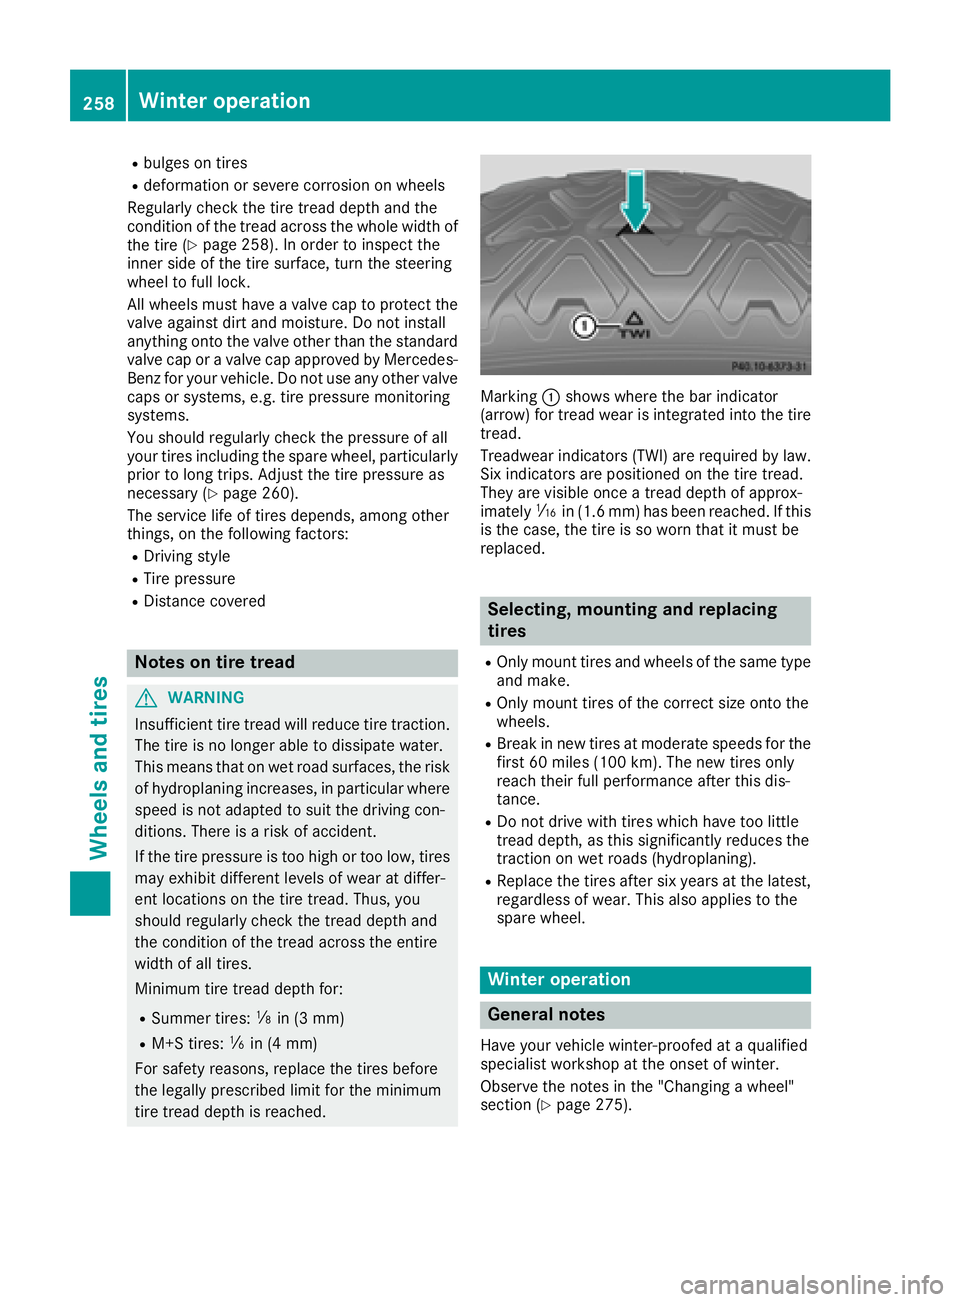
Marking :shows where the bar indicator
(arrow) for tread wear is integrated into the tire
tread.
Treadwear indicators (TWI) are required by law. Six indicators are positioned on the tire tread.
They are visible once a tread depth of approx-
imately áin (1.6 mm) has been reached. If this
is the case, the tire is so worn that it must be
replaced.
Selecting, mounting and replacing
tires
ROnly mount tires and wheels of the same type
and make.
ROnly mount tires of the correct size onto the
wheels.
RBreak in new tires at moderate speeds for the
first 60 miles (100 km). The new tires only
reach their full performance after this dis-
tance.
RDo not drive with tires which have too little
tread depth, as this significantly reduces the
traction on wet roads (hydroplaning).
RReplace the tires after six years at the latest,
regardless of wear. This also applies to the
spare wheel.
Winter operation
General notes
Have your vehicle winter-proofed at a qualified
specialist workshop at the onset of winter.
Observe the notes in the "Changing a wheel"
section (
Ypage 275).
258Winter operation
Wheels and tires
Page 261 of 294
Drivingwit hsummer tire s
At temperature sbelo w45 ‡(+7 †), elasticity in
summer tires is significantly lower and thus also
traction and braking power. Change the tires on
your vehicle to M+S tires. Using summer tires at
very cold temperatures could cause cracks to
form, thereby damaging the tires permanently.
Mercedes-Benz cannot accept responsibility for
this type of damage.
GWARNING
Damaged tires can cause tire inflation pres-
sure loss. As a result, you could lose control of
your vehicle. There is a risk of accident.
Check the tires regularly for signs of damage
and replace any damaged tires immediately.
M+S tires
GWARNING
M+S tires with a tire tread depth of less than
ã in (4 mm) are not suitable for use in winter
and do not provide sufficient traction. There is
a risk of an accident.
M+S tires with a tread depth of less than ãin
(4 mm) must be replaced immediately.
GWARNING
Wheel and tire dimensions as well as the type of tire can vary between the spare wheel and
the wheel to be replaced. When the spare
wheel is mounted, driving characteristics may be severely affected. There is a risk of an acci-
dent.
In order to reduce risks:
Ryou should therefore adapt your driving
style and drive carefully.
Rnever mount more than one spare wheel
that differs from the wheel to be replaced.
Ronly use a spare wheel that differs from the
wheel to be replaced for a short time.
Rdo not deactivate ESP®.
Rhave a spare wheel that differs from the
wheel that has been changed replaced at
the nearest qualified specialist workshop.
You must observe the correct wheel and
tire dimensions as well as the wheel type.
Do not exceed a maximum speed of 50 mph
(80 km/h) if a spare wheel of a different size is
installed.
At temperatures below 45 ‡(+7 †), use winter
tires or all-season tires. Both types of tire are
identified by the M+S marking.
Only winter tires bearing the isnowflake
symbol in addition to the M+S marking provide
the best possible grip in wintry road conditions.
Only these tires will allow driving safety systems
such as ABS and ESP
®to function optimally in
winter. These tires have been developed specif-
ically for driving in snow.
Use M+S tires of the same make and tread on all
wheels to maintain safe handling characteris-
tics.
Always observe the maximum permissible
speed specified for the M+S tires you have
mounted.
When you have mounted the M+S tires:
XCheck the tire pressures (Ypage 263).
XRestart the tire pressure monitor
(Ypage 265).
Snow chains
GWARNING
If you drive too fast with snow chains moun-
ted, they may snap. As a result, you could
injure others and damage the vehicle. There is
a risk of an accident.
Observe the maximum permissible speed for
operation with snow chains.
!Information about the use of snow chain
compatible AMG winter tires is applicable for
AMG tires. Use of snow chains is only per-
missible with these tires.
!On some tire sizes there is not enough space
for snow chains. To avoid damage to the vehi- cle or tires, observe the "Wheel and tire com-
binations" section under "Tires and wheels".
Winter operation259
Wheels and tires
Z