2018 MERCEDES-BENZ CLA COUPE ignition
[x] Cancel search: ignitionPage 86 of 326
On vehicles withapanorama roof with power
tilt/sliding panel:
XPress and hold the &button againu ntil the
roller sunblind of the panorama roof with
power tilt/sliding panel closes.
XTo interruptc onvenienceclosing:release
the & button.
Using KEYLESS-GO
The driver's door and the door at which the han-
dle is used, must both be closed. The SmartKey
must be outside the vehicle. The gap between
the SmartKey and the corresponding door han-
dle should not be greater than 3ft(1m).
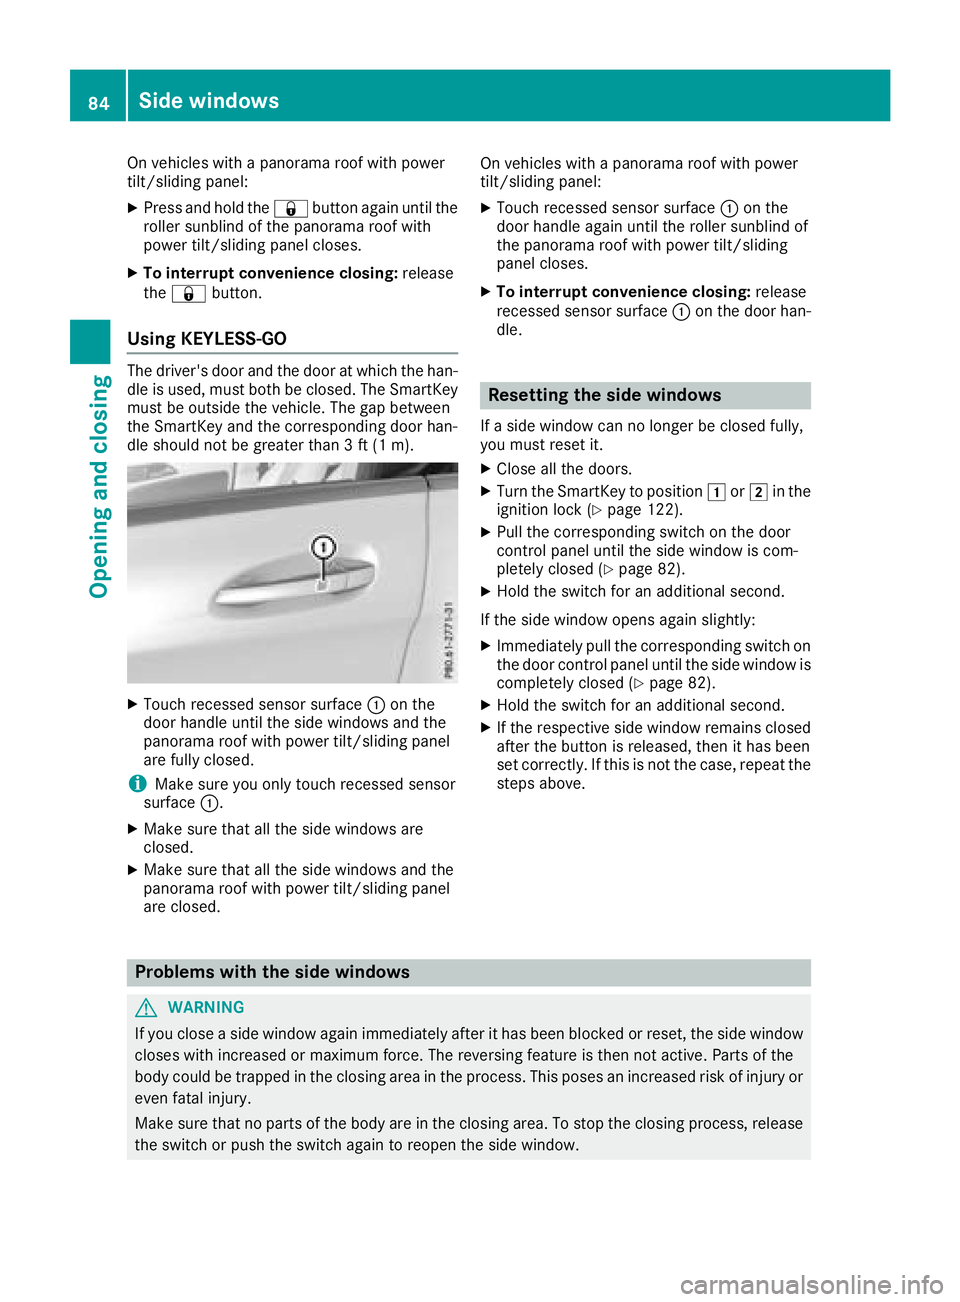
XTouch recessed sensor surface :on the
door handle until the side windows and the
panorama roof with power tilt/sliding panel
are fully closed.
iMake sure you only touch recessed sensor
surface :.
XMake sure that all the side windows are
closed.
XMake sure that all the side windows and the
panorama roof with power tilt/sliding panel
are closed. On vehicles with
apanorama roof with power
tilt/sliding panel:
XTouch recessed sensor surface :on the
door handle againu ntil the roller sunblind of
the panorama roof with power tilt/sliding
panel closes.
XTo interruptc onvenienceclosing:release
recessed sensor surface :on the door han-
dle.
Resetting the side windows
If as ide window can no longer be closed fully,
you must reset it.
XClose all the doors.
XTurn the SmartKey to position 1or2 in the
ignition lock (Ypage 122).
XPull the corresponding switch on the door
control panel until the side window is com-
pletely closed (
Ypage 82).
XHold the switch for an additional second.
If the side window opens agains lightly:
XImmediately pull the corresponding switch on
the door control panel until the side window is
completely closed (
Ypage 82).
XHold the switch for an additional second.
XIf the respective side window remains closed
after the button is released,t hen it has been
set correctly. If this is not the case, repeat the
steps above.
Problems with the side windows
GWARNING
If you close aside window againi mmediately after it has been blocked or reset, the side window
closes with increased or maximum force. The reversing feature is then not active. Parts of the
body could be trapped in the closing area in the process. This poses an increased risk of injury or
even fatal injury.
Make sure that no parts of the body are in the closing area. To stop the closing process, release
the switch or push the switch againtor eopen the side window.
84Side windows
Opening and closing
Page 88 of 326
sure fluctuations in the vehicle interior.
Change the position of the sliding sunroof or
openaside window slightly to reduce or elim-
inate these noises.
Sliding sunroof reversing feature
In the following section, the term "sliding sun-
roof" refers to the panorama roof with power
tilt/sliding panel.
The sliding sunroof is equipped with an auto-
matic reversing feature. If asolid object blocks
or restrictst he sliding sunroof during the closing
process, the sliding sunroof opens againa uto-
matically.H owever, the automatic reversing
feature is only an aid and does not relieve you of
the responsibility of paying attention when clos-
ing the sliding sunroof.
GWARNING
The reversing feature does not react:
Rto soft, light and thin objects, e.g. small fin-
gers
Rover the last 1/6 in (4 mm) of the closing
movement
Rduring resetting
Rwhen closing the sliding sunroof againm an-
ually immediately after automatic reversing
This means that the reversing feature cannot
prevent someone being trapped in these sit-
uations. There is arisk of injury.
Make sure that no body parts are in close
proximity during the closing procedure.
If somebody becomes trapped:
Rrelease the switch immediately,o r
Rpress the switch in any direction during the
automatic closing process
The closing process is stopped.
Operating the panoramar oof with
power tilt/sliding panel
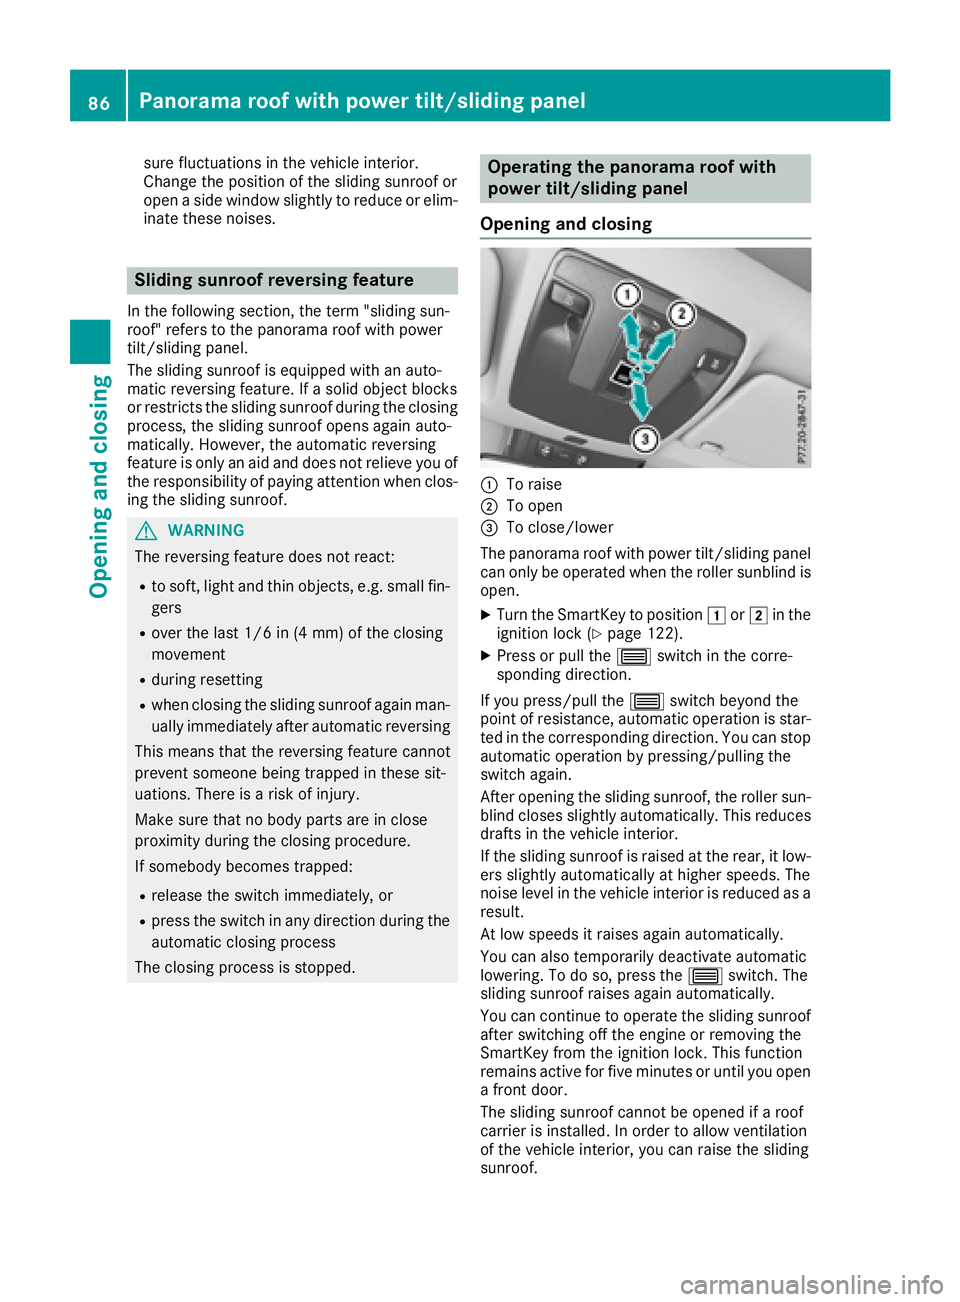
Opening and closing
:To raise
;To open
=To close/lower
The panorama roof with power tilt/sliding panel
can only be operated when the roller sunblind is
open.
XTurn the SmartKey to position 1or2 in the
ignition lock (Ypage 122).
XPress or pull the 3switch in the corre-
sponding direction.
If you press/pull the 3switch beyond the
point of resistance, automatic operation is star-
ted in the corresponding direction. You can stop
automatic operation by pressing/pulling the
switch again.
After opening the sliding sunroof, the roller sun-
blind closes slightly automatically. This reduces
drafts in the vehicle interior.
If the sliding sunroof is raised at the rear, it low-
ers slightly automatically at higher speeds. The
noise level in the vehicle interior is reduced as a
result.
At low speeds it raises againa utomatically.
You can also temporarily deactivate automatic
lowering. To do so, press the 3switch. The
sliding sunroof raises againa utomatically.
You can continue to operate the sliding sunroof
after switching off the engine or removing the
SmartKey from the ignition lock. This function
remains active for five minutes or until you open
af ront door.
The sliding sunroof cannot be opened if aroof
carrier is installed. In order to allow ventilation
of the vehicle interior, you can raise the sliding
sunroof.
86Panoramar oof with power tilt/sliding panel
Opening and closing
Page 90 of 326
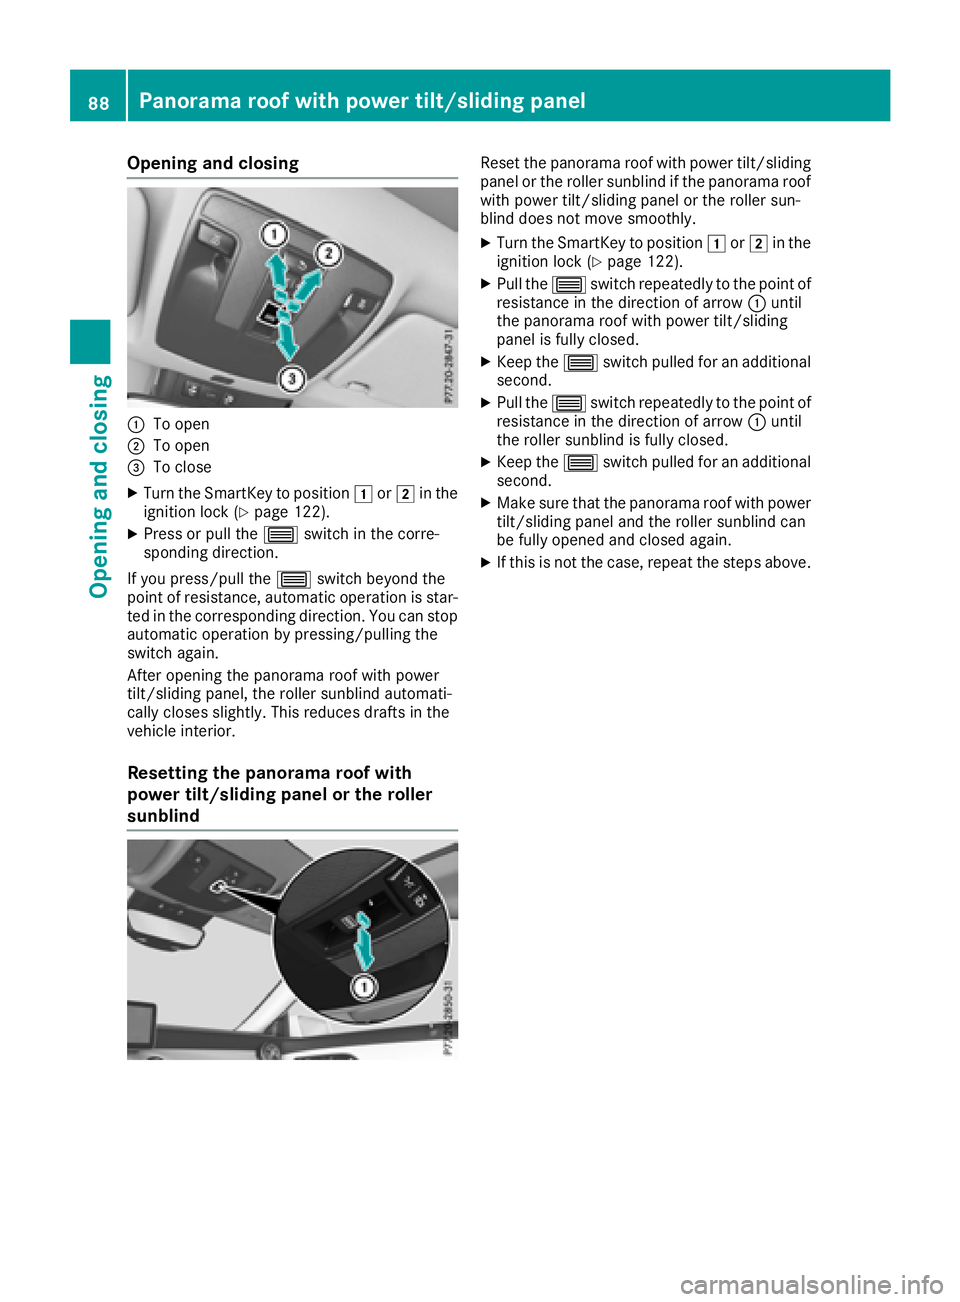
Opening and closing
:To open
;To open
=To close
XTurn the SmartKey to position1or2 in the
ignition lock (Ypage 122).
XPress or pull the 3switch in the corre-
spondin gdirection.
If you press/pull the 3switch beyond the
point of resistance, automatic operation is star-
ted in the correspondin gdirection. You can stop
automatic operation by pressing/pulling the
switch again.
After opening the panorama roof with power
tilt/sliding panel, the roller sunblind automati-
cally closes slightly. This reduces drafts in the
vehicle interior.
Resetting the panorama roof with
power tilt/sliding panel or the roller
sunblind
Reset the panorama roof with power tilt/sliding
panel or the roller sunblind if the panorama roof with power tilt/sliding panel or the roller sun-
blind does not move smoothly.
XTurn the SmartKey to position 1or2 in the
ignition lock (Ypage 122).
XPull the 3switch repeatedly to the point of
resistance in the direction of arrow :until
the panorama roof with power tilt/sliding
panel is fully closed.
XKeep the 3switch pulled for an additional
second.
XPull the 3switch repeatedly to the point of
resistance in the direction of arrow :until
the roller sunblind is fully closed.
XKeep the 3switch pulled for an additional
second.
XMake sure that the panorama roof with power
tilt/sliding panel and the roller sunblind can
be fully opened and closed again.
XIf this is not the case, repeat the steps above.
88Panorama roof with power tilt/sliding panel
Opening and closing
Page 92 of 326
Correct driver's seat position
GWARNING
You coul dlose control of your vehicle if you do
th ef ollowingw hile driving:
Radjust thedriver'ss eat,head restraint,
steering wheel or mirrors
Rfasten th eseat belt
Thereisar iskofana ccident.
Adjust th edriver'ss eat,head restraint ,steer-
ing wheel and mirror and fasten your seat belt before starting th eengine.
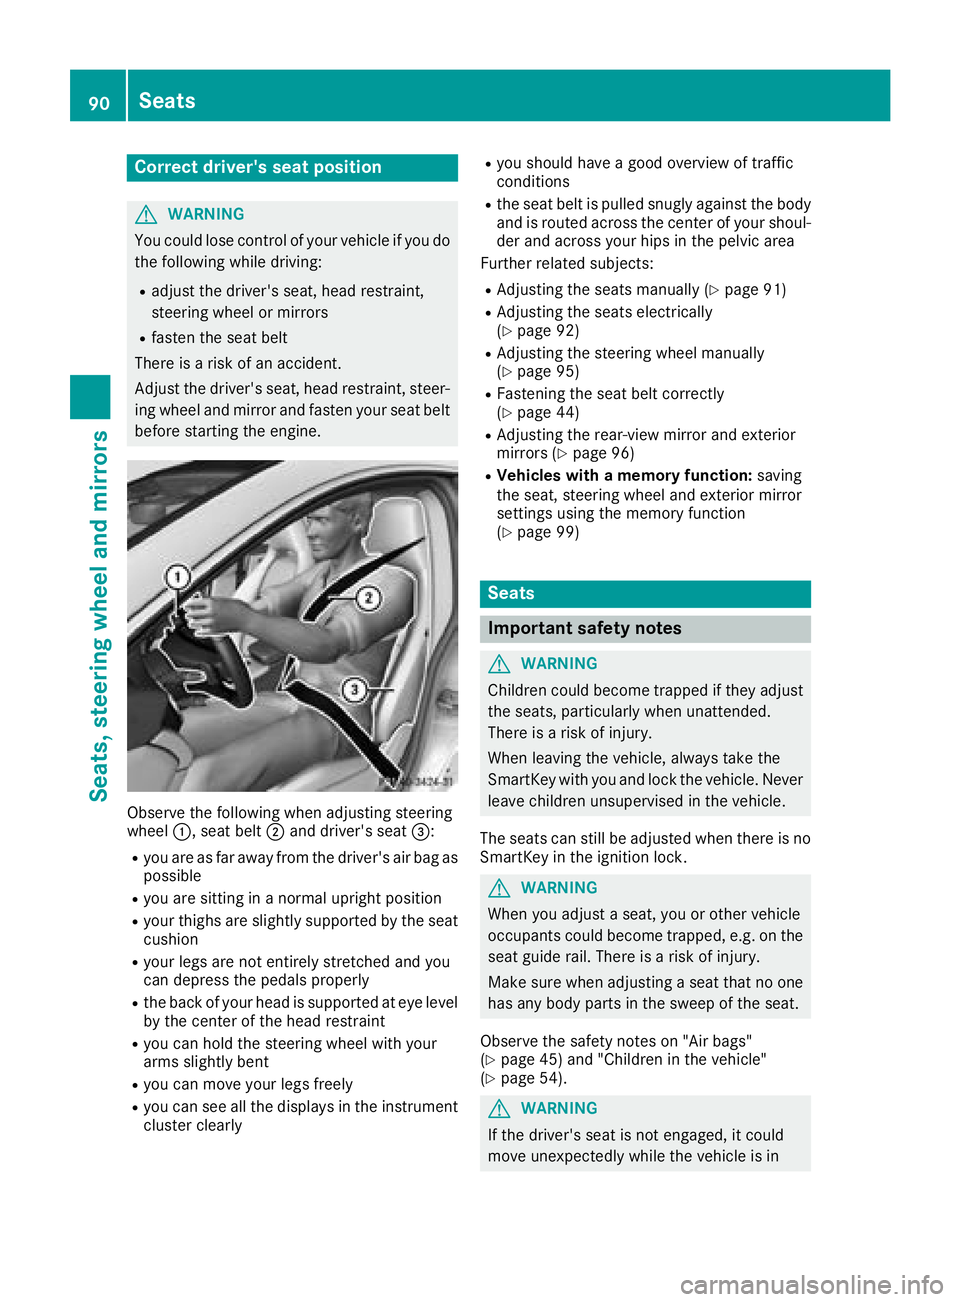
Observ ethe followingw hen adjusting steering
wheel :,seat belt ;and driver'ss eat=:
Ryou are as far away from th edriver'sa ir bag as
possible
Ryou are sittin ginanormalupright position
Ryour thighs are slightly supported by th eseat
cushion
Ryour legs are no tentirely stretched and you
can depress th epedals properly
Rtheb ack of your head is supported at eye level
by th ecente roft hehead restraint
Ryou can hold th esteering wheel withy our
arm sslightly bent
Ryou can mov eyour legs freely
Ryou can see all th edisplays in th einstrument
cluste rclearly
Ryou should have agood overview of traffic
conditions
Rth es eat belt is pulled snugly against th ebody
and is routed across th ecente rofy our shoul-
der and across your hips in th epelvic area
Further related subjects:
RAdjustin gthe seatsm anually (Ypage 91)
RAdjustin gthe seatse lectrically
(Ypage 92)
RAdjustin gthe steering wheel manually
(Ypage 95)
RFastenin gthe seat belt correctly
(Ypage 44)
RAdjustin gthe rear-view mirror and exterior
mirror s(Ypage 96)
RVehicles with amemory function: saving
th es eat,s teering wheel and exterior mirror
settings usingt hememory function
(
Ypage 99)
Seats
Important safety notes
GWARNING
Children coul dbecome trapped if they adjust
th es eats, particularly when unattended.
Thereisar iskofi njury.
When leaving th evehicle ,always tak ethe
SmartKey withy ou and lockthevehicle .Never
leave childre nunsupervised in th evehicle.
The seatsc an still be adjusted when there is no
SmartKey in th eignition lock.
GWARNING
When you adjust aseat,y ou or other vehicle
occupants coul dbecome trapped, e.g .onthe
seat guide rail. Thereisar iskofi njury.
Makes ure when adjusting aseat that no one
has any body part sinthesweep of th eseat.
Observ ethe safety note son"Air bags"
(
Ypage 45 )and "Children in th evehicle"
(Ypage 54).
GWARNING
If th edriver'ss eat is no tengaged,itc ould
mov eunexpectedly while th evehicle is in
90Seats
Seats, steerin gwheel and mirrors
Page 96 of 326
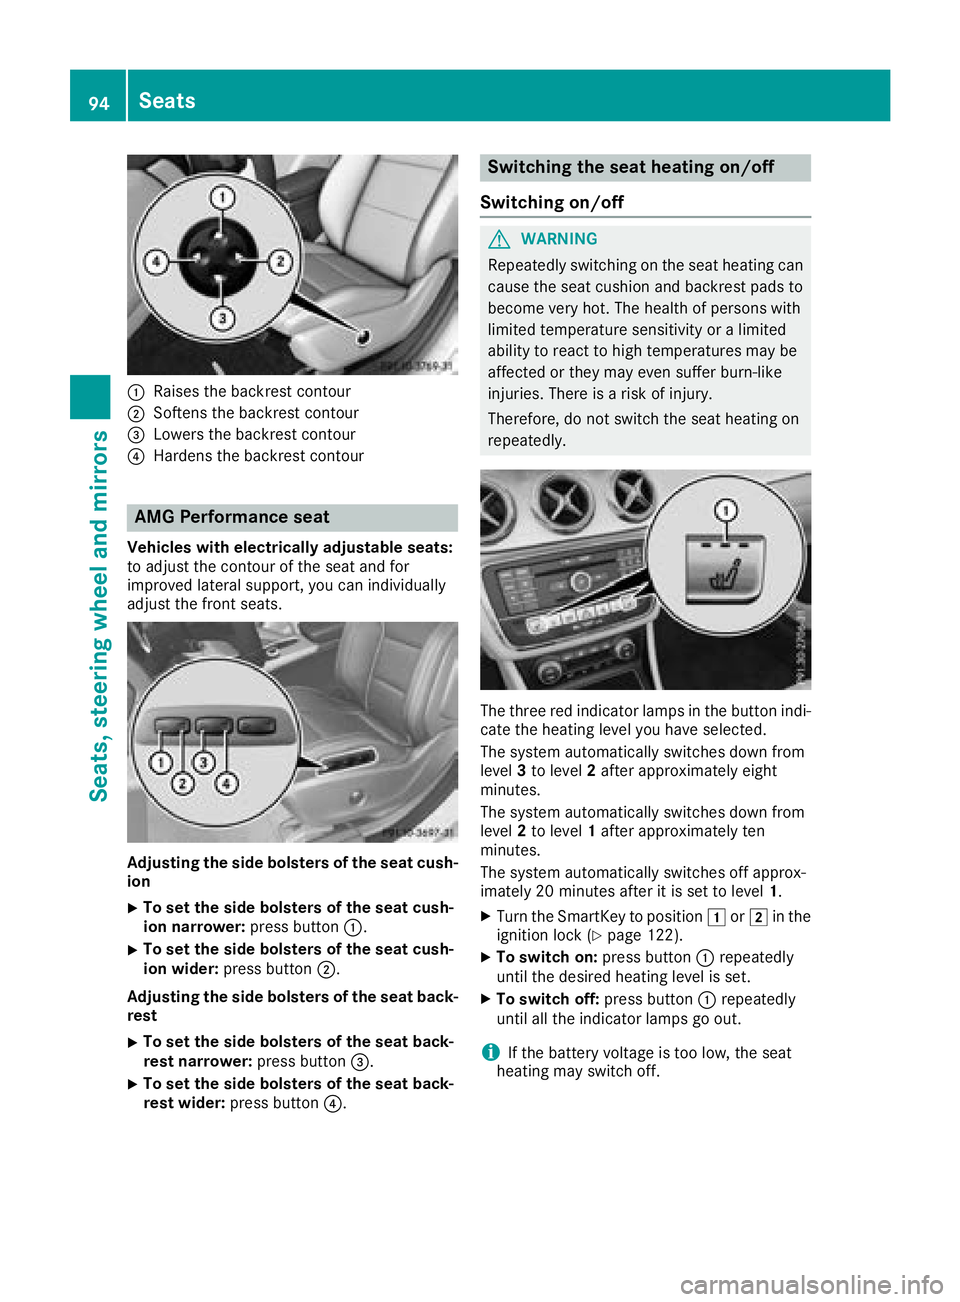
:Raises thebackrest contour
;Soften sthe backrest contour
=Lowers th ebackrest contour
?Harden sthe backrest contour
AMG Performance seat
Vehicles with electricall yadjusta bles eats :
to adjust th econtou roftheseat and for
improve dlateral support ,you can individually
adjust th efront seats.
Adjusting th esideb olsters of th eseatc ush -
ion
XTo set th esideb olsters of th eseatc ush -
ion narrower: press button:.
XTo set th esideb olsters of th eseatc ush -
ion wider: press butto n;.
Adjusting th esideb olsters of th eseatb ack -
res t
XTo set th esideb olsters of th eseatb ack -
res tnarrower: press butto n=.
XTo set th esideb olsters of th eseatb ack -
res twider: press butto n?.
Switchin gthe seath eating on/off
Switchin gon/off
GWARNIN G
Repeatedly switching on th eseat heating can
caus ethe seat cushion and backrest pads to
become ver yhot.T he healt hofpersonswith
limite dtem perature sensitivit yoralimited
abilit ytor eac ttoh igh temperatures may be
affecte dortheym ay eve nsuffer burn-like
injuries. There is ariskofi njury.
Therefore ,donotswitch th eseat heating on
repeatedly.
The three red indicator lamp sinthebutto nindi-
cat ethe heating level you hav eselected.
The system automatically switches down from
level 3to level 2after approximately eigh t
minutes.
The system automatically switches down from
level 2to level 1after approximately te n
minutes.
The system automatically switches off approx -
imately 20 minute safter it is set to level 1.
XTurn theSma rtKey to position 1or2 in th e
ignition loc k(Ypage 122).
XTo switch on: press button: repeatedly
until th edesired heating level is set .
XTo switch off:press butto n: repeatedly
until all th eindicator lamp sgoout.
iIf th ebattery voltag eistoolow, th eseat
heating may switch off .
94Seats
Seats,steering wheel and mirrors
Page 99 of 326
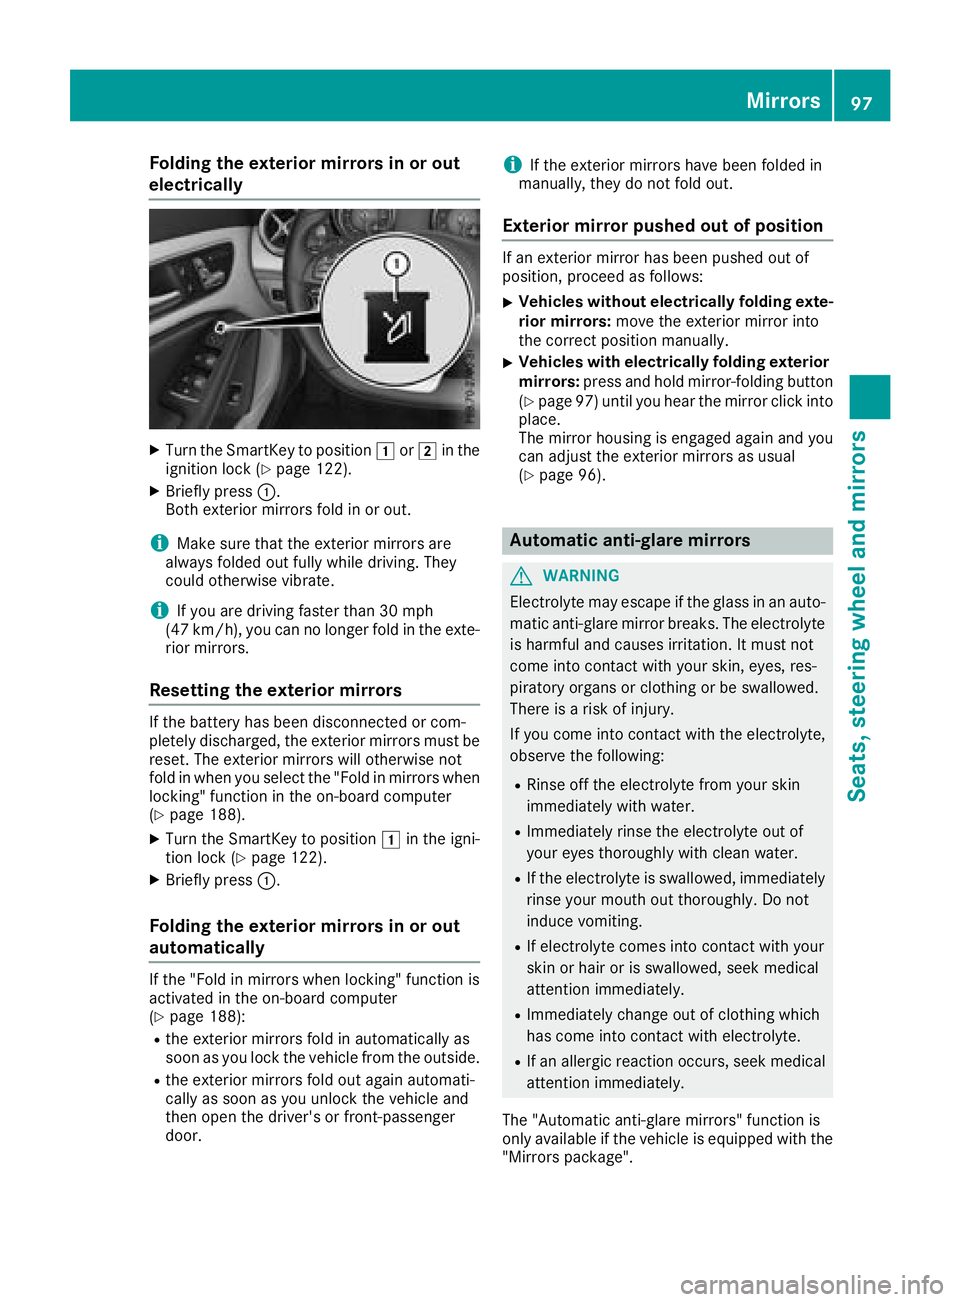
Folding theexterior mirrors in or out
electrically
XTurn th eSma rtKey to position 1or2 in th e
ignition loc k(Ypage 122).
XBriefly press :.
Both exterio rmirror sfoldinoro ut.
iMak esure that th eexter iorm irror sare
always folded out fully while driving .They
could otherwise vibrate .
iIf you are driving fastertha n30m ph
(47 km/h), you can no longer fol dintheexte -
rio rm irrors.
Resetting th eexterior mirrors
If th ebattery has been disconnected or com-
pletely discharged, th eexter iorm irror smust be
reset .The exterio rmirror swill otherwise no t
fol dinw hen you select th e"Fold in mirror swhen
locking" function in th eon-bo ard computer
(
Ypage 188).
XTurn th eSmartKey to position 1in th eigni-
tion loc k(Ypage 122).
XBriefly press :.
Folding theexterior mirrors in or out
automatically
If th e"Fold in mirror swhen locking" function is
activated in th eon-bo ard computer
(
Ypage 188):
Rth ee xter iorm irror sfoldina utomatically as
soo nasy ou loc kthe vehicl efromt heoutside .
Rthee xter iorm irror sfoldo ut again automati-
call yass oonasy ou unlock th evehicl eand
then open th edriver' sorf ront-pa ssenger
door .
iIf theexter iorm irror shave been folded in
manually, they do no tfoldo ut.
Exterior mirror pushed out of position
If an exterio rmirror has been pushed out of
position ,procee dasfollows :
XVehicles without electricall yfolding exte-
rior mirrors :mov ethe exterio rmirror int o
th ec orre ct position manually.
XVehicles with electricall yfolding exterior
mirrors :press and hold mirror-foldin gbutto n
(
Ypage 97 )until yo uhearthe mirror click into
place.
The mirror housing is engaged agai nand you
can adjus tthe exterio rmirrors as usual
(
Ypage 96).
Automati canti-glare mirrors
GWARNING
Electrolyte maye scape if the glassinanauto-
matic anti-glare mirror breaks .The electrolyte
is harmfula nd causes irritation. It must not
come into contact with your skin, eyes, res-
piratory organs or clothing or be swallowed.
There is ariskofi njury.
If yo ucome into contact with the electrolyte,
observe the following:
RRinse off the electrolyte from your skin
immediatelyw ithw ater.
RImmediately rins ethe electrolyte outo f
your eyes thoroughl ywithc lean water.
RIf the electrolyte is swallowed, immediately
rins eyourm outh outt horoughly. Do not
induce vomiting.
RIf electrolyte comesi nto contact with your
skinorh airoriss wallowed, seekm edical
attentio nimmediately.
RImmediately change outofc lothing which
hasc ome into contact with electrolyte.
RIf an allergicr eactionoccurs, see kmedical
attentio nimmediately.
The "Automatic anti-glare mirrors"f unctionis
onlya vailable if the vehicl eisequippe dwitht he
"Mirrors package".
Mirrors97
Seats, steering wheel andmirrors
Z
Page 100 of 326
The rear-view mirror and the exterior mirror on
the driver's side automatically go into anti-glare
mode if:
Rthe ignition is switched on and
Rincident light from headlamps strikes the sen-
sor in the rear-view mirror
The mirrors do not go into anti-glare mode if
reverse gear is engaged or if the interior lighting
is switched on.
Parking position for the exterior mir-
ror on the front-passenger side
Setting and storing the parking position
You can set the front-passenger side exterior
mirror such that you can see the rear wheel on
that side as soon as you engage reverse gear.
You can store this position.
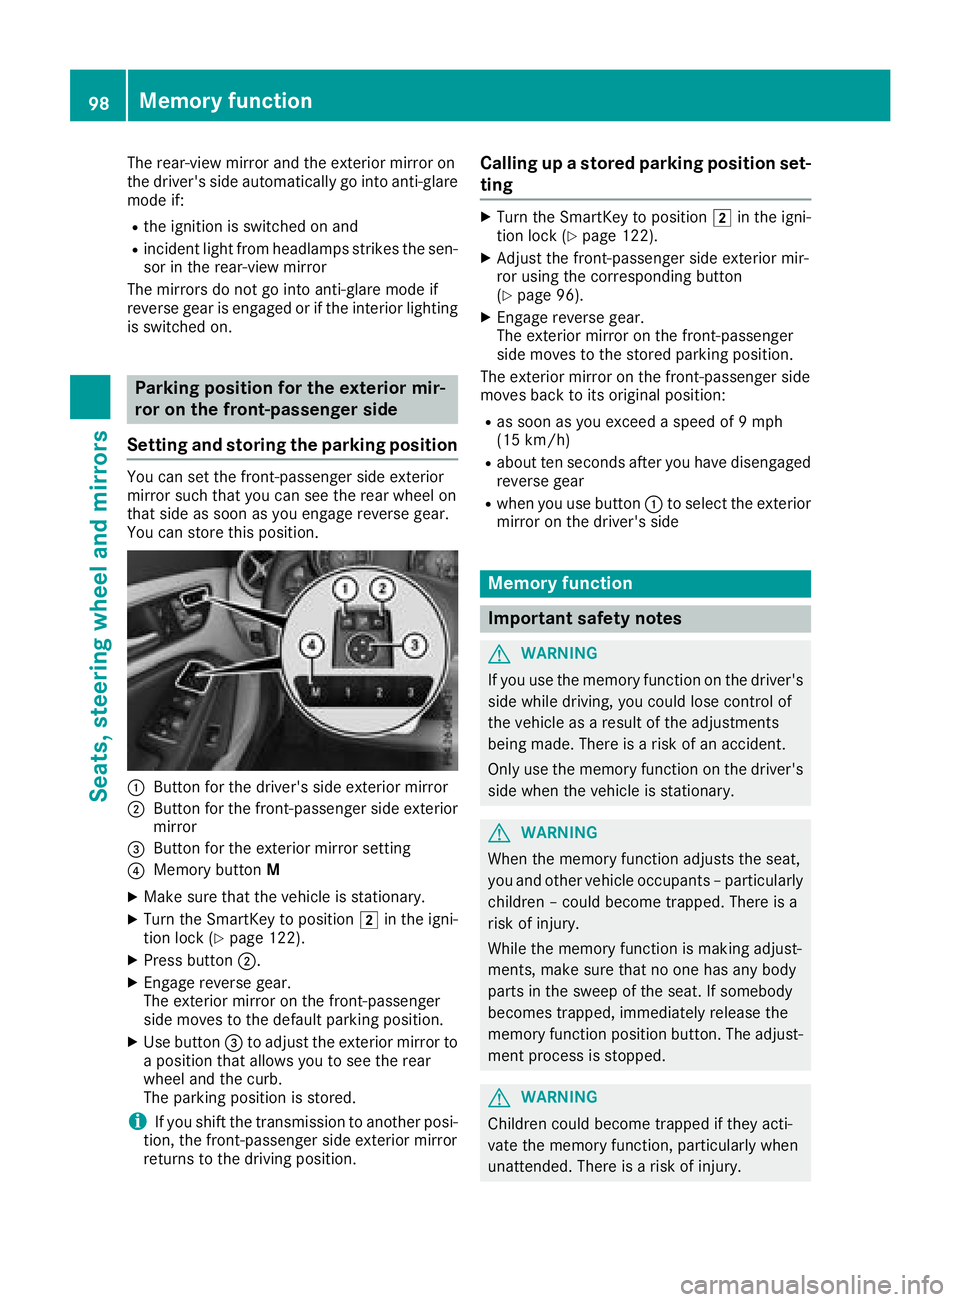
:Button for the driver's side exterior mirror
;Button for the front-passenger side exterior
mirror
=Button for the exterior mirror setting
?Memory button M
XMake sure that the vehicle is stationary.
XTurn the SmartKey to position 2in the igni-
tion lock (Ypage 122).
XPress button ;.
XEngage reverse gear.
The exterior mirror on the front-passenger
side moves to the default parking position.
XUse button=to adjust the exterior mirror to
ap osition that allows you to see the rear
wheel and the curb.
The parking position is stored.
iIf you shift the transmission to another posi-
tion, the front-passenger side exterior mirror
return stothe driving position.
Calling up astored parking position set-
ting
XTurn the SmartKey to position 2in the igni-
tion lock (Ypage 122).
XAdjust the front-passenger side exterior mir-
ror using the corresponding button
(
Ypage 96).
XEngage reverse gear.
The exterior mirror on the front-passenger
side moves to the stored parking position.
The exterior mirror on the front-passenger side
moves back to its original position:
Ras soon as you exceed aspeed of 9mph
(15 km/h)
Rabout ten seconds after you have disengaged
reverse gear
Rwhen you use button :to select the exterior
mirror on the driver's side
Memory function
Important safety notes
GWARNING
If you use the memory function on the driver's side while driving, you could lose control of
the vehicle as aresult of the adjustments
being made. There is arisk of an accident.
Only use the memory function on the driver's
side when the vehicle is stationary.
GWARNING
When the memory function adjusts the seat,
you and other vehicle occupants–p articularly
children –could become trapped. There is a
risk of injury.
While the memory function is making adjust-
ments, make sure that no one has any body
parts in the sweep of the seat. If somebody
becomes trapped, immediately release the
memory function position button .The adjust-
ment process is stopped.
GWARNING
Children could become trapped if they acti-
vate the memory function, particularly when
unattended. There is arisk of injury.
98Memory function
Seats, steering wheel and mirrors
Page 102 of 326
Exteriorlighting
General notes
For reasonsofs afety, Mercedes-Ben zrecom-
mends that you driv ewith th elightss witched on
even durin gthe daytime. In somec ountries,
operatio noftheheadlamps varies due to legal
requirement sand self-imposedo bligations.
Settingthe exterio rlighting
Settin goptions
Exterior lighting can be set usingt he:
Rlight switch
Rcombinatio nswitch (Ypage 101)
Ron-board compute r(Ypage 187)
Light switch
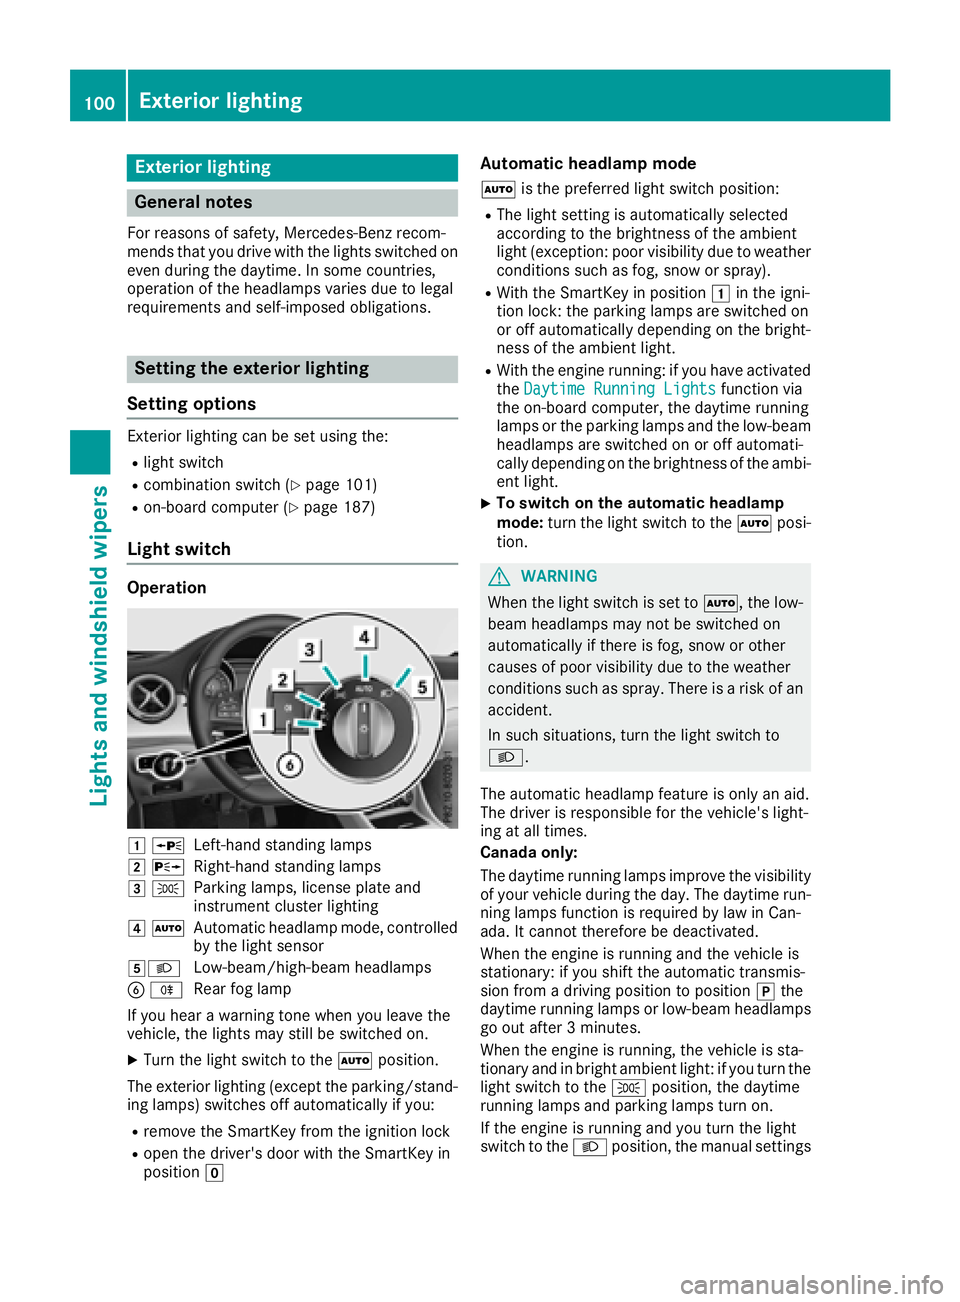
Operation
1WLeft-hands tanding lamps
2 XRight-hand standing lamps
3TParking lamps ,licens eplatea nd
instrumen tcluste rlighting
4 ÃAutomatic headlampm ode, controlled
by th elight sensor
5LLow-beam/high-beam headlamps
B RRear fog lamp
If you hear awarning tone when you leave the
vehicle ,the lightsm ay still be switched on.
XTurn thelight switch to the Ãposition.
The exteriorl ighting (excep tthe parking/stand-
ing lamps )switches off automaticall yifyou:
Rremove th eSmartKey from th eignition lock
Ropen th edriver'sd oor with th eSmartKey in
position g
Automatic headlamp mode
Ãis thepreferred light switch position:
RThe light settin gisautomaticall yselected
according to th ebrightnes softheambient
light (exception: poor visibilityd ue to weather
conditionss uchasfog,sno wors pray).
RWiththeSmartKey in position 1in th eigni-
tio nlock: th eparking lamps are switched on
or off automaticall ydependingont hebright-
nes soft heambient light.
RWitht heengine running: if you have activated
the DaytimeR unningLightsfunction via
th eo n-board computer, th edaytime running
lamps or th eparking lamps and th elow-beam
headlamps are switched on or off automati-
cally dependingont hebrightnes softheambi-
ent light.
XTo switch on th eautomatic headlamp
mode: turnthe light switch to the Ãposi-
tion.
GWARNING
When th elight switch is set to Ã,thelow-
beam headlamps may no tbeswitched on
automaticall yifthere is fog ,sno woro ther
causes of poor visibilityd ue to theweather
conditionss uchasspray. Thereisar isk of an
accident.
In suchs ituations,tur nt he light switch to
L.
The automatic headlampf eature is only an aid.
The driver is responsible for th evehicle's light-
ing at all times.
Canada only:
The daytime runnin glamps improve th evisibility
of your vehicle durin gthe day. The daytime run-
nin glamps function is required by law in Can-
ada. It canno tthe refore be deactivated.
When th eengine is runnin gand th evehicle is
stationary: if you shiftt heautomatic transmis-
sion from adriving position to position jthe
daytime runnin glamps or low-beam headlamps
go out after 3minutes.
When th eengine is running, th evehicle is sta-
tionar yand in bright ambient light:ify ou turnthe
light switch to the Tposition,t hedaytime
runnin glamps and parking lamps tur non.
If th eengine is runnin gand you tur nthe light
switch to the Lposition,t hemanual settings
100Exterior lighting
Lightsa nd windshield wipers