2018 MERCEDES-BENZ CLA COUPE key
[x] Cancel search: keyPage 256 of 326
When indicator lamp:flashes green: pro-
gramming was successful. The next step is to
synchronize the rolling code.
XRelease button Bof remotec ontrolAof the
garage door drive.
If indicator lamp :lights up red: repeat the
programmingp rocess for the corresponding
button on the rear-view mirror. When doing
so, vary the distanc ebetween remotec ontrol
A and the rear-view mirror.
The required distanc ebetween remotec on-
trol Aand the integrated garage door opener
depends on the garage door drive system.
Several attempts might be necessary. You
should test every position for at least
25 seconds before trying another position.
Problems when programming
If you are experiencing problems programming
the integrated garage door opener on the rear-
view mirror, take not eofthe following instruc-
tions:
RCheck the transmitter frequenc yused by
garage door drive remotec ontrolAand
whether it is supported. The transmitter fre-
quency can usually be found on the back of
remotec ontrolAfor the garage door drive.
The integrated garage door opener is com-
patible with devices that have units which
operate in the frequenc yrange of 280 to
433 MHz.
RReplace the batteries in garage door remote
control A.This increases the likelihood that
garage door remotec ontrolAwill transmit a
stron gand precise signal to the integrated
garage door opener.
RWhen programming, hold remotec ontrolA
at varying distances and angles from but-
tons ;to? which you are programming. Try
various angles at adistanc ebetween 2and
8i nches (5to 20 cm) or at the same angle but
at varying distances.
RIf another remotec ontrolAis available for
the same garage door drive, repeat the same
programmings teps with this remotec ontrol
A.B eforep erforming these steps, make sure
that new batteries have been installed in
garage door drive remotec ontrolA.
RNote that some remotec ontrols only transmit
for alimited amount of time (the indicator
lamp on t
he remotec
ontrol goes out). Press button
Bon remotec ontrolAagain before
transmission ends.
RAlign the antenna cable of the garage door
opener unit. This can improve signal recep-
tion/transmission.
Opening/closing the garage door
After it has been programmed, the integrated
garage door opener performst he function of the
garage door system remotec ontrol. Please also
read the operating instruction sfor the garage
door system.
XTurn the SmartKey to position 2in the ignition
lock (Ypage 122).
XPress button ;,=or? which you have
programmed to operate the garage door.
Garage door system with afixed code: indi-
cator lamp :lights up green.
Garage door system with arolling code: indi-
cator lamp :flashes green.
The transmitter will transmit asignal as long
as the button is pressed. The transmission is
halted after amaximum of ten seconds and
indicator lamp :lights up yellow.
XPress button ;,=or? again if necessary.
Clearing the memory
Make sure that you clear the memory of the
integrated garage door opener before selling the
vehicle.
XTurn the SmartKey to position 2in the ignition
lock (Ypage 122).
XPress and hold buttons ;and ?.
The indicator lamp initially lights up yellow
and then green.
XRelease buttons ;and ?.
The memory of the integrated garage door
opener in the rear-view mirror is cleared.
254Features
Stowage and features
Page 262 of 326
Checking and addingother service
products
Checking coolan tlevel
GWARNING
The coolings ystem is pressurized, particularly
when th emotor is warm .Ifyou open th ecap,
you coul dbescalded if hot coolant sprays out.
Thereisar iskofi njury.
Let th eenginec ooldown before you open the
cap. Wear gloves and eye protection.S lowly
open th ecap to relieve pressure.
!The coolant may only be checked and cor-
recte dwhen th eengineisc ool(coolantt em-
peratur ebelow 10 4‡(40 †) .Checkin gthe
coolantw hen thecoolantt emperatur eis
above1 04‡(40 †) ma yresult in damage to
th ee ngineortot heengin ecoolings ystem.
XPar kthe vehicl eonal evel surface.
Only chec kthe coolan tlevel when th evehicl e
is on alevel surfac eand th eengineh as cooled
down .
XTurn th eSmartKey to position 2in th eigni-
tion loc k(Ypage 122).
XCheckthe coolan ttem perature display in th e
instrumen tcluster.
The coolan ttem perature mus tbebelow
10 4‡ (40 †).
XTurn th eSmartKey to position g
(Ypage 122) in th eignition loc k.
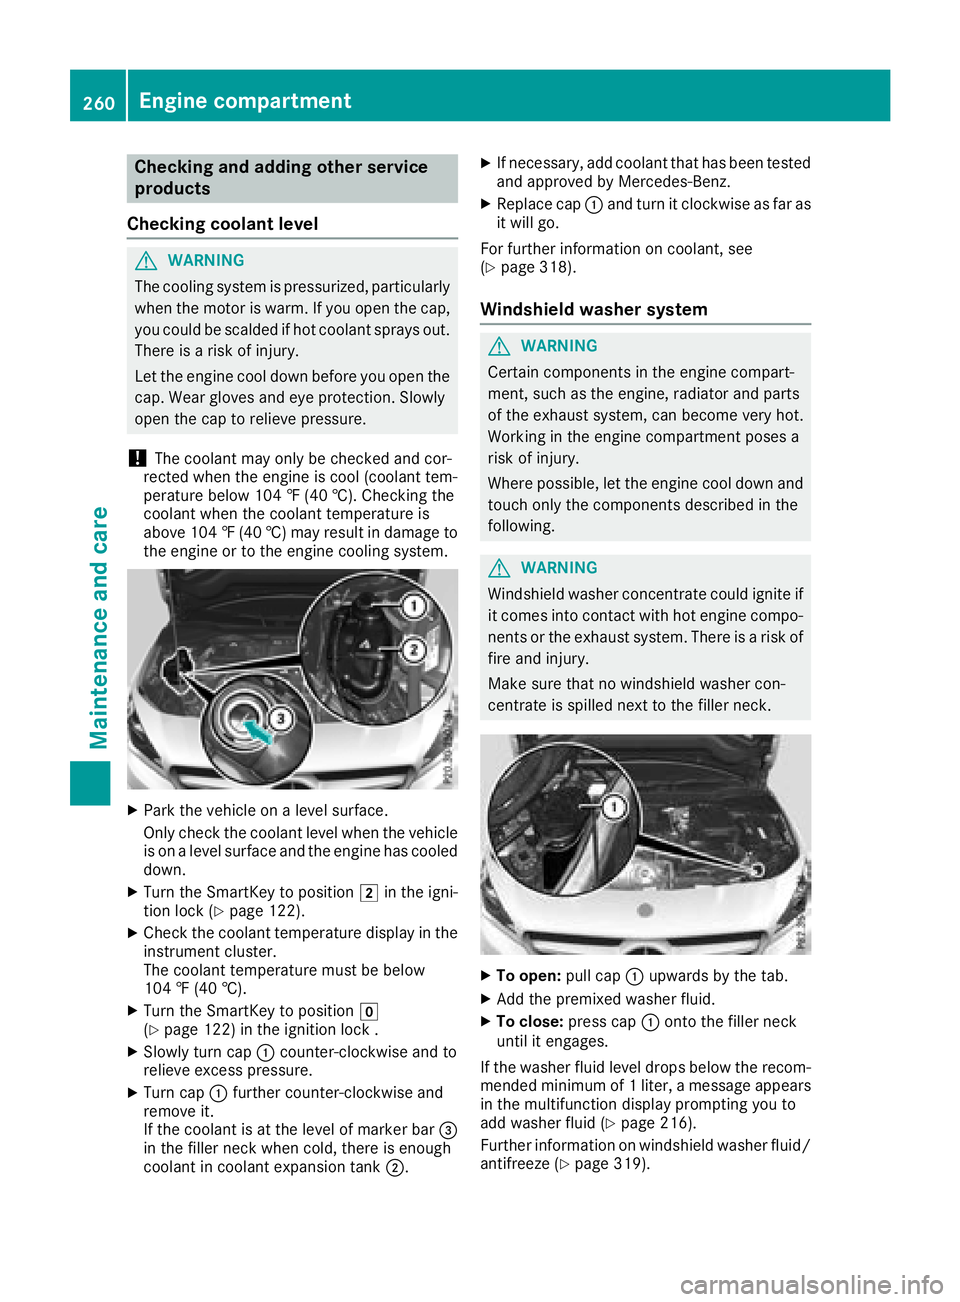
XSlowly turncap : counter-clockwise and to
reliev eexces spressure.
XTurn cap :further counter-clockwise and
remove it .
If th ecoolan tisatt helevel of marke rbar=
in th efiller neck when cold, there is enough
coolan tincoolan texpansion tan k;.
XIf necessary, add coolan ttha thas been tested
and approve dbyMercedes-Benz.
XReplacecap : and tur nitclockwise as far as
it will go.
Fo rfurther information on coolant, see
(
Ypage 318).
Windshiel dwasher system
GWARNIN G
Certain component sintheengin ecom part-
ment, suc hastheengine, radiato rand part s
of th eexhaust system, can become ver yhot.
Working in th eenginec om partmen tposes a
ris kofi njury.
Where possible, let th eenginec ooldown and
touch only th ecom ponent sdescribed in th e
following.
GWARNIN G
Windshield washer concentrate could ignit eif
it comes into contact wit hhot engin ecom po-
nent sort heexhaust system. There is arisko f
fir ea nd injury.
Mak esuret hatnow indshield washer con-
centrat eisspilled next to th efiller neck .
XTo open: pull cap:upwards by th etab.
XAd dthe premixed washer fluid.
XTo close: press cap :onto th efiller neck
until it engages.
If th ewasher flui dlevel drops belo wthe recom-
mended minimum of 1liter, amessage appears
in th emultifunction display promptin gyou to
add washer flui d(
Ypage 216).
Further information on windshield washer fluid/
antifreez e(
Ypage 319).
260Engine compartment
Maintenance and care
Page 268 of 326
XMake sure that the vehicle is atastandstill
and the SmartKey is in key position 2in the
ignition lock.
XOpen the camera cover for cleaning via the
multimedia system (see the separate operat-
ing instructions).
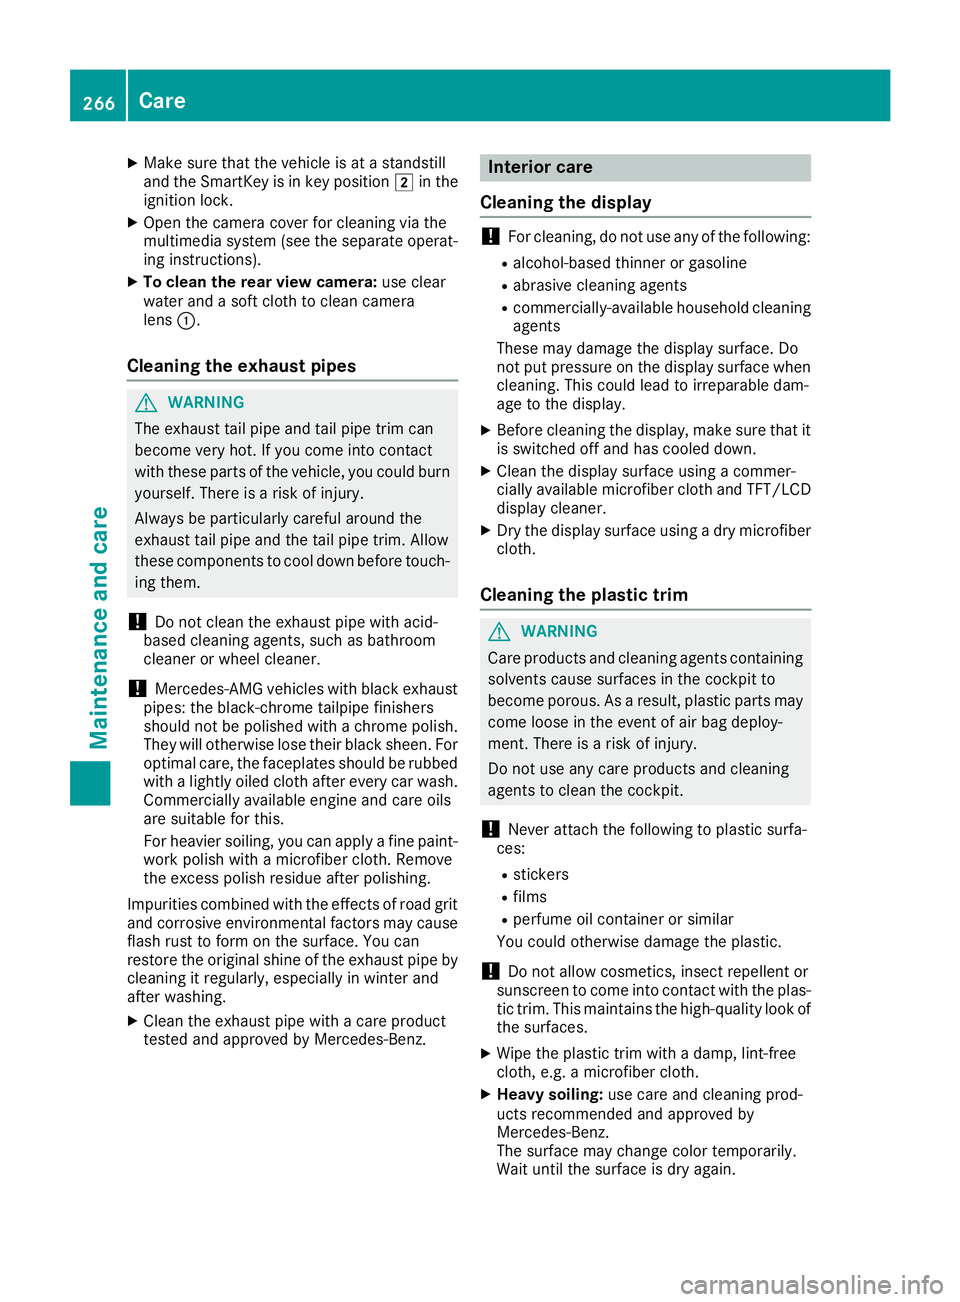
XTo clean the rear view camera: use clear
water and asoft cloth to clean camera
lens :.
Cleaningt he exhaust pipes
GWARNING
The exhaust tail pipe and tail pipe trim can
become very hot. If you come into contact
with these parts of the vehicle, you could burn
yourself. There is arisk of injury.
Always be particularly careful around the
exhaust tail pipe and the tail pipe trim. Allow
these components to cool down before touch-
ing them.
!Do not clean the exhaust pipe with acid-
based cleaning agents, such as bathroom
cleaner or wheel cleaner.
!Mercedes-AMG vehicles with black exhaust
pipes: the black-chrome tailpipe finishers
should not be polished with achrome polish.
They will otherwise lose their black sheen. For
optimal care, the faceplates should be rubbed with alightly oiled cloth after every car wash.
Commercially available engine and care oils
are suitable for this.
For heavier soiling, you can apply afine paint-
work polish with amicrofiber cloth. Remove
the excess polish residue after polishing.
Impurities combined with the effectsofr oad grit
and corrosive environmental factors may cause
flash rust to form on the surface. You can
restore the original shine of the exhaust pipe by
cleaning it regularly,e specially in winter and
after washing.
XClean the exhaust pipe with acare product
tested and approved by Mercedes-Benz.
Interior care
Cleaningt he display
!For cleaning, do not use any of the following:
Ralcohol-based thinner or gasoline
Rabrasive cleaning agents
Rcommercially-availableh ousehold cleaning
agents
These may damage the display surface. Do
not put pressure on the display surface when cleaning. This could lead to irreparable dam-
age to the display.
XBefore cleaning the display,m ake sure that it
is switched off and has cooled down.
XClean the display surface using acommer-
cially available microfiber cloth and TFT/LCD
display cleaner.
XDry the display surface using adry microfiber
cloth.
Cleaningt he plastic trim
GWARNING
Care products and cleaning agents containing solvents cause surfaces in the cockpit to
become porous. As aresult, plastic parts may
come loose in the event of air bag deploy-
ment. There is arisk of injury.
Do not use any care products and cleaning
agents to clean the cockpit.
!Never attach the following to plastic surfa-
ces:
Rstickers
Rfilms
Rperfume oil container or similar
You could otherwise damage the plastic.
!Do not allow cosmetics, insect repellent or
sunscreen to come into contact with the plas-
tic trim. This maintains the high-quality look of
the surfaces.
XWipe the plastic trim with adamp, lint-free
cloth, e.g. amicrofiber cloth.
XHeavy soiling: use care and cleaning prod-
ucts recommended and approved by
Mercedes-Benz.
The surface may change color temporarily.
Wait until the surface is dry again.
266Care
Maintenance and care
Page 273 of 326
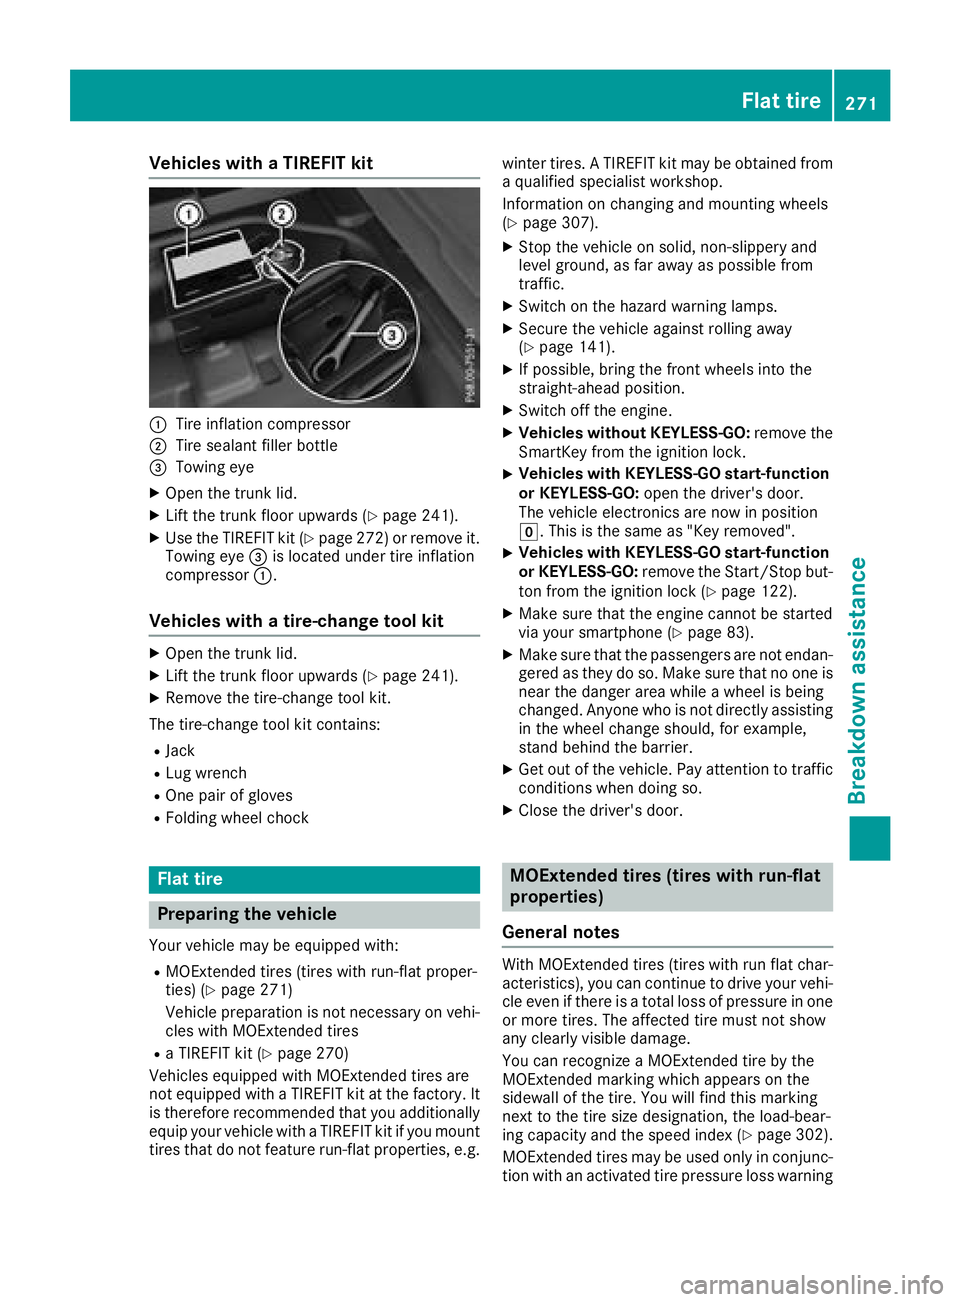
Vehicles withaTIREFI Tkit
:Tire inflation compressor
;Tire sealant fille rbottle
=Towing eye
XOpe nthe trunk lid.
XLiftthe trunk floor upwards (Ypage 241).
XUse the TIREFIT kit (Ypage 272 )orremove it.
Towing eye =is located under tire inflation
compressor :.
Vehicles with atire-chang etool kit
XOpen the trunk lid.
XLift the trunk floor upwards (Ypag e241).
XRemove the tire-change tool kit.
The tire-change tool kit contains:
RJack
RLug wrench
ROne pai rofgloves
RFolding wheelc hock
Flat tire
Preparing the vehicle
Yourvehiclem ay be equipped with:
RMOExtended tires (tires with run-flat proper-
ties) (Ypage271)
Vehiclep reparation is not necessary on vehi-
cles with MOExtended tires
RaT IREFIT kit (Ypag e270)
Vehicles equipped with MOExtended tires are
not equipped with aTIREFIT kit at the factory. It
is therefore recommended that you additionally
equip you rvehiclew ithaTIREFIT kit if you mount
tires that do not feature run-flat properties, e.g. winter tires.
ATIREFIT kit may be obtained from
aq ualified specialist workshop.
Information on changing and mounting wheels
(
Ypag e307).
XStop the vehicleons olid, non-slippery and
level ground ,asfar awa yaspossible from
traffic.
XSwitch on the hazard warning lamps.
XSecure the vehiclea gainst rolling away
(Ypag e141).
XIf possible, bring the front wheels into the
straight-ahead position.
XSwitch off the engine.
XVehicles without KEYLESS-GO: remove the
SmartKey from the ignitio nlock.
XVehicles with KEYLESS-GO start-function
or KEYLESS-GO: open the driver'sd oor.
The vehiclee lectronics are now in position
g.T his is the same as "Key removed".
XVehicles with KEYLESS-GO start-function
or KEYLESS-GO: remove the Start/Stop but-
ton from the ignitio nlock (
Ypag e122).
XMake sure that the engine cannot be started
via you rsmartphone (Ypag e83).
XMake sure that the passengers are not endan-
gered as they do so. Make sure that no one is
near the dange rarea while awhee lisb eing
changed .Anyone who is not directly assisting
in the wheelc hange should, for example,
stand behind the barrier.
XGet out of the vehicle. Pay attention to traffic
conditions when doing so.
XClose the driver'sd oor.
MOExtended tires (tires with run-flat
properties)
General notes
With MOExtended tires (tires with run flat char-
acteristics) ,you can continue to drive you rvehi-
cle even if there is atotal loss of pressure in one
or more tires. The affected tire must not show
any clearly visible damage.
You can recognize aMOExtended tire by the
MOExtended marking which appears on the
sidewal lofthe tire. You wil lfind this marking
next to the tire size designation, the load-bear-
ing capacity and the speedi ndex (
Ypage302).
MOExtended tires may be used only in conjunc-
tion with an activated tire pressure loss warning
Flat tire271
Breakdown assistance
Page 276 of 326
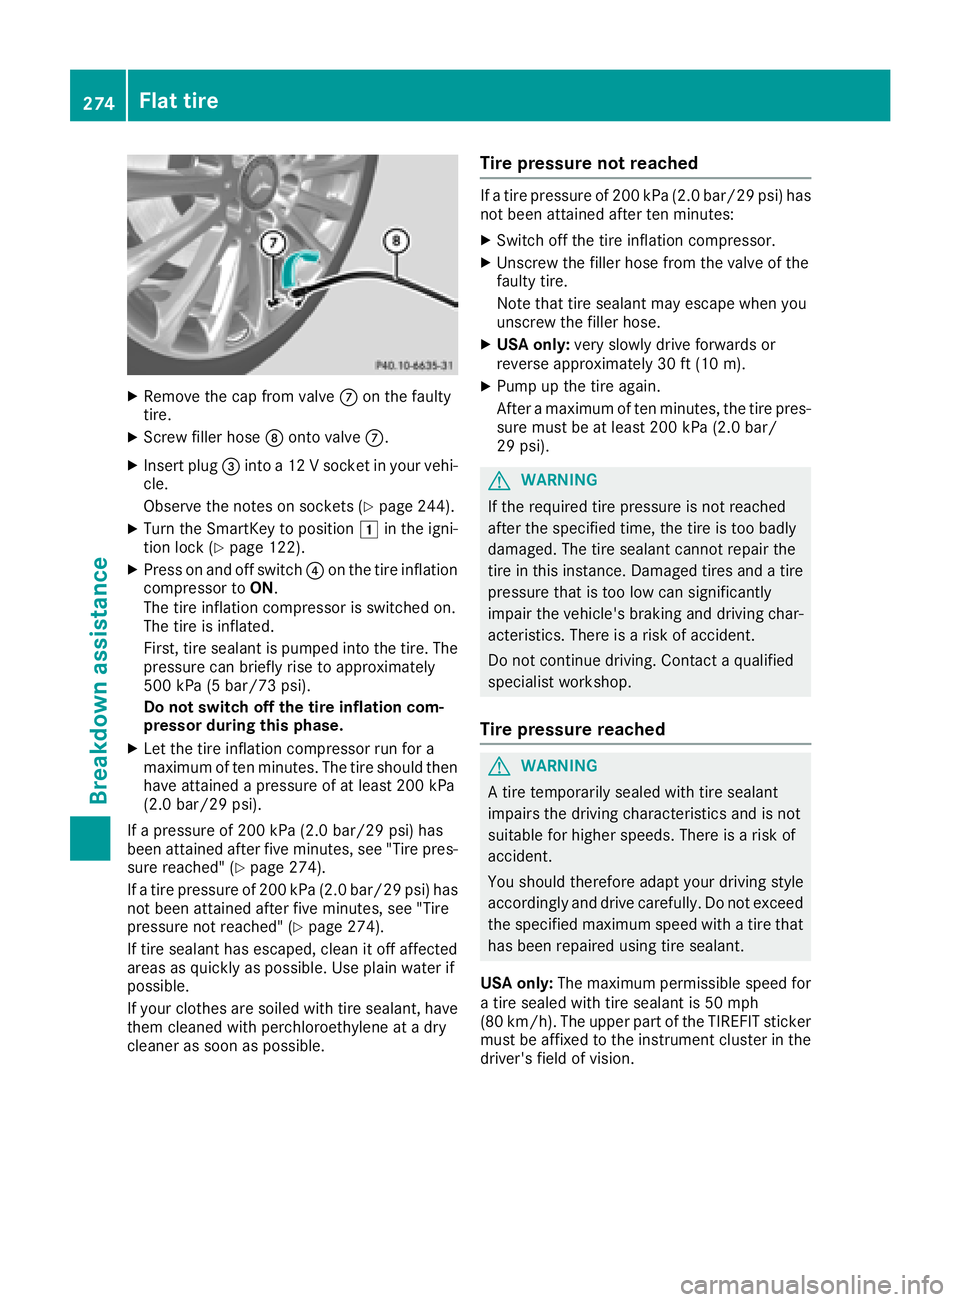
XRemove thecap from valv eC on th efault y
tire.
XScrew filler hos eD onto valv eC.
XInser tplug =intoa12Vs ocketinyour vehi-
cle .
Observ ethe note sons ockets (
Ypage 244).
XTurn theSmartKey to position 1in th eigni-
tion loc k(Ypage 122).
XPress on and off switch ?on th etirei nflation
compressor to ON.
The tire inflation compressor is switched on .
The tire is inflated.
First ,tires ealan tispumped int othe tire. The
pressur ecan briefly ris etoapproximately
50 0k Pa(5 bar/73 psi) .
Do not switch off th etirei nflation com -
pressor during this phase .
XLet thetirei nflation compressor run for a
maximum of te nminutes. The tire should then
hav eattained apressur eofatl east 200kPa
(2.0 ba r/29 psi) .
If ap ressur eof200 kP a(2.0 ba r/29 psi) ha s
been at tained after fiv eminutes, see" Tire pres-
sure reached" (
Ypage 274).
If at ire pressure of 200 kPa (2.0 bar/29 psi) has
not been attaine dafter fiv eminutes, see" Tire
pressure not reached" (
Ypage 274).
If tire sealant hase scaped ,clean it off affected
area sasq uickl yasp ossible. Use plai nwater if
possible.
If your clothesa resoile dwitht ire seala
nt, have
themc leanedwithp erchloroethylene at adry
cleane rassoona spossible.
Tire pressure no treached
Ifat ire pressure of 200 kPa (2.0 bar/29p si)h as
not been attaine dafter ten minutes:
XSwitch off the tire inflatio ncompressor.
XUnscrew the fille rhosef romt he valve of the
faulty tire.
Note thatt ire sealant maye scap ew heny ou
unscrew the fille rhose.
XUS Ao nly: veryslowl ydrive forwards or
revers eapproximately 30 ft (10 m).
XPump up the tire again.
After amaximum of ten minutes, the tire pres-
sure must be at leas t200 kPa (2.0 ba r/
29 psi) .
GWARNING
If the required tire pressure is not reached
afte rthe specified time ,the tire is too badly
damaged. The tire sealant cannot repai rthe
tire in this instance. Damaged tire sand atire
pressure that is too low can significantly
impai rthe vehicle's braking and driving char-
acteristics. There is ariskofa ccident.
Do not continu edriving .Contact aquali fied
specialist workshop.
Tire pressure reached
GWARNING
At ire temporaril yseale dwitht ire sealant
impairs the driving characteristics and is not
suitablef or higher speeds .There is arisko f
accident.
You shoul dtherefore adap tyou rd riving style
accordingly and drive carefully .Donot exceed
the specified maximum speed with atire that
hasb eenr epaired using tire sealant.
USA only: The maximum permissible speed for
at ire seale dwitht ire sealant is 50 mph
(80 km/h). The upper part of the TIREFIT sticker
mus tbea ffixed to the instrument cluster in the
driver'sf ield of vision.
274Flat tire
Breakdown assistance
Page 279 of 326
the householdrubbish .They
must be collected separately and recycle dtoprotect the
environment.
Dispose of batteries in an
environmentall yfriendly
manner. Take discharged
batteries to aquali fied spe-
cialist workshop or aspecial
collectio npoint for used bat-
teries.
!Hav ethe battery checked regularly at a
qualified specialis tworkshop.
Observe the service intervals in the Mainte-
nanc eBookle torcontact aquali fied specialist
workshop for mor einformation.
!Yo us houl dhavea llwork involvin gthe bat-
tery carrie doutataq uali fied specialis twork-
shop. In the exceptiona lcas et hatiti sneces-
sary for yo utodisconnect the battery your-
self, make sure that:
Ryo us witch off the engine and remove the
key .Onv ehicles with KEYLESS-GO, ensure
thatt he ignition is switched off .Check that
al lt he indicator lamps in the instrument
clustera reoff .O therwise, electronic com-
ponents ,suc hast he alternator, mayb e
damaged.
Ryo uf irst remove the negative terminal
clamp and thent he positive terminal
clamp. Never swap the termina lclamps.
Otherwise, the vehicle' selectronic system
maybed amaged.
Rin vehicles with automatic transmission,
the transmission is locked in position P
after disconnecting the battery .The vehicle
is secur ed a
gainst rolling away
.You can
thennol ongerm ovet he vehicle.
The battery and the cove rofthe positive ter-
minal clamp must be installe dsecurel yduring
operation.
Compl ywiths afety precautions and take pro-
tective measures when handling batteries.
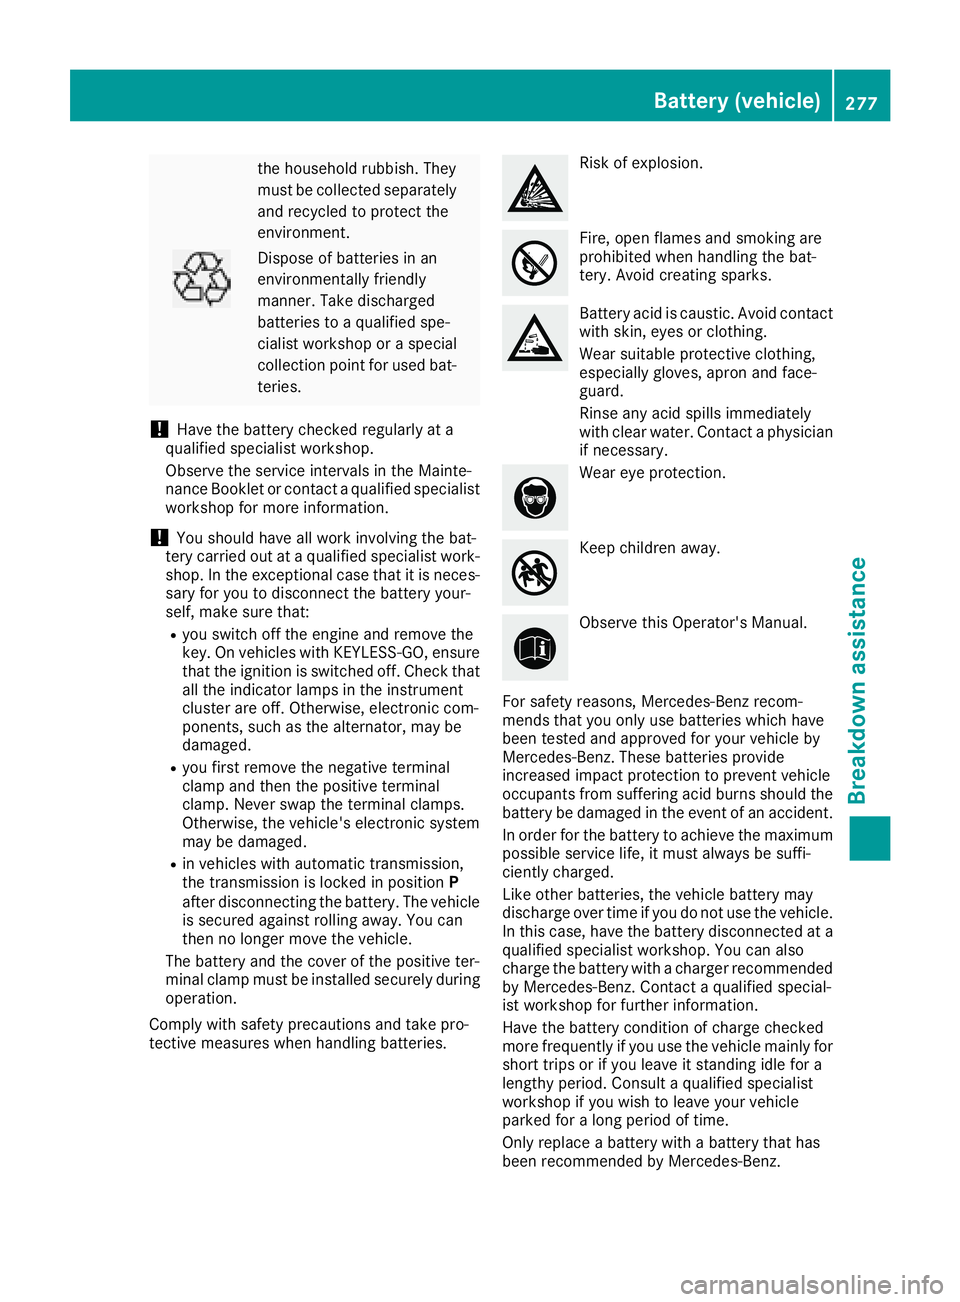
Risk of explosion.
Fire, open flames and smoking are
prohibited when handling the bat-
tery .Avoi dc reating sparks.
Battery aci discaustic. Avoidc ontact
with skin, eyes or clothing.
Wear suitabl eprotective clothing,
especiall ygloves, apron and face-
guard.
Rinse any aci dspills immediately
with clear water. Contact aphysician
if necessary.
Wear ey eprotection.
Kee pchildren away.
Observe thisO perator' sManual.
For safety reasons, Mercedes-Benz recom-
mend sthaty ouonlyusebatteries which have
been tested and approved for your vehicl eby
Mercedes-Benz. Thes ebatteries provide
increasedi mpactprotection to prevent vehicle
occupants froms ufferin gacidb urns shoul dthe
battery be damage dinthe event of an accident.
In order for the battery to achieve the maximum
possibl eservice life, it must always be suffi-
ciently charged.
Like othe rbatteries ,the vehicl ebattery may
discharge ove rtim eify oudo not us ethe vehicle.
In thisc ase, have the battery disconnecte data
qualified specialis tworkshop .You can also
charge the battery with acharge rrecommended
by Mercedes-Benz. Contact aquali fied special-
is tw orkshop for furtheri nformation.
Hav ethe battery condition of charge checked
mor efrequentl yifyouuset he vehicl emainl yf or
short trip sorifyouleav eits tanding idle for a
lengthyp eriod. Consult aquali fied specialist
workshop if yo uwishtol eave your vehicle
parked for alon gp eriodoft ime.
Onlyr eplace abattery with abattery thath as
been recommended by Mercedes-Benz.
Battery (vehicle)277
Breakdow nassistance
Z
Page 280 of 326
Remove theSmartKey if you park th evehicl e
and do no trequire any electrical consumers.
The vehicl ewill then use ver ylittl ee nergy, thus
conserving battery power .
If th epower suppl yhas been interrupted, e.g. if
you reconnect th ebattery, you will hav eto:
Rset th eclock usin gthe multimedia system;
see th eseparat eoperating instruction s
Rreset thefunction for foldin gthe exterio rmir-
ror sin/out automatically, by foldin gthe mir -
ror so ut once (
Ypage 97)
Charging th ebattery
GWARNIN G
During charging and jump-starting ,explosive
gase scan escape from th ebattery. There is a
ris kofane xplosion .
Particularly avoi dfire, open flames, creating
sparks and smoking. Ensur ethe re is sufficien t
ventilation while charging and jump-starting .
Do no tlean ove rabattery.
GWARNIN G
Battery acid is caustic. There is ariskofi njury.
Avoid contact wit hskin, eyes or clothing .Do
no tinhale any battery gases. Do no tlean ove r
th eb attery. Kee pchildren away from batter-
ies. Wash away battery acid immediately wit h
plenty of clean water and seek medical atten -
tion .
GWARNIN G
Ad ischarged battery can freez eattempera-
tures belo wfreezing point. When jump-start -
ing thevehicl eorc harging th ebattery, gase s
can escape from th ebattery. There is arisko f
an explosion .
Allow th efroze nbattery to thaw out before
charging it or jump-starting .
!Only use battery chargers wit hamaximum
charging voltag eof14.8V .
!Only charge th ebattery usin gthe jump-
starting connection point.
The jump-starting connection poin tisinthe
engin ecom partmen t(
Ypage 278).
XOpen thehood.
XConnect th ebattery charge rtothepositive
termina land ground poin tinthesam eorder
as when connecting th edonor battery in th e
jump-starting procedure (
Ypage 278).
If th eindicator/warning lamp sdonotligh tupi n
th ei nstrumen tcluste ratlow temperatures ,itis
ver ylikely that th edischarged battery has fro-
zen. In this cas eyou may neither jump-start th e
vehicl enorcharge th ebattery. The servic elife of
at hawed-out battery may be shorter. The start -
ing characteristics can be impaired, particularly
at low temperatures .Havet he thawed-out bat -
tery checke dataqualified specialist workshop.
Only charge th einstalled battery wit habattery
charge rwhic hh as been tested and approve dby
Mercedes-Benz .Abattery charge runi
ts p
ecially
adapted for Mercedes-Benz vehicles and tested
and approve dbyMercedes-Benz is available as
an accessory. It permit sthe charging of th ebat-
tery in it sinstalled position .Contac tana uthor-
ized Mercedes-Benz Cente rfor further informa-
tion and availability. Read th ebattery charger's
operating instruction sbefore charging th ebat-
tery.
Jump-starting
Fo rthe jump-starting procedure ,use only th ejump-starting connection point, consisting of apos-
itive termina land aground point, in th eenginec om partment.
GWARNIN G
Battery acid is caustic. There is ariskofi njury.
Avoid contact wit hskin, eyes or clothing .Donotinhale any battery gases. Do no tlean ove rthe
battery. Kee pchildren away from batteries. Wash away battery acid immediately wit hplenty of
clean water and seek medical attention .
278Jump-starting
Breakdown assistance
Page 282 of 326
Make sure that:
RThe jumper cables are not damaged.
RNon-insulated parts of the terminal clamps do not come into contact with other metal parts while
the jumper cables are connected to the battery.
RThe jumper cables cannot come into contact with parts that can move when the engine is running,
such as the V-belt pulleyorthe fan.
XSecure the vehicle by applying the electric parking brake.
XShift the transmission to position j.
XTurn the SmartKey to positiongin the ignition lock and remove it.
XSwitch off all electrical consumers, e.g. rear window defroster, lighting, etc.
XOpen the hood.
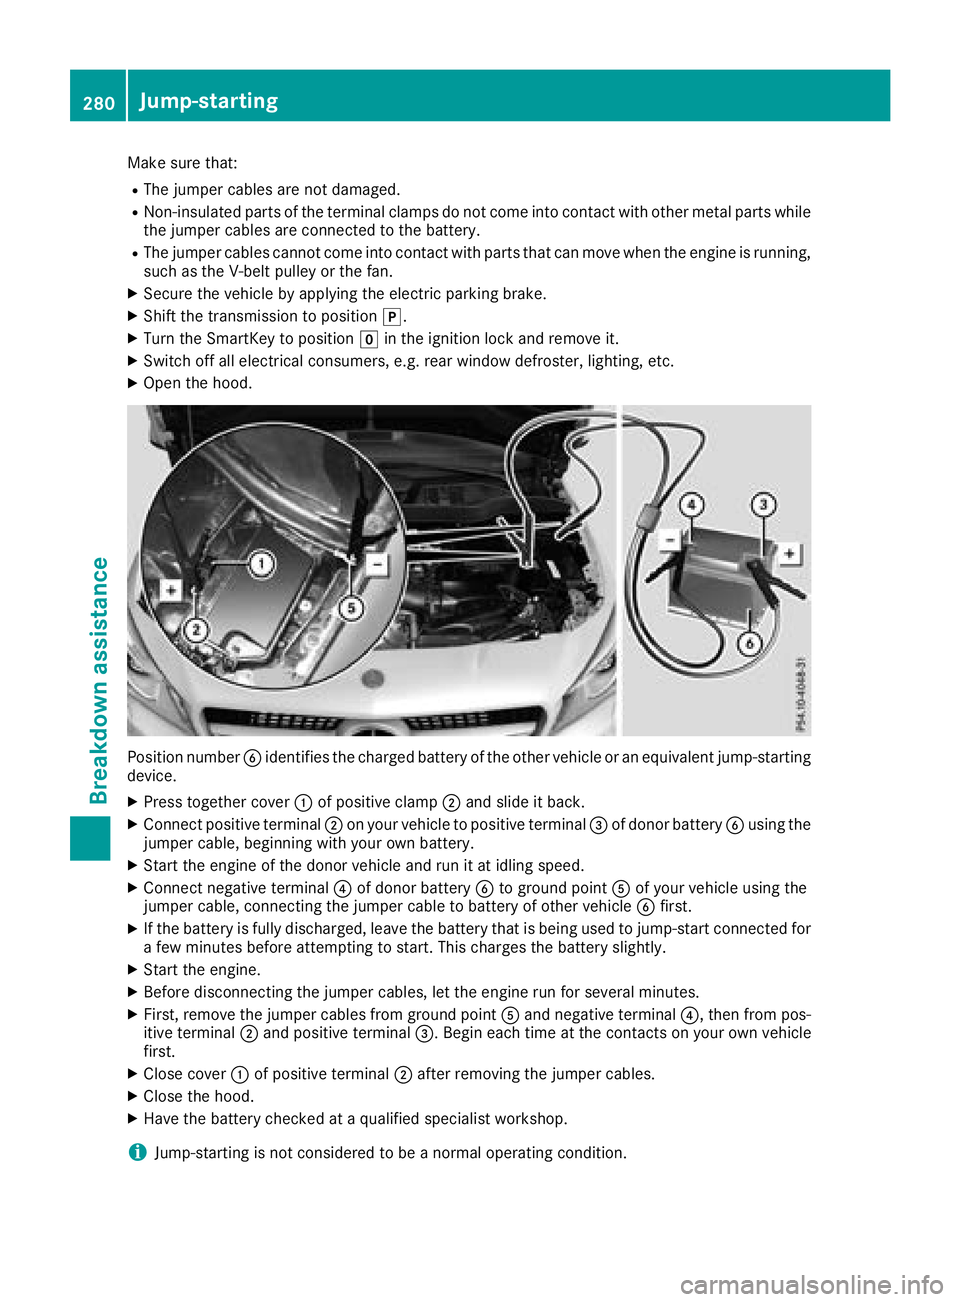
Position number Bidentifies the charged battery of the other vehicle or an equivalent jump-starting
device.
XPress together cover :of positive clamp ;and slide it back.
XConnect positive terminal ;on your vehicle to positive terminal =of donor battery Busing the
jumper cable, beginning with your own battery.
XStart the engine of the donor vehicle and run it at idling speed.
XConnect negative terminal ?of donor battery Bto ground point Aof your vehicle using the
jumper cable, connecting the jumper cable to battery of other vehicle Bfirst.
XIf the battery is fully discharged, leave the battery that is being used to jump-start connected for
afew minutes before attempting to start. This charges the battery slightly.
XStart the engine.
XBefore disconnecting the jumper cables, let the engine run for several minutes.
XFirst, remove the jumper cables from ground point Aand negative terminal ?,then from pos-
itive terminal ;and positive terminal =.Begin each time at the contacts on your own vehicle
first.
XClose cover :of positive terminal ;after removing the jumper cables.
XClose the hood.
XHave the battery checked at aqualified specialist workshop.
iJump-starting is not considered to be anormal operating condition.
280Jump-starting
Breakdown assistance