2018 MERCEDES-BENZ CLA COUPE key
[x] Cancel search: keyPage 283 of 326
iJumper cablesand further informatio nregardingj ump-startin gcan be obtaine datany qualified
specialist workshop.
Towing and tow-starting
Important safety notes
GWARNING
Functionsr elevanttos afety are restricted or
no longer available if:
Rth ee ngine is no trunning.
Rtheb rakes ystem or th epower steering is
malfunctioning.
Rthere is amalfunctio ninthevoltage supply
or th evehicle's electrical system.
If your vehicle is beingt owed, muchm ore
force may be necessaryt osteer or brake.
Thereisar isk of an accident.
In such cases, use atow bar. Before towing,
makes ure that th esteering moves freely.
GWARNING
You can no longer steer th evehicle if the
steering wheel lockh as been engaged. There
is ar isk of an accident.
Always switch off th eignitio nwhen towing the
vehicle with atow cable or atow bar.
GWARNING
When towing or tow-startin ganother vehicle
and its weight is greater than th epermissible
gross weight of your vehicle ,the :
Rthet ow ing eye could detach itself
Rthev ehicle/trailer combinatio ncould roll-
over.
Thereisar isk of an accident.
When towing or tow-startin ganother vehicle,
its weight shouldn otbe greater than th eper-
missible gross weight of your vehicle.
Details on th epermissible gross vehicle weight
of your vehicle can be foun donthevehicle iden-
tification plate(
Ypage 314).
!When Activ eBrake Assist,D istance Pilot
DISTRONIC or th eHOLDfunction is activated, th
ev ehicle brakes automatically in certain
situations.
To avoid damage to th evehicle ,deactivate
these systems in th efollowing or similar sit-
uations:
Rwhen towing th evehicle
Rin th ecar wash
!Makes ure that th eelectric parking brak eis
released. If th eelectric parking brakeisf aulty,
visitaq ualifiedspecialist workshop.
!Only secure th etow rope or to wbar at the
towing eyes. Otherwise, th evehicle coul dbe
damaged.
!Do no tuse th etow ing eyes for recoveryp ur-
posesast hisc oul dd amage th evehicle .Ifin
doubt,r ecover th evehicle with acrane.
!When towing ,pull away slowly and
smoothly. If th etractive power is to ohigh,t he
vehicle scoul dbed amaged.
!The vehicle can be towed amaximum of
30 miles (50km ). The towing speed of 30 mph
(50km/h) must no tbeexceeded.
If th evehicle has to be towed moret han
30 miles (50km), th efront axle must be raised
or th eentire vehicle raiseda nd transported.
!Do nottow with sling-type equipment .This
coul ddamage th evehicle.
!When towing vehicle swith KEYLESS-GO,
use th ekey instead of th eStart/Sto pbutton.
Otherwise, th eautomatic transmission may
shifttop ositionPwhen th edriver' sorf ront-
passenger door are opened, whichc ouldlead
to damage to th etransmission.
!Vehicles with automatic transmission must
no tbes tarted by tow-starting. This coul doth-
erwis edamage th etransmission.
It is bette rtohave th evehicle transported than
to have it towed away.
If th evehicle can no longer be driven because of
an accidentorb reakdown,you have thefollow-
ing options:
RTransportin gthe vehicle.
Towing and tow-starting281
Breakdown assistance
Z
Page 284 of 326
Asarule, yous houl dhavet he vehicl etrans-
ported.
RTowing the vehicl ewithat ow ropeort ow bar.
Onlyt ow the vehicl einexceptionalc ases.
The battery must be connected and charged.
Otherwise, you:
Rcanno tturn the SmartKeytop osition2in
the ignition lock.
Rcanno trelease the electri cparking brake.
Rcanno tshift the transmission to position i.
The functio nofthe electri cparking brake and
the parking lock is dependent on the on-board
voltage.
If the on-board voltag eislowor if ther eisasys-
tem malfunction:
Rthe electri cparking brake mayn ot be applied
in certain circumstances ,or
Rit maynol ongerbep ossibl etos hift the trans-
mission to position j
Switch off non-essentia lconsumers, e.g .the
radio.
Disar mthe automatic locking feature before the
vehicl eistowed (
Ypage 187). Yo ucould other-
wise be locked outw henp ushing or towing the
vehicle.
Installing/removin gthe towin geye
Installing the towin geye
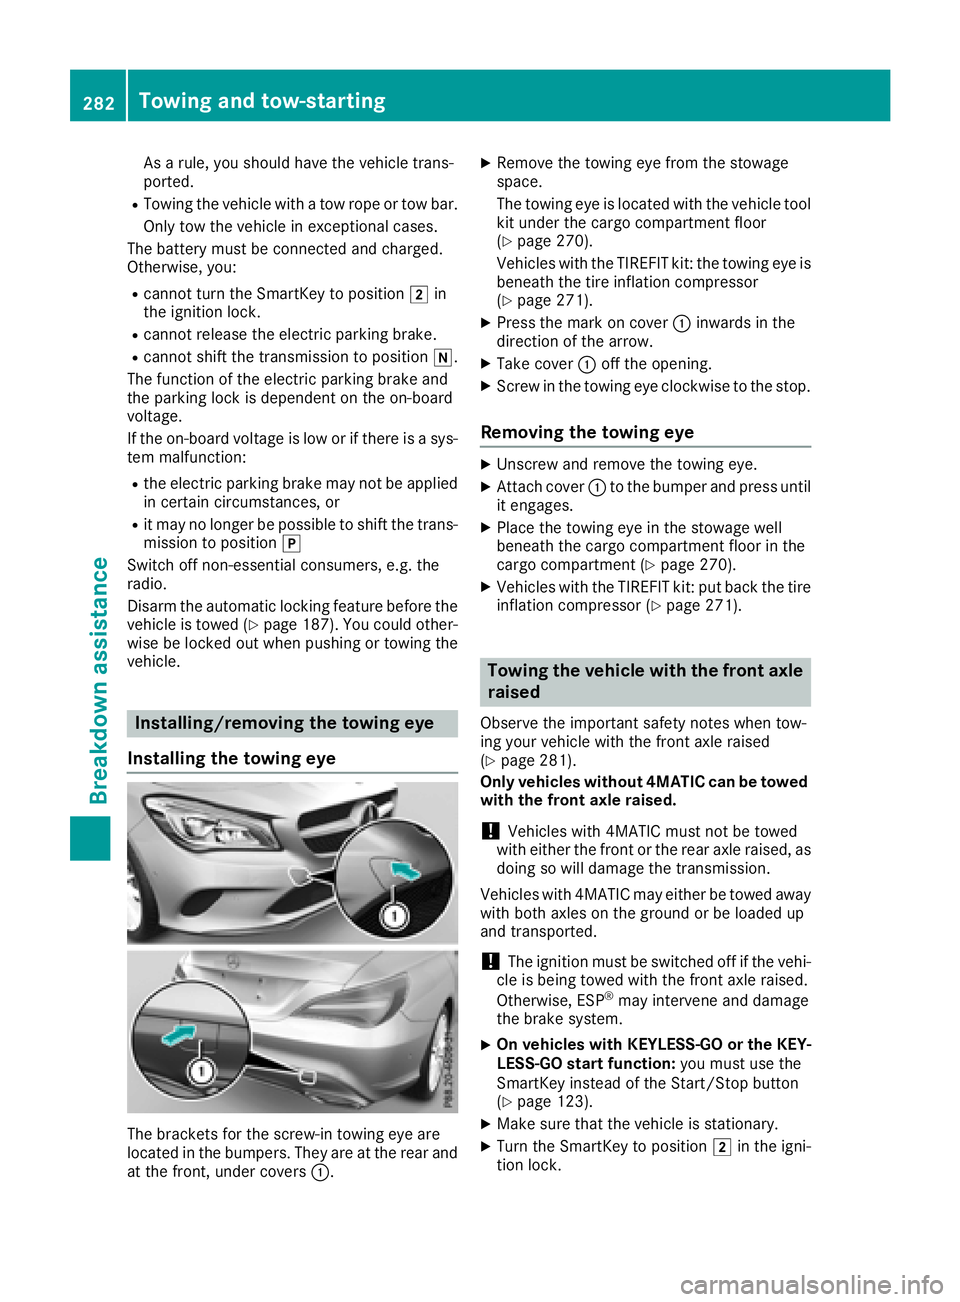
The brackets for the screw-i ntowing ey eare
locate dinthe bumpers. The yareat the rea rand
at the front, under covers :.
XRemove the towing eyefrom the stowage
space.
The towing ey eislocate dw itht he vehicl etool
kit under the cargo compartment floor
(
Ypage 270).
Vehicles with the TIREFIT kit: the towing ey eis
beneath the tire inflation compressor
(
Ypage 271).
XPress the mark on cover :inwards in the
direction of the arrow.
XTake cover :off the opening.
XScrew in the towing ey eclockwise to the stop.
Removing the towin geye
XUnscrew and remove the towing eye.
XAttach cover :to the bumpe rand press until
it engages.
XPlace the towing ey einthe stowag ewell
beneath the cargo compartment floor in the
cargo compartment (
Ypage 270).
XVehicles with the TIREFIT kit: pu tbackt he tire
inflation compressor (Ypage 271).
Towin gthe vehicle with the fron taxle
raised
Observ ethe important safety notes when tow-
ing your vehicl ewitht he front axl eraised
(
Ypage 281).
Only vehicle swithou t4MATIC can be towed
with the fron taxler aised.
!Vehicles with 4MATIC must not be towed
with either the front or the rea raxler aised, as
doing so will damage the transmission.
Vehicles with 4MATIC maye ither be towed away
with both axles on the ground or be loaded up
and transported.
!The ignition must be switched off if the vehi-
cle is being towed with the front axl eraised.
Otherwise, ESP
®mayi ntervene and damage
the brake system.
XOn vehicle swithK EYLESS -GO or the KEY-
LESS-GO start function: youm ustu se the
SmartKeyi nsteadofthe Start/Stop button
(
Ypage 123).
XMake sure thatt he vehicleisstationary.
XTurn the SmartKeytop osition 2in the igni-
tio nlock.
282Towin gand tow-starting
Breakdo wn assis tance
Page 285 of 326
XWhen the vehicle is stationary, depress the
brake pedal and keep it depressed.
XShift the automatic transmission to position
j.
XRelease the brake pedal.
XRelease the electric parking brake.
XSwitchoff the automatic locking
(Ypage 187).
XSwitc hont he hazard warning lamps
(Ypage 102).
XTurn the SmartKey in the ignition lock to posi-
tion gand leave the SmartKey in the ignition
lock.
Towing avehicle with both axles on
the ground
It is importan tthat you observe the safety
instruction swhen towing away your vehicle
(
Ypage 281).
XOn vehicles with KEYLESS-GO or the KEY-
LESS-GO star tfunction: you must use the
SmartKey instead of the Start/Stop button
(
Ypage 123).
The automatic transmission automatically shifts
to position jwhen you open the driver's or
front-passenger door or when you remove the
SmartKey from the ignition lock. In order to
ensure that the automatic transmission stays in
position iwhen towing away the vehicle, you
must observe the following points:
XMake sure that the vehicle is stationary.
XTurn the SmartKey to position 2in the igni-
tion lock.
XDepress and hold the brake pedal.
XShift the automatic transmission to position
i.
XLeave the SmartKey in position 2in the igni-
tion lock.
XRelease the brake pedal.
XRelease the electric parking brake.
XSwitc hont he hazard warning lamps
(Ypage 102).
iIn order to signal achange of direction when
towing the vehicle with the hazard warning
lamps switched on, use the combination
switch as usual. In this case, only the indicator
lamps for the direction of travel flash. After resetting the combination switch, the hazard
warning lamp start
sflashing again.
Transporting the vehicle
4MATIC vehicles or vehicles with auto-
matic transmission
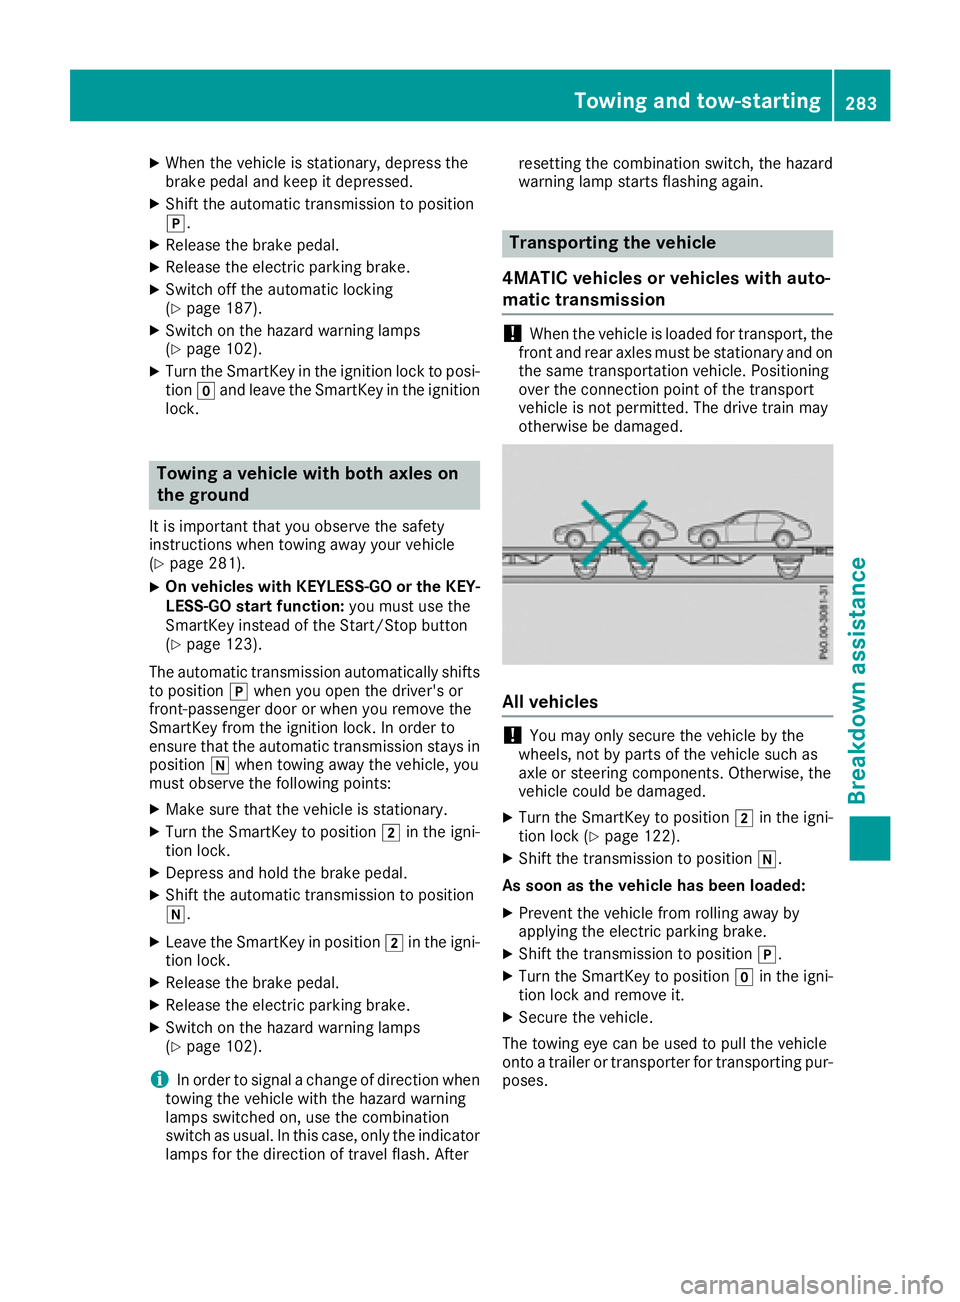
!When the vehicle is loaded for transport, the
fronta nd rear axles must be stationary and on
the same transportation vehicle. Positioning
over the connection point of the transport
vehicle is not permitted. The drive train may
otherwise be damaged.
All vehicles
!You may only secure the vehicle by the
wheels, not by parts of the vehicle such as
axle or steerin gcomponents. Otherwise, the
vehicle could be damaged.
XTurn the SmartKey to position 2in the igni-
tion lock (Ypage 122).
XShift the transmission to position i.
As soon as the vehicle has been loaded:
XPreventt he vehicle from rolling away by
applying the electric parking brake.
XShift the transmission to position j.
XTurn the SmartKey to positiongin the igni-
tion lock and remove it.
XSecure the vehicle.
The towing eye can be used to pull the vehicle
ont oat railer or transporter for transportin gpur-
poses.
Towing and tow-starting283
Breakdown assistance
Z
Page 286 of 326
Noteson4 MATIC vehicles
!
Vehicle swith4 MATIC must not be towed
with eithe rthe front or the rea raxler aised, as
doing so will damage the transmission.
Vehicle swith4 MATIC mayo nlye ithe rbet owed
away with both axles on the ground or be loaded
up and transported.
If the vehicle' stransmission, front, or rea raxlei s
damaged, have the vehicl etransporte dona
truck or trailer.
In the even tofdamagetot he electrical sys-
tem:
If the battery is defective, the automatic trans-
mission will be locked in position j.Tos hift the
automatic transmission to position i,you
must provide powe rtothe vehicle' son-board
electrica lsys temint he same wa yaswhenjump-
starting (
Ypage 278).
Have the vehicl etransporte donatransporte ror
trailer.
Tow-startin g(em ergency engine
starting)
!
Vehicle switha utomatic transmission must
not be tow-started .You could otherwis edam -
ag et he automatic transmission.
iYouc an find information on "Jump-starting"
under (Ypage 278).
Fuses
Important safety notes
GWARNING
If yo umanipulate or bridg eafaulty fuse or if
yo ur eplace it with afusew ithah igheramper -
age, the electric cable scould be overloaded.
This could resul tinafire. There is ariskofa n
accident and injury.
Alway sreplace faulty fusesw itht he specified
new fusesh avingthe correc tamperage.
!Onlyu sefusest hath aveb eena pproved for
Mercedes-Benz vehicles and which have the
correc tfus er ating for the systemc oncerned.
Onlyu sefusesm arked with an "S" .Other- wise,c
omponents or systems could be dam-
aged.
!Make sure tha tnomoisture can ente rthe
fuse bo xwhent he cover is open.
!When closing the cover, make sure tha titis
lying correctly on the fuse box. Moistur eseep-
ing in or dirt could otherwis eimpair the oper-
ation of the fuses.
Th ef uses in your vehicl eserve to close down
faulty circuits .Ifafuse blows, al lthe compo-
nents on the circuit and their functions stop
operating.
Blown fusesm ustber eplaced with fusesoft he
same rating ,which yo ucan recognize by the
color and value. Th efuser ating sarelistedint he
fuse allocation chart.
Th efusea lloc atio
nc h
art is in the fuse bo xinthe
front-passenge rfootwell (Ypage 285).
If an ewly inserte dfusea lsob lows ,havet he
cause traced and rectifie dataqualified special-
is tw orkshop ,e.g.ana uthorized Mercedes-Benz
Center.
Before changin gafuse
XSecure the vehicl eagain st rolling away
(Ypage 141).
XSwitch off al lelectrica lconsumers.
XVehicle swithout KEYLESS-GO: remove the
SmartKeyf romthe ignition lock.
XVehicle swithK EYLESS -GOs tart-function
or KEYLESS-GO: open the driver's door.
Th ev ehicl eelectronics ar enow in position
g .Thisc orresponds to the SmartKeyb eing
remove dfromt he ignition.
Th ef uses arel oc ated in variou sfuseb oxes:
RFuse bo xinthe engine compartment on the
left-hand side of the vehicle, when viewed in
the directio noftravel
RFuse bo xinthe front-passenge rfootwell
Th efus ea lloc atio nchart is on the fuse bo xinthe
front-passenge rfootwell (
Ypage 285).
284Fuses
Breakdow nassistance
Page 296 of 326
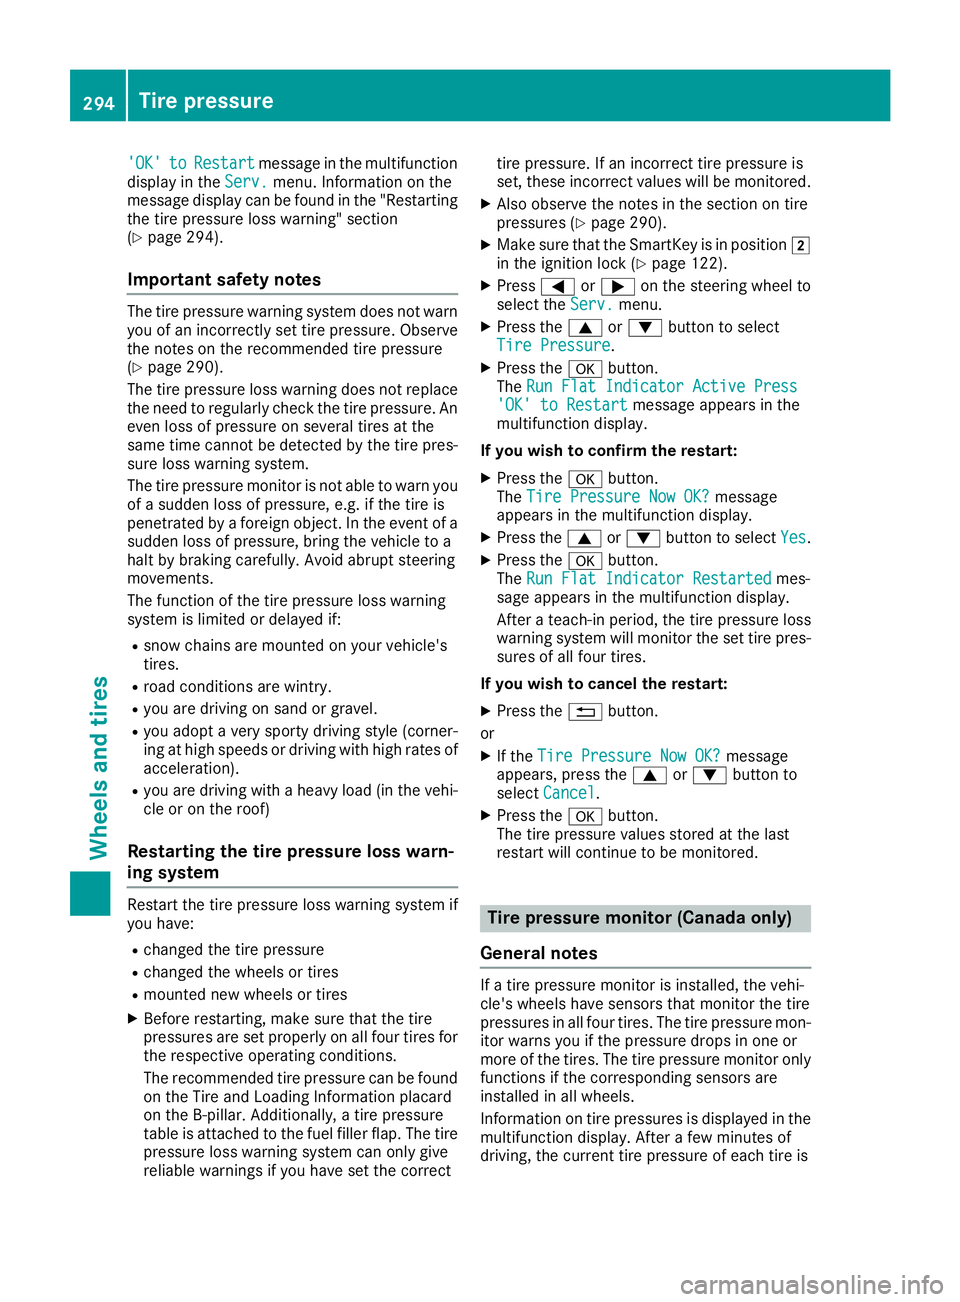
'OK'toRestartmessage in the multifunction
displayint heServ.menu. Information on the
message displayc an be found in the "Restarting
the tire pressure loss warning" section
(
Ypage 294).
Important safety notes
The tire pressure warning system does not warn
you of an incorrectly set tire pressure. Observe
the notes on the recommended tire pressure
(
Ypage 290).
The tire pressure loss warning does not replace
the need to regularly check the tire pressure. An
even loss of pressure on several tires at the
same time cannot be detected by the tire pres-
sure loss warning system.
The tire pressure monitor is not able to warn you
of as udden loss of pressure, e.g. if the tire is
penetrated by aforeign object. In the event of a
sudden loss of pressure, bring the vehicle to a
halt by braking carefully.A void abrupt steering
movements.
The function of the tire pressure loss warning
system is limited or delayed if:
Rsnow chains are mounted on your vehicle's
tires.
Rroad conditions are wintry.
Ryou are driving on sand or gravel.
Ryou adopt avery sporty driving style (corner-
ing at high speeds or driving with high rates of acceleration).
Ryou are driving with aheavy load (in the vehi-
cle or on the roof)
Restarting the tire pressure loss warn-
ing system
Restart the tire pressure loss warning system if you have:
Rchanged the tire pressure
Rchanged the wheels or tires
Rmounted new wheels or tires
XBefore restarting, make sure that the tire
pressures are set properly on all four tires for
the respective operating conditions.
The recommended tire pressure can be found
on the Tire and Loading Information placard
on the B-pillar. Additionally,at ire pressure
table is attached to the fuel filler flap. The tire
pressure loss warning system can only give
reliable warnings if you have set the correct tire pressure. If an incorrect tire pressure is
set, these incorrect valuesw
ill be monitored.
XAlso observe the notes in the section on tire
pressures (Ypage 290).
XMake sure that the SmartKey is in position 2
in the ignition lock (Ypage 122).
XPress =or; on the steering wheel to
select the Serv.menu.
XPress the9or: button to select
Tire Pressure.
XPress the abutton.
The Run Flat Indicator Active Press
'OK' to Restartmessage appears in the
multifunction display.
If you wish to confirm the restart:
XPress the abutton.
The Tire Pressure Now OK?message
appears in the multifunction display.
XPress the 9or: button to select Yes.
XPress theabutton.
The Run Flat Indicator Restartedmes-
sage appears in the multifunction display.
After ateach-in period, the tire pressure loss
warning system will monitor the set tire pres-
sures of all four tires.
If you wish to cancelt he restart:
XPress the%button.
or
XIf the Tire Pressure Now OK?message
appears, press the 9or: button to
select Cancel
.
XPress the abutton.
The tire pressure valuess tored at the last
restart will continue to be monitored.
Tire pressure monitor (Canada only)
General notes
If at ire pressure monitor is installed, the vehi-
cle's wheels have sensors that monitor the tire
pressures in all four tires. The tire pressure mon-
itor warns you if the pressure drops in one or
more of the tires. The tire pressure monitor only
functions if the corresponding sensors are
installed in all wheels.
Information on tire pressures is displayed in the
multifunction display. After afew minutes of
driving, the current tire pressure of each tire is
294Tire pressure
Wheels and tires
Page 298 of 326
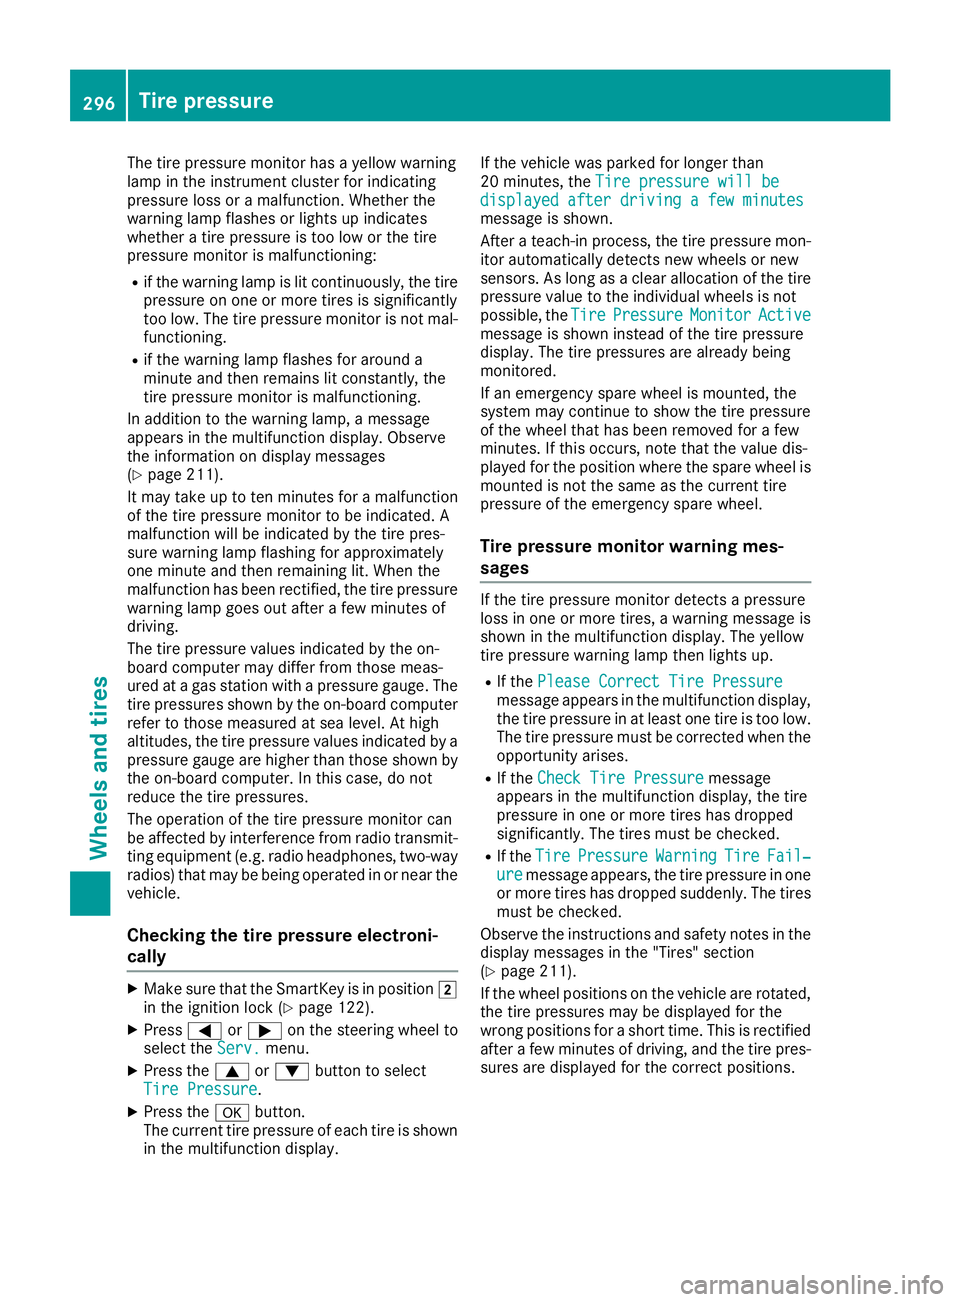
The tire pressure monitor hasayellow warning
lamp in the instrument cluster for indicating
pressure loss or amalfunction. Whether the
warning lamp flashes or lights up indicates
whether atire pressure is too low or the tire
pressure monitor is malfunctioning:
Rif the warning lamp is lit continuously, the tire
pressure on one or more tires is significantly
too low. The tire pressure monitor is not mal- functioning.
Rif the warning lamp flashes for around a
minute and then remains lit constantly, the
tire pressure monitor is malfunctioning.
In addition to the warning lamp, amessage
appears in the multifunction display.O bserve
the information on display messages
(
Ypage 211).
It may take up to ten minutes for amalfunction
of the tire pressure monitor to be indicated. A
malfunction will be indicated by the tire pres-
sure warning lamp flashing for approximately
one minute and then remaining lit. When the
malfunction has been rectified, the tire pressure
warning lamp goes out after afew minutes of
driving.
The tire pressure values indicated by the on-
board computer may differ from those meas-
ured at agas station with apressure gauge. The
tire pressures shown by the on-board computer
refer to those measured at sea level. At high
altitudes, the tire pressure values indicated by a
pressure gauge are higher than those shown by the on-board computer. In this case, do not
reduce the tire pressures.
The operation of the tire pressure monitor can
be affected by interferenc efrom radio transmit-
ting equipment (e.g. radio headphones, two-way
radios) that may be being operated in or near the vehicle.
Checking the tire pressur eelectroni-
cally
XMake sure that the SmartKey is in position 2
in the ignition lock (Ypage 122).
XPress =or; on the steerin gwheel to
select the Serv.menu.
XPress the9or: button to select
Tire Pressure.
XPress the abutton.
The current tire pressure of each tire is shown
in the multifunction display. If the vehicle was parked for longer than
20 minutes, the
Tire pressure will be
displayed after driving afew minutesmessage is shown.
After ateach-in process, the tire pressure mon-
itor automatically detect snew wheels or new
sensors. As long as aclear allocation of the tire
pressure value to the individual wheels is not
possible, the Tire
PressureMonitorActivemessage is shown instead of the tire pressure
display.The tire pressures are already being
monitored.
If an emergencys pare wheel is mounted, the
system may continue to show the tire pressure
of the wheel that has been removed for afew
minutes. If this occurs, notet hat the value dis-
played for the position where the spare wheel is
mounted is not the same as the current tire
pressure of the emergencys pare wheel.
Tire pressuremonitor warning mes-
sages
If the tire pressure monitor detect sapressure
loss in one or more tires, awarning message is
shown in the multifunction display.T he yellow
tire pressure warning lamp then lights up.
RIf the Please Correct Tire Pressuremessage appears in the multifunction display,
the tire pressure in at least one tire is too low.
The tire pressure must be corrected when the
opportunit yarises.
RIf the Check Tire Pressuremessage
appears in the multifunction display,t he tire
pressure in one or more tires has dropped
significantly. The tires must be checked.
RIf the TirePressureWarningTireFail‐uremessage appears, the tire pressure in one
or more tires has dropped suddenly. The tires
must be checked.
Observe the instructions and safety notes in the
display messages in the "Tires" section
(
Ypage 211).
If the wheel positions on the vehicle are rotated,
the tire pressures may be displayed for the
wrong positions for ashort time. This is rectified
after afew minutes of driving, and the tire pres-
sures are displayed for the correctp ositions.
296Tirepressure
Wheels and tires
Page 299 of 326
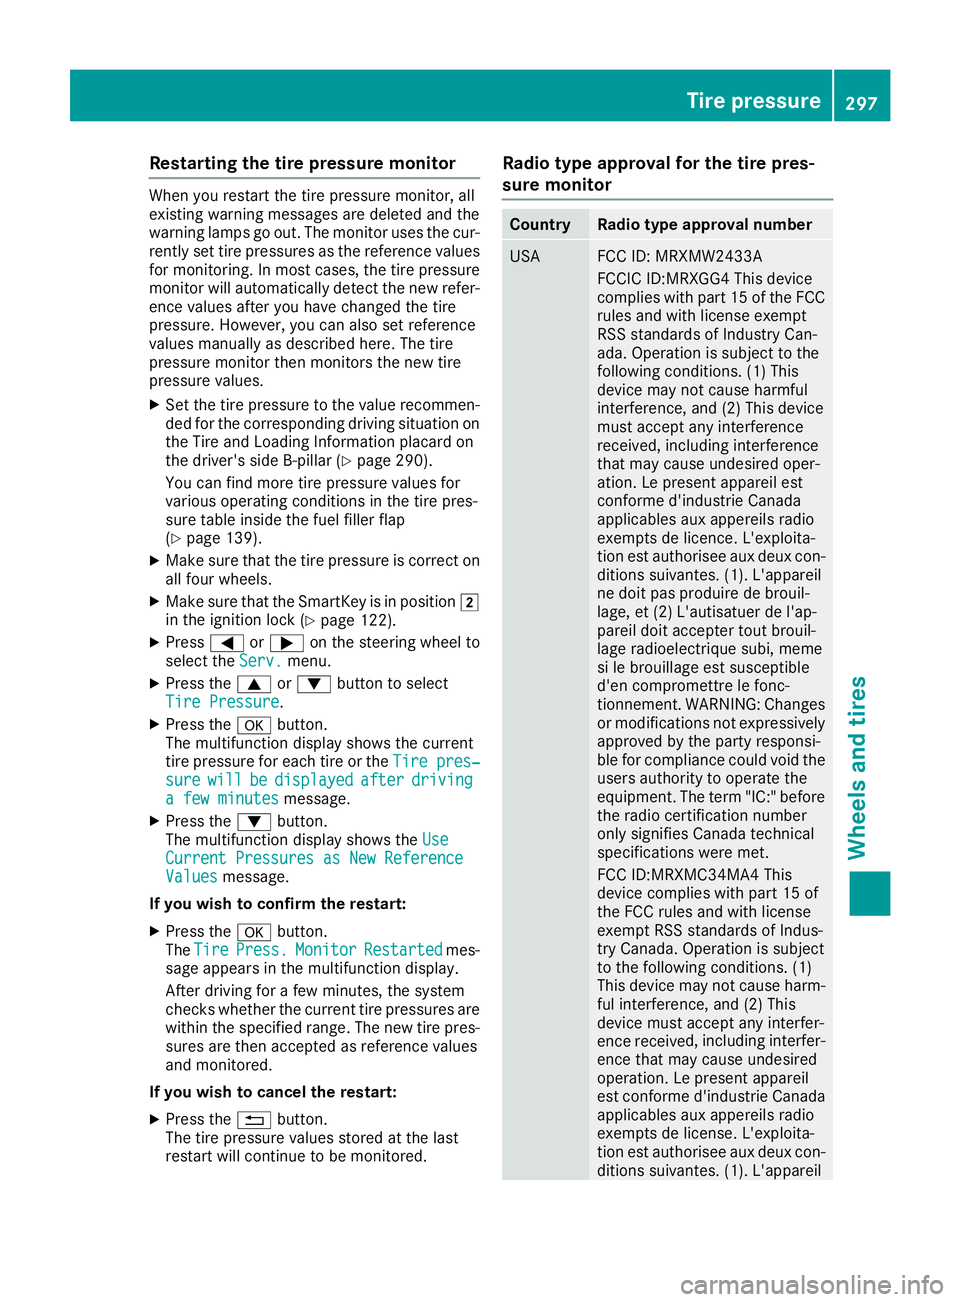
Restarting the tire pressure monitor
Whenyourestart the tire pressure monitor, all
existing warning messages are deleted and the
warning lamps go out. The monitor uses the cur-
rentlys et tire pressures as the reference values
for monitoring. In most cases, the tire pressure
monitor will automaticall ydetect the new refer-
ence value safteryou have changed the tire
pressure. However, yo ucan also set reference
value smanually as described here. The tire
pressure monitor then monitors the new tire
pressure values.
XSet the tire pressure to the value recommen-
ded for the corresponding driving situation on
the Tire and Loading Information placard on
the driver'ss ideB -pillar (
Ypage 290).
Yo uc an find more tire pressure value sfor
various operating conditions in the tire pres-
sure table inside the fue lfille rflap
(
Ypage 139).
XMake sure that the tire pressure is correct on
al lf ourw heels.
XMake sure that the SmartKey is in position 2
in the ignition lock (Ypage 122).
XPress =or; on the steering wheel to
select the Serv.menu.
XPress the9or: button to select
Tire Pressure.
XPress the abutton.
The multifunction display shows the current
tire pressure for each tire or the Tire pres‐
surewillbedisplayedafterdrivingafew minutesmessage.
XPress the :button.
The multifunction display shows the Use
Current PressuresasNew ReferenceValuesmessage.
If you wish to confirm the restart:
XPress the abutton.
The TirePress.MonitorRestartedmes-
sage appears in the multifunction display.
After driving for afew minutes, the system
checks whethert he current tire pressures are
within the specified range. The new tire pres-
sures are then accepted as reference values
and monitored.
If you wish to cance lthe restart:
XPress the %button.
The tire pressure value sstoredatt he last
restart will continu etobemonitored.
Radio type approval for the tire pres-
sure monitor
CountryRadio type approval number
USAFCC ID: MRXMW2433A
FCCIC ID:MRXGG4 Thisd evice
complies with part 15 of the FCC
rules and with license exempt
RSS standard sofIndustry Can-
ada. Operation is subject to the
following conditions .(1) This
device may not cause harmful
interference, and (2) Thisd evice
mus taccept any interference
received, including interference
that may cause undesired oper-
ation. Le present appareile st
conforme d'industrieC anada
applicables au xappereils radio
exempts de licence. L'exploita-
tion est authorisee au xdeuxc on-
ditions suivantes. (1) .L'appareil
ne doi tpas produire de brouil-
lage, et (2) L'autisatue rdel'ap-
pareild oita ccepter toutb rouil-
lage radioelectriqu esubi, meme
si le brouillag eest susceptible
d'e ncompromettre le fonc-
tionnement. WARNING:C hanges
or modifications not expressively
approved by the party responsi-
bl ef or compliance could voidt he
users authority to operate the
equipment. The term "IC:" before the radio certification number
only signifies Canad atechnical
specifications were met.
FCC ID:MRXMC34MA4 This
device complies with part 15 of
the FCC rules and with license
exempt RSS standard sofIndus-
try Canada. Operation is subject
to the following conditions .(1)
Thisd evice may not cause harm-
ful interference, and (2) This
device mus taccept any interfer-
ence receive d, i
ncluding interfer-
ence that may cause undesired
operation. Le present appareil
est conforme d'industrieC anada
applicables au xappereils radio
exempts de license .L'exploita-
tion est authorisee au xdeuxc on-
ditions suivantes. (1) .L'appareil
Tire pressure297
Wheel sand tires
Z
Page 310 of 326

Tire-mounting tools should not be used near
the valve. This could damage the electronic
components.
Only have tires changed ataqualified spe-
cialist workshop.
Observe the instructions and safety notes in the
"Changing awheel" section (
Ypage 307).
The wear pattern sonthe front and rear tires
differ, depending on the operating conditions.
Rotate the wheels before aclear wear pattern
has formed on the tires. Frontt ires typically
wear more on the shoulders and the rear tires in
the center.
On vehicles that have the same size front and
rear wheels, you can rotat ethe wheels accord-
ing to the intervals in the tire manufacturer's
warranty book in your vehicle documents. If no
warranty book is available, the tires should be
rotated every 3,000 to 6,000 miles (5,000 to
10,000k m).D ependin gontire wear, this may
be required earlier. Do not change the direction
of wheel rotation.
Clean the contact surfaces of the wheel and the brake disc thoroughly every time awheel is rota-
ted. Check the tire pressure and, if necessary,
restart the tire pressure loss warning system
(Canada only) or the tire pressure monitor (USA
only).
Direction of rotation
Tires with aspecified direction of rotation have
additional benefits ,e.g. if there is arisk of hydro-
planing. These advantages can only be gained if
the tires are installed corresponding to the
direction of rotation.
An arrow on the sidewall of the tire indicates its
correctd irection of rotation.
Storing wheels
Storewheels that are not being used in acool,
dry and preferably dark place. Protectt he tires
from oil, grease, gasoline and diesel.
Mounting awheel
Preparing the vehicle
XStop the vehicle on solid, non-slippery and
level ground.
XApply the electric parking brake manually.
XBring the front wheels into the straight-ahead position.
XShift the transmission to position j.
XSwitch off the engine.
XVehicles without KEYLESS-GO:remove the
SmartKey from the ignition lock.
XVehicles with KEYLESS-GO start-function
or KEYLESS-GO: open the driver's door.
The vehicle electronics are now in position
u.T his is the same as “key removed”.
XVehicles with KEYLESS-GO start-function
or KEYLESS-GO: remove the Start/Stop but-
ton from the ignition lock (
Ypage 122).
XMake sure that the engine cannot be started
via your smartphon e(Ypage 83).
XIf included in the vehicle equipment, remove
the tire-change tool kit from the vehicle.
XSafeguard the vehicle against rolling away
(Ypage 141).
iApart from certain country-specific varia-
tions, the vehicles are not equipped with a
tire-change tool kit. Some tools for changing a
wheel are specific to the vehicle. For more
information on which tools are required to
perform awheel change on your vehicle, con-
sult aqualified specialist workshop.
Necessary tire-changing tools can include, for
example:
RJack
RWheel chock
RLug wrench
308Changing awheel
Wheels and tires