2018 MERCEDES-BENZ CLA COUPE key
[x] Cancel search: keyPage 235 of 326
Connectingamobile phone
(COMAND)
Requirements
For telephony via th eBluetooth®interface, you
require aBluetooth®-capable mobile phone. The
mobile phonem ust support Hands-Free Profile
1. 0ora bove.
Multimedia system:
XSelect VehicleQSystem Set‐tingsQActivate Bluetooth.
XActivate Bluetooth®O.
Mobilep hone:
XActivate Bluetooth®and,ifn ecessary, Blue-
tooth®visibilityf or other devices (see the
manufacturer'so peratinginstructions).
The Bluetooth
®device names for all of onem an-
ufacturer'sp roductsmightbei dentical. To
mak eitp ossible to clearly identif yyour mobile
phone, chang ethe device nam e(see th eman-
ufacturer'so peratinginstructions).
If th emobile phones upportsthe PBA P(Phone
B oo kAccess Profile) and MAP( Message
Acc ess Profile )Bluetooth
®profiles, th efollow-
ing informatio nwill be transmitte dafter you
connect:
RPhoneb ook
RCall lists
RTextmessages and e-mail
iFurther informatio nonsuitable mobile
phones can be foun dat:http://
www.mercedes-benz.com/connect
iIn th eUSA,you can get in touch witht he
Mercedes-Ben zCustome rAssistanc eCenter
on 1-800-FOR-MERCedes (1-800-367-6372 ).
In Canada, you can get in touch with the Cus-
tomer Relations Center on 1-800-387-0100.
Searchin gfor and authorizing (connect-
ing) amobile phone
Before using you rmobilep hone with the multi-
media system for the first time, you willn eed to
search for the phone and then authorize (con-
nect) it. Depending on the mobilep hone, author-
ization either takes place by means of Secure
Simple Pairing or by entering apasskey.T he
multimedia system automatically makes the procedure that is relevant for you
rmobilep hone
available. The mobilep hone is always connec-
ted automatically after authorization. Further
information on using amobilep hone with the
multimedia system (see the Digital Operator's
Manual).
If the multimedia system does not detect your
mobilep hone, this may be due to particular
security settings on you rmobilep hone (see the
manufacturer's operating instructions).
Only one mobilep hone can be connected to the
multimedia system at any one time.
Searchin gfor am obile phone
Multimedia system:
XSelect Tel/®QConn.DeviceQSearc hfor PhonesQStartSearch.
The available mobilep hones are displayed.
Symbols in the devicel ist
Sym-
bolExplanation
ÏNew mobilephone found, not yet
authorized.
ÑMobilep hone is authorized, but is
not connected.
#Mobilep hone is authorized and
connected.
Connecting amobile phone
Authorization using Secure Simple Pairing:
XSelect mobilep hone.
Ac ode is displaye dinthe multimedia system
and on the mobilep hone.
XIf codesmatch: select Yeson the multimedia
system.
XConfirm code on the mobilep hone. Depend-
ing on the mobilep hone used,confirm the
connection to the multimedia system and for
the PBAP and MAP Bluetooth
®profiles. The
prompt to confirm may take up to two
minutes to be displaye d(see the manufactur-
er's operating instructions).
XIf the code sare different: selectNoon the
multimedia system.
The process is canceled.
Repeat authorization.
Operating system233
Multimedia system
Z
Page 236 of 326
Authorization by enteringapasskey( passcode):
XSelect the Bluetooth®nameoft he mobile
phone.
The input menu for the passkeyisd isplayed.
XChoos eaone to sixteen-digitn umbercombi-
nation as apasskey.
XEnter the passkeyont he multimedia system.
XPress¬to confirm.
XEnter and confirm the passkeyont he mobile
phone. Depending on the mobil ephone used,
confirm the connectio ntothe multimedia sys-
tem and for the PBAP and MAP Bluetooth
®
profiles. The prompt to confirm mayt ake up
to two minutes to be displayed (se ethe man-
ufacturer's operating instructions).
Connectin gamobilephon e(Au dio 20)
Requirements
For telephony via the Bluetooth®interface, you
require at leas tone Bluetooth®-capable mobile
phone depending on us eofone-telephone
mode ortwo-telephon emode.The mobile
phone must support Hands-FreeP rofile1.0 or
above.
In two-telephon emode youc an us eallthe
functions of the multimedia system with the
main telephone .Witht he additional tele-
phone ,you can receive incoming calls.
Multimedia system:
XSelect VehicleQSystem Set‐tingsQActivate Bluetooth.
XActivate Bluetooth®O.
Mobil ephone:
XActivate Bluetooth®and ,ifn ecessary,B lue-
tooth®visibility for othe rdevice s(seet he
manufacturer's operating instructions).
The Bluetooth
®device names for al lofone man-
ufacturer's products might be identical .To
make it possibl etoclearly identify your mobile
phone, change the device nam e(seet he man-
ufacturer's operating instructions). If the mobil
ephone supports the PBAP ( Phone
Book Access Profile )and MAP ( Message
A ccess Profile) Bluetooth
®profiles, the follow-
ing informatio nist ransmitte dafteryou connect
the main telephone:
RPhone book
RCall lists
RText messages and e-mail
iFurther informatio nonsuitabl emobile
phones can be found at: http://
www.mercedes-benz.com/connect
iIn the USA, yo ucan getint ouch with the
Mercedes-Benz Customer Assistance Center
on 1-800-FOR-MERCedes (1-800-367-6372).
In Canada, yo ucan getint ouch with the Cus-
tomerR elations Center on 1-800-387-0100.
Searching for and authorizing (connect-
ing) amobile phone
Before using your mobile phone with the multi-
media system for the first time, you will need to
search for the phone and then authorize (con-
nect)i t. Depending on the mobile phone, author-
ization either takes place by means of Secure
Simple Pairing or by enteringap asskey. The
multimedia system automatically makes the
procedure that is relevant for your mobile phone
available. The mobile phone is always connec-
ted automatically after authorization. Further
information on using amobile phone with the
multimedia system (see the Digital Operator's
Manual).
If the multimedia system does not detect your
mobile phone, this may be due to particular
security settings on your mobile phone (see the
manufacturer's operating instructions).
Searching for amobile phone
Multimedia system:
XSelect Tel/®QConn. DeviceQCon‐nect New Device.
XSelectConnect via vehicle.
XSelect mobile phone.
Connecting amobile phone
XOne-telephone mode :select Main Phone.
XTwo telephone mode: selectAdditional
Phone (Incoming Calls Only)when a
mobile phone is already connected.
234Operating system
Multimedia system
Page 237 of 326
XAuthorizationusingS ecur eSimple Pai r-
ing:
Ac odeisd isplayed inthem ultimedia system
and on th emobile phone.
XConfir mcodeont hemob ilephone. Depend-
ing on th emobile phoneu sed, confirm the
connection to th emultimedia system and for
th eP BAPa nd MAPB luetooth
®profiles. The
prompt to confirm may tak euptotwo
minute stobed isplayed (see th emanufactur-
er' so peratin ginstructions).
XIfth ec odes are different :select Noon the
multimedia system.
The proces siscanceled.
Repeat authorization.
or
XAuthorizatio nbyentering apasskey
(passcode): enterany one- to sixteen-digit
number sequenc ewhichy ou have chosen
yourself int othe passke yinput menu.
XPress ¬to confirm.
XEnterand confirm th epasske yonthe mob ile
phone. Dependin gonthemob ilephoneu sed,
confirm th econnectio ntothemultimedia sys-
te ma nd for th ePBAPa nd MAPB luetooth
®
profiles. The prompt to confirm may tak eup
to two minute stobedisplayed (see th eman-
ufacturer' soperatin ginstructions).
Symbols in th edevice manager
The symbols are shown in color dependingon
their use.
SymbolExplanation
Mobile phonec onnected to the
multimedia system
Main telephone withfull range of
functions
Ad ditional telephone for incoming
calls intwo telephone mode
Media mode
General notes
If you wish toplay external medi asources ,the
appropriat emediam odem ust alread ybeturned on.F
urther informatio nonmediam ode(see the
Digital Operator's Manual).
The followinge xternalmediasources can be
used:
RApple®device s(e.g. iPhone®)
RUSBd evices(e.g. USBs tick ,M P3 player)
(Ypage 236)
RCD
RDV D(COMAND)
RSD cards
Rvia device sconnected by Bluetooth®
iInformation on single CD/DV DdriveorD VD
changer (see th eDigital Operator's Manual).
Selecting usin gthe device list
Multimedia system:
XSelectMediaQDevices.
The available medi asources willbe shown.
The #dot indicates th ecurren tsetting.
XSelect th emediasource.
Playable filesare played.
Inserting/removing an SD card
Important safety notes
GWARNING
SD cardsare smal lparts. They can beswal-
lowed and caus echoking. This posesa n
increased ris kofinjury or eve nfatal injury.
Keep th eSDc ardo ut of th ereac hofc hildren.
If aS Dc ardiss wallowed, seek medical atten-
tio nimmediately.
!If you are no longer usingt heSD card,you
should remove it and store itoutside thev ehi-
cle .Hight em peratures can damag ethe card.
Insertin ganSDc ard
TheSDcardslot islocate donthecontrol panel.
XInsertt heSD cardintot he SD cardslot until
th eS Dc arde ngages.T he side withthe con-
tacts must fac edown.
Removing an SD card
XPress th eSDc ard.
The SD car disejected.
XRemo vetheS Dc ard.
Operatin gsystem235
Multimedia system
Z
Page 247 of 326
Your attention must always be focused on the
traffic conditions. Only use the cigarettelighter
when road and traffic condition spermit.
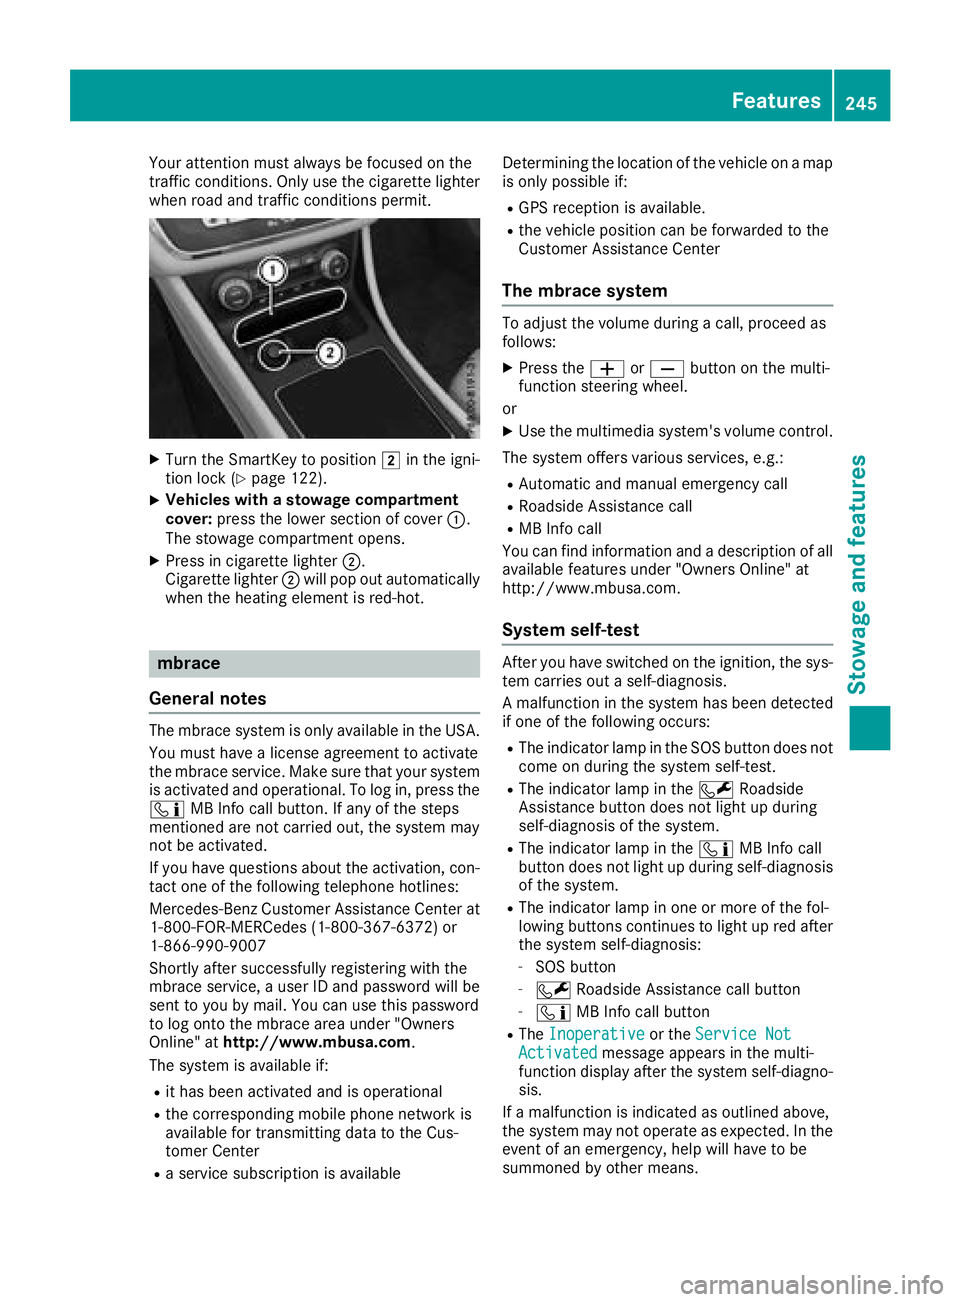
XTurn the SmartKey to position 2in the igni-
tion lock (Ypage 122).
XVehicles with astowag ecompartment
cover: press the lower section of cover :.
The stowage compartmento pens.
XPress in cigarettelighter ;.
Cigarette lighter ;will pop out automatically
when the heatin gelementisr ed-hot.
mbrace
Genera lnotes
The mbraces ystemiso nly available in the USA.
You must have alicense agreement to activate
the mbraces ervice. Make sure that your system
is activate dand operational. To log in, press the
ï MB Inf ocall button. If any of the steps
mentioned are not carried out, the syste mmay
not be activated.
If you have questions about the activation, con-
tac tone of the followingt elephone hotlines:
Mercedes-Ben zCustomer Assistance Center at
1-800-FOR-MERCedes (1-800-367-6372) or
1-866-990-9007
Shortly afte rsuccessfully registeringw ith the
mbraces ervice,auser ID and password will be
sent to you by mail. You can use this password
to log ont othe mbracea rea under "Owners
Online" at http://www.mbusa.com.
The syste misavailable if:
Rit has been activate dand is operational
Rthe corresponding mobile phonen etwork is
available for transmitting data to the Cus-
tomer Center
Ras ervice subscription is available Determining the location of the vehicle on
amap
is only possible if:
RGPS receptio nisavailable.
Rthe vehicle position can be forwarded to the
Customer Assistance Center
Them brace system
To adjust the volume during acall, proceed as
follows:
XPress the WorX button on the multi-
function steeringw heel.
or
XUse the multimedia system's volume control.
The syste moffers various services, e.g.:
RAutomatic and manual emergenc ycall
RRoadside Assistance call
RMB Inf ocall
You can findi nformation and adescription of all
available features under "Owner sOnline" at
http://www.mbusa.com.
System self-test
After you have switched on the ignition, the sys-
tem carries out aself-diagnosis.
Am alfunction in the syste mhas been detected
if one of the followingo ccurs:
RThe indicator lamp in the SOS button does not
com eond uring the syste mself-test.
RThe indicator lamp in the FRoadside
Assistance button does not light up during
self-diagnosis of the system.
RThe indicator lamp in the ïMB Inf ocall
button does not light up during self-diagnosis
of the system.
RThe indicator lamp in one or more of the fol-
lowing buttons continues to light up red after
the syste mself-diagnosis:
-SOS button
-F Roadside Assistance call button
-ïMB Inf ocall button
RThe Inoperativeor the Service NotActivatedmessagea ppears in the multi-
function display afte rthe syste mself-diagno-
sis.
If am alfunction is indicated as outlined above,
the syste mmay not operatease xpected. In the
eventofane mergency, help will have to be
summoned by other means.
Features245
Stowage and features
Z
Page 251 of 326
The destination download function is available
if:
Rthe vehicle is equipped withanavigation sys-
tem.
Rthe relevant mobile phone network is availa-
ble and data transfer is possible.
Route Assistance
This service is part of the mbrace PLUS Package
and cannot be purchased separately.
You can use the Route Assistance function even
if the vehicle is not equipped with anavigation
system.
Within the framework of this service, you receive
ap rofessional and reliable form of navigation
support without having to leave your vehicle.
The customer service representative finds a
suitable route depending on your vehicle's cur-
rent position and the desired destination. You
will then be guided live through the current route
section.
Search and Send
General notes
To use "Search &Send", your vehicle must be
equipped with mbrace and anavigation system.
Additionally, an mbrace service subscription
must be completed.
"Search &Send" is adestination entr yservice. A
destination address found on Google Maps™
can be transferred via mbrace directly to your
vehicle's navigation system.
Specifying and sending the destination
address
XGo to the website http://maps.google.com
and enter adestination address into the entry
field.
XTo send the destination address to the e-
mail address of your mbrace account:
click on the corresponding button on the web-
site.
Example:
If you select 'Send to vehicle' and then
'Mercedes-Benz', the destination address will
be sent to your vehicle.
XWhen the "Send" dialog window appears: Enter the e-mail address you specified when
setting up your mbrace account into the cor-
responding field.
XClick "Send".
Information on specific commands such as
"Address entry" or "Send" can be found on the
website.
Calling up atransmitted destination
address
XTurn the SmartKey to position 2in the igni-
tion lock (Ypage 122).
The transmitted destination address is loaded
into the vehicle's navigation system.
Ad isplay message appears, asking whether
navigation should be started.
XSelect Yesby turning 3or sliding 1
the controller and confirm with 7.
The system calculates the route and subse-
quently start sthe route guidance with the
address entered.
If you select No
the address can be stored in
the address book.
If you have sent more than one destination
address, each individual destination must be
confirmed separately.
Destination addresses are loaded in the same
order as the order in which they were sent.
If you own multiple Mercedes-Benz vehicles with
mbrace and activated mbrace accounts:
If multiple vehicles are registered under the
same e-mail address, the destination will be
sent to all the vehicles.
Vehicle remot eopening
You can use the vehicle remote opening if you
have unintentionally locked your vehicle and a
replacement SmartKey is not available.
The vehicle can be opened by the Mercedes-
Benz Customer Assistance Center.
The vehicle can be immediately opened
remotely within four days of the ignition being
turned off. After this time, the remote unlocking
may be delayed by 15 to 60 minutes. After
30 days, the vehicle can no longer be opened
remotely.
The vehicle remote unlockingf eature is availa-
ble if the relevant mobile phone network is avail-
able and adata connection is possible.
XContact the following service hotlines:
Features249
Stowage and features
Z
Page 252 of 326
Mercedes-BenzCustomer Assistanc eCenter
at 1-800-FOR-MERCedes (1-800-367-6372)
or 1-866-990-9007
You will be asked for your password.
XReturn to your vehicle at the time agreed upon
with the Mercedes-BenzC ustomer Assis-
tance Center.
Alternatively, the vehicle can be opened via:
Rthe Internet, under the "Owners Online" sec-
tion
Rtelephone applications (e.g. for iPhone®,
Android™)
To do this, you will need your identification num-
ber and password.
Vehicle remote closing
The vehicle remote-closing feature can be used
when you have forgotten to lock the vehicle and
you are no longer nearby.
The vehicle can then be locked by the Mercedes-
Benz Customer Assistanc eCenter.
The vehicle can be immediately remotely locked
within four days of the ignition being turned off.
After this time, remote closing may be delayed
by 15 to 60 minutes. After 30 days the vehicle
can no longer be valet locked remotely.
The vehicle remote closing feature is available if
the relevant mobile phone network is available
and adata connection is possible.
XContact the following service hotlines:
Mercedes-BenzC ustomer Assistanc eCenter
at 1-800-FOR-MERCedes (1-800-367-6372)
or 1-866-990-9007
You will be asked for your password.
The next time you are inside the vehicle and you
switch on the ignition, the Doors Locked
Remotelymessage appears in the multifunction
display.
Alternatively, the vehicle can be locked via:
Rthe Internet, under the "Owners Online" sec-
tion
Rtelephone applications (e.g. for iPhone®,
Android™)
To do this, you will need your identification num- ber and password.
Stolen vehicle recovery service
If your vehicle has been stolen:
XNotify the police.
The police will issue anumbered incident
report.
XThis number will be forwarded to the
Mercedes-BenzC ustomer Assistanc eCenter
together with your PIN.
The Mercedes-BenzC ustomer Assistance
Center then tries to locate the system. The
Mercedes-BenzC ustomer Assistanc eCenter
contacts you and the local law enforcement
agency if the vehicle is located.
However, only the law enforcement agency is informed of the location of the vehicle.
If the anti-theft alarm system is activated for
longer than 30 seconds, the Mercedes-Benz
Customer Assistanc eCenter is automatically
notified.
Vehicle Health Check
With the Vehicle Health Check, the Customer
Assistanc eCenter can provide improved sup-
port for problems with your vehicle. During an
existing call, vehicle data is transferred to the
Customer Assistanc eCenter.
The customer service representative can use
the received data to decide what kind of assis-
tance is required. You are then, for example,
guided to the nearest Mercedes-BenzS ervice
Center or arecovery vehicle is called.
If vehicle data needs to be transferred during an
MB Info call or aRoadside Assistanc ecall, this is
initiated by the Customer Assistanc eCenter.
The Roadside Assistance Connected
mes-
sage appears in the display.Ift he Vehicle Health
Check can be started, the Request
forVehi‐cle Diagnostics Received Start vehi‐cle diagnostics?message appears in the
display.
XPress the Yesbutton to confirm the message.
XWhen the Vehicle Diagnostics PleaseStart Ignitionmessage appears: turn the
SmartKey to position 2in the ignition lock
(
Ypage 122).
XIf the Please follow the instructionsreceivedbyphoneandmoveyourvehi‐cle to asafe position.message
appears: please follow the instructions
250Features
Stowage and features
Page 254 of 326
Currently inactiveareas can beactivated bytext
message.
Triggering th evehicle alarm
Witht hisf unction,y ou can triggert heveh icle's
panic alarm via text message. An alarm sounds
and th eexteri or lighting flashes. Dependin gon
th es etting, th epanic alarm lastsf iveort ensec-
onds. Afterwards, th ealarm switches off.
Garage door opener
General notes
The HomeLink®garag edoor opener integrated
in ther ear-view mirror allowsyou to operate up
to three different door and gates ystems.
Use th eintegrate dgarag edoor opener only on
garag edoorst hat:
Rhave safety stop and revers efeatures and
Rmee tcurren tU.S.federal safety standards
Once programed, th eintegrate dgarag edoor
opener inther ear-view mirror willassumet he
function of th egarag edoor system' sremote
control. Pleasea lso read theoperatin ginstruc-
tions for th egarag edoor system.
When programmin gagaragedoor opener, park
th ev ehicle outside theg arage. Do no tleave the
enginer unningwhile programming.
Certain garag edoor drives are incompatib le
wit hthe integrate dgarag edoor opener. Ifyou
have difficult yprograming th eintegrate dgarage
door opener, contact aMercedes-Ben zService
Center.
Alternatively, you can call th efollowin gtele-
phonea ssistance services:
RUSA:Mercedes-Ben zCustomerA ssistance
Cente rat1-800-FOR -MERCe des
RCanada: CustomerS erviceat
1-800-387-0100
RHomeLink®hotlin e1-800-355-351 5(free of
charge)
Morei nformatio nonHomeLink
®and/or com-
patible product sisalso availab leonlin eat
http:/ /www. homelin k.com.
Notes on the declaration of conformity
(
Ypage 27).
USA: FCC ID: CB2HMIHL4
Canada: IC: 279B-HMIHL4
Important safety notes
GWARNING
When you operate or program the garag edoor
with the integrated garag edoor opener, per-
sons in the range of movement of the garage
door can become trapped or struck by the
garag edoor. There is arisk of injury.
When using the integrated garag edoor
opener, always make sure that nobody is
within the range of movement of the garage
door.
GWARNING
Combustion engines emit poisonouse xhaust
gases such as carbon monoxide. Inhaling
these exhaust gases leadstop oisoning. There
is ar isk of fatal injury. Therefore never leave
the engine running in enclosed spaces with-
out sufficient ventilation.
Programming
Programming the buttons
Pay attention to the "Important safety notes"
(Ypage 252).
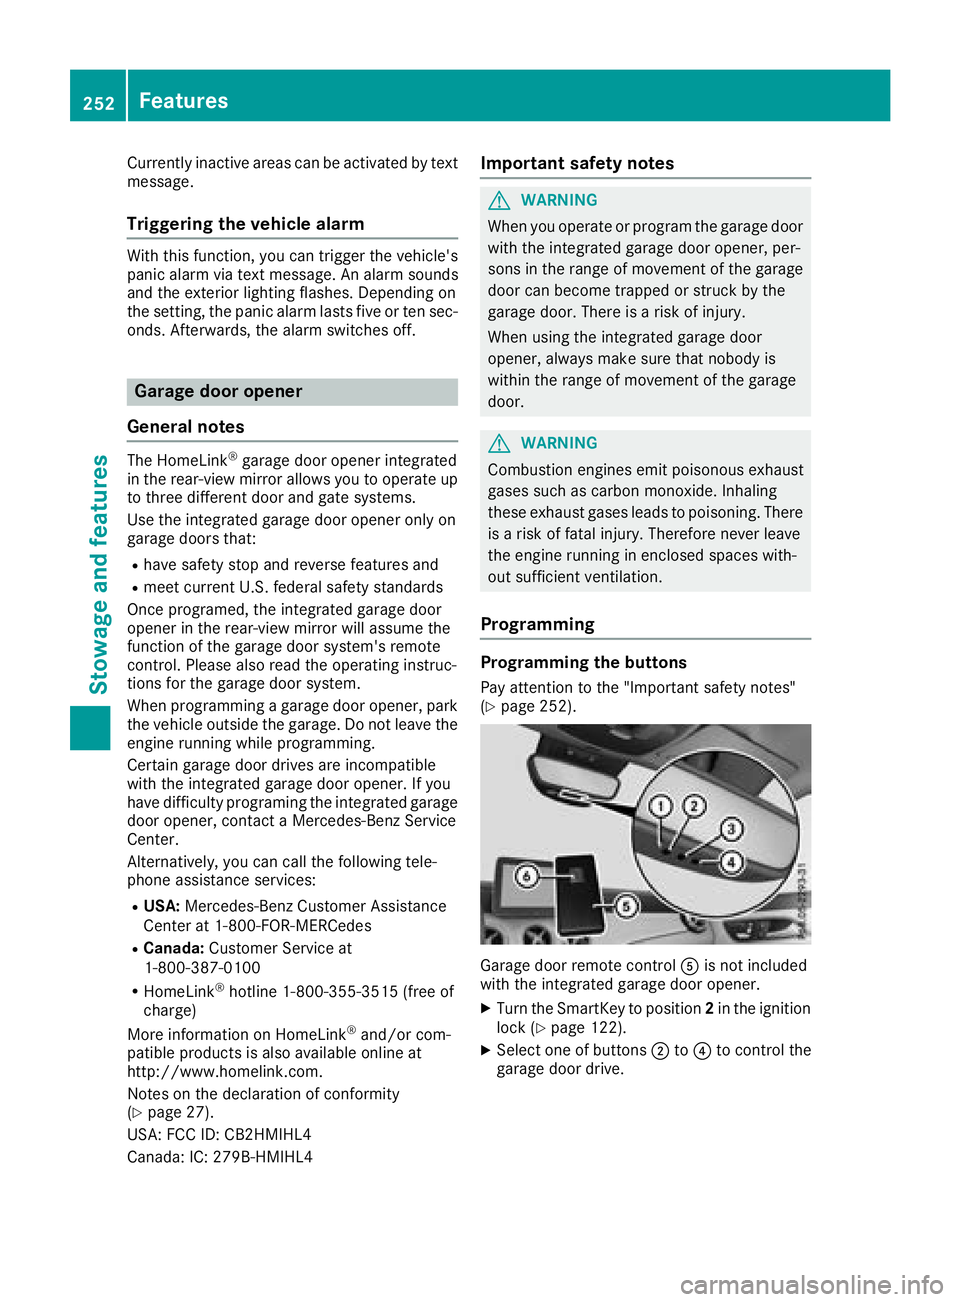
Garage door remote control Ais not included
with the integrated garag edoor opener.
XTurn the SmartKey to position 2in the ignition
lock (Ypage 122).
XSelect one of buttons ;to? to control the
garag edoor drive.
252Features
Stowage and features
Page 255 of 326
XTo start program mode:press and holdone
of buttons ;to? on the integrated garage
door opener.
The garag edooro penerisn ow in program
mode. After ashort time ,indicator lamp :
lights up yellow.
Indicato rlam p: lights up yellow as soona s
button ;,=or? is stored for the first time.
If the selecte dbutton hasa lready been pro-
gramed,i ndicator lamp :will onlyl ight up
yellow afte rten seconds have elapsed.
XReleas ebutton ;, =or?.I ndicator
lamp :flashesy ellow.
XTo program the remote control: point
garag edoorremote control Atoward sbut-
tons ;to? on the rear-view mirror at adis-
tance of 2to8in(5t o20c m).
XPress and hol dbutton Bon remote control
A unti lindicator lamp :lights up green.
Whe nindicator lamp :lights up green: pro-
gramming is finished.
Whe nindicator lamp :flashesg reen: pro-
gramming wa ssuccessful. The next step is to
synchronize the rolling code(
Ypage 253).
XReleas ebutton Bon remote control Afor
the garag edoord rive system.
If indicator lamp :lights up red:r epeatthe
programing procedur efor the corresponding
button on the rear-view mirror. Whe ndoing
so, var ythe distance between remote control
A and the re
ar-view mirror.
The required distance between remote con-
trol Aand the integrated garag edooropener
depends on the garag edoord rive system.
Several attempts might be necessary.Y ou
shoul dtest every positio nfor at least
25 seconds before trying another position.
Synchronizin gthe rolling code
Paya ttentio ntothe "Important safety notes"
(Ypage 252).
If the garag edoors ystem uses arolling code,
yo uw illa lsoh avetos ynchronize the garage
door system with the integrated garag edoor
opene rinthe rear-view mirror. To do thisy ouwill
nee dtou sethe programming button on the door
drive controlp anel.T he programming button
maybel ocate dind ifferent place sdepen ding on
the manufacturer. It is usuall yloc ate dont he
door drive uni tonthe garag eceiling.
Familiarize yoursel fwitht he garag edoord rive
operating instructions, e.g .under "Program- ming additional remote controls", before carry-
ing outt
he following steps.
Your vehicl emustbew ithinr each of the garage
door or gate opene rdrive. Make sure thatn ei-
ther your vehicl enor any persons/objects are
present withint he sweepofthe door or gate.
XTurn the SmartKey to position 2in the ignition
lock (Ypage 122).
XGe toutof the vehicle.
XPress the programming button on the door
drive unit.
Usually ,you now have 30 seconds to initiate
the next step.
XGe tinto the vehicle.
XPress previously programed button ;,=
or ? on the integrated garag edooro pener
repeatedly and in quick succession unti lthe
door closes.
The rolling codes ynchronizatio nist hen com-
plete.
Note sonp rogrammin gthe remote con-
trol
Canadia nradio frequency laws require a"break"
(o ri nterruption) of the transmission signals
afte rbroadcasting for afew seconds. Therefore,
thes esignals mayn ot last long enough for the
integrated garag edooro pener. The signalisn ot
detectedd uring programming. Comparable with
Canadia nlaw ,someU .S. garag edooro peners
also feature a"break".
Proceedasf ollows:
Rif youliveinC anada
Rif yo uhaved ifficultie sprogramming the
garag edooro pener(regardless of where you
live) as yo ufollo wthe programming steps.
XPress and hol done of buttons ;to? on the
integrated garag edooro pener.
After ashort time ,indicator lamp :lights up
yellow.
XReleas ethe button.
Indicato rlam p: flashesy ellow.
XPress button Bof garag edoorre mote con-
trol Afor two seconds, then release it for two
seconds.
XPress button Bagai nfor two seconds.
XRepeat thiss equence on button Bof remote
control Aunti lindicator lamp :lights up
green.
Whe nindicator lamp :lights up green: pro-
gramming is finished.
Features253
Stowag eand featur es
Z