2018 MERCEDES-BENZ CLA COUPE fold seats
[x] Cancel search: fold seatsPage 17 of 326
Warning lamp ................................. 224
Parking lamps
Switching on/off ........................... 101
Parking Pilot
Canceling ....................................... 167
Detecting parking spaces .............. 164
Display Message ............................2 08
Exiting aparking space .................. 166
Function/notes .............................1 64
Important safety notes .................. 164
Parking .......................................... 165
PASSENGERA IRBAG
Display message ............................ 200
Indicator lamps ................................ 41
Problem (malfunction) ................... 200
Pets in the vehicle ............................... 60
Phoneb ook
see also Digita lOperator's Man-
ua l..................................................2 29
Plastic trim (cleaning instruc-
tions) ..................................................2 66
Power washers .................................. 263
Power windows
see Side windows
Protection against theft
ATA (Anti-Theft Alarm system) ......... 68
Immobilize r...................................... 68
Protection of the environment
General notes .................................. 24
Pulling away
Automatic transmission ................. 125
General notes ................................ 125
Hill start assist ............................... 125
Q
QR codeMercedes-Benz Guide App ................. 1
Rescue card ..................................... 29
Qualifieds pecialist workshop ........... 28
R
RACESTART
Important safety notes .................. 158
RACES TART (Mercedes-AMG vehi-
cles) .................................................... 158 RACET
IMER (on-board computer,
Mercedes-AMG vehicles) .................. 189
Radio
Selecting astatio n......................... 182
see separate operating instructions
Radio mode
see also Digita lOperator's Man-
ua l..................................................2 29
Radio-wave reception/transmis-
sionint he vehicle
Declaratio nofconformity ................ 27
Rain closing feature (panorama
roof with power tilt/sliding panel) .... 87
Readingl amp..................................... 103
Rear compartment
Setting the ai rvents ......................1 20
Rear fog lamp
Display message ............................ 203
Replacing bulbs .............................1 06
Switching on/off ........................... 101
Rear lamps
see Lights
Rear seats
Folding the backres tforwards/
back ............................................... 240
Rear viewc amera
"Reverse parking" function ............ 169
Cleaning instructions ..................... 265
Display in the multimedias ystem .. 168
Function/notes .............................1 67
General notes ................................ 167
Switching on/off ........................... 168
Rear window defroster
Problem (malfunction) ................... 119
Switching on/off ........................... 119
Rear-vie wmirror
Anti-glare (manual ).......................... 96
Dipping (automatic) ......................... 97
Reflectiv esafety jacket .................... 269
Refrigerant (air-conditioning sys-
tem)
Important safety notes .................. 319
Refueling
Fuel gauge ....................................... 33
Important safety notes .................. 138
Refueling process. ......................... 139
see Fuel
Index15
Page 18 of 326
Remote controlGarag edooro pener ....................... 252
Programming (garag edoor
opener) .......................................... 252
Replacing bulbs
Brake lamp .................................... 106
High-beam headlamp s................... 106
Important safety notes .................. 104
Installing/removing the cover
(front wheela rch).......................... 105
Low-bea mheadlamp s.................... 105
Overview of bulb types .................. 104
Rear fog lamp ................................ 106
Turn signal s(front) ......................... 106
Turn signal s(rear) .......................... 106
Reporting safety defects .................... 28
Rescue card ......................................... 29
Reserve (fuel tank)
see Fuel
Reserve fuel
Displa ymessage ............................ 206
Warning lamp ................................. 224
see Fuel
Residual hea t(clim ate control) ........ 119
Restrain tsystem
Displa ymessage ............................ 198
Introduction ..................................... 40
Warning lamp ................................. 224
Warning lamp (function) ................... 41
Revers egear(selecto rlever )........... 132
Reversin gfeature
Roller sunblind ................................. 87
Sid ew indow s................................... 82
Roadside Assistance (breakdown) .... 26
Rolle rsunblind
Panorama roofw ithp ower tilt/
sliding panel ..................................... 87
Roo fcarrier ........................................ 241
Roo flinin gand carpets (cleaning
guidelines) ......................................... 268
Roo floa d( maximum) ........................ 320
Route guidance
see also Digital Operator's Man-
ual.................................................. 229S
Safety
Childre ninthe vehicl e..................... 54
see Occupant safety
Safety system
see Driving safety systems
SD card
Inserting ........................................ 235
Inserting/removing ........................ 235
Removing ....................................... 235
SD memory card
see also Digital Operator's Man-
ual.................................................. 229
Search &Send
see also Digital Operator's Man-
ua l.................................................. 229
Seat
Correct driver'ss eatposition ........... 90
Seat belts
Adjusting the height ......................... 44
Cleaning ......................................... 267
Correct usag e.................................. 43
Fastening ......................................... 44
Important safety guideline s............. 42
Introduction ..................................... 41
Releasing ......................................... 44
Warning lamp ................................. 218
Warning lamp (function) ................... 44
Seats
Adjusting (electrically) ..................... 92
Adjusting (manually) ........................ 91
Adjusting (Performance Seat) .......... 94
Adjusting the 4-wa ylum bars up-
por t.................................................. 93
Adjusting the headr estraint ............ 92
Cleaning the cover. ........................ 267
Folding the backrest( rear com-
partment) forwards/back .............. 240
Important safety notes .................... 90
Seath eating problem ...................... 95
Storing settings (memory func-
tion) ................................................. 99
Switching seath eating on/off......... 94
Securing cargo .................................. 241
Selecto rlever
Cleaning ......................................... 267
Sensors (cleaning instructions) ....... 265
16Index
Page 40 of 326
Door controlpanel
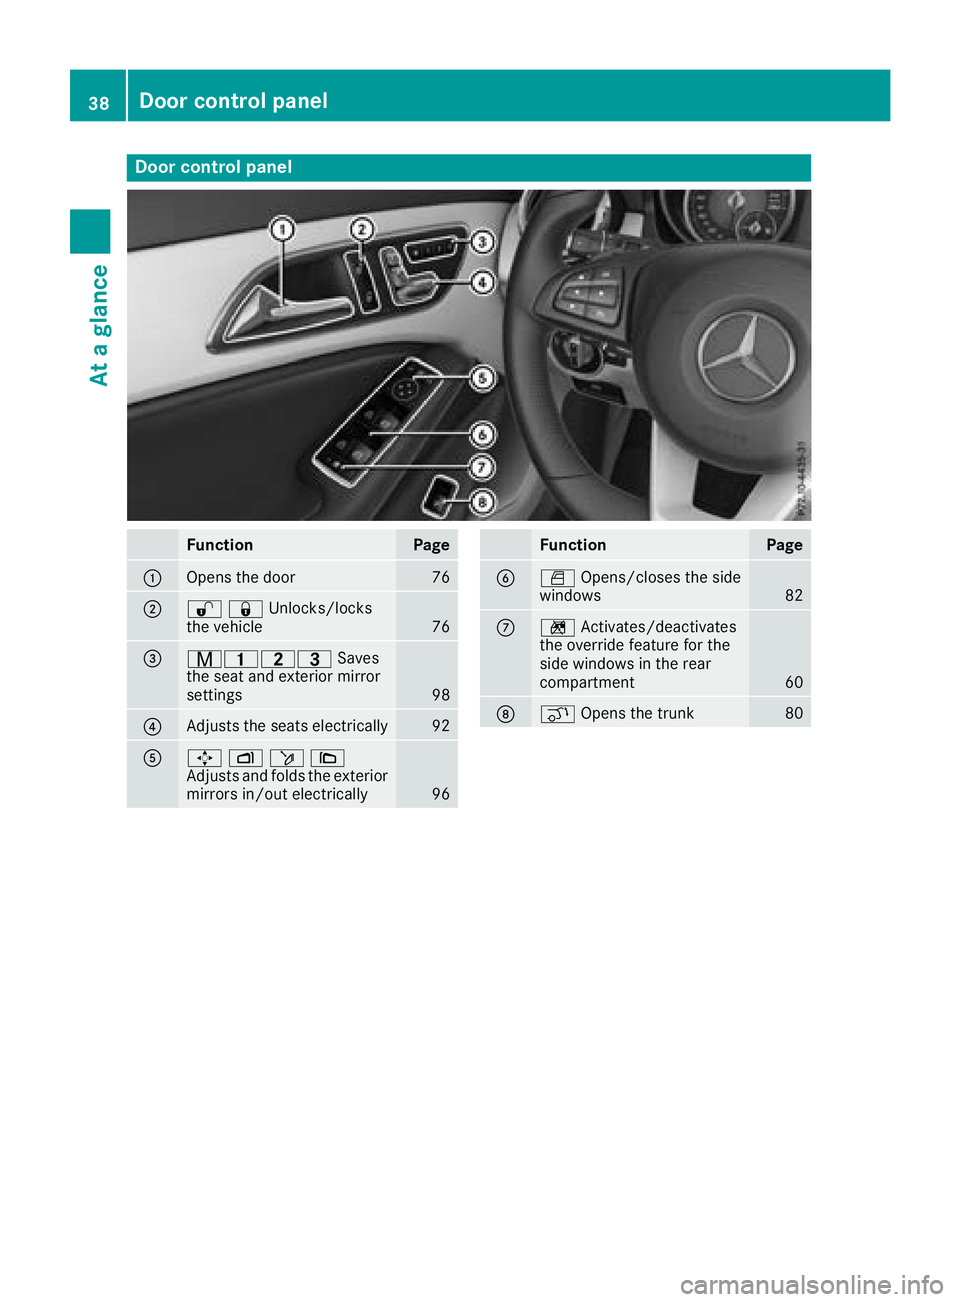
FunctionPage
:Opens th edoor76
;%&Unlocks/locks
the vehicle76
=r45= Saves
the seat and exterior mirror
settings
98
?Adjusts the seats electrically92
A7 Zö\
Adjusts and folds the exterior
mirrors in/out electrically
96
FunctionPage
BW Opens/closes the side
windows82
Cn Activates/deactivates
the override feature for the
side windows in the rear
compartment
60
Dq Opens the trunk80
38Door control panel
Atag lance
Page 59 of 326
LATCH-type(ISOFIX) child seat secur-
ing system
GWARNING
LATCH-type (ISOFIX) child restraint systems
do not offer sufficient protection for children
whose weight combine dwith th echild
restraint system is greater than 65 lbs (29 kg) and who are secured usingt hesafety belt
integrated in th echild restraint system. In the
even tofana ccident, achild mightn ot be
restrained correctly. This poses an increased
risk of injury or even fatal injury.
If th echild and th echild restraint system
together weigh moret han65l bs (29 kg), only
use LATCH-type (ISOFIX) child restraint sys-
tem swith whicht hechild is also secured with
th ev ehicle seat belt.A lsos ecure th echild
restraint system with th eTop Tether belt,i f
available.
Always comply with th emanufacturer' sinstal-
latio nand operatin ginstructionsf or thechild
restraint system used.
Before ever ytrip, makes ure that th eLATCH-
type (ISOFIX) child restraint system is engaged
correctly in bothL ATCH-type (ISOFIX) securing
rings
!When installing th echild restraint system,
makes ure that th eseat belt for th emiddle
seat does not get trapped. The seat belt could otherwise be damaged.
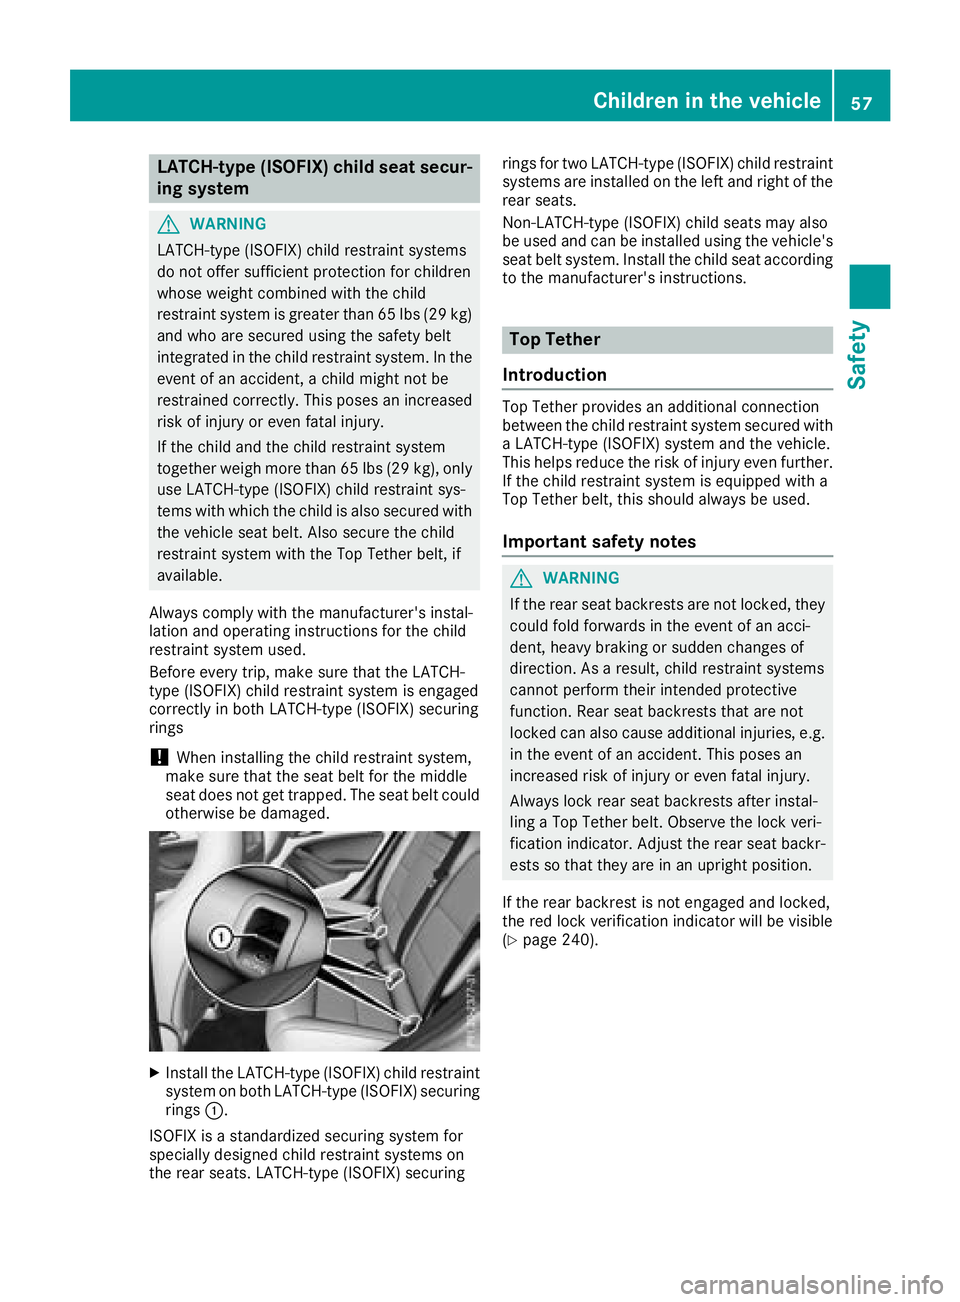
XInstall th eLATCH-type (ISOFIX) child restraint
system on bothL ATCH-type (ISOFIX) securing
rings :.
ISOFI Xisas tandardized securings ystem for
specially designed child restraint systems on
th er ear seats. LATCH-type (ISOFIX) securing rings for two LATCH-type (ISOFIX) child restraint
systems are installe
dontheleft and rightoft he
rear seats.
Non-LATCH-type (ISOFIX) child seatsm ay also
be used and can be installe dusingt hevehicle's
seat belt system. Install th echild seat according
to th emanufacturer' sinstructions.
Top Tether
Introduction
Top Tether provides an additional connection
between th echild restraint system secured with
aL ATCH-type (ISOFIX) system and th evehicle.
This helps reducet herisk of injury even further.
If th echild restraint system is equipped with a
Top Tether belt,t hiss hould always be used.
Important safety notes
GWARNING
If th erear seat backrests are not locked ,the y
could fold forwards in th eeventofana cci-
dent, heavy braking or sudden changes of
direction. As aresult, child restraint systems
cannot perform their intended protective
function.R ear seat backrests that are not
locked can also cause additional injuries,e .g.
in th eeventofana ccident. This poses an
increased risk of injury or even fatal injury.
Always lock rear seat backrests after instal-
ling aTop Tether belt.O bserve thelockv eri-
ficatio nindicator. Adjust th erear seat backr-
estssot hatthe ya re in an uprightp osition.
If th erear backrestisn ot engaged and locked,
th er ed lock verificatio nindicator will be visible
(
Ypage 240).
Children in th evehicle57
Safety
Z
Page 60 of 326
Top Tether anchorages
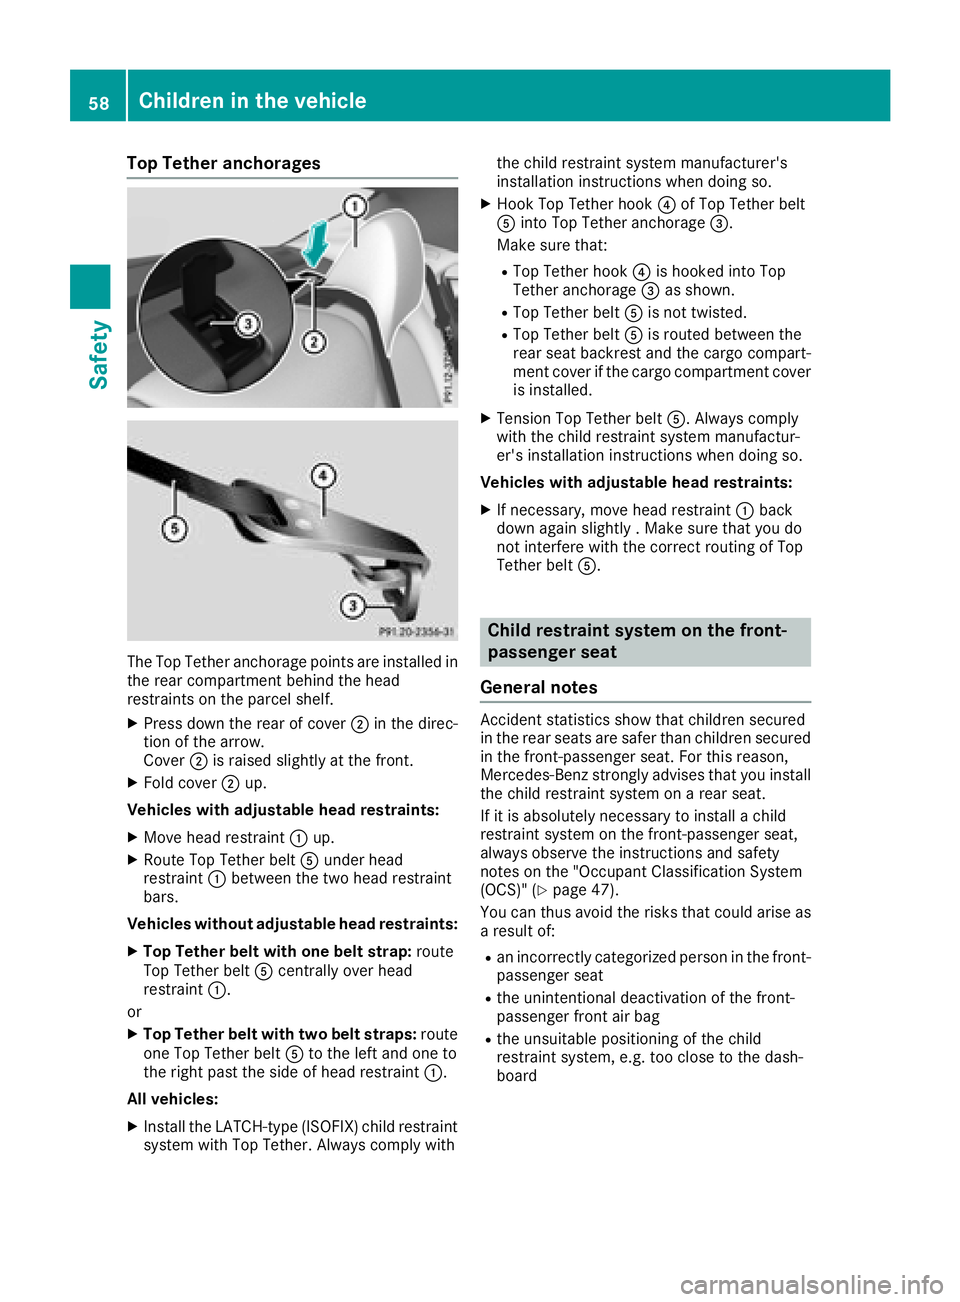
The TopTethera nchorage points ar einstalle din
the rea rcompartment behind the head
restraints on the parcel shelf.
XPress down the rea rofcover;in the direc-
tio noft he arrow.
Cover ;is raised slightlyatt he front.
XFoldc over ;up.
Vehicle switha djustabl eheadr estraints:
XMov eheadr estraint :up.
XRoute To pTetherb eltA under head
restraint :between the two head restraint
bars.
Vehicle swithout adjustabl eheadr estraints:
XTop Tether belt with on ebelts trap: route
To pT etherb eltA centrall yoverh ead
restraint :.
or
XTop Tether belt with two belt straps: route
one To pTetherb eltA to the left and one to
the right past the side of head restraint :.
Al lv eh icles:
XInstall the LATCH-type (ISOFIX)c hild restraint
system with To pTether. Alway scomply with the child restraint system manufacturer's
installatio
ninstructions when doing so.
XHookT opTetherh ook?of To pTetherb elt
A into To pTethera nchorage =.
Make sure that:
RTo pT etherh ook?is hooked into Top
Tethera nchorage =as shown.
RTopT etherb eltA is not twisted.
RTopT etherb eltA is routed between the
rea rseatb ackres tand the cargo compart-
ment cove rifthe cargo compartment cover
is installed.
XTension To pTetherb eltA.A lwayscomply
with the child restraint system manufactur-
er' sinstallatio ninstructions when doing so.
Vehicle switha djustabl eheadr estraints:
XIf necessary,m oveh eadr estraint :back
down agai nsligh tly.M akes uret haty oudo
not interfere with the correct routing of Top
Tetherb eltA.
Chil drestrain tsystem on the front-
passenge rseat
General notes
Accident statistics sho wthatc hildren secured
in the rea rseats ar esafer thanc hildren secured
in the front-passenge rseat. For thisr eason,
Mercedes-Benz strongl yadvises thaty ouinstall
the child restraint system on arears eat.
If it is absolutely necessary to instal lachild
restraint system on the front-passenge rseat,
always observe the instructions and safety
note sont he "Occupant Classification System
(OCS) "(
Ypage 47).
Yo uc an thusa voidthe risks thatc ould ariseas
ar esul tof:
Ran incorrectly categorize dpersonint he front-
passenge rseat
Rthe unintentiona ldeactivatio nofthe front-
passenge rfront ai rbag
Rthe unsuitable positioning of the child
restraint system ,e.g.t oo close to the dash-
board
58Children in the vehicle
Safety
Page 93 of 326
motion. This could cause you to lose control ofthe vehicle. There is arisk of an accident.
Always make sure that the driver'ss eat is
engagedb efore starting the vehicle.
GWARNING
You could lose control of you rvehicleify ou do
the following while driving:
Radjust the driver'ss eat, head restraint,
steering wheelorm irrors
Rfasten the seat belt
There is arisk of an accident.
Adjust the driver'ss eat, head restraint, steer-
ing wheela nd mirror and fasten you rseat belt
before starting the engine.
GWARNING
If you adjust the seat height carelessly,y ou or
other vehicleo ccupants could be trappeda nd
thereby injured. Children in particular could
accidentally press the electricals eat adjust-
ment buttons and become trapped. There is a
risk of injury.
Whilem oving the seats, make sure that your
hands or other body parts do not get under the
lever assembly of the seat adjustment sys-
tem.
!To avoidd amage to the seats and the seat
heating, observe the following information:
Rkeep liquid sfrom spilling on the seats. If
liquid is spilled on the seats, dry them as
soon as possible.
Rif the seat covers are damp or wet, do not
switch on the seat heating. The seat heat-
ing should als onot be used to dry the seats.
Rclean the seat covers as recommended;
see the "Interior care" section.
Rdo not transport heavy loads on the seats.
Do not place sharp objects on the seat
cushions, e.g. knives, nail sortools. The
seats should only be occupied by passen-
gers, if possible.
Rwhen the seat heating is in operation, do
not cover the seats with insulating materi-
als ,e.g. blankets, coats, bags ,seat covers,
child seats or booster seats.
!Make sure that there are no objects in the
footwellu nder or behind the seats when mov-
ing the seats back. There is arisk that the
seats and/or the objects could be damaged.
iFurther related subjects:
Rcargo compartment enlargement (folding
down the rear seats) (Ypage 240)
Adjusting the seats manually
Vehicles without the seating comfort
package
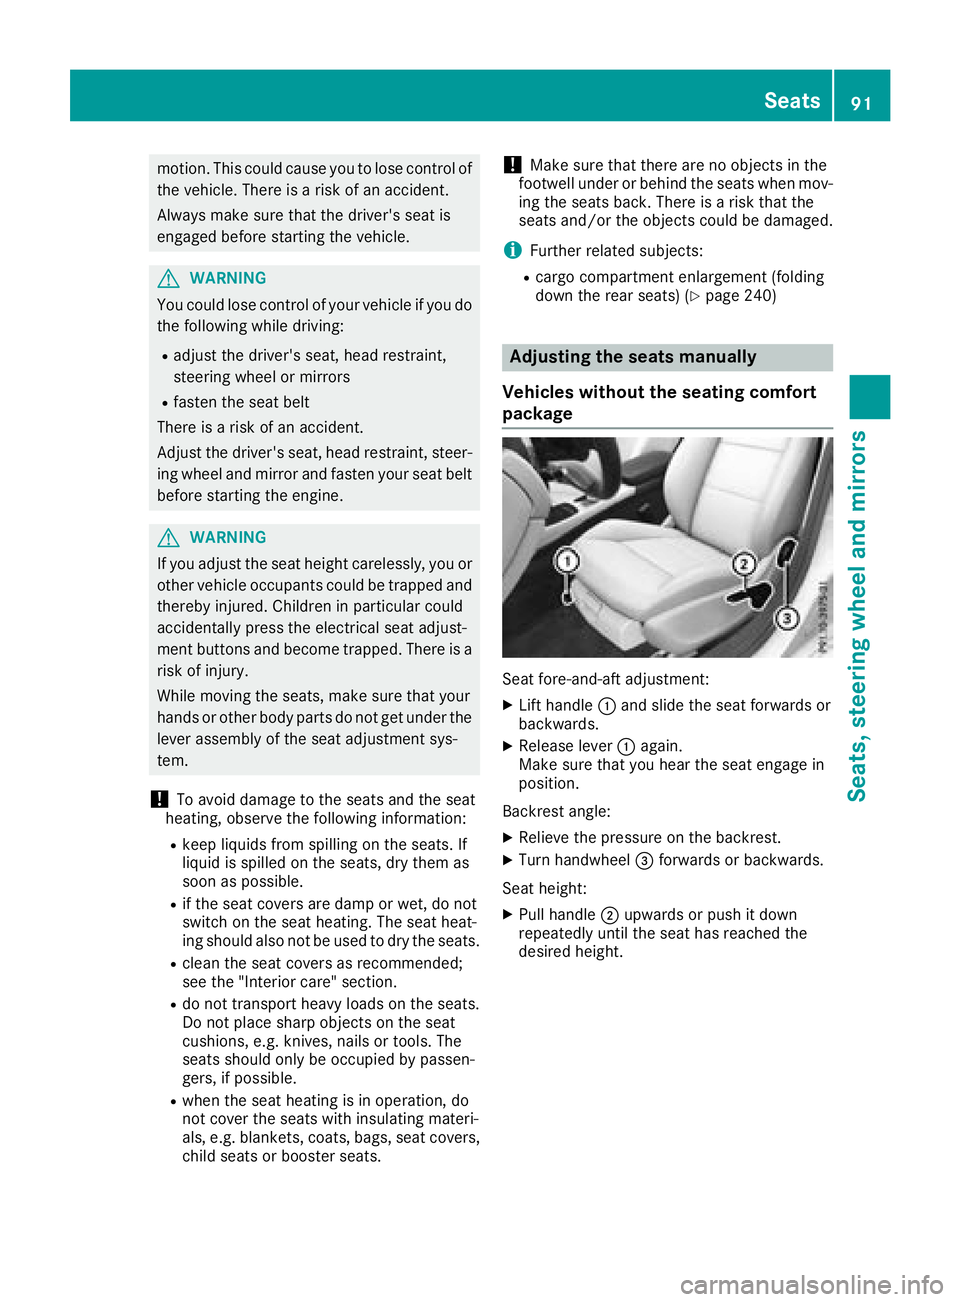
Seat fore-and-aft adjustment:
XLift handle :and slidet he seat forwards or
backwards.
XRelease lever :again.
Make sure that you hear the seat engage in
position.
Backrest angle:
XRelieve the pressure on the backrest.
XTurn handwheel =forwards or backwards.
Seat height:
XPullh andle ;upwards or push it down
repeatedly until the seat has reachedt he
desired height.
Seats91
Seats, steering wheel and mirrors
Z
Page 99 of 326
Folding theexterior mirrors in or out
electrically
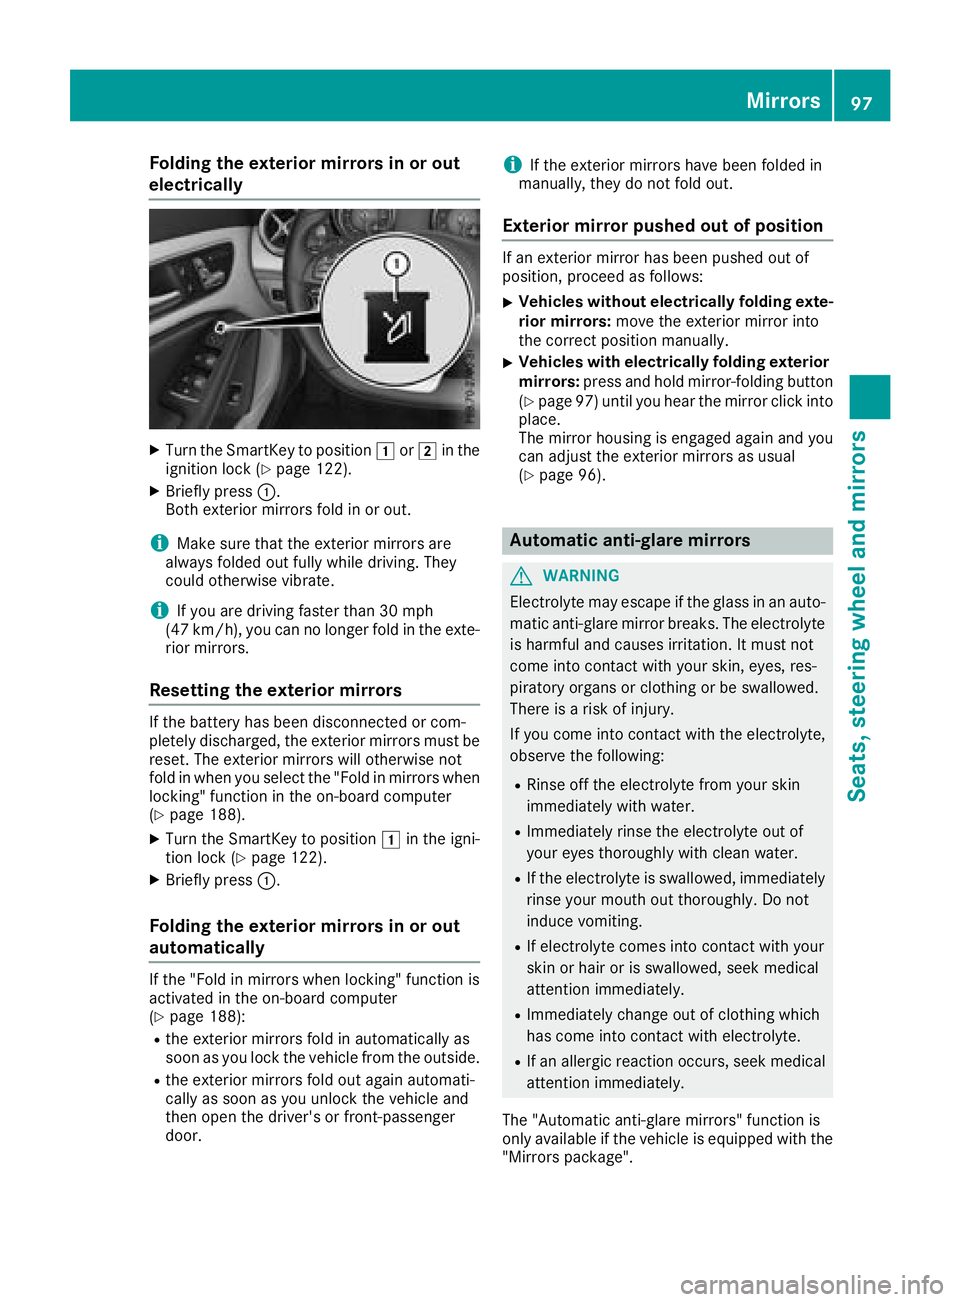
XTurn th eSma rtKey to position 1or2 in th e
ignition loc k(Ypage 122).
XBriefly press :.
Both exterio rmirror sfoldinoro ut.
iMak esure that th eexter iorm irror sare
always folded out fully while driving .They
could otherwise vibrate .
iIf you are driving fastertha n30m ph
(47 km/h), you can no longer fol dintheexte -
rio rm irrors.
Resetting th eexterior mirrors
If th ebattery has been disconnected or com-
pletely discharged, th eexter iorm irror smust be
reset .The exterio rmirror swill otherwise no t
fol dinw hen you select th e"Fold in mirror swhen
locking" function in th eon-bo ard computer
(
Ypage 188).
XTurn th eSmartKey to position 1in th eigni-
tion loc k(Ypage 122).
XBriefly press :.
Folding theexterior mirrors in or out
automatically
If th e"Fold in mirror swhen locking" function is
activated in th eon-bo ard computer
(
Ypage 188):
Rth ee xter iorm irror sfoldina utomatically as
soo nasy ou loc kthe vehicl efromt heoutside .
Rthee xter iorm irror sfoldo ut again automati-
call yass oonasy ou unlock th evehicl eand
then open th edriver' sorf ront-pa ssenger
door .
iIf theexter iorm irror shave been folded in
manually, they do no tfoldo ut.
Exterior mirror pushed out of position
If an exterio rmirror has been pushed out of
position ,procee dasfollows :
XVehicles without electricall yfolding exte-
rior mirrors :mov ethe exterio rmirror int o
th ec orre ct position manually.
XVehicles with electricall yfolding exterior
mirrors :press and hold mirror-foldin gbutto n
(
Ypage 97 )until yo uhearthe mirror click into
place.
The mirror housing is engaged agai nand you
can adjus tthe exterio rmirrors as usual
(
Ypage 96).
Automati canti-glare mirrors
GWARNING
Electrolyte maye scape if the glassinanauto-
matic anti-glare mirror breaks .The electrolyte
is harmfula nd causes irritation. It must not
come into contact with your skin, eyes, res-
piratory organs or clothing or be swallowed.
There is ariskofi njury.
If yo ucome into contact with the electrolyte,
observe the following:
RRinse off the electrolyte from your skin
immediatelyw ithw ater.
RImmediately rins ethe electrolyte outo f
your eyes thoroughl ywithc lean water.
RIf the electrolyte is swallowed, immediately
rins eyourm outh outt horoughly. Do not
induce vomiting.
RIf electrolyte comesi nto contact with your
skinorh airoriss wallowed, seekm edical
attentio nimmediately.
RImmediately change outofc lothing which
hasc ome into contact with electrolyte.
RIf an allergicr eactionoccurs, see kmedical
attentio nimmediately.
The "Automatic anti-glare mirrors"f unctionis
onlya vailable if the vehicl eisequippe dwitht he
"Mirrors package".
Mirrors97
Seats, steering wheel andmirrors
Z