Page 217 of 286

Releasehandle for th ehoo d
XStop your veh icleas far away fr omtraff icas
possible on level ground.
XSwitch off the engine.
XSecure the veh icleto prevent itfrom rolling
away.
XPull release handle :onthe hood.
The hoodis released.
XReach into the gap and push lever ;onthe
hoo d catch up.
XSwin g the hood up unt ilsupport strut =
engages and the hood issupported.
Closing the hood
GWARNIN G
If the hoodis unlatched, it could tip forward
during rapid decelerati on ofthe vehicle and
hit persons or objectswithin its path. There is
a risk ofan accident and injury.
Therefore, always make sure that the hood is
closed and locked co mpletely before driv ing
off.
If the hood is not locked and you are alrea dy
driving at walkingpace:
Rthe yellow 1indicat or lamp in theinstru-
ment cluster goes onfor vehicles without
steering-wheel butto ns.
Rthe 1 Hoodopendisp lay appears for vehi-
cles with steering-wheel butto ns.
!When you press the support strut back,
make sure that you do not press it against the
detent position and cause itto bend.
!Do no t use your hands to push thehood
down .You could damage it otherwise.
XLift the hood slightly.
XPress support strut =towards the back.
XLowe r the hood and allow itto fall with
mom entum fr oma height of approximat ely
1 ft (30 cm).
The hood locks audibly.
XChec k that the hood is correctly locke d.
If the hood can beraised slightly, it is not
properly engaged. If the hood is not correctly
engaged, openthehood again. Let the hood
fall with a little moremom entum.
Engine compartment215
Maintenance and care
Z
Page 218 of 286

;DEF filler neck cap (Ypage 126)
=Engine oil filler neck cap (Ypage 216)
?Brake fluid expansion tank cap
(Yp")
Overview of the engine compartment
Example: engine
:
Coolant expansion tank cap (Ypage 218)
;DEF filler neck cap (Ypage 126)
=Engine oil filler neck cap (Ypage 216)
?Brake fluid expansion tank cap
(Ypage 219)
AWasher fluid reservoir cap (Ypage 220)
Regularly check the fluid level and the assembly
for leaks. If you detect fluid loss, e.g. oil flecks on
the vehicle parking space, consult a qualified
specialist workshop immediately.
Engine oil
General notes
!Engine oil gets dirty in the course of opera-
tion and its quality and volume are gradually
diminished. Regularly check the oil level, and
top up or have it replaced as needed.
Observe the information on engine oils and oil
consumption in the "Technical data" section
(
Ypage 277).
You can check the oil level in the engine:
Ron the display of the on-board computer
Rwith the oil dipstick
Checking the oil level shown in the dis-
play
If at extremely low temperatures no engine oil
level is displayed after 5 minutes, repeat the
engine oil level check after another 5 minutes.
If an oil level reading is still not displayed, check
the engine oil level with the dipstick
(
Ypage 217). Have the engine oil level checked
at a qualified specialist workshop. Only check the oil level when the engine is at
normal operating temperature.
XPark the vehicle on a level surface.
XSwitch off the engine.
XWait 5 minutes.
XTurn the key to position
2in the ignition lock.
The display is activated.
XVehicles without steering wheel buttons:
press the 4menu button on the instrument
cluster (
Ypage 33) repeatedly until the dis-
play shows the 1symbol.
The --:--
display message appears in the
display while the engine oil level measure-
ment is running.
XVehicles with steering wheel buttons:
press the Ëservice button on the instrument
cluster (
Ypage 33).
The 4 Engine oil level Measuring
inprogressdisplay message appears in the
display while the engine oil level measure-
ment is in progress.
Display message for vehicles without steer-
ing-wheel buttons: the display may show the
following messages after the engine oil level
measurement.
1Action
OKXDo not add oil.
– 1.0 qtsXAdd the amount of oil
shown (Ypage 218).
XCheck the engine oil level
again after a few minutes.– 1.5 qts
– 2.0 qts
HIThe oil level is too high.
XHave excess oil removed.
Measurement units in the display:
RqtsUSA only
RltrCanada only
Display message for vehicles with steering- wheel buttons: the display may show the fol-
lowing messages after the engine oil level meas-
urement.
1Action
Engineoillevel OKXDo not add oil.
216Engine compartment
Maintenance and care
Page 219 of 286
.
XCheck the engine oil level
again after a few minutes.
EngineoilAdd1.5quarts
EngineoilAdd2.0quarts
EngineoillevelReduceoillevel
The oil")
EngineoilAdd1.0 quart
XAdd the amount of oil
shown (Ypage 218).
XCheck the engine oil level
again after a few minutes.
EngineoilAdd1.5quarts
EngineoilAdd2.0quarts
EngineoillevelReduceoillevel
The oil level is too high.
XHave excess oil removed.
Eng. oillev. Turnignitionon forlevel
XTurn the key to position2in
the ignition lock.
Observewait.period
XRepeat the engine oil
measurement after about
5 minutes if the engine is at
normal operating tempera-
ture.
XRepeat the engine oil
measurement after about
30 minutes if the engine is
not at normal operating
temperature.
Engineoillevel Notwhen eng.running
XSwitch off the engine when it is at normal operating
temperature and wait
approximately 5 minutes
before measuring the
engine oil level.
Measurement units in the display:
RqtsUSA only
RltrCanada only
Checking the oil level using the oil dip-
stick
Example: 4-cylinder diesel engine
Example: 6-cylinder diesel engine
For vehicles with a red oil dipstick, only check
the oil level when the engine is at normal oper-
ating temperature:
XStop your vehicle as far away from traffic as
possible on level ground.
XSecure the vehicle to prevent it from rolling
away.
XSwitch off the engine.
XWait 5 minutes.
For vehicles with a yellow oil dipstick, only check
the oil level when the engine is cold.
XStop your vehicle as far away from traffic as
possible on level ground.
XSecure the vehicle to prevent it from rolling
away.
XOpen the hood (Ypage 214).
XPull out oil dipstick :.
XWipe oil dipstick:using a lint-free cloth.
Engine compartment217
Maintenance and care
Z
Page 220 of 286

XInsert oil dipstick:back into the guide tube
as far as it will go and remove it again.
If the level is between minimum mark =and
maximum mark ;, the oil level is correct.
XIf the oil level has dropped to or below mini-
mum mark=, open cap ?and add engine oil
(
Ypage 218).
The difference in quantity between marks ;
and =is approximately 2 qt (2 l).
XInsert the oil dipstick into the guide tube as far
as it will go.
XClose the hood (Ypage 215).
OM651 4-cylinder diesel engine:
At outside temperatures between 32 ‡ (–0 †)
and 86 ‡ (30 †), the oil level can be checked
when the engine is cold.
Measuring the engine oil when the engine is cold
is less precise than measuring when the engine
is at normal operating temperature.
When the appropriate warning is shown in the
display
XAdd engine oil (Ypage 218)
or
XHave engine oil siphoned off.
Adding engine oil
GWARNING
If engine oil comes into contact with hot com- ponents in the engine compartment, it may
ignite. There is a risk of fire and injury.
Make sure that engine oil is not spilled next to
the filler neck. Let the engine cool down and
thoroughly clean the engine oil off the com-
ponents before starting the engine.
!The alternator is located below the engine
oil filler neck. If engine oil spills onto the alter-
nator, there is a danger of alternator damage.
Be very careful when adding engine oil.
HEnvironmental note
When adding oil, take care not to spill any. If
oil enters the soil or waterways, it is harmful to
the environment.
!Do not add too much oil. adding too much
engine oil can result in damage to the engine
or to the catalytic converter. Have excess
engine oil siphoned off.
!Do not use any additives in the engine oil.
This could damage the engine.
XOpen the hood (Ypage 214).
XUnscrew and remove cap ?.
XAdd engine oil.
XReplace cap?on the filler neck and tighten.
When doing so, make sure that the cap
engages correctly.
XCheck the oil level with the oil dipstick
(Ypage 217) or on the display (Ypage 216).
XClose the hood.
Coolant
GWARNING
The engine cooling system is pressurized, par-
ticularly when the engine is warm. When
opening the cap, you could be scalded by hot
coolant spraying out. There is a risk of injury.
Let the engine cool down before opening the
cap. Wear eye and hand protection when
opening the cap. Open the cap slowly half a
turn to allow pressure to escape.
Only check the coolant level and/or fill the cool-
ant if the vehicle is on a level surface and the
engine has cooled down. The coolant tempera-
ture must be below 122 ‡ (50 †).
!Check the engine cooling and heating sys-
tem regularly for leaks.
If a large quantity of coolant is lost, have the
cause traced and rectified at a qualified spe-
cialist workshop.
GWARNING
If antifreeze comes into contact with hot com- ponents in the engine compartment, it may
ignite. There is a risk of fire and injury.
Let the engine cool down before you add anti-
freeze. Make sure that antifreeze is not spilled
next to the filler neck. Thoroughly clean the
antifreeze from components before starting
the engine.
!Take care not to spill any coolant on painted
surfaces. You could otherwise damage the
paintwork.
218Engine compartment
Maintenance and care
Page 221 of 286

Example: cap and coolant expansion tank
Checking the coolant level
XStop your vehicle as far away from traffic as
possible on level ground.
XSwitch off the engine.
XSecure the vehicle to prevent it from rolling
away.
XOpen the hood (Ypage 214).
XSlowly turn cap:half a turn counter-clock-
wise to allow excess pressure to escape.
XTurn cap :further and remove it.
XCheck the coolant level.
If the coolant reaches the maximum mark on
coolant expansion tank ;, there is enough
coolant in coolant expansion tank ;.
Adding coolant
XIf the coolant drops under the minimum mark
on coolant expansion tank ;, add coolant to
the maximum mark.
Observe the information on coolant mixture
ratio and water quality in the "Technical data"
section (
Ypage 280). To prevent damage to
the engine cooling system, use only approved
corrosion inhibitor and antifreeze that com-
plies with the Mercedes-Benz Specifications
for Service Products.
XReplace cap :and turn it clockwise to
tighten.
XStart the engine.
XAfter approximately 5 minutes, switch off the
engine and allow it to cool down.
XCheck the coolant level again and add coolant
if necessary.
XClose the hood.
Brake fluid
GWARNING
Service products may be poisonous and haz-
ardous to health. There is a risk of injury.
Comply with instructions on the use, storage
and disposal of service products on the labels
of the respective original containers. Always
store service products sealed in their original
containers. Always keep service products out
of the reach of children.
Brake fluid is hazardous to health. Also observe
the safety notes in the "Service products and
capacities" section (
Ypage 273).
GWARNING
The brake fluid constantly absorbs moisture
from the air. This lowers the boiling point of
the brake fluid. If the boiling point of the brake
fluid is too low, vapor pockets may form in the
brake system when the brakes are applied
hard. This would impair braking efficiency.
There is a risk of an accident.
You should have the brake fluid renewed at
the specified intervals.
!Brake fluid corrodes paint, plastic and rub-
ber. If paint, plastic or rubber has come into
contact with brake fluid, rinse with water
immediately.
Have the brake fluid renewed every 2 year sat a
qualified specialist workshop. Observe the infor- mation on brake fluid in the "Technical data"
section (
Ypage 279).
Check the brake fluid level regularly, e.g. weekly
or when refueling.
Engine compartment219
Maintenance and care
Z
Page 222 of 286

Checking the brake fluid level
XStop your vehicle as far away from traffic as
possible on level ground.
XSwitch off the engine.
XSecure the vehicle to prevent it from rolling
away.
XOpen the hood (Ypage 214).
XCheck the brake fluid level.
The brake fluid level is correct if the level is
between the MIN mark and MAX mark on
brake fluid reservoir:.
XClose the hood.
!If the brake fluid level in the brake fluid res-
ervoir has fallen to the MIN mark or below,
check the brake system immediately for
leaks. Also check the thickness of the brake
linings. Visit a qualified specialist workshop
immediately.
Do not add brake fluid. This does not correct
the malfunction.
Washer fluid
GWARNING
Windshield washer concentrate could ignite if it comes into contact with hot engine compo-
nents or the exhaust system. There is a risk of
fire and injury.
Make sure that no windshield washer con-
centrate is spilled next to the filler neck.
!Only use washer fluid that is suitable for
plastic lamp lenses, e.g. MB SummerFit or MB WinterFit. Unsuitable washer fluid could dam-
age the plastic lenses of the headlamps.
Example: washer fluid reservoir
Add windshield washer concentrate to the
washer fluid all year round. Observe the infor-
mation on washer fluid in the "Technical data"
section (
Ypage 281).
Adding washer fluid
XMix the washer fluid to the appropriate mixing ratio in a container beforehand.
XOpen the hood (Ypage 214).
XPull cap :on the washer fluid reservoir
upwards at the tab.
XAdd the premixed washer fluid.
XPress cap :onto the filler neck until it
engages audibly.
XClose the hood.
Fuel system
Draining the fuel filter
GWARNING
Fuel is highly flammable. Improper handling of
fuel creates a risk of fire and explosion.
Avoid fire, open flames, smoking and creating
sparks under all circumstances. Switch off the
ignition and auxiliary heating before carrying
out work to the fuel system. Always wear pro-
tective gloves.
HEnvironmental note
Dispose of the water-fuel mixture in an envi-
ronmentally responsible manner.
!When the :indicator lamp lights up,
drain the fuel filter with water separator
immediately. Otherwise, the engine may be
damaged.
220Engine compartment
Maintenance and care
Page 223 of 286

If the: indicator lamp in the instrument
cluster goes on, drain the fuel filter with the
water separator immediately.
iWe recommend that you have this mainte-
nance work carried out at a qualified special-
ist workshop.
XPark the vehicle safely and secure it from roll-
ing away.
XSwitch off the auxiliary heating system .
XSwitch off the engine.
XOpen the hood (Ypage 214).
XPlace a suitable receptacle under drain
hose :.
XTurn the SmartKey to position 2in the ignition
lock.
XOpen drain plug ;immediately until the
water/fuel mixture flows out of drain hose :.
XScrew in drain plug;as soon as approx-
imately 0.2 qt (0.2 l)of the water/fuel mixture
has been collected.
The electrical fuel pump automatically halts
the flow of the water/fuel mixture after
30 seconds.
XAfter draining, turn the SmartKey back to
position 0in the ignition lock.
XDispose of the collected water/fuel mixture
in an environmentally responsible manner,
e.g. at a qualified specialist workshop.
XCheck drain plug ;. The drain plug must be
closed.
When the engine is running and drain hose ;
is open, fuel is lost through drain hose :.
XClose the hood (Ypage 215).
If the : indicator lamp does not go out after
draining:
XDrain the fuel filter again.
XIf the : indicator lamp does not go out
after draining for the second time, have the
cause checked immediately at a qualified spe-
cialist workshop.
Vehicle interior
Air filter for the rear-compartment air
conditioning
!
Regularly check the air filters for visible dirt.
Clean or replace a dirty filter mat. The dirt may otherwise lead to damage to the air-condi-
tioning system.
Filter magazine, located on the roof in the rear
compartment
An increased amount of sand or dust may collect
in the air filter of the rear-compartment air con-
ditioning when you drive on dusty or sandy
roads.
XTo remove the filter mat: carefully pry
cover :out of recesses ;and remove.
XRemove the filter mat from the air duct.
XTo clean the filter mat: wash the dirty filter
mat with clear water.
XLeave the filter mat to dry.
iThe filter mat must not be cleaned or dried in
a machine.
XTo install the filter mat: insert the filter mat
into the air duct.
XReplace and engage cover :.
Maintenance
General notes
HEnvironmental note
Observe measures to protect the environ-
ment when working on the vehicle. You must
observe the legal requirements when dispos-
ing of service products, e.g. engine oil. This
also includes all components, e.g. filters,
which have come into contact with service
products. Any qualified specialist workshop
can provide information about this.
Dispose of empty containers, cleaning cloths
and care products in an environmentally
Maintenance221
Maintenance and care
Z
Page 224 of 286

responsible manner. Comply with the instruc-
tions for use of the care products.
Do not run the engine for longer than neces-
sary when the vehicle is stationary.
Before having maintenance and repairs per-
formed, it is essential to read the materials rela-
ted to the maintenance and repairs:
Rthe applicable sections of the technical doc-
umentation, e.g. the Operator's Manual and
workshop information.
Rregulations such as industrial safety regula-
tions and accident prevention regulations.
While working under the vehicle, you must
secure the vehicle on jack stands with sufficient load capacity.
Never use the jack as a substitute. The vehicle's
jack is intended only to raise the vehicle for a
short time when changing a wheel. It is not
suited for performing maintenance work under
the vehicle.
Please also refer to the notes about qualified
specialist workshops (
Ypage 27).
The scope and regularity of the inspection and
maintenance work primarily depend on the
often diverse operating conditions. Specialist
knowledge beyond the scope of this Operator's
Manual is required when carrying out testing
and maintenance work. This work should only be
carried out by trained staff.
The vehicle Maintenance Booklet describes the scope and frequency of maintenance work and
contains additional notes on the New Vehicle
Limited Warranty and on service products.
Maintenance services must be carried out in
accordance with the provisions and recommen-
dations in the Maintenance Booklet. Not doing
so could void the warranty claim and lead to
refusal of goodwill gestures after the manufac-
turer has submitted a damage report.
iObserve the notes on genuine Sprinter parts
(Ypage 29).
Service interval display
General notes
A service that is due is displayed in the service
interval display about 1 month in advance. A
message is then displayed while the vehicle is in motion or when the ignition is switched on.
iThe service interval display does not provide
information about the engine oil level. The
service interval display should therefore not
be confused with the 5engine oil level
display.
The service due date is displayed in days or
miles (kilometers), depending on the total dis-
tance driven.
The symbols or letters on the service display
show the type of service that is due.
¯ orA
for a minor service
° orB
for a major service
Service due date display
Vehicles with steering wheel buttons: the
following messages may be displayed.
R¯ Service A due in ... days
R¯Service A due in ... mi(km)
R¯Service A Carry out now
Vehicles without steering wheel buttons:
the following messages may be displayed.
R¯for service A
R°for Service B
Additionally, you will see the remaining distance
in miles (mi
) or kilometers (km) or the remaining
time in days (d).
Service due date has been exceeded
Vehicles with steering wheel buttons: if you
have missed the service due date, one of the
following messages appears in the display and
warning tone also sounds.
R¯ Service A overdue by ... days
R¯Service A overdue by ... km(km)
Vehicles without steering wheel buttons: if
you have missed the service due date, the ¯
or ° symbol for the service flashes for
10 seconds after the ignition is switched on. A
minus sign also appears in front of the service
due date.
Calling up the service due date
XTurn the key to position 2in the ignition lock.
The display is activated.
222Maintenance
Maintenance and care
 1
1 2
2 3
3 4
4 5
5 6
6 7
7 8
8 9
9 10
10 11
11 12
12 13
13 14
14 15
15 16
16 17
17 18
18 19
19 20
20 21
21 22
22 23
23 24
24 25
25 26
26 27
27 28
28 29
29 30
30 31
31 32
32 33
33 34
34 35
35 36
36 37
37 38
38 39
39 40
40 41
41 42
42 43
43 44
44 45
45 46
46 47
47 48
48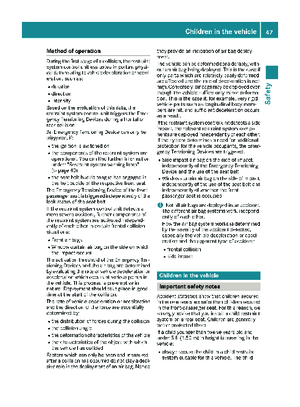 49
49 50
50 51
51 52
52 53
53 54
54 55
55 56
56 57
57 58
58 59
59 60
60 61
61 62
62 63
63 64
64 65
65 66
66 67
67 68
68 69
69 70
70 71
71 72
72 73
73 74
74 75
75 76
76 77
77 78
78 79
79 80
80 81
81 82
82 83
83 84
84 85
85 86
86 87
87 88
88 89
89 90
90 91
91 92
92 93
93 94
94 95
95 96
96 97
97 98
98 99
99 100
100 101
101 102
102 103
103 104
104 105
105 106
106 107
107 108
108 109
109 110
110 111
111 112
112 113
113 114
114 115
115 116
116 117
117 118
118 119
119 120
120 121
121 122
122 123
123 124
124 125
125 126
126 127
127 128
128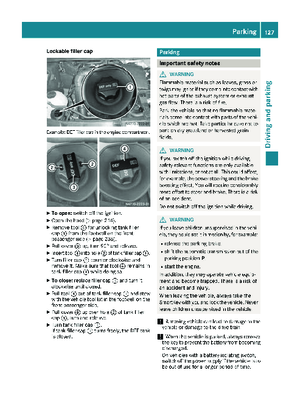 129
129 130
130 131
131 132
132 133
133 134
134 135
135 136
136 137
137 138
138 139
139 140
140 141
141 142
142 143
143 144
144 145
145 146
146 147
147 148
148 149
149 150
150 151
151 152
152 153
153 154
154 155
155 156
156 157
157 158
158 159
159 160
160 161
161 162
162 163
163 164
164 165
165 166
166 167
167 168
168 169
169 170
170 171
171 172
172 173
173 174
174 175
175 176
176 177
177 178
178 179
179 180
180 181
181 182
182 183
183 184
184 185
185 186
186 187
187 188
188 189
189 190
190 191
191 192
192 193
193 194
194 195
195 196
196 197
197 198
198 199
199 200
200 201
201 202
202 203
203 204
204 205
205 206
206 207
207 208
208 209
209 210
210 211
211 212
212 213
213 214
214 215
215 216
216 217
217 218
218 219
219 220
220 221
221 222
222 223
223 224
224 225
225 226
226 227
227 228
228 229
229 230
230 231
231 232
232 233
233 234
234 235
235 236
236 237
237 238
238 239
239 240
240 241
241 242
242 243
243 244
244 245
245 246
246 247
247 248
248 249
249 250
250 251
251 252
252 253
253 254
254 255
255 256
256 257
257 258
258 259
259 260
260 261
261 262
262 263
263 264
264 265
265 266
266 267
267 268
268 269
269 270
270 271
271 272
272 273
273 274
274 275
275 276
276 277
277 278
278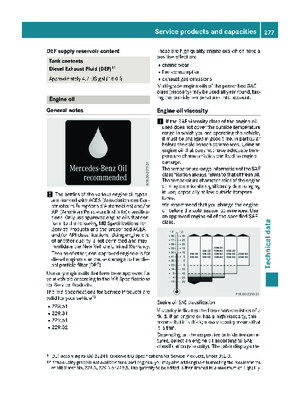 279
279 280
280 281
281 282
282 283
283 284
284 285
285