Page 225 of 286

Vehicles without steering wheel buttons
XPress the4menu button on the instrument
cluster repeatedly until the ¯or°
symbol for the service appears in the display.
Additionally, you will see the remaining dis-
tance in miles ( mi
) or kilometers ( km) or the
remaining time in days ( d).
Vehicles with steering wheel buttons
XPress the VorU button on the steering
wheel until the standard display (Ypage 164)
appears in the display.
XPress the &or* button on the steering
wheel repeatedly until the service message
appears in the display, for example:
R¯ Service A in ... days
R¯Service A in ... mi(km)
Battery
Important safety notes
Work on the battery, e.g. removing or installing,
requires specialist knowledge and the use of
special tools. Therefore, always have work on
the battery carried out at a qualified specialist
workshop.
GWARNING
Work carried out incorrectly on the battery
can lead, for example, to a short circuit and
thus damage the vehicle electronics. This can
lead to function restrictions applying to
safety-relevant systems, e.g the lighting sys-
tem, the ABS (anti-lock braking system) or the
ESP
®(Electronic Stability Program). The oper-
ating safety of your vehicle may be restricted.
You could lose control of the vehicle, for
example:
Rwhen braking
Rin the event of abrupt steering maneuvers
and/or when the vehicle's speed is not
adapted to the road conditions
There is a risk of an accident.
In the event of a short circuit or a similar inci-
dent, contact a qualified specialist workshop
immediately. Do not drive any further. You
should have all work involving the battery car- ried out at a qualified specialist workshop.
Further information can be found under "ABS"
(
Ypage 53) and under "ESP®" (Ypage 55).
GWARNING
Electrostatic build-up can lead to the creation of sparks, which could ignite the highly explo-
sive gases of a battery. There is a risk of an
explosion.
Before handling the battery, touch the vehicle
body to remove any existing electrostatic
build-up.
The flammable gas mix is produced when the
battery is charged or when the vehicle is jump-
started.
Always make sure that neither you nor the bat-
tery are electro statically charged. Electrostatic
charging results, for example, from:
Rwearing synthetic clothing
Rfriction between clothing and the seat
Rdragging or pushing the battery across carpet
flooring or any other synthetic materials
Rrubbing the battery with cloths or towels.
Comply with the following safety precautions
and take protective measures when handling
batteries.
Risk of explosion. Explosive oxyhy-
drogen is produced when batteries
are being charged. Only charge bat-
teries in well-ventilated areas.
Fire, open flames and smoking are
therefore prohibited when working
on the battery. Avoid creating
sparks.
Battery acid is caustic. Avoid con-
tact with the skin, eyes or clothing.
Wear acid-proof protective gloves. If
skin or clothes are splashed with
acid, neutralize the splashes imme-
diately with soapy water or an acid
neutralizer, and then clean the affec-
ted areas with water. Consult a doc- tor if necessary.
Wear eye protection. When mixing
water and acid, the liquid can splash
into your eyes. Rinse acid splashes
to the eyes immediately with clean
Battery223
Maintenance and care
Z
Page 226 of 286

water and contact a doctor immedi-
ately.
Keep children at a safe distance.
Children are not able to assess the
dangers posed by batteries and
acid.
When handling batteries, observe
the safety precautions and special
protective measures contained in
this Operator's Manual.
HEnvironmental note
Batteries contain dangerous
substances. It is against the
law to dispose of them with
the household rubbish. They
must be collected separatelyand recycled to protect the
environment.
Dispose of batteries in an
environmentally friendly
manner. Take discharged
batteries to a qualified spe-
cialist workshop or a special
collection point for used bat-
teries.
Observe the following notes:
RRecharge the battery more frequently, if you:
-predominantly drive short distances
-predominantly drive at low outside temper-
atures
-park the vehicle longer than 3 weeks
In order for the batteries to achieve their max- imum possible service life, they must always
be sufficiently charged.
RWhen you park the vehicle, remove the Smart-Key if you do not require any electrical con-
sumers. The vehicle will then use very little
energy, thus conserving battery power.
RWhen replacing a battery, only use batteries
that are recommended for use in Sprinter
vehicles.
RHave the battery removed at a qualified spe-
cialist workshop.
RIf you leave your vehicle parked longer than
3 weeks:
-consult a qualified specialist workshop or
-switch off the power supply using the bat-
tery main switch (Ypage 116) or
-disconnect the batteries (Ypage 225).
Otherwise, you need to check the battery's
condition of charge every 3 weeks, since
standby power consumption can drain the
battery. If the battery voltage is lower than
12.2 V, the battery must be charged. Other-
wise, the battery may be damaged by exhaus-
tive discharging.
Be sure to observe the notes on charging the batteries (
Ypage 228).
Installation locations
Your vehicle may be equipped with three bat-
teries, depending on the equipment version:
RStarter battery in the battery case in the left
footwell
RAdditional battery in the engine compartment
RAuxiliary battery under the left-hand front
seat
Have the auxiliary battery removed at a qualified
specialist workshop.
Installing/removing the floor cover-
ing (starter battery)
GWARNING
Objects in the driver's footwell can restrict the pedal travel or obstruct a depressed pedal.
The operating and road safety of the vehicle is
jeopardized. There is a risk of an accident.
Make sure that all objects in the vehicle are
stowed correctly, and that they cannot enter
the driver's footwell. Install the floormats
securely and as specified in order to ensure
sufficient clearance for the pedals. Do not use
loose floormats and do not place floormats on
top of one another.
224Battery
Maintenance and care
Page 227 of 286

XSwitch off all electrical consumers.
XTo remove:remove screws =and take off
trim ;.
XRemove floor covering :.
XTo install:insert floor covering :and align
with the driver's seat base and the doorway.
XPut trim ;in place and screw screws =
back in.
Disconnecting/connecting the
starter battery
Important safety notes
GWARNING
During the charging process, a battery produ-
ces hydrogen gas. If a short circuit occurs or
sparks are created, the hydrogen gas can
ignite. There is a risk of an explosion.
RMake sure that the positive terminal of a
connected battery does not come into con- tact with vehicle parts.
RNever place metal objects or tools on a bat-
tery.
RIt is important that you observe the descri-
bed order of the battery terminals when
connecting and disconnecting a battery.
RWhen jump-starting, make sure that the
battery poles with identical polarity are
connected.
RIt is particularly important to observe the
described order when connecting and dis-
connecting the jumper cables.
RNever connect or disconnect the battery
terminals while the engine is running.
Disconnecting the starter battery
!Switch off the engine and remove the key
from the ignition lock. Firstly remove the bat-
tery terminals. Otherwise, you could destroy
electronic components such as the alterna-
tor.
Always disconnect the starter battery in the
battery case in the left-hand side footwell
first.
!Always disconnect the battery in the order
described below. Never swap the terminal
clamps. You may otherwise damage the vehi- cle electronics.
If the vehicle is expected to be out of use for over
3 weeks, disconnect the batteries. This will pre-
vent battery discharge caused by off-load cur-
rent consumption.
Battery cover in the left footwell
XSwitch off all electrical consumers.
XSwitch off the engine and remove the key
from the ignition lock.
XRemove the floor covering (Ypage 224).
XLoosen screws ;and slide battery cover :
in the direction of the arrow.
The screws must protrude beyond the larger
recesses.
XRemove battery cover :upwards.
Battery225
Maintenance and care
Z
Page 228 of 286

Starter battery in the left footwell
XFirst loosen and remove the negative terminal
clamp so that it is no longer in contact with
the terminal.
XRemove the cover from the positive terminal.
XLoosen the positive terminal clamp and fold it
up to the side together with the pre-fuse box.
Reconnecting the starter battery
!Always connect the battery in the order
described below. Never swap the terminal
clamps. You may otherwise damage the vehi-
cle electronics.
XFold the positive terminal clamp with the pre-
fuse box down to the terminal.
XConnect the positive terminal clamp.
XAttach the cover to the positive terminal.
XConnect the negative terminal clamp.
XPosition battery cover :so that screws ;
are positioned over the large recesses.
XSlide battery cover :in the direction of
travel into the smaller recesses.
XTighten screws ;.
XInstall the floor covering (Ypage 224).
Carry out the following work after connecting
the battery:
XReset the side windows (Ypage 71).
Removing/installing the starter bat-
tery
Removing the starter battery
XDisconnect the battery (Ypage 225).
XPull breather hose with connector bracket ;
from connection :on the degassing cover.
XLoosen the bolts holding retainer =, which
prevents the battery from moving around.
XPull retainer =upwards.
XSlide the battery from its anchorage in the
direction of travel.
XFold the bar of the battery upwards and
remove the battery from the battery case.
226Battery
Maintenance and care
Page 229 of 286

Installing the starter battery
XInsertth ebattery int oth ebattery case.
XFold down th ebar of th ebattery.
XSlide th ebattery int oits anchorage in th e
opposit edirection to th edirection of travel .
XInsertretainer =.
XTightenth ebolt son retainer =whic hhold s
th ebattery in place.
XAttac hbreather hos ewit hconnecto r
bracke t; to connection :of th eventilation
cover .
XConnect th ebattery (Ypage 225).
Disconnecting and connecting the
additional battery (engine compart-
ment)
Important safety notes
GWARNIN G
During th echarging process, abattery produ-
ce shydrogen gas. If ashort circuit occur sor
sparks are created, th ehydrogen gas can
ignite. Ther eis aris kof an explosion .
RMakesur ethat th epositive termina lof a
connecte dbattery does no tcome int ocon-
tac twit hvehicl eparts.
RNever plac emetal objects or tools on abat -
tery.
RIt is important that you observ eth edescri-
bed order of th ebattery terminals when
connecting and disconnecting abattery.
RWhen jump-starting ,mak esur ethat th e
battery pole swit hidentical polarit yare
connected.
RIt is particularly important to observ eth e
describe dorder when connecting and dis-
connecting th ejumper cables.
RNever connec tor disconnect th ebattery
terminals while th eengin eis running.
Disconnecting the additional battery
!Switc hoff th eengin eand remove th eke y
from th eignition lock. Firstly remove th ebat -
tery terminals. Otherwise, you could destroy electronic component
ssuc has th ealterna-
tor.
Always disconnect th estarter battery in th e
battery cas ein th eleft-han dside footwell
first .
!Always disconnect th ebattery in th eorder
describe dbelow. Never swap th etermina l
clamps. You may otherwise damag eth evehi-
cle electronics .
Additional battery in th eengin ecompartmen t
XSwitchoff all electrical consumers.
XSwitc hoff th eengin eand remove th eke y
from th eignition lock.
XOpen th ehoo d (Ypage 214).
XFirst loosen and remove th enegative termina l
clam pso that it is no longer in contact wit h
th eterminal.
XRemove th ecover from th epositive terminal.
XLoosen and remove th epositive termina l
clamp.
Connecting the additional battery
!Always connec tth ebattery in th eorder
describe dbelow. Never swap th etermina l
clamps. You may otherwise damag eth evehi-
cle electronics .
XConnect thepositive termina lclamp.
XAttac hth ecover to th epositive terminal.
XConnect th enegative termina lclamp.
XClose th ehood.
Carr yout th efollowin gwor kafter connecting
th ebattery:
XReset th eside windows (Ypage 71).
Battery227
Maintenance and care
Z
Page 230 of 286

Removing the additional battery
XDisconnect th ebattery (Ypage 227).
XLoosen th ebolt sholding th eretainer that pre -
vents th ebat")
Installing and removing the additional
battery (engine compartment)
Removing the additional battery
XDisconnect th ebattery (Ypage 227).
XLoosen th ebolt sholding th eretainer that pre -
vents th ebattery from moving around.
XRemove th ebattery holder and tak eout th e
battery.
Installing the additional battery
XInser tth ebattery int oth ebattery case.
XInser tth ebattery holder.
XTighte nth ebolt sholding th eretainer that
prevents th ebattery in th eengin ecompart-
men tfrom moving around.
XConnect th ebattery (Ypage 227).
Charging
GWARNIN G
A discharged battery can freez eat tempera-
tures belo wfreezing point. When jump-start -
ing th evehicl eor charging th ebattery, gase s
can escape from th ebattery. Ther eis aris kof
an explosion .
Allow th efrozen battery to thaw out before
charging it or jump-starting .
If th eindicator/warning lamp sdo no tligh tup in
th einstrumen tcluste rwhen temperatures are
low, it is probably because th edischarged bat -
tery has frozen .Should this be th ecase, do no t
jump-start th evehicl eor charge th ebattery. The
servic elife of athawed battery may be shorter.
Start-up behavior may deteriorate, in particular
at low temperatures .Hav eth ethawed battery
checke dat aqualified specialist workshop.
GWARNIN G
During charging and jump-starting ,explosive
gase scan escape from th ebattery. Ther eis a
ris kof an explosion .
Particularly avoi dfire, open flames, creating
sparks and smoking. Ensur ethere is sufficien t
ventilation while charging and jump-starting .
Do no tlean ove r abattery.
GWARNIN G
Battery acid is caustic. Ther eis aris kof injury.
Avoid contact wit hskin, eyes or clothing .Do
no tinhale any battery gases. Do no tlean ove r
th ebattery. Kee pchildren away from batter-
ies. Wash away battery acid immediately wit h
plenty of clean water and seek medical atten -
tion .
!Only charge th einstalled battery wit h abat-
tery charge rthat has been tested and
approve dby th edistributo rnamed on th e
inside of th efron tcover .This device allows
th ebattery to be charge dwhen it is installed
in th evehicle. The vehicle's electronics may
otherwise be damaged.
A battery charge runit specially adapted for
Mercedes-Ben zvehicles and tested and
approve dby Mercedes-Ben zis available as an
accessory. Only this device permit sth echarging
of th ebattery in it sinstalled position .Only
charge th einstalled battery wit h abattery
charge rthat has been tested and approve dby
Mercedes-Benz, usin gth ejump-start connec -
tion poin tin th eengin ecompartment. Contac t
an authorize dMercedes-Ben zCente rfor infor-
mation and availability. Read th eoperating
instruction sfor your charge rbefore charging
th ebattery.
The additional battery canno tbe charge dfrom
th eju
mp-starting connection point.
Recharge th ebattery mor efrequentl yif you use
th evehicl emainly for short trips and/o rdriv eat
low outside temperatures .
XCharge thebattery. Observ eth enote sin th e
operating instruction sfor your battery
charger.
XIf necessary, instal lbattery. Observ eth e
note son reconnecting th ebattery.
iRecharge uninstalled, out of servic ebatter-
ies every three months. This will counter self -
dischargin gand preven tbattery damage.
Care
!
Dirt ybattery clamps and battery surfaces
caus eleak currents whic hlead to th ebatter-
ies discharging.
228Battery
Maintenance and care
Page 231 of 286

!Do not use cleaning agents containing fuel.
Cleaning agents containing fuel corrode the
battery housing.
!If dirt gets into the battery cell, battery self-
discharge will increase and the battery may
be damaged.
The following points on battery care must be
observed:
XRegularly check the battery terminals and the
fastening of the negative cable to the chassis
to ensure that they are firmly seated.
XAlways keep the battery terminals and battery
surfaces clean and dry.
XLightly grease the undersides of the battery
terminals with acid-resistant grease.
XOnly clean the battery casing with a commer-
cially available cleaning product.
Care
Notes on care
GWARNING
If you use openings in the bodywork or
detachable parts as steps, you could:
Rslip and/or fall
Rdamage the vehicle and cause yourself to
fall.
There is a risk of injury.
Always use secure climbing aids, e.g. a suita-
ble ladder.
!For cleaning your vehicle, do not use any of
the following:
Rdry, rough or hard cloths
Rabrasive cleaning agents
Rsolvents
Rcleaning agents containing solvents
Do not scrub.
Do not touch the surfaces or protective films
with hard objects, e.g. a ring or ice scraper.
You could otherwise scratch or damage the
surfaces and protective film.
!Do not park your vehicle for a long period of
time directly after cleaning, particularly after
cleaning the wheel rim with wheel cleaner.
Wheel cleaner can lead to the increased cor- rosion of the brake discs and pads. Therefore,
drive for a few minutes after cleaning. By
heating up the brakes, the brake discs and
pads dry. The vehicle can then be parked for a
long period of time.
HEnvironmental note
Only clean your vehicle at specially designed
wash bays. Dispose of empty containers and
used cleaning products in an environmentally
responsible manner.
HEnvironmental note
Dispose of empty packaging and cleaning
cloths in an environmentally responsible man-
ner.
Regular care of your vehicle is a condition for
retaining the quality in the long term.
Use care products and cleaning agents recom-
mended and approved for Sprinter vehicles.
Washing the vehicle and cleaning the
paintwork
Automatic car wash
GWARNING
Braking efficiency is reduced after washing
the vehicle. There is a risk of an accident.
After the vehicle has been washed, brake
carefully while paying attention to the traffic
conditions until full braking power is restored.
!Never clean your vehicle in a Touchless
Automatic Car Wash as these use special
cleaning agents. These cleaning agents can
damage the paintwork or plastic parts.
!Make sure that the automatic car wash is
suitable for the size of the vehicle.
Before washing the vehicle in an automatic
car wash, fold in the exterior mirrors and
remove any additional antennas. Otherwise,
the exterior mirror, antenna or the vehicle
itself could be damaged.
Make sure that the exterior mirrors are fully
folded out again and that any additional
antennas are re-installed when you leave the
automatic car wash.
Care229
Maintenance and care
Z
Page 232 of 286

!Make sure that:
Rthe side windows and the roof are com-
pletely closed
Rthe climate control blower is switched off
Rthe windshield wiper switch is at position0
The vehicle could otherwise be damaged.
You can wash the vehicle in an automatic car
wash from the very start.
Wash off excess dirt before cleaning the vehicle
in an automatic car wash.
After putting the vehicle through an automatic
car wash, wipe off wax from:
Rthe rear view camera lens (Ypage 232)
Rthe windshield
Rthe windshield wiper blades
This will prevent smears and reduce wiping
noises caused by residue on the windshield.
Washing by hand
In some countries, washing by hand is only
allowed at specially equipped washing bays.
Observe the legal requirements of the country
you are currently in when washing by hand.
XDo not use hot water and do not wash the
vehicle in direct sunlight.
XUse a soft car sponge.
XUse a mild cleaning agent, e.g. a car shampoo
approved for use with Sprinter vehicles.
XThoroughly hose down the vehicle with a gen-
tle jet of water.
XDo not point the water jet directly towards the
air inlets.
XUse plenty of water and rinse out the sponge
frequently.
XRinse the vehicle with clean water and dry
thoroughly with a chamois.
XDo not let the cleaning agents dry on the
paintwork.
When using the vehicle in winter, remove all
traces of road salt deposits carefully and as
soon as possible.
Power washers
GWARNING
The water jet from a circular jet nozzle (dirt
blasters) can cause invisible exterior damage
to the tires or chassis components. Compo-
nents damaged in this way may fail unexpect-
edly. There is a risk of an accident.
Do not use power washers with circular jet
nozzles to clean the vehicle. Have damaged
tires or chassis components replaced imme-
diately.
!Under no circumstances use power washers
in the vehicle interior. The pressurized water
and associated spray produced by the power washer could cause extensive damage to the
vehicle.
!Observe the minimum distance to be main-
tained between the nozzle of the high-pres-
sure cleaner and the object to be cleaned:
Rapproximately 2.2 ft(70 cm) when using
round-jet nozzles
Rapproximately 1 ft (30 cm) when using 25°
flat-spray jets and concentrated-power jets
Keep the water jet moving while cleaning. To
avoid causing damage, do not point the water jet directly at:
Rdoor joints
Rbrake hoses
Relectrical components
Relectrical connections
Rseals
Rdrive train, especially not at the intermedi-
ate bearing of the propeller shaft
Rrear view camera
Keep a minimum distance of 1.6 ft(50 cm).
Cleaning the engine
!Water must not enter intake or ventilation
openings. When cleaning with high pressure
water or steam cleaners, the spray must not
be aimed directly at electrical components or
the terminals of electrical lines.
Preserve the engine after the engine has been
cleaned. Protect the belt drive system from
exposure to the preservative agent.
Also observe the information under "Power
washers" (
Ypage 230).
230Care
Maintenance and care
 1
1 2
2 3
3 4
4 5
5 6
6 7
7 8
8 9
9 10
10 11
11 12
12 13
13 14
14 15
15 16
16 17
17 18
18 19
19 20
20 21
21 22
22 23
23 24
24 25
25 26
26 27
27 28
28 29
29 30
30 31
31 32
32 33
33 34
34 35
35 36
36 37
37 38
38 39
39 40
40 41
41 42
42 43
43 44
44 45
45 46
46 47
47 48
48 49
49 50
50 51
51 52
52 53
53 54
54 55
55 56
56 57
57 58
58 59
59 60
60 61
61 62
62 63
63 64
64 65
65 66
66 67
67 68
68 69
69 70
70 71
71 72
72 73
73 74
74 75
75 76
76 77
77 78
78 79
79 80
80 81
81 82
82 83
83 84
84 85
85 86
86 87
87 88
88 89
89 90
90 91
91 92
92 93
93 94
94 95
95 96
96 97
97 98
98 99
99 100
100 101
101 102
102 103
103 104
104 105
105 106
106 107
107 108
108 109
109 110
110 111
111 112
112 113
113 114
114 115
115 116
116 117
117 118
118 119
119 120
120 121
121 122
122 123
123 124
124 125
125 126
126 127
127 128
128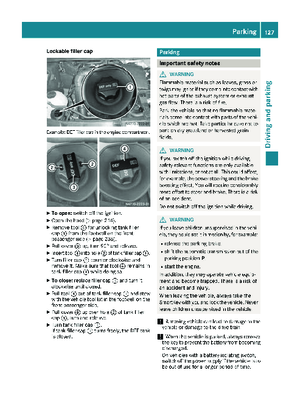 129
129 130
130 131
131 132
132 133
133 134
134 135
135 136
136 137
137 138
138 139
139 140
140 141
141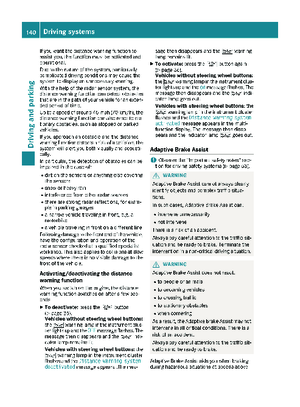 142
142 143
143 144
144 145
145 146
146 147
147 148
148 149
149 150
150 151
151 152
152 153
153 154
154 155
155 156
156 157
157 158
158 159
159 160
160 161
161 162
162 163
163 164
164 165
165 166
166 167
167 168
168 169
169 170
170 171
171 172
172 173
173 174
174 175
175 176
176 177
177 178
178 179
179 180
180 181
181 182
182 183
183 184
184 185
185 186
186 187
187 188
188 189
189 190
190 191
191 192
192 193
193 194
194 195
195 196
196 197
197 198
198 199
199 200
200 201
201 202
202 203
203 204
204 205
205 206
206 207
207 208
208 209
209 210
210 211
211 212
212 213
213 214
214 215
215 216
216 217
217 218
218 219
219 220
220 221
221 222
222 223
223 224
224 225
225 226
226 227
227 228
228 229
229 230
230 231
231 232
232 233
233 234
234 235
235 236
236 237
237 238
238 239
239 240
240 241
241 242
242 243
243 244
244 245
245 246
246 247
247 248
248 249
249 250
250 251
251 252
252 253
253 254
254 255
255 256
256 257
257 258
258 259
259 260
260 261
261 262
262 263
263 264
264 265
265 266
266 267
267 268
268 269
269 270
270 271
271 272
272 273
273 274
274 275
275 276
276 277
277 278
278 279
279 280
280 281
281 282
282 283
283 284
284 285
285