Page 145 of 286

The brightness of the indicator/warning lamps
is adjusted automatically according to the
brightness of the ambient light.
Collision warning
If a vehicle is detected in the monitoring range of
Blind Spot Assist and you switch on the corre-
sponding turn signal, a double warning tone
sounds once. Red warning lamp:flashes. If
the turn signal remains on, detected vehicles
are indicated by the flashing of red warning
lamp :. There are no further warning tones.
Activating/deactivating Blind Spot Assist
iBlind Spot Assist is activated when you
switch on the ignition.
XTurn the SmartKey to position 2in the ignition
lock.
Warning lamps :in the exterior mirrors light
up red for approximately 1.5 seconds and
then turn yellow.
XTo deactivate: press thekbutton in the
center console (Ypage 36).
The yellow indicator lamp in exterior mirror :
first flashes and then lights up continuously.
XTo activate: press thekbutton in the
center console again (Ypage 36).
The yellow indicator lamp in exterior mirror :
flashes initially. If you exceed 20 mph
(30 km/h) while driving, the yellow indicator
lamp in exterior mirror :goes out.
Towing a trailer
If you attach a trailer, make sure that you have
correctly established the electrical connection.
This can be accomplished by checking the trailer
lighting. Blind Spot Assist is deactivated as a
result. The indicator lamp in the exterior mirrors
lights up yellow.
On vehicles with steering wheel buttons, the
Blind Spot Assist Deactivated
message
also appears in the display.
Lane Keeping Assist
General notes
Lane Keeping Assist monitors the area in front of
your vehicle by means of a camera at the top of
the windshield. Lane Keeping Assist detects
lane markings on the road and warns you before
you leave your lane unintentionally.
:Lane Keeping Assist camera
Lane Keeping Assist supports you from speeds
of approximately 40 mph(60 km/h).
If Lane Keeping Assist detects lane markings,
the à indicator lamp in the instrument clus-
ter lights up green. Lane Keeping Assist is opera-
tional.
Important safety notes
GWARNING
Lane Keeping Assist may not always clearly
recognize lane markings.
In this case, Lane Keeping Assist may:
Rgive an unnecessary warning
Rnot give a warning
There is a risk of an accident.
Always pay particular attention to the traffic
situation and stay in lane, in particular if
warned by Lane Keeping Assist.
GWARNING
The Lane Keeping Assist warning does not
return the vehicle to the original lane. There is
a risk of an accident.
You should always steer, brake or accelerate
yourself, in particular if warned by Lane Keep-
ing Assist.
If you fail to adapt your driving style, Lane Keep-
ing Assist can neither reduce the risk of accident
nor override the laws of physics. Lane Keeping
Assist cannot take into account road, weather or traffic conditions. Lane Keeping Assist is only an
aid. You are responsible for the distance to the
vehicle in front, for vehicle speed, braking in
good time and for staying in your lane.
Driving systems143
Driving and parking
Z
Page 146 of 286

Rthere is poor visibility, e.g. due to")
Lane Keeping Assist does not keep your vehicle
in its lane.
The system may be impaired or may not function
if:
Rif the vehicle is incorrectly loaded
(Ypage 208)
Rthere is poor visibility, e.g. due to insufficient
illumination of the road, or due to snow, rain,
fog or spray
Rthere is glare, e.g. from oncoming traffic, the
sun or reflection from other vehicles (e.g. if
the road surface is wet)
Rthe windshield is dirty, fogged up, damaged or
covered, for instance by a sticker, in the vicin-
ity of the camera
Rno, or several, unclear lane markings are pres-
ent for one lane, e.g. in a construction area
Rthe lane markings are worn away, dark or cov-
ered up, e.g. by dirt or snow
Rthe distance to the vehicle in front is too small
and the lane markings thus cannot be detec-
ted
Rthe lane markings change quickly, e.g. lanes
branch off, cross one another or merge
Rthe road is narrow and winding
Rthere are highly variable shade conditions on
the road
A warning may be given if a front wheel passes
over a lane marking. In addition, a warning tone
sounds and the Ãindicator lamp in the
instrument cluster flashes red.
Activating/deactivating Lane Keeping
Assist
Lane Keeping Assist is automatically activated
when you start the engine.
XTo deactivate: press thejbutton in the
center console (Ypage 36).
On vehicles without steering wheel but-
tons:
OFF
flashes briefly in the display and the Ã
indicator lamp in the instrument cluster
flashes yellow and then lights up continu-
ously.
On vehicles with steering wheel buttons:
The Lane
Keep.AssistDeactivatedmes-
sage appears in the display and the Ã
indicator lamp in the instrument cluster
flashes yellow and then lights up continu-
ously. Lane Keeping Assist is deactivated.
XTo activate:
press thejbutton in the
center console again (Ypage 36).
On vehicles without steering wheel but-
tons:
on
flashes briefly in the display and the Ã
indicator lamp in the instrument cluster goes
out. If a lane marking is detected, the Ã
indicator lamp lights up green.
On vehicles with steering wheel buttons:
The Lane Keep. Assist Activated
mes-
sage appears in the display and the Ã
indicator lamp in the instrument cluster goes
out. If a lane marking is detected, the Ã
indicator lamp lights up green.
Lane Keeping Assist is activated.
A Lane Keeping Assist warning is suppressed if:
Ra driving safety system intervenes, such as
ABS, BAS or ESP®.
Ryou have set the turn signal and a lane change is detected. In this case, the warnings are
suppressed for a certain period of time.
Ryou accelerate hard, e.g. kickdown on vehi-
cles with an automatic transmission.
Ryou brake hard.
Ryou steer actively, e.g. swerve to avoid an
obstacle or change lane quickly.
Ryou cut the corner on a sharp bend.
In order that you are warned only when neces-
sary and in good time if you cross the lane mark-
ing, the system recognizes certain conditions
and warns you accordingly.
Lane Keeping Assist warns you earlier if:
Ryou approach the outer lane marking on a
bend.
Rthe road has very wide lanes, e.g. a freeway.
Rthe system recognizes solid lane markings.
Warnings are given later if:
Rthe road has narrow lanes.
Ryou cut the corner on a bend.
All-wheel drive
Important safety notes
!Never tow the vehicle with one axle raised.
This may damage the transfer case. Damage
of this sort is not covered by the Mercedes-
Benz Limited Warranty. All wheels must
144Driving systems
Driving and parking
Page 147 of 286

remain either on the ground or be fully raised.
Observe the instructions for towing the vehi-
cle with all wheels in full contact with the
ground.
!A function or performance test should only
be carried out on a two-axle dynamometer.
Before you operate the vehicle on such a
dynamometer, please consult a qualified
workshop. You could otherwise damage the
drive train or the brake system.
If you fail to adapt your driving style or if you are
inattentive, the all-wheel drive system can nei-
ther reduce the risk of an accident nor override
the laws of physics. The all-wheel drive system
cannot take road, weather and traffic conditions
into account. The all-wheel drive system is only
an aid. You are responsible for the distance to
the vehicle in front, for vehicle speed and for
braking in good time.
4ETS ensures permanent drive for all four
wheels, and together with ESP
®it improves the
vehicle's traction.
If a driven wheel spins due to lack of traction:
RWhen pulling away, make use of the traction
control integrated in ESP®. Depress the
accelerator pedal as far as necessary.
RWhile driving, slowly take your foot off the
accelerator pedal
In wintry driving conditions, always use winter
tires (M+S tires) and if necessary, snow chains
(
Ypage 246). This is the only way to get the full
benefit from the all-wheel drive system.
For information on "Driving off-road", see
(
Ypage 135).
Engaging all-wheel drive
Conditions for engaging/disengaging
All-wheel drive can only be engaged or disen-
gaged if:
Rthe engine is running
Rthe vehicle is stationary
If it is not possible to engage all-wheel-drive:
Rmove the selector lever to position N
Rrelease the brake pedal
Rpress the;button
Rmove the selector lever from Nto Dor R
Engaging/disengaging all-wheel drive
XTo engage/disengage: press the;but-
ton.
The indicator lamp in the ;button flashes.
The h and: indicator lamps light up in
the instrument cluster. ESP
®and ASR are
deactivated for the duration of the engaging/ disengaging process.
If the engaging/disengaging process is suc-
cessful, the hand: indicator lamps in
the instrument cluster go out and ESP
®and
ASR are reactivated.
If the indicator lamp in the ;button is lit,
all-wheel drive is engaged. On vehicles with
steering-wheel buttons, the display then
shows the following message: Four-wheel
drive active.
If the engaging/disengaging process fails, the indicator lamp in the ;button flashes
three times briefly. One of the gear change
conditions was not fulfilled.
As long as the indicator lamp in the ;button
is flashing, you can cancel the engaging/disen-
gaging process by pressing the ;again.
iIf the LOW RANGE transmission ratio
(Ypage 145) is engaged, all-wheel drive can-
not be disengaged.
LOW RANGE transmission ratio
General notes
The LOW RANGE transmission ratio assists you
when driving on difficult terrain. If you engage
LOW RANGE, the engine's performance charac-
teristics and the automatic transmission's shift-
ing characteristics are adjusted accordingly.
The transmission ratio from the engine to the
wheels is around 40% lower than in the on-road position. This increases the drive torque.
Driving systems145
Driving and parking
Z
Page 148 of 286

Conditions for engaging/disengaging
LOW RANGE can only be engaged or disengaged
if:
Rthe engine is running
Rthe vehicle is stationary
Rthe brake pedal is depressed
Rthe selector lever of the automatic transmis-
sion is in positionPor N
Rall-wheel drive is engaged
Engaging and disengaging LOW RANGE
:Engages and disengages LOW RANGE
XTo engage or disengage: press button:
or ;.
The + indicator lamp flashes in the instru-
ment cluster for the duration of the engaging/
disengaging process.
If the engaging/disengaging process is suc-
cessful:
Rand LOW RANGE is engaged, the +indi-
cator lamp lights up.
Rand LOW RANGE is disengaged, the +
indicator lamp goes out.
As long as the +indicator lamp is flashing,
you can cancel the engaging/disengaging
process by pressing button :or; again.
If the engaging/disengaging process fails, the + indicator lamp briefly flashes three
times. One of the gear change conditions was
not fulfilled.
DSR (Downhill Speed Regulation)
Important safety notes
Observe the notes on braking in the section on
"Driving and parking". If you fail to adapt your
driving style or you are inattentive, DSR can nei-
ther reduce the risk of accident nor override the laws of physics. DSR cannot take road, weather
and traffic conditions into account. DSR is only
an aid. You are responsible for the distance to
the vehicle in front, for vehicle speed and for
braking in good time.
General notes
DSR supports you with the LOW RANGE trans-
mission ratio when you are driving downhill off-
road and on construction sites. DSR maintains a
preset speed for you on downhill gradients by
applying the brakes as required. Maintaining the
speed is dependent on the road surface condi-
tions and the downhill gradient and cannot
therefore be guaranteed in all situations.
You can set the speed to between 2.5 mph
(4 km/h) and 11 mph (18 km/h) using the brake
and accelerator pedals or the cruise control
lever.
RIf the vehicle is stationary, or its speed is less
than 2.5 mph (4 km/h) the speed is set to
2.5 mph (4 km/h).
RIf you drive faster than 11 mph (18 km/h) off-
road, DSR switches to standby mode. DSR
remains activated, but does not brake auto-
matically.
RIf you drive downhill slower than 11 mph
(18 km/h), DSR sets the speed to the previ-
ously set speed.
RDSR switches off automatically if you drive
faster than 28 mph (45 km/h).
Cruise control lever
:Activates DSR and stores the current or
higher speed
;Activates DSR and stores the current speed
=Activates DSR and stores the current or
lower speed
?Deactivates DSR
The cruise control lever is the uppermost lever
on the left of the steering column. For as long as
146Driving systems
Driving and parking
Page 149 of 286

the LOW RANGE transmission ratio is engaged,
only use the cruise control lever to operate DSR.
When the LOW RANGE transmission ratio is dis-
engaged, use cruise control.
Activation conditions
In order to activate DSR, both activation condi-
tions must be fulfilled:
RThe LOW RANGE transmission ratio is
engaged. The+indicator lamp in the
instrument cluster lights up.
RThe vehicle is stationary or you are not driving faster than 11 mph (18 km/h).
Activating DSR
You can activate DSR when the vehicle is sta-
tionary or moving.
XBrake or accelerate the vehicle to the
required speed between 2.5 mph (4 km/h)
and 11 mph (18 km/h).
XBriefly push the cruise control lever up :or
down =.
or
XBriefly pull the cruise control lever towards
you ;.
XRelease the brake or accelerator pedal.
The current speed is stored. When the vehicle
is stationary, the speed is stored at 2.5
(4 km/h). DSR maintains the stored speed on
the downhill gradient and brakes automati-
cally.
When DSR is activated and the vehicle pulls
away, accelerates or brakes, the speed set cor-
responds to the speed at which the accelerator
or brake pedal is released. Thi s i
s only the case
if you are not driving faster than 11 mph
(18 km/h).
DSR status indicator in the on-board com-
puter
Vehicles with steering wheel buttons
LOW RANGE is engaged
RThe DSRmessage is displayed in the status
area of the on-board computer.
RDSR can be activated.
DSR is activated
RThe DSRmessage and the set speed are dis-
played in the status area of the on-board com-
puter. DSR is activated but is not intervening
RYou are driving at between 11 mph (18 km/h)
and 28 mph (45 km/h).
RThe
DSRmessage is displayed in the status
area of the on-board computer. Also, the
speed 11 mph (18 km/h) flashes.
DSR is activated but is not intervening
RYou are driving faster than 28 mph (45 km/h).
RThe DSRmessage is displayed in the status
area of the on-board computer. Also, the ---
message is displayed for 5 seconds.
DSR is activated but is not intervening
RThe DSR---message is displayed in the sta-
tus area of the on-board computer.
There is a malfunction in the Electronic Brak-
ing System (EBS). Visit a qualified specialist
workshop.
Vehicles without steering wheel buttons
LOW RANGE is engaged:
RThe DSRsymbol is displayed in the on-board
computer.
RDSR can be activated.
DSR is activated
RThe DSRsymbol and the set speed are dis-
played in the on-board computer.
DSR is activated but is not intervening
RYou are driving at between 11 mph (18 km/h)
and 28 mph (45 km/h).
RThe DSRsymbol is displayed in the on-board
computer. Also, the speed 11 mph (18 km/h)
flashes.
DSR is activated but is not intervening
RYou are driving faster than 28 mph (45 km/h).
RThe DSRsymbol is displayed in the on-board
computer. Also, the ---message is displayed
for 5 seconds.
DSR is activated but is not intervening
RThe DSRsymbol is displayed in the on-board
computer. Also, the ---message is perma-
nently displayed.
There is a malfunction in the Electronic Brak-
ing System (EBS). Visit a qualified specialist
workshop.
Setting the speed whilst driving downhill
You can set the speed to between 2.5 mph
(4 km/h) and 11 mph (18 km/h) using the brake
Driving system s147
Driving an d parking
Z
Page 150 of 286

and accelerator pedals or the cruise control
lever.
XBrake or accelerate the vehicle to the
required speed on the downhill gradient.
XRelease the brake or accelerator pedal. The
current speed is stored.
or
XBriefly push the cruise control lever up :to
increase the speed or down =to reduce the
speed.
The last speed stored is increased or reduced
incrementally.
XRelease the cruise control lever. The current
speed is stored.
or
XPress and hold the cruise control lever up :
or down =until the desired speed has been
reached.
XRelease the cruise control lever.
The current speed is stored.
iIt may take a moment before the vehicle
brakes to the set speed. Take this delay into
account when setting the speed with the
cruise control lever.
Deactivating DSR
XBriefly press the cruise control lever
forward ?.
or
XAccelerate and drive faster than 28 mph
(45 km/h).
DSR deactivates automatically if:
Ryou are driving faster than 28 mph (45 km/h).
Ryou disengage th eLOW RANGE transmission
ratio.
Rthere is amalfunction in th eES P®or AB Ssys-
tem.
PARKTRONIC
Gene ral notes
PARKTRONI Cis an electronic parkin gaid. The
system is equipped wit hultrasonic sensor sin
th efron tand rear bumpers to monitor th earea
around your vehicle. PARKTRONI Cindicate svis -
ually and audibl yth edistanc ebetween your
vehicl eand an object.
Your vehicl efeatures tw oseparat esoun demit-
ters wit hdifferen tfrequencie sfor th ewarnin gtones. The warnin
granges in fron tof and behind
th evehicl eare indicate dby differen twarnin g
tones.
PARKTRONI Cis activated automatically when
you:
Rtur nth eke yto position 2in th eignition loc k
Rrelease theparkin gbrak eand
Rmov eth eselector lever to D,Nor R.
PARKTRONI Cis deactivated at speeds abov e
11 mph (18 km/h). PARKTRONI Cis reactivated
at speeds belo w10 mph (16 km/h).
Impor tant safety notes
PARKTRONI Cis only an aid. It canno treplac e
your own awareness of th eimmediat esurround-
ings. You are responsibl efor saf emaneuvering,
parkin gand pullin gaway. Whe nmaneuvering,
parkin gand pullin gaway, mak esur ethat there
are no persons, animals or objects in th emaneu-
verin garea .
!Pay particular attention to obstacles abov e
or belo wthesensor swhen parking, suc has
flower pot sor trailer towbars. PARKTRONI C
does no trecogniz esuc hobjects when they
are in th eimmediat evicinit yof th evehicle.
You could damage th evehicl eor objects .
PARKTRONI Ccan suffer interferenc efrom:
Rultrasonic source ssuc has atruck's
compressed-air brakes, an automati ccar
wash or apneumati cdrill
Rattachments to th evehicle, e.g. rear moun -
te dracks
Rnumber plates (vehicle license plates) that
are no taffixe dflat against th ebumper
Rdirty or icy sensor s
Remove adetachable trailer couplin gif it is no
longer required. PARKTRONI Cmeasures th e
minimum detection range to an obstacle from
th ebumper, no tth eball coupling.
Range ofthe sensor s
PARKTRONI Cdoes no taccoun tfor obstacles
that are:
Rbeneat hits detection range, e.g. persons, ani -
mals or objects
Rabov eits detection range, e.g. overhangin g
loads ,overhang sor truck loading ramps
148Driving systems
Driving and parking
Page 151 of 286
.
Front sensors
CenterAppr")
The sensors must be free of dirt, ice or slush.
Otherwise, they cannot function correctly.
Clean the sensors regularly, taking care not to
scratch or damage them (
Ypage 232).
Front sensors
CenterApprox. 39 in
(100 cm)
CornersApprox. 26 in (65 cm)
Rear sensors
CenterApprox. 71 in
(180 cm)
CornersApprox. 39 in
(100 cm)
Minimum distance
CenterApprox. 12 in (30 cm)
Front corner sensorsApprox. 10 in (25 cm)
Rear corner sensorsApprox. 12 in (30 cm)
If an obstacle is within this range, all segments
of the warning displays light up and you hear awarning tone. If the distance between the vehi-
cle and the obstacle falls below the minimum
range, it is possible that the distance may no
longer be displayed.
Warning displays
Warning display, front area
Warning display for the left-hand rear area in the
left-hand exterior mirror
:
Warning segments for the left front area
;Warning segments for the right front area
=Operational readiness symbol for the front
area
?Warning display segments
AOperational readiness symbol for the rear
area
The warning displays show the distance
between the sensor and the obstacle.
The warning display is divided into five yellow
and two red segments for each side of the vehi- cle. PARKTRONIC is operational if yellow indi-
cator segments =and Aare lit.
There is a malfunction if only the red segments
of the warning display light up .
The position of the gear lever determines
whether the front and/or rear area is monitored.
Driving systems149
Driving and parking
Z
Page 152 of 286

Selector lever posi-
tionMonitoring
DFront area
Ror NFront and rear area
PNo areas activated
One or more segments light up as the vehicle
approaches an obstacle, depending on the vehi-
cle's distance from the obstacle.
From the:
Rsixth segment, an intermittent warning tone
sounds for approximately 2 seconds.
Rseventh segment, a continuous warning tone
sounds. This indicates that you have now
reached the minimum distance.
Roll-back warning
PARKTRONIC automatically monitors the area
behind the vehicle if the vehicle begins to roll
backwards without reverse gear engaged, e.g.
after stopping on an uphill gradient.
If PARKTRONIC recognizes an obstacle at a dis-
tance of at most 31 in (80 cm), all the segments
in the warning displays light up. A continuous
warning tone also sounds as the vehicle
approaches the obstacle and for a further
2 seconds after the vehicle has come to a halt.
Activating/deactivating PARKTRONIC
XPress the fbutton.
If PARKTRONIC is deactivated, the indicator
lamp in the switch lights up.
Towing a trailer
PARKTRONIC detects a coupled trailer if your
vehicle is equipped with the corresponding elec-
trical installations for trailer towing.
PARKTRONIC is deactivated for the rear area
when you establish an electrical connection
between your vehicle and a trailer. If you use an
adapter for the socket, remove it from the
socket after detaching the trailer. Otherwise,
PARKTRONIC remains deactivated for the rear
area.
Remove a detachable trailer coupling if it is no
longer required. PARKTRONIC measures the
minimum detection range to an obstacle from
the bumper, not the ball coupling.
150Driving systems
Driving and parking
 1
1 2
2 3
3 4
4 5
5 6
6 7
7 8
8 9
9 10
10 11
11 12
12 13
13 14
14 15
15 16
16 17
17 18
18 19
19 20
20 21
21 22
22 23
23 24
24 25
25 26
26 27
27 28
28 29
29 30
30 31
31 32
32 33
33 34
34 35
35 36
36 37
37 38
38 39
39 40
40 41
41 42
42 43
43 44
44 45
45 46
46 47
47 48
48 49
49 50
50 51
51 52
52 53
53 54
54 55
55 56
56 57
57 58
58 59
59 60
60 61
61 62
62 63
63 64
64 65
65 66
66 67
67 68
68 69
69 70
70 71
71 72
72 73
73 74
74 75
75 76
76 77
77 78
78 79
79 80
80 81
81 82
82 83
83 84
84 85
85 86
86 87
87 88
88 89
89 90
90 91
91 92
92 93
93 94
94 95
95 96
96 97
97 98
98 99
99 100
100 101
101 102
102 103
103 104
104 105
105 106
106 107
107 108
108 109
109 110
110 111
111 112
112 113
113 114
114 115
115 116
116 117
117 118
118 119
119 120
120 121
121 122
122 123
123 124
124 125
125 126
126 127
127 128
128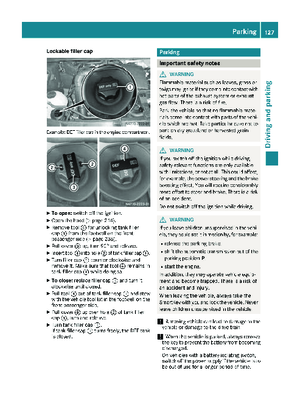 129
129 130
130 131
131 132
132 133
133 134
134 135
135 136
136 137
137 138
138 139
139 140
140 141
141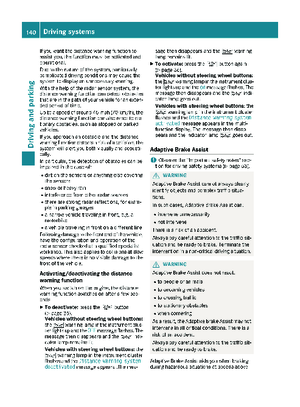 142
142 143
143 144
144 145
145 146
146 147
147 148
148 149
149 150
150 151
151 152
152 153
153 154
154 155
155 156
156 157
157 158
158 159
159 160
160 161
161 162
162 163
163 164
164 165
165 166
166 167
167 168
168 169
169 170
170 171
171 172
172 173
173 174
174 175
175 176
176 177
177 178
178 179
179 180
180 181
181 182
182 183
183 184
184 185
185 186
186 187
187 188
188 189
189 190
190 191
191 192
192 193
193 194
194 195
195 196
196 197
197 198
198 199
199 200
200 201
201 202
202 203
203 204
204 205
205 206
206 207
207 208
208 209
209 210
210 211
211 212
212 213
213 214
214 215
215 216
216 217
217 218
218 219
219 220
220 221
221 222
222 223
223 224
224 225
225 226
226 227
227 228
228 229
229 230
230 231
231 232
232 233
233 234
234 235
235 236
236 237
237 238
238 239
239 240
240 241
241 242
242 243
243 244
244 245
245 246
246 247
247 248
248 249
249 250
250 251
251 252
252 253
253 254
254 255
255 256
256 257
257 258
258 259
259 260
260 261
261 262
262 263
263 264
264 265
265 266
266 267
267 268
268 269
269 270
270 271
271 272
272 273
273 274
274 275
275 276
276 277
277 278
278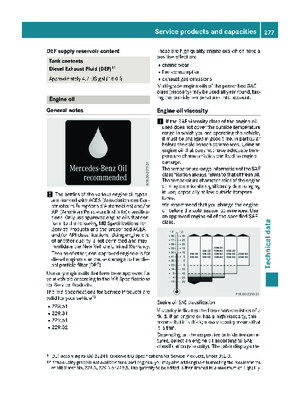 279
279 280
280 281
281 282
282 283
283 284
284 285
285