Page 342 of 497

As a
result, when transporting vehicles with
th eAd aptive Damping Sy stem PLUS, the
ve hicle/trailer combination may start toskid.
Consequentl y,yo u could lose cont rol of your
ve hicle. #
When transporting, ensure that:
R theve hicle has been loaded onto
th e transpor ter cor rectly
R theve hicle is secured at all four
wheels with suitable tensioning
st ra ps
R the maximum permissible speed of
60 km/h is not exceeded when
transporting *
NO
TEDama getotheve hicle from secur‐
ing it incor rectly #
After loading, theve hicle must be
secured on all four wheels. Otherwise,
th eve hicle could be damaged. #
A minimum dis tance of 20 cm up wards
and 10cm down wards must be kept to
th e transport platform. #
Secure theve hicle on all four wheels af ter
loading.
4MATIC vehicles/ vehicles with automatic
transmission #
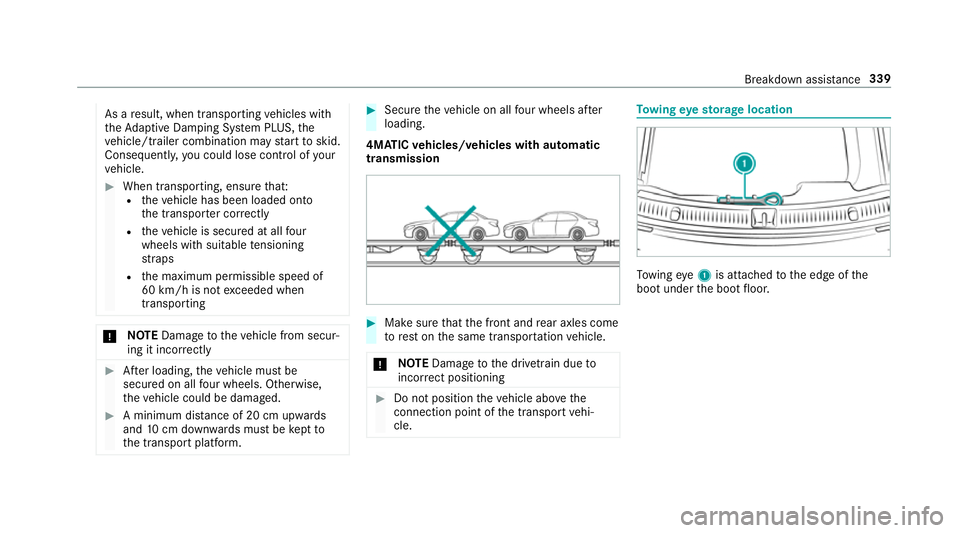
Make sure that the front and rear axles come
to rest on the same transpor tation vehicle.
* NO
TEDama getothe driv etra in due to
incor rect positioning #
Do not position theve hicle abo vethe
connection point of the transport vehi‐
cle. To
wing eyesto rage location To
wing eye1 is attached tothe edge of the
boot under the boot floor. Breakdown assis
tance 339
Page 343 of 497

Installing
theto wing eye #
Press the mark on co ver1 inwa rds and
re mo ve. #
Screw intheto wing eyeclockwise as far as it
will go and tighten.
Ve hicles with a trailer tow hit ch:ve hicles with
a trailer hitch do not ha veare ar brac ketfo rthe to
wing eye. Fasten theto w bar tothe trailer tow
hitch.
% Make sure that co ver1 engages in the
bumper when youre mo vetheto wing eye.
* NO
TEDama gedue toincor rect use of
th eto wing eye When a
towing eye is used toreco ver a vehi‐
cle, theve hicle may be damaged in the proc‐
ess. #
Only use theto wing eyeto to waw ay or
to w start theve hicle. To
w- starting theve hicle (eme rgency engine
st arting) Ve
hicles with automatic transmission
* NO
TEDama getothe automatic trans‐
mission due to tow-starting The automatic transmission may be damaged
in the process of tow- starting vehicles with
automatic transmission. #
Vehicles with automatic transmission
must not be tow- star ted. #
Vehicles with automatic transmission must
not be tow- star ted.
Ve hicles with manual transmission #
Obser vethe no tes on towing away
( → page 336). #
If necessar y,allow the engine and exhaust
sy stem tocool down. #
Switch the ignition on. #
Enga gesecond gear. #
Release the electric parking brake. #
Tow- start theve hicle while the clutch pedal
is fully depressed. #
Slowly release the clutch pedal. #
Immediately shift toneutral if the engine
st arts. #
Pull over and stop theve hicle, in accordance
with the traf fic conditions. #
Remo vetheto w bar. 340
Breakdown assis tance
Page 360 of 497

5
Folding chock
6 Ratchet for jack
Setting up thefo lding wheel chock Prepa
ring theve hicle for a wheel change Re
quirements:
R The requ ired tyre-change tool kit is available.
If yo ur vehicle is not equipped with the tyre-
ch ange tool kit, consult a qualified specialist
wo rkshop tofind out about suitable tools.
R The vehicle is not on a slope.
R The vehicle is on solid, non-slippery and le vel
ground. #
Apply the electric parking brake manually. #
Movethe front wheels tothest ra ight-ahead
position. #
Vehicles with manual transmission:
engage firs t or reve rsege ar. #
Vehicles with automatic transmission:
shift into position j. #
Vehicles with AIR BODY CONT ROL:set the
normal vehicle le vel (→ page 215). #
Switch off the engine. #
Make sure that the engine cann otbe star ted. #
Place choc ks orother suitable items under
th e front and rear of the wheel that is diago‐
nally opposite the wheel you wish tochange. #
Remo vethe hub caps if necessary
(→ page 357). #
Raising theve hicle (→ page 358). Re
moving and fitting hub caps Re
quirement:
R The vehicle is prepared for a wheel change
(→ page 357).
Pla stic hub cap #
Toremo ve:turn the cent recover of the hub
cap anti-clockwise and remo vethe hub cap. #
Tofit: make sure that the cent recover of the
hub cap is turned anti-clockwise. #
Position the hub cap and turn the cent re
co ver clockwise until the hub cap engages
ph ysically and audibly. Wheels and tyres
357
Page 368 of 497

*
NO
TEInva lidation of the operating per‐
mit due tofailure tocomply wi th the
instructions for ins tallation and use The operating permit may be in
validated if
th e instructions for ins tallation and use of
two-w ayradios are not obser ved. #
Only use appr oved frequency bands. #
Obser vethe maximum permissible out‐
put po wer in these frequency bands. #
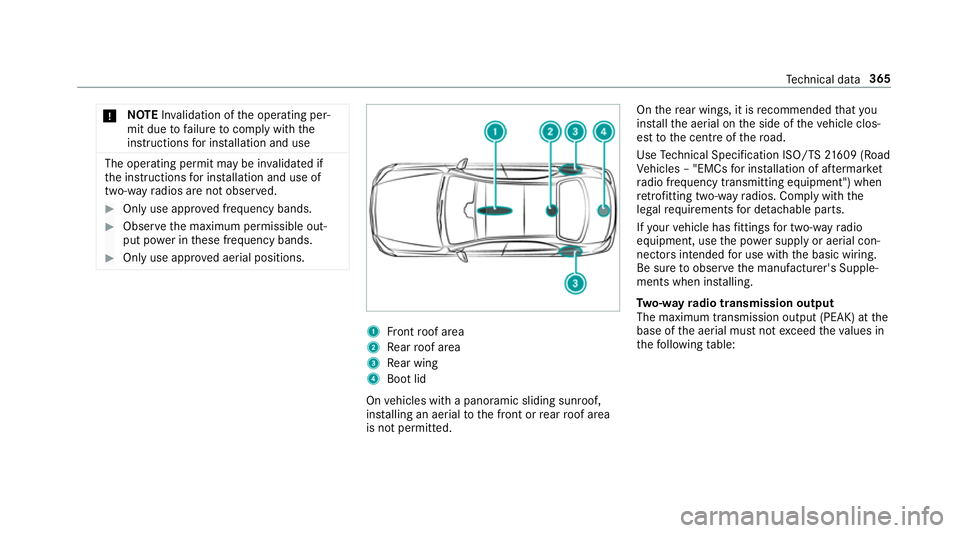
Only use appr oved aerial positions. 1
Front roof area
2 Rear roof area
3 Rear wing
4 Boot lid
On vehicles with a panoramic sliding sunroof,
ins talling an aerial tothe front or rear roof area
is not permitted. On
there ar wings, it is recommended that you
ins tallth e aerial on the side of theve hicle clos‐
est tothe cent reofthero ad.
Use Tech nical Specification ISO/TS 21609 (Road
Ve hicles – "EMCs for ins tallation of af term arket
ra dio frequency transmitting equipment") when
re trofitting two-w ayradios. Comply with the
legal requirements for de tach able parts.
If yo ur vehicle has fittings for two-w ayradio
equipment, use the po wer supp lyor aerial con‐
nectors intended for use with the basic wiring.
Be sure toobser vethe manufacturer's Supple‐
ments when ins talling.
Tw o-w ayradio transmission output
The maximum transmission output (PEAK) at the
base of the aerial must not exceed theva lues in
th efo llowing table: Te
ch nical da ta365
Page 369 of 497
frequency band and maximum transmission
output
Fr
equency band Maximum transmis‐
sion output
Sho rtwa ve
3 - 54 MHz 10
0 W
4 m frequency band
74 - 88 MHz 30 W
2 m frequency band
14 4 - 174 MHz 50 W
Tr unked radio sys‐
te m/T etra
380 - 460 MHz 10 W
70 cm frequency
band
420 - 450 MHz 35 W
Tw o-w ayradio
(2G/3G/4G) 10 W The
following can be used in theve hicle without
re strictions:
R two-w ayradios with a maximum transmission
output of up to100 mW
R two-w ayradios with transmit ter frequencies
in the 380 - 410 MHz frequency band and a
maximum transmission output of up to2 W
(trunked radio sy stem/T etra)
R mobile phones (2G/3G/4G)
There are no restrictions when positioning the
aerial on the outside of theve hicle forth efo llow‐
ing frequency bands:
R trunked radio sy stem/T etra
R 70 cm frequency band
R 2G/3G/4G Ve
hicle identification plate, VIN and engine
number
Ve hicle identification plate 366
Tech nical da ta
Page 373 of 497

Fu
el Information on fuel
grades forve hicles with
a petrol engine
Obser vethe no tes on operating fluids
(→ page 368).
* NO
TEDama gecaused bythe wrong fuel Even small amounts of
the wrong fuel could
re sult in damage tothe fuel sy stem, the
engine and the emission control sy stem. #
Only refuel using premium-grade unlea‐
ded fuel that con form sto EN 228, or an
equi valent specification.
Fu el of this specification may con tain up to
10 %ethanol. Your vehicle is suitable for use
with E10 fuel.
Do not refuel using:
R Diesel
R E85, E100
R Petrol containing me thanol (M15, M30,
M85, M100) R
Petrol wi thadditives con taining me tal
If yo u accidentally refuel with the wrong fuel: #
Do not switch the ignition on. #
Consult a qualified specialist workshop. If
th eav ailable fuel is not suf ficiently low in sul‐
phu r,th is can produce unpleasant odours.
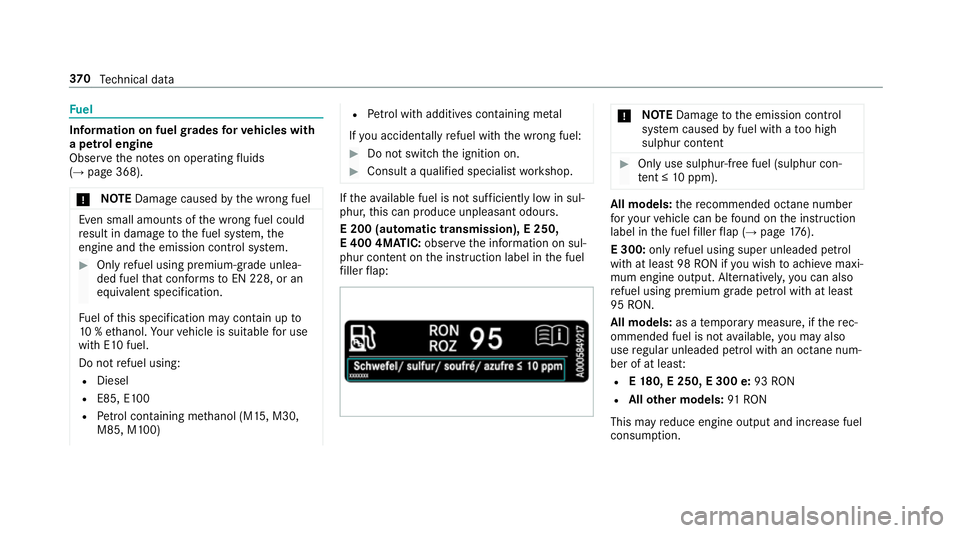
E 200 (automatic transmission), E 250,
E 400 4MATIC: observethe information on sul‐
phur conte nt onthe instruction label in the fuel
fi ller flap: *
NO
TEDama getothe emission control
sy stem caused byfuel with a too high
sulphur content #
Only use sulphur-free fuel (sulphur con‐
tent ≤ 10ppm). All models:
there commended octane number
fo ryo ur vehicle can be found on the instruction
label in the fuel filler flap (→ page176).
E 300: onlyrefuel using super unleaded petrol
with at lea st98 RON if you wish toachie vemaxi‐
mum engine output. Alternatively, you can also
re fuel using premium grade petrol with at lea st
95 RON.
All models: as atemp orary measure, if there c‐
ommended fuel is not available, you may also
use regular unleaded petrol with an octane num‐
ber of at leas t:
R E18 0, E 250, E 300 e: 93RON
R Allother models: 91RON
This may reduce engine output and increase fuel
consum ption. 37 0
Tech nical da ta
Page 383 of 497
Pe
rm issible rear axle load during trailer
operation Axle load
Model
Axle load
E 18 01 335kg
E 200, manual trans‐
mission 13
40 kg
E 200, au tomatic
transmission
E 250
E 200 4MATIC 13
45 kg
E 200 d
E 220 d 13
75 kg
E 220 d 4MATIC 1365 kg
E 300
E 300 d 13
70 kg Model
Axle load
E 350 d
E 400 4MATIC 14
00 kg
E 350 d 4MATIC 1385 kg 380
Tech nical da ta
Page 394 of 497

Display messages
Possible causes/consequences and M
MSolutions
Brake immediately *
Ve hicles with manual transmissions: a malfunction has occurred while the HOLD function was activated.
A tone may also sound at regular inter vals. If you attem pttolock theve hicle, theto ne becomes louder.
Yo u cannot start the engine. #
Immediately depress the brake pedal firm lyuntil the display message disappears.
Yo u can restart the engine.
J
Check brake fluid level *T
here is insuf ficient brake fluid in the brake fluid reser voir. &
WARNING Risk of an accident due tolow brake fluid le vel
If th e brake fluid le vel is too lo w,the braking ef fect and the braking characteristics may be impaired. #
Pull over and stop theve hicle safely as soon as possible, paying attention toroad and traf fic conditions.
Do not continue driving under any circums tances. #
Consult a qualified specialist workshop.
Do not top up the brake fluid. #
Pull over and stop theve hicle safely as soon as possible, paying attention toroad and traf fic conditions. Do not
continue driving under any circums tances. #
Consult a qualified specialist workshop.
Do not top up the brake fluid. Display messages and
warning/indicator lamps 391