2017 MERCEDES-BENZ E-CLASS SALOON charging
[x] Cancel search: chargingPage 5 of 497

At
agl ance .................................................... 6
Cockpit ........................................................... 6
Overview of warning and indicator lamps .... .10
Overhead contro l panel ................................ 14
Door control panel and seat adjustment ....... 16
Emergencies and breakdowns ...................... 18Digital Owner's Manual
.............................20
Calling up the Digital Owner's Manual ..........20 Genera
l notes............................................. 21
Pr otection of the environment ......................21
Ta ke -ba ckof end-of-life vehicles ...................21
Mercedes-Benz GenuineParts ....................... 22
Owner's Manual ...........................................23
Operating saf ety .......................................... .23
Declaration of Conformity ............................. 24
Diagno stics connection ................................ 26
Qualified specialist workshop ....................... 26
Ve hicle registration ....................................... 27
Cor rect use of theve hicle ............................. 27
Implied warranty .......................................... .27
QR code forre scue card ...............................27
Ve hicle data storage .....................................28 Copyright ...................................................... 30 Occupant saf
ety......................................... 31
Re stra int sy stem ...........................................31
Seat belts ..................................................... 33
Airbags ......................................................... 38
PRE-SAFE ®
sy stem ....................................... 45
Children in theve hicle ..................................46
No tes on pets in theve hicle .........................65 Opening and closing
.................................. 67
Ke y ................................................................ 67
Doo rs............................................................ 71
Boot .............................................................. 76
Ro ller sunblinds ............................................ 81
Side windo ws............................................... 83
Sliding sunroof ............................................. 86
Anti-theft pr otection .....................................91 Seats and
stowing ...................................... 94
No tes on the cor rect driver's seat position ... 94
Seats ............................................................ 95
St eering wheel ............................................ 103Using
the memory function ........................ 106
St ow age areas ............................................ 107
Cup holders ................................................ .118
Ashtr ayand cigar ette lighter ...................... .120
Soc kets ....................................................... 121
Wi reless charging of the mobile phone
and connection with theex terior aerial .......1 24
Fitting or removing thefloor mats .............. 12 6 Light and sight
......................................... 127
Exterior lighting .......................................... 127
Interior lighting ........................................... 13 6
Changing bulbs (on lyforve hicles with
halogen headlamp s) .................................... 137
Wi ndsc reen wipers and windscreen
wa sher sy stem ............................................ 14 0
Mir rors ........................................................ 14 2
Operating the sun visors ............................. 14 5
Infrared reflective windscreen .................... 14 6 Climate control
......................................... 147
Overview of climate contro l systems ..........1 47
Operating the climate control sy stem ......... 14 8 2
Contents
Page 29 of 497

Diagnostics connection
The diagnostics connection is on ly intended for
th e connection of diagnostic devices at a quali‐
fi ed specialist workshop. &
WARNING Risk of accident due tocon‐
necting devices tothe diagnostics con‐
nection
If yo u connect equipment toa diagnostics
connection in theve hicle, it may af fect the
operation of vehicle sy stems.
As a result, the operating saf ety of theve hi‐
cle could be af fected. #
Only connect equipment toa diagnos‐
tics connection in theve hicle which is
appr ovedfo ryo ur vehicle byMercedes-
Benz. &
WARNING Risk of accident due to
objects in the driver's foot we ll
Objects in the driver's foot we ll may impede
pedal tr avel or block a depressed pedal. This jeopardises
the operating and road
saf ety of theve hicle. #
Stow all objects in theve hicle securely
so that they cannot getinto the driver's
fo ot we ll. #
Alw aysfit th efloor mats securely and
as prescribed in order toensure that
th ere is alw ays suf ficient room forthe
pedals. #
Do not use loose floor mats and do not
place floor mats on top of one ano ther. *
NO
TEBattery discharging from using
devices connected tothe diagnostics
connection Using devices at
the diagnostics connection
drains the batter y. #
Check thech arge leve l of the batter y. #
Ifth ech arge leve l is lo w,charge the
batter y,e.g. bydriving a considerable
dis tance. Connecting equipment
tothe diagnostics con‐
nection can lead toemissions monitoring infor‐
mation being reset, forex ample. This may lead
to theve hicle failing tomeet therequ irements of
th e next emissions inspection during the main
inspection. Qualified specialist
workshop
A qu alified specialist workshop has the neces‐
sary special skills, tools and qualifications to
cor rectly car ryout any necessary workon your
ve hicle. This particularly applies towo rkreleva nt
to saf ety.
Alw ays ha vethefo llowing workcar ried out on
yo ur vehicle at a qualified specialist workshop:
R workreleva nt tosaf ety
R service and maintenance work
R repair work
R modifications as well as ins tallations and
con versions
R workon electronic components 26
General no tes
Page 84 of 497

The boot lid could be opened or closed uninten‐
tionall y,in thefo llowing situations:
R If a person's arms or legs are moving in the
sensor de tection range, e.g. when polishing
th eve hicle, sitting on the edge of the boot,
or picking up objects.
R If objects are mo ved or placed behind the
ve hicle, e.g. charging cables, tensioning
st ra ps or luggage.
R When working on the trailer coupling, trailers
or rear bicycle rack s.
Deactivate KEYLESS-GO (→ page 68) or do not
car rytheke y about your person in such situa‐
tions. Swit
ching separate boot locking on or off If
yo u centrally unlo cktheve hicle while separate
locking is activated, the boot remains loc ked. #
Toswitch on: slidethe switch toposition
1. #
Toswitch off: slidethe switch toposition
2.
% If an accident has been de tected, the boot
unloc kseve n if separate lo cking is switched
on. Ac
tivating/deactivating the bo otlid opening
limiter Multimedia sy
stem:
, Vehicle .
Vehicle settings .
Boot
opening-height restriction
Ac tivating the function allo wsyouto av oid
bumping the boot lid on a low garage ceiling, for
ex ample. #
Activate or deacti vate the function. Ro
ller sunblinds Extending
there ar side window roller sun‐
blinds *
NO
TEDama getothe inertia reel due to
it snapping back If suddenly snapped bac
k,the inertia reel
may be damaged. #
Alw ays mo vethero ller sun blind man‐
uall y. Opening and closing
81
Page 127 of 497

USB port in
there ar Yo
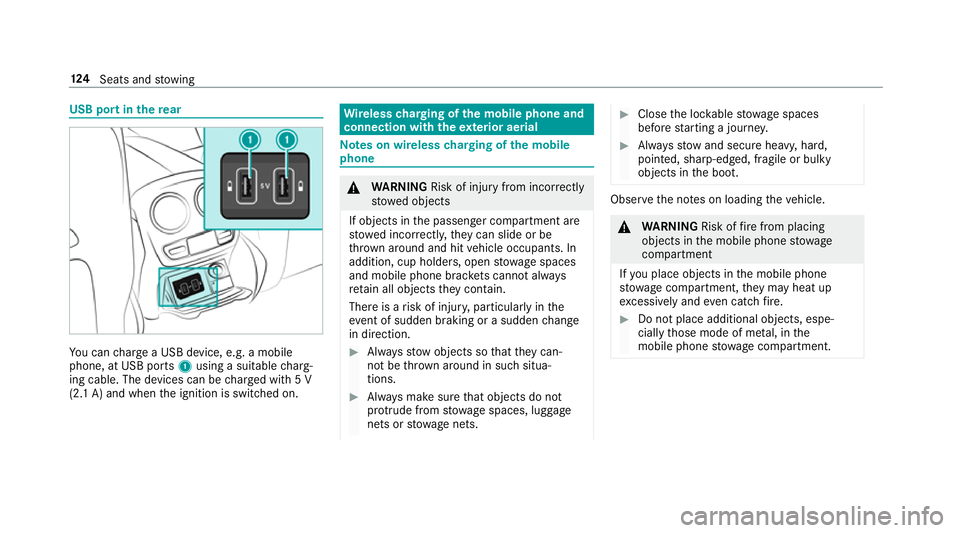
u can charge a USB device, e.g. a mobile
phone, at USB ports 1using a suitable charg‐
ing cable. The devices can be charge d with 5 V
(2.1 A) and when the ignition is switched on. Wire
lesscharging of the mobile phone and
connection with theex terior aerial Note
s on wireless charging of the mobile
phone &
WARNING Risk of inju ryfrom incor rectly
stowe d objects
If objects in the passenger compartment are
stowe d incor rectl y,they can slide or be
th ro wn around and hit vehicle occupants. In
addition, cup holders, open stowage spaces
and mobile phone brac kets cann otalw ays
re tain all objects they contain.
The reis a risk of injur y,particularly in the
ev ent of sudden braking or a sudden change
in direction. #
Alw aysstow objects so that they can‐
not be throw n around in su chsitua‐
tions. #
Alw ays make sure that objects do not
pr otru de from stowage spaces, luggage
nets or stowage nets. #
Close the loc kable stow age spaces
before starting a journe y. #
Alw aysstow and secure heavy, hard,
poin ted, sharp-edged, fragile or bulky
objects in the boot. Obser
vethe no tes on loading theve hicle. &
WARNING Risk offire from placing
objects in the mobile phone stowage
compartment
If yo u place objects in the mobile phone
stow age compartment, they may heat up
exc essively and even catch fire. #
Do not place additional objects, espe‐
cially those mode of me tal, in the
mobile phone stowage compartment. 124
Seats and stowing
Page 128 of 497

*
NO
TEDama getoobjects caused by
placing them in the mobile phone stow‐
age compartment If
yo u place objects in the mobile phone
stow age compartment, these may be dam‐
aged byelectromagnetic fields. #
Do not place credit cards, storage
media or other objects sensitive to
electromagnetic fields in the mobile
phone stowage compartment. *
NO
TEDama getothe mobile phone
stow age compartment caused byliquids If liquids enter
the mobile phone stowage
compartment, the compartment may be
damaged. #
Ensure that no liquids enter the mobile
phone stowage compartment. R
Depending on theve hicle equipment, the
mobile phone is connected totheve hicle's
ex terior aerial via thech arging module. R
The charging function and wireless connec‐
tion of the mobile phone totheve hicle's
ex terior aerial are only available if the ignition
is switched on.
R Small mobile phones may not be able tobe
ch arge d in everyposition of the mobile
phone stowage compartment.
R Largemobile phones which do not rest flat in
th e mobile phone stowage compartment may
not be able tobe charge d or connec ted with
th eve hicle's exterior aerial.
R The mobile phone may heat up during the
ch arging process. This depends on the appli‐
cations (apps) cur rently running.
The mobile phone can be cooled in the
mobile phone stowage compartment when
th e air conditioning sy stem is switched on.
The cooling output in the mobile phone stow‐
age compartment is highest when the con‐
troller in theglove box is closed.
R Toensure more ef ficient charging and con‐
nection with theve hicle's exterior aerial,
re mo vethe pr otective co ver from the mobile phone. Pr
otective co vers which are designed
fo r wireless charging are excluded.
R When charging, the mat should be used if
possible. Wire
lesscharging of the mobile phone in the
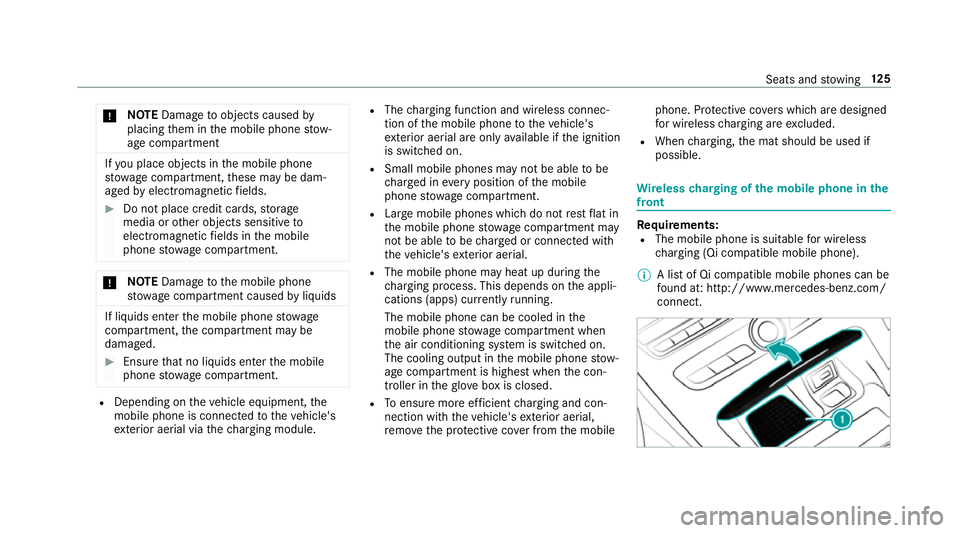
front Requ
irements:
R The mobile phone is suitable for wireless
ch arging (Qi compatible mobile phone).
% A list of Qi compatible mobile phones can be
fo und at: http://www.mercedes-benz.com/
connect. Seats and
stowing 12 5
Page 131 of 497

5
L Dipped beam/main beam
6 R Switches there ar fog light on or off
When dipped beam is activated, the indicator
lamp forth est anding lights Tis deactivated
and replaced bythe dipped beam indicator lamp
L. #
Alw ays park your vehicle safely and in a well-
lit area, in accordance with there leva nt le gal
st ipulations.
* NO
TEBattery discharging byoperating
th est anding lights Operating
thest anding lights over a period of
hours puts a stra in on the batter y. #
Where possible, switch on the
ri ght X or left Wparking light. In
the case of se vere battery discharging, the
st anding lights or parking lights are automati‐
cally swit ched off tofacilitate the next engine
st art. The
exterior lighting (e xcept standing and park‐
ing lights) swit ches off automatically when the
driver's door is opened.
R Obser vethe no tes on sur round lighting .
Au tomatic driving lights function
The standing lights, dipped beam and daytime
ru nning lights are switched on au tomatical ly
depending on the ignition status, whe ther the
engine is running and the light conditions. &
WARNING Risk of accident when the
dipped beam is switched off in poor visi‐
bility
When the light switch is set toà ,the
dipped beam may not be switched on auto‐
matically if there is fog, snow or other causes
of poor visibility such as spr ay. #
In such cases, turn the light switch to
L . The automatic driving lights are only an aid.
Yo u
are responsible forve hicle lighting. Ac
tivating/deactivating the rear fog light
Re quirements:
R The light switch is in the L orà posi‐
tion. #
Press the R button.
Please obser vethe count ry-specific la wsonthe
use of rear fog lamps.
Ad justing the headlamp range (halogen
headla mps without active suspension)
The headlamp range adjus ter allows youto
adjust the cone of light from the headlamps in
re lation totheve hicle's load condition. 12 8
Light and sight
Page 166 of 497

Ensu
rethefo llowing before starting the engine:
R the legal stipulations in the area where your
ve hicle is par ked allow engine starting via
smartphone.
R it is safe tostart and runth e engine where
yo ur vehicle is par ked.
R the fuel tank is su fficiently filled.
R thest ar ter battery is suf ficiently charge d.
% You can also set thete mp erature with your
smartphone. In form ation on Mercedes me
connect and other services: http://
www.mercedes.me
Charging the bat tery before commencing
yo ur journey
% This function is not available in all countries.
R Ifth eve hicle battery is discharged, you
re cei vea message on your smartphone.
R You can then start theve hicle with the
smartphone tocharge the batter y.
R The vehicle is automatically switched off
af te rte n minu tes. Ensure
thefo llowing before starting the engine:
R the legal stipulations in the area where your
ve hicle is par ked allow engine starting via
smartphone.
R it is safe tostart and runth e engine where
yo ur vehicle is par ked.
R the fuel tank is su fficiently filled.
St arting theve hicle &
WARNING Risk of crushing or entrap‐
ment due tounin tentional starting of the
engine
Limbs could be crushed or trapped if the
engine is star ted unintentionally during
service or maintenance work. #
Alw ays secure the engine against unin‐
te ntional starting before car rying out
maintenance or repair work. Re
quirements:
R park position jis selected.
R the anti- theft alarm sy stem is not activated.
R the panic alarm is not activated. R
the hazard warning lamps are switched off.
R the bonn etis closed.
R the doors are closed and loc ked.
R the windo wsand sliding sun roof are closed. #
Start theve hicle using the smartphone:
R afte reve ryvehicle start, the engine runs for
te n minu tes.
R you can car ryout a maximum of two consec‐
utive starting attem pts.
R you can stop theve hicle again at any time.
R further information can be found in the
smartphone app.
Securing the engine against starting before
car rying out maintenance or repair work: #
switch on the hazard warning lamps.
or #
unlock the doors.
or #
open a side window or the sliding sunroof. Driving and parking
16 3
Page 250 of 497

Re
quirements:
R the ball neck must be extended fully electri‐
cal lyand engaged in the securely loc ked
position.
Tr ailers with a 7-pin plug can be connec tedto
th eve hicle with thefo llowing adap ters:
R adap ter plug
R adapte r cable
The trailer will be cor rectly de tected bytheve hi‐
cle only if thefo llowing conditions are me t:
R the trailer is connected cor rectly
R the trailer lighting sy stem is in working order
The operation of thefo llowing sy stems depends
on the trailer being connected cor rectly:
R Active Lane Keeping Assist
R ESP ®
R Parking Assist PARKTRONIC
R Active Parking Assist
R Blind Spot Assist or Active Blind Spot Assi stCoupling up a trailer
* NO
TEDama getothe battery due tofull
discharge Charging
the trailer battery using the po wer
supply of the trailer can damage the batter y. #
Do not use the po wer supp lyto charge
th e trailer batter y. #
Remo vethe co ver from the ball head and
st ore it in a safe place (→ page107). #
Position the trailer on a le vel sur face behind
th eve hicle and couple it up totheve hicle. #
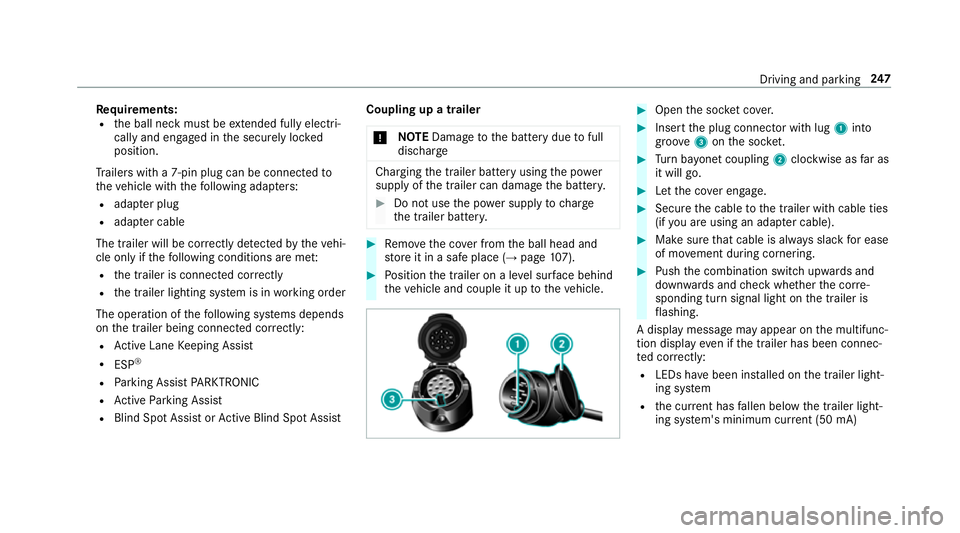
Open the soc ket co ver. #
Insert the plug connector with lug 1into
groo ve3 onthe soc ket. #
Turn bayonet coupling 2clockwise as far as
it will go. #
Let the co ver engage. #
Secure the cable tothe trailer with cable ties
(if you are using an adap ter cable). #
Make sure that cable is alw ays slack for ease
of mo vement during cornering. #
Push the combination switch upwards and
down wards and check whe ther the cor re‐
sponding turn signal light on the trailer is
fl ashing.
A display message may appear on the multifunc‐
tion display even if the trailer has been connec‐
te d cor rectly:
R LEDs ha vebeen ins talled on the trailer light‐
ing sy stem
R the cur rent has fallen below the trailer light‐
ing sy stem's minimum cur rent (50 mA) Driving and pa
rking 247