Page 22 of 497
What
todo in theeve nt of an accident
1 QR code for accessing there scue card →
27
2 Safetyve sts →
322
3 Button forth e SOS emer gency call sy stem and
breakdown assis tance →
290
4 Checking and topping up service products →
368
5 Tow- starting and towing away →
336
6 Flat tyre →
324
7 Jump -sta rting →
332 8
Hazard warning lamps →
13 0
9 Fire extinguisher →
324
A Fuelfiller flap with instruction labels for tyre
pressu re, fuel type and QR code for accessing
th ere scue card →
176
B Tow- starting and towing away →
336
C TIREFIT kit →
326
D First-aid kit (so ftsided) →
323
E Warning triangle →
323 At
aglance – Emer gencies and breakdowns 19
Page 33 of 497
The services and functions (sometimes subject
to
afe e) can usually be activated or deactivated.
In some cases, this also applies tothe entire
ve hicle's data connection. This excludes, in par‐
ticular, legally prescribed functions and services.
Third pa rty services
If it is possible touse online services from other
pr ov iders, these services are subject tothe data
pr otection and term s of use of there sponsible
pr ov ider. The manufacturer has no influence on
th e conte ntexc hanged.
Please enquire, therefore, about the type, scope
and purpose of the collection and use of per‐
sonal data as part of third party services from
th eir respective pr ovider. Copyright
Information on free and open source software
licences foryo ur vehicle's software can be found
on the data storage medium in your vehicle
document wallet and on the Internet toget her
with updates:
http://www.mercedes-benz.com/opensource 30
General no tes
Page 142 of 497

#
Turn there leva nt housing co ver anti-clock‐
wise and remo veit. #
Main beam/dipped beam: turnthe soc ket
anti-clockwise and remo veit. #
Turn signal light: turnthe soc ket anti-clo ck‐
wise, unlock and remo veit. #
Pull the bulb out of the soc ket. #
Inse rtthe new bulb into the soc ket so that
th e entire base of the bulb is resting on the
bottom of the soc ket. #
Inse rtsoc ket and turn it clo ckwise. #
Press on the housing co ver and turn it clock‐
wise. #
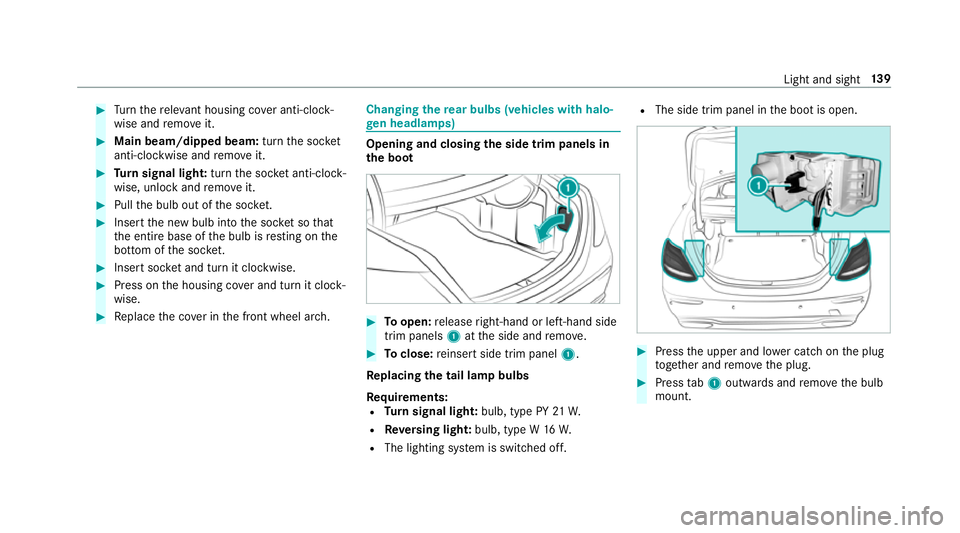
Replace the co ver in the front wheel ar ch. Changing
there ar bulbs (vehicles with halo‐
ge n headla mps) Opening and closing
the side trim panels in
th e boot #
Toopen: release right-hand or left-hand side
trim panels 1atthe side and remo ve. #
Toclose: reinse rtside trim panel 1.
Re placing the tail lamp bulbs
Re quirements:
R Turn signal light: bulb, type PY 21W.
R Reversing light: bulb, type W 16W.
R The lighting sy stem is switched off. R
The side trim panel in the boot is open. #
Press the upper and lo wer catch on the plug
to ge ther and remo vethe plug. #
Press tab1 outwards and remo vethe bulb
mount. Light and sight
13 9
Page 358 of 497

Obser
vethefo llowing when selecting, fitting and
re placing tyres:
R Countr y-specific requirements for tyre
appro valth at define a specific tyre type for
yo ur vehicle.
Fu rthermore, the use of cer tain tyre types in
cer tain regions and areas of operation can
be highly beneficial.
R Only use tyres and wheels of the same type
(summer tyres, winter tyres, MOEx tended
tyres) and the same make.
R Only fit wheels of the same size on one axle
(left and right).
It is only permissible tofit a di fferent wheel
size in theeve nt of a flat tyre in order to
drive tothe specialist workshop.
R Only fit tyres of the cor rect size onto the
wheels.
R Do not make any modifications tothe brake
sy stem, the wheels or the tyres.
The use of shims or brake dust shields is not
permitted and may in validate theve hicle's
ge neral operating pe rmit. R
Vehicles with a tyre pressure monitoring
sy stem: allfitted wheels mu stbe equipped
with functioning sensors forth e tyre pres‐
sure monitoring sy stem.
R Attemp eratures below 7 °C, use winter tyres
or all-season tyres mar ked M+S for all
wheels.
Wi nter tyres bearing thei snowflake
symbol in addition tothe M+S marking pro‐
vide the best possible grip in wintry road
conditions.
R For M+S tyres, only use tyres with the same
tread.
R Obser vethe maximum permissible speed for
th e M+S tyres fitted.
If th is is below theve hicle's maximum speed,
th is must be indicated in an appropriate label
in the driver's field of vision.
R Run in new tyres at moderate speeds forthe
fi rs t10 0 km.
R Replace the tyres af ter six years at the latest,
re ga rdless of wear. R
When replacing with tyres that do not
fe ature run-flat characteristics: vehicles
with MOExtended tyres are not equipped
with a TIREFIT kit at thefa ctor y.Equip the
ve hicle with a TIREFIT kit af terre placing with
tyres that do not feature run-flat characteris‐
tics, e.g. winter tyres.
Fo r more information on wheels and tyres, con‐
ta ct a qualified specialist workshop.
Be sure toalso obse rveth efo llowing fur ther
re lated subjects:
R Notes on tyre pressure (→ page 345)
R Tyre pressure table (→ page 346)
R Notes on the emer gency spa rewheel
(→ page 362) Note
s on inter changing wheels &
WARNING Risk of inju rythro ugh dif fer‐
ent wheel sizes
Inter changing the front and rear wheels if the
wheels or tyres ha vediffere nt dimensions Wheels and tyres
355