Page 140 of 497
Changing bulbs (only
forve hicles with halo‐
ge n headla mps) Note
s onchanging bulbs &
WARNING Risk of bu rns from hot com‐
ponent parts whilst replacing a bulb
Bulbs, lamps and plugs can become very hot
during operation.
When replacing a bulb, you could burn your‐
self on these component parts. #
Allow the component parts tocool
down before replacing the bulb. R
Do not use a bulb if it has been dropped or if
itsglass has been sc ratched. The bulb may
ot herwise explode.
R Do not touch theglass bulb with your bare
hands.
R Protect bulbs from moisture and do not allow
bulbs tocome into contact wi thliquids. Overview of bulb types
The
following bulbs can be replaced. Halogen headlamps
1 Turn signal light: PY 21 W
2 Main beam: H7 55 W
3 Dipped beam: H7 55 W Ta
il lamps
1 Turn signal light: PY 21 W
2 Reversing light: W 16 W Light and sight
137
Page 141 of 497

Changing
the front bulbs (vehicles with halo‐
ge n headla mps) Fi
tting/ removing the co ver on the front
wheel ar ch
Re quirements:
R The lighting sy stem is switched off.
R The appropriate front wheel is turned
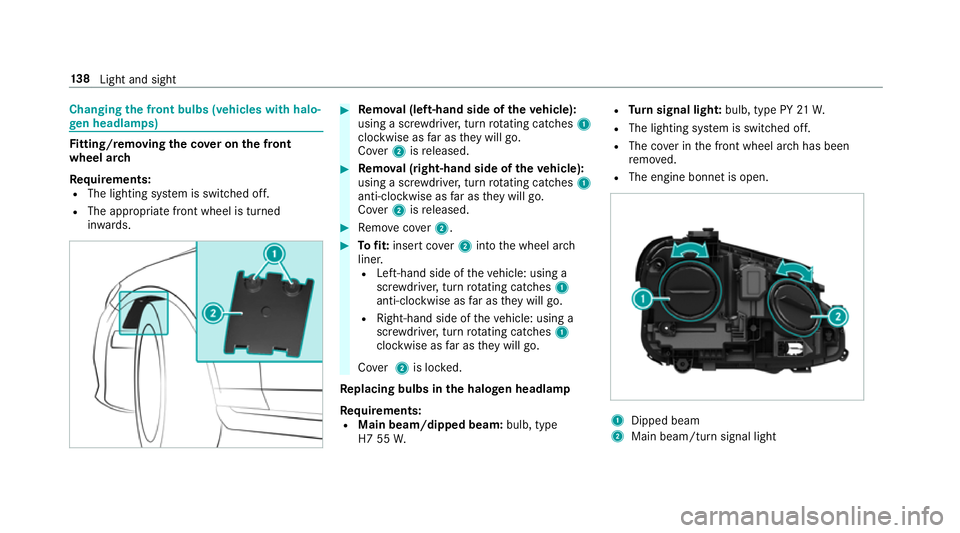
in wa rds. #
Remo val (left-hand side of theve hicle):
using a scr ewdriver, turn rotating catches 1
clo ckwise as far as they will go.
Co ver2 isreleased. #
Remo val (right-hand side of theve hicle):
using a scr ewdriver, turn rotating catches 1
anti-clo ckwise as far as they will go.
Co ver2 isreleased. #
Remo vecover2. #
Tofit: inse rtco ver2 into the wheel ar ch
liner.
R Left-hand side of theve hicle: using a
scr ewdriver, turn rotating catches 1
anti-clo ckwise as far as they will go.
R Right-hand side of theve hicle: using a
scr ewdriver, turn rotating catches 1
clo ckwise as far as they will go.
Co ver2 is loc ked.
Re placing bulbs in the halo gen headla mp
Requ irements:
R Main beam/dipped beam: bulb, type
H7 55 W. R
Turn signal light: bulb, type PY 21W.
R The lighting sy stem is switched off.
R The co ver in the front wheel ar chhas been
re mo ved.
R The engine bonn etis open. 1
Dipped beam
2 Main beam/turn signal light 13 8
Light and sight
Page 142 of 497

#
Turn there leva nt housing co ver anti-clock‐
wise and remo veit. #
Main beam/dipped beam: turnthe soc ket
anti-clockwise and remo veit. #
Turn signal light: turnthe soc ket anti-clo ck‐
wise, unlock and remo veit. #
Pull the bulb out of the soc ket. #
Inse rtthe new bulb into the soc ket so that
th e entire base of the bulb is resting on the
bottom of the soc ket. #
Inse rtsoc ket and turn it clo ckwise. #
Press on the housing co ver and turn it clock‐
wise. #
Replace the co ver in the front wheel ar ch. Changing
there ar bulbs (vehicles with halo‐
ge n headla mps) Opening and closing
the side trim panels in
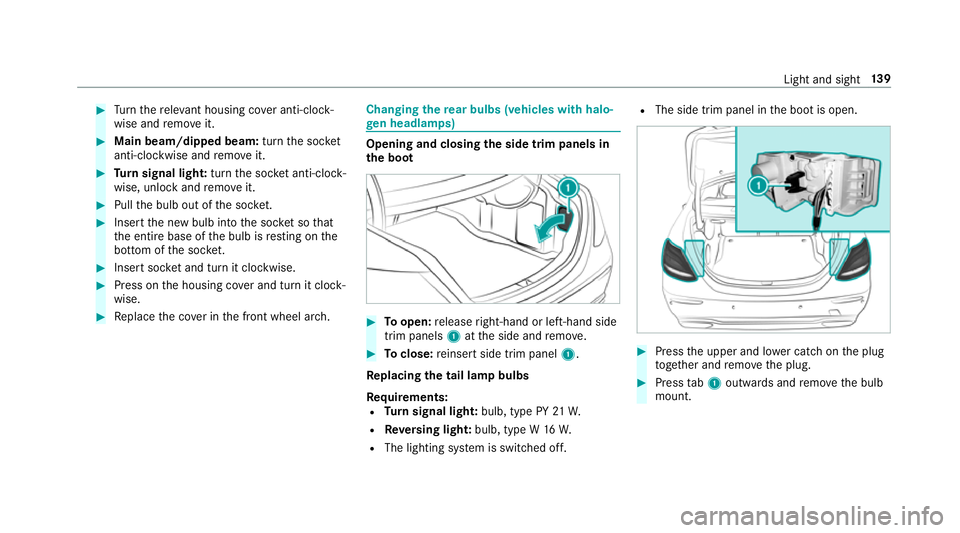
th e boot #
Toopen: release right-hand or left-hand side
trim panels 1atthe side and remo ve. #
Toclose: reinse rtside trim panel 1.
Re placing the tail lamp bulbs
Re quirements:
R Turn signal light: bulb, type PY 21W.
R Reversing light: bulb, type W 16W.
R The lighting sy stem is switched off. R
The side trim panel in the boot is open. #
Press the upper and lo wer catch on the plug
to ge ther and remo vethe plug. #
Press tab1 outwards and remo vethe bulb
mount. Light and sight
13 9
Page 143 of 497

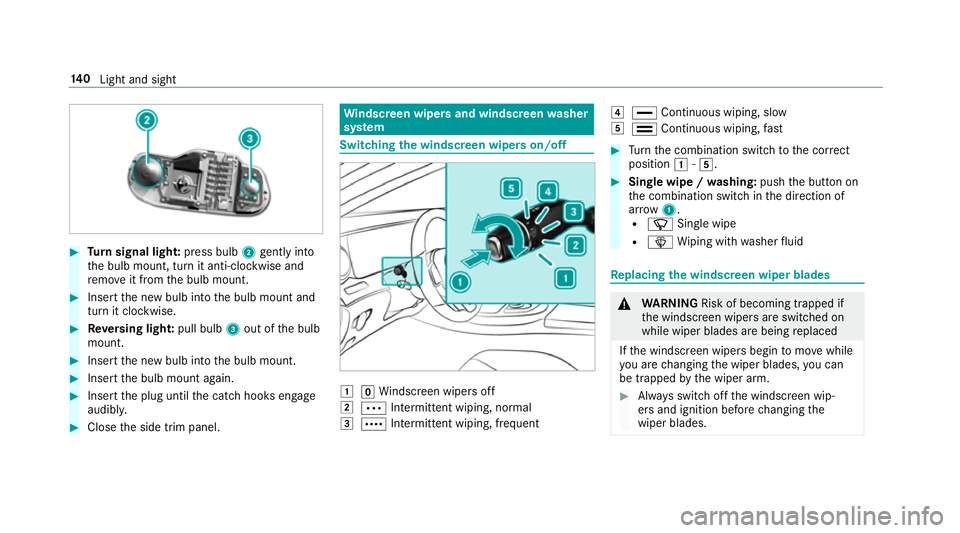
#
Turn signal light: press bulb2gently into
th e bulb mount, turn it anti-clockwise and
re mo veit from the bulb mount. #
Insert the new bulb into the bulb mount and
turn it clockwise. #
Reversing light: pull bulb3out of the bulb
mount. #
Insert the new bulb into the bulb mount. #
Insert the bulb mount again. #
Insert the plug until the catch hooks engage
audibl y. #
Close the side trim panel. Wi
ndscreen wipers and windscreen washer
sy stem Switching
the windscreen wipers on/off 1
gWindsc reen wipers off
2 Ä Intermittent wiping, normal
3 Å Intermittent wiping, frequent 4
° Continuous wiping, slow
5 ¯ Continuous wiping, fast #
Turn the combination switch tothe cor rect
position 1-5. #
Single wipe / washing: pushthe button on
th e combination switch in the direction of
ar row 1.
R í Single wipe
R î Wiping with washer fluid Re
placing the windsc reen wiper blades &
WARNING Risk of becoming trapped if
th e windscreen wipers are switched on
while wiper blades are being replaced
If th e windscreen wipers begin tomo vewhile
yo u are changing the wiper blades, you can
be trapped bythe wiper arm. #
Alw ays switch off the windscreen wip‐
ers and ignition before changing the
wiper blades. 14 0
Light and sight
Page 489 of 497

Re
ading the handwriting recognition
aloud ................................................... 268
Selecting a station and track .............. .268
Selecting an input langua ge................ 268
Switching on/off ................................. 266
To w- aw ay protection
Fu nction ................................................ 92
Switching on/o ff................................... 93
To w- starting ............................................. 340
To wing a trailer
Ex tending/r etra cting the ball neck ...... 24 5
To wing away ............................................ 336
To wing eye
Ins talling .............................................. 340
St orage location ..................................3 39
To wing me thods ...................................... 335
Tr ack
Selecting (audio mode) ........................ 297
Tr af fic announcements
Ac tivating/deactivating ...................... .304
Tr ailer hitch
Axle load ............................................. 380
Bicycle rack ......................................... 24 8Extending/r
etra cting the ball neck ...... 24 5
Fa stening point .................................... 378
Gene ral no tes ...................................... 378
Mounting dimensions .......................... 378
No tes ................................................... 24 4
Overhang dimension ............................3 78
Po we r soc ket ....................................... 24 6
To ngue weight .................................... .379
Tr ailer operation
Ac tive Blind Spot Assi st....................... 239
Bicycle rack ......................................... 24 8
Coupling up/uncoupling a trailer ........ .246
No tes ................................................... 24 4
Po we r soc ket ....................................... 24 6
Tr ailer stabilisation
Fu nction/no tes ................................... 19 5
Tr ailer tow hit ch
Care .................................................... .317
To wing weight ...................................... 379
Tr ansmission position display ................172
Tr anspo rting
Ve hicle ................................................ 338
Tr im element (Care) .................................319 Tr
ip
Menu (on-board computer) .................. 257
Tr ip computer
Displaying ............................................ 257
Re setting ............................................. 258
Tr ip distance ............................................ 257
Displaying ............................................ 257
Re setting ............................................. 258
Tr ip me ter
see Trip dis tance
Tu rn signal indicator
see Turn signal light
Tu rn signal light ....................................... 12 9
Ac tivating/deactivating ...................... .129
Changing bulbs (front) ......................... 13 8
Changing bulbs (rear) .......................... 13 9
Tw o-w ayradios
Fr equencies ......................................... 365
No tes on ins tallation .......................... .364
Tr ansmission output (maximum) ........ .365
Ty re inflation compressor
see TIREFIT kit 486
Index